
實作 OAuth 2.0 後,您可以選擇設定以 OAuth 為基礎的 App Flip,讓 Android 使用者更快速地將驗證系統中的帳戶連結至 Google 帳戶。以下章節說明如何設計及實作 App Flip,以整合 Cloud-to-cloud。
設計指南
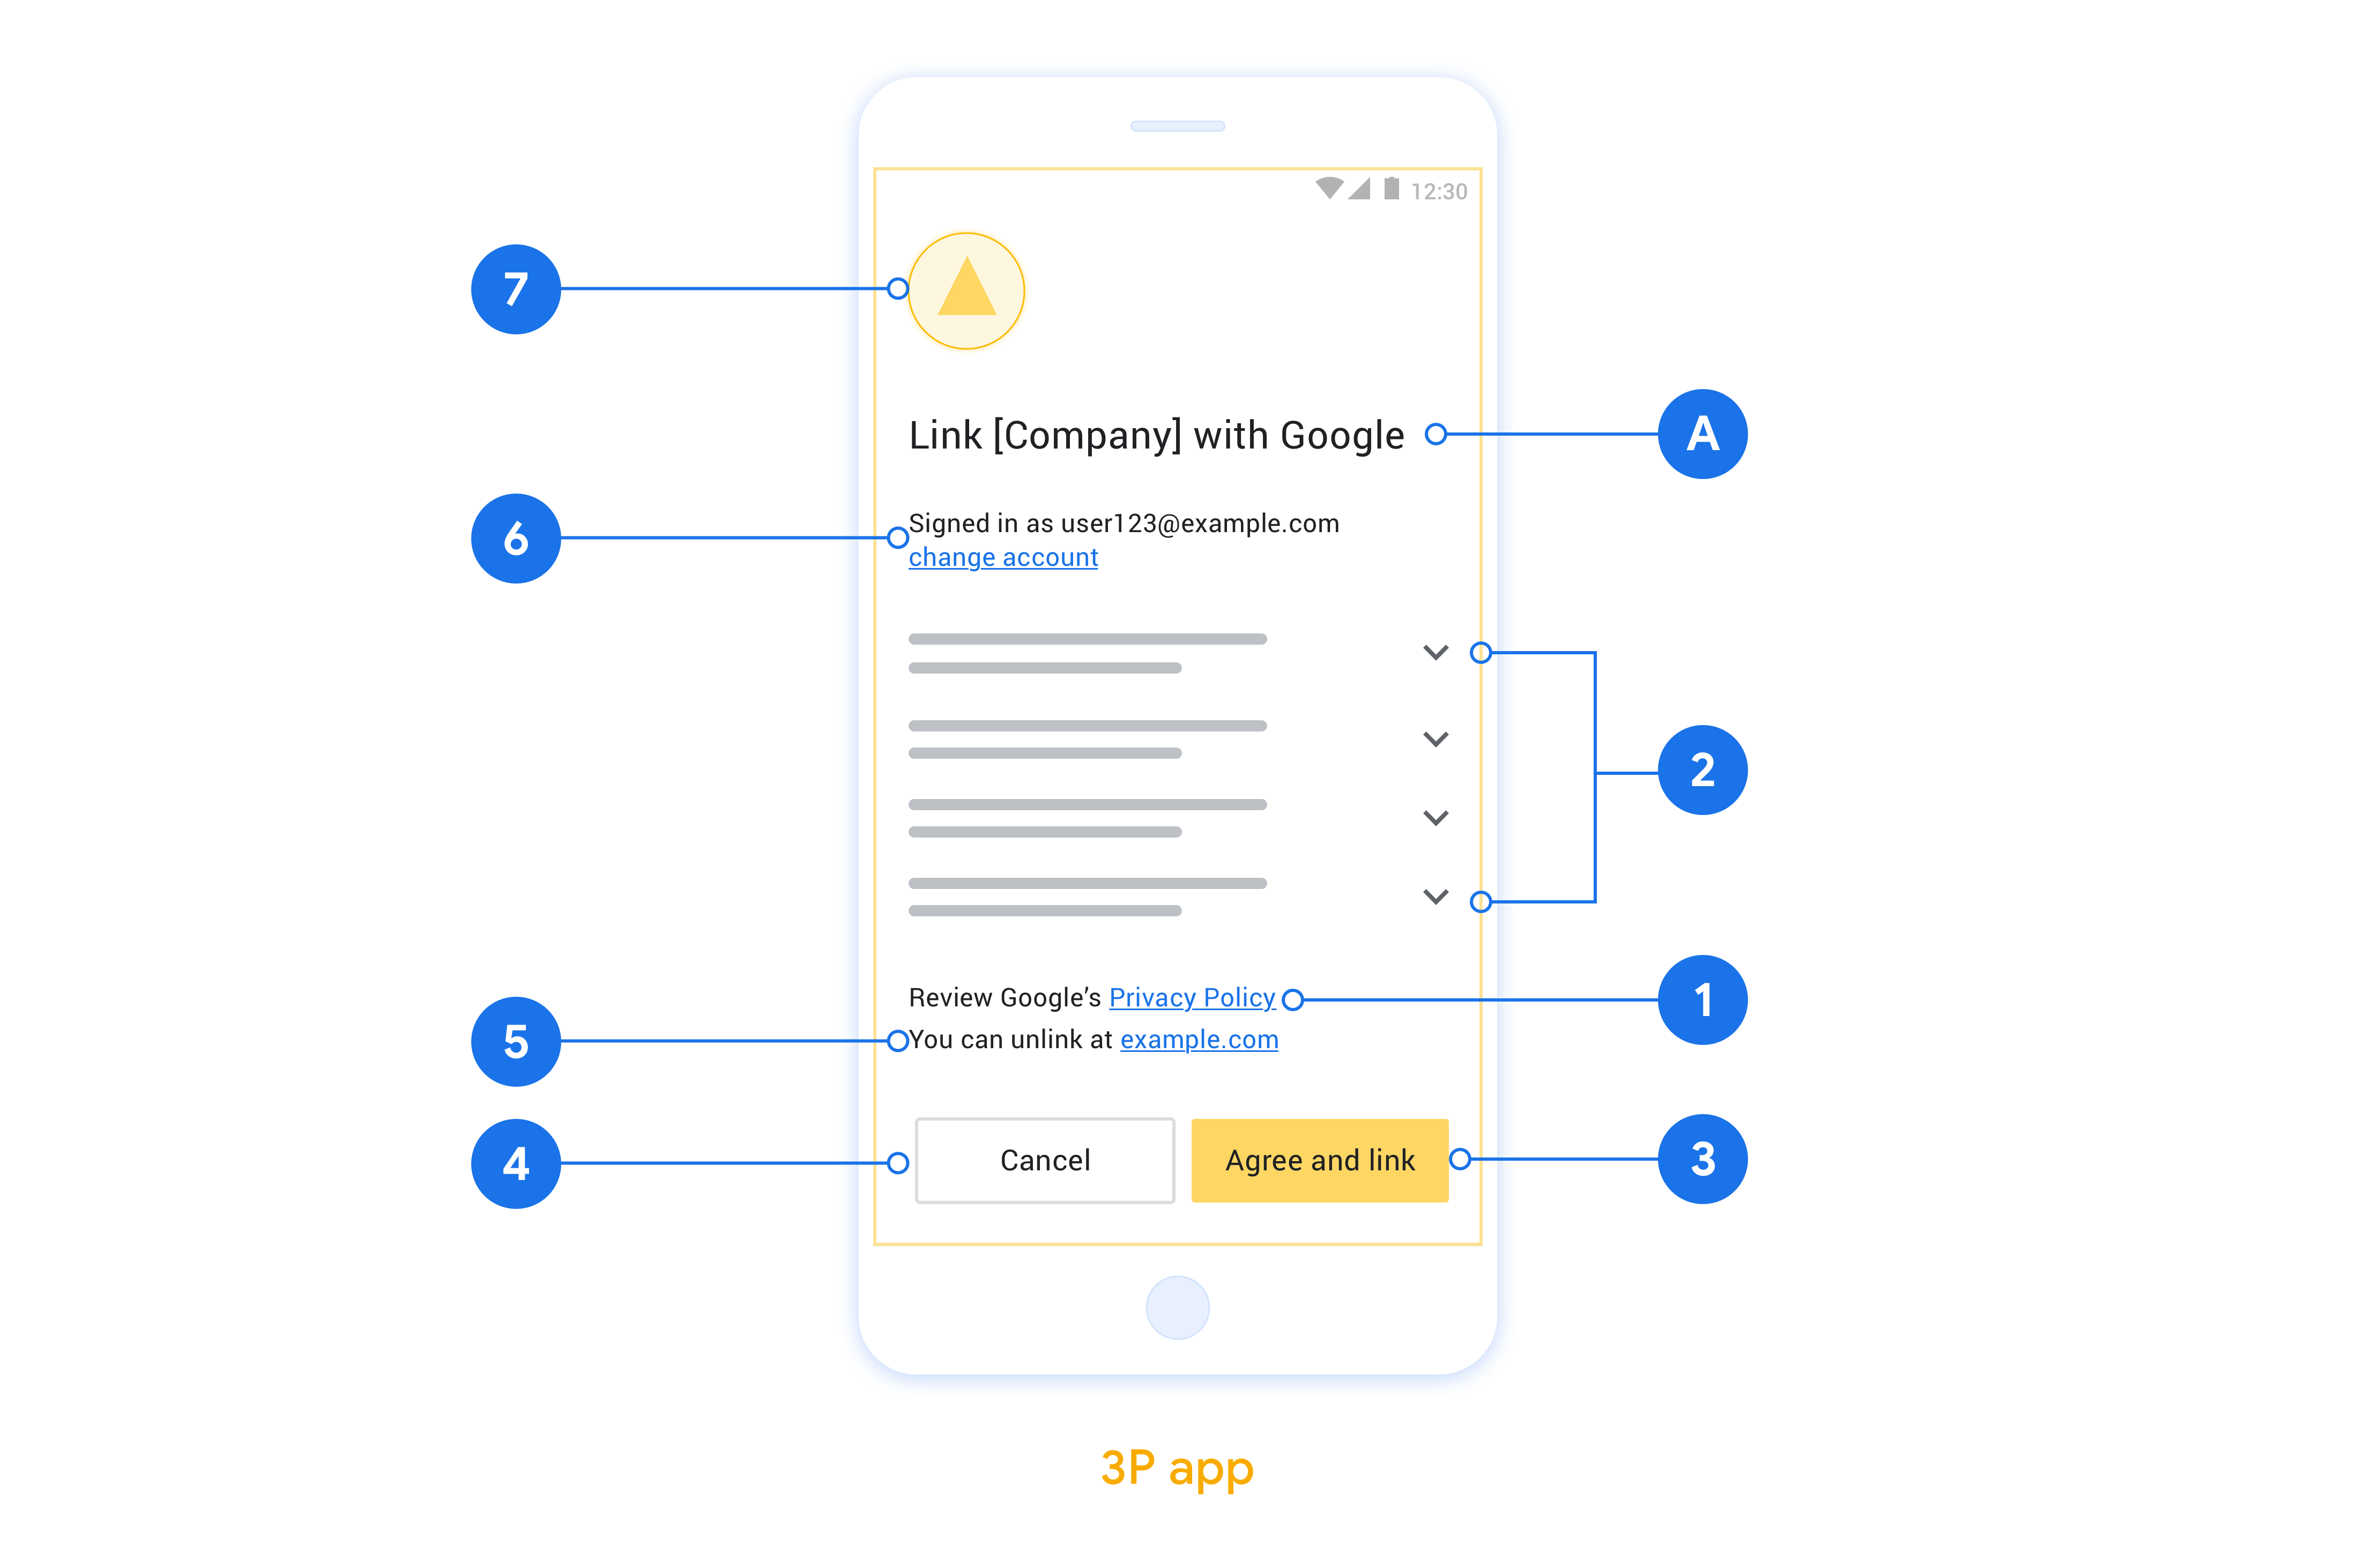
本節說明應用程式切換帳戶連結同意畫面的設計規定和建議。Google 呼叫應用程式後,應用程式會向使用者顯示同意畫面。
需求條件
- 您必須提供 Google 授權聲明,例如「連結後,Google 將有權控制您的裝置。」
- 您必須告知使用者,他們的帳戶將連結至 Google,而非 Google Home 或 Google 助理等特定 Google 產品。
- 您必須在同意畫面中加入明確的行動號召,並使用「同意並連結」字樣來表示連結動作。這是因為使用者必須瞭解連結帳戶時,需要與 Google 分享哪些資料。
- 如果使用者選擇不連結,您必須提供返回、拒絕或取消的方法。取消動作請使用「取消」一詞。
- 您必須實作這項工作流程:使用者點選「同意並連結」後,您必須顯示連結成功訊息,並自動將使用者重新導向至 Google Home 應用程式。使用者現在應該會在 Google Home 應用程式中看到連結的裝置。按一下「取消」後,請將使用者重新導向回 Google Home 應用程式。
建議
建議您採取下列做法:
顯示《Google 隱私權政策》。在同意畫面中加入《Google 隱私權政策》連結。
要分享的資料。請使用簡潔明瞭的用語,告知使用者 Google 需要哪些資料,以及原因。
可取消連結。提供使用者取消連結的機制,例如平台帳戶設定的網址。或者,您也可以加入 Google 帳戶的連結,讓使用者管理已連結的帳戶。
可變更使用者帳戶。建議使用者切換帳戶的方法。如果使用者通常有多個帳戶,這項功能就特別實用。
- 如果使用者必須關閉同意畫面才能切換帳戶,請將可復原的錯誤傳送給 Google,讓使用者透過 OAuth 連結和隱含流程登入所需帳戶。
加入您的標誌。在同意畫面上顯示公司標誌。 請按照樣式指南放置標誌。如要顯示 Google 標誌,請參閱「標誌和商標」一文。
設定以 OAuth 為基礎的 App Flip
以下各節說明 OAuth 型應用程式切換的必要條件,以及如何在 Google Home 開發人員管理中心設定應用程式切換專案。
建立雲端對雲端整合,並設定 OAuth 2.0 伺服器
如要設定 App Flip,請先完成下列步驟:
- 設定 OAuth 2.0 伺服器。如要進一步瞭解如何設定 OAuth 伺服器,請參閱「實作 OAuth 2.0 伺服器」。
- 建立雲端對雲端整合。如要建立整合,請按照「建立雲端對雲端整合」中的說明操作。
在開發人員控制台中設定應用程式切換功能
下節說明如何在開發人員控制台中設定應用程式切換。
- 填寫「OAuth 用戶端資訊」下方的所有欄位。 (如果系統不支援 App Flip,會改用一般 OAuth 做為備援。)
- 在「使用應用程式連結帳戶(選用)」下方,勾選「啟用 iOS 版」。
- 填寫「通用連結」欄位。如要進一步瞭解通用連結,請參閱「允許應用程式和網站連結至您的內容」。
- 如要視需要設定用戶端,請新增範圍,然後按一下「設定用戶端 (選用)」下方的「新增範圍」。
- 按一下 [儲存]。
現在可以繼續前往下一節,在 iOS 或 Android 應用程式中導入 App Flip。
在原生應用程式中導入 App Flip
如要導入 App Flip,您必須修改應用程式中的使用者授權碼,接受來自 Google 的深層連結。
在裝置上測試 App Flip
您已建立雲端整合,並在控制台和應用程式中設定應用程式切換功能,現在可以在行動裝置上測試這項功能。你可以使用 Google Home 應用程式測試應用程式切換功能。
如要透過 Google Home 應用程式測試 App Flip,請按照下列步驟操作:
- 前往 Developer Console,然後選取您的專案。
- 依序前往「雲端對雲端」>「測試」。
- 從 Google Home 應用程式觸發帳戶連結流程:
- 開啟 Google Home app (GHA)。
- 按一下「+」按鈕。
- 按一下「設定裝置」。
- 按一下「是否有已經設定好的裝置?」。
- 從供應商清單中選取雲端對雲端整合服務。清單中的服務會加上「[test]」前置字元。從清單中選取「[test]」整合服務時,應用程式應會開啟。
- 確認應用程式已啟動,並開始測試授權流程。