
1. Before you begin
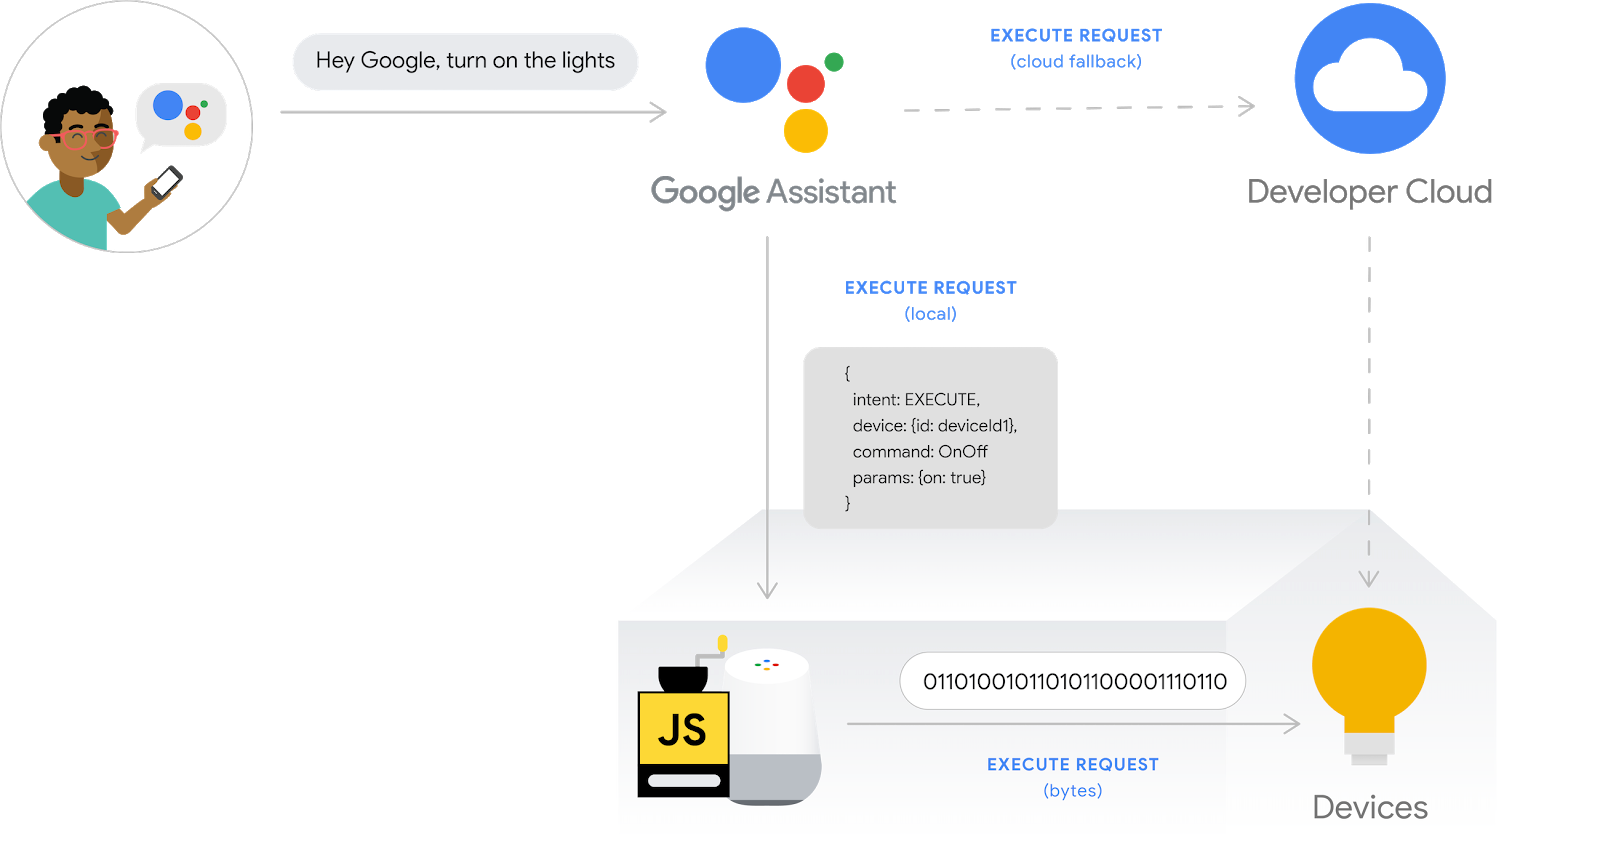
Smart home integrations allow the Google Assistant to control connected devices in users' homes. To build a Cloud-to-cloud integration, you need to provide a cloud webhook endpoint capable of handling smart home intents. For example, when a user says, "Hey Google, turn on the lights," the Assistant sends the command to your cloud fulfillment to update the state of the device.
The Local Home SDK enhances your smart home integration by adding a local path to route smart home intents directly to a Google Home device, which enhances reliability and reduces latency in processing users' commands. It lets you write and deploy a local fulfillment app in TypeScript or JavaScript that identifies devices and executes commands on any Google Home smart speaker or Google Nest smart display. Your app then communicates directly with users' existing smart devices over the local area network by using existing standard protocols to fulfill commands.
Prerequisites
- Create a Cloud-to-cloud integration developer guide
- Smart Home Washer codelab
- Local fulfillment Developer's Guide
What you'll build
In this codelab, you will deploy a previously built smart home integration with Firebase, then apply a scan configuration in the Developer Console, and build a local app sing TypeScript to send commands written in Node.js to a virtual washer device.
What you'll learn
- How to enable and configure local fulfillment in the Developer Console.
- How to use the Local Home SDK to write a local fulfillment app.
- How to debug the local fulfillment app loaded on the Google Home speaker or Google Nest smart display.
What you'll need
- The latest version of Google Chrome
- An iOS or Android device with the Google Home app
- A Google Home smart speaker or Google Nest smart display
- Node.js version 24 or later
- A Google Account
- A Google Cloud billing account
- Blaze (pay-as-you-go) plan for Firebase.
2. Getting started
Enable Activity controls
In order to use the Google Assistant, you must share certain activity data with Google. The Google Assistant needs this data to function properly; however, the requirement to share data is not specific to the SDK. To share this data, create a Google account if you don't already have one. You can use any Google account—it does not need to be your developer account.
Open the Activity Controls page for the Google Account that you want to use with the Assistant.
Ensure the following toggle switches are enabled:
- Web & App Activity - In addition, be sure to select the Include Chrome history and activity from sites, apps, and devices that use Google services checkbox.
- Device Information
- Voice & Audio Activity
Create a Cloud-to-cloud Integration project
- Go to the Developer Console.
- Click Create Project, enter a name for the project, and click Create Project.

Select the Cloud-to-cloud Integration
On the Project Home in the Developer Console, select Add cloud-to-cloud integration under Cloud-to-cloud.

Install the Firebase CLI
The Firebase Command Line Interface (CLI) will allow you to serve your web apps locally and deploy your web app to Firebase hosting.
To install the CLI, run the following npm command from the terminal:
npm install -g firebase-tools
To verify that the CLI has been installed correctly, run:
firebase --version
Authorize the Firebase CLI with your Google Account by running:
firebase login
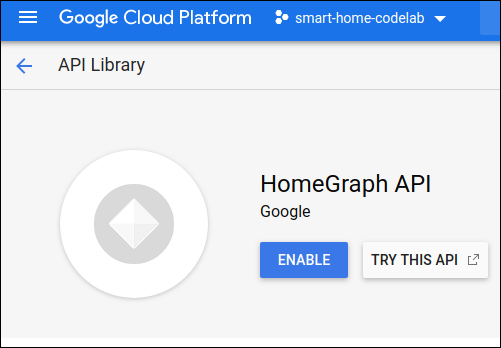
Enable the HomeGraph API
The HomeGraph API enables the storage and querying of devices and their states within a user's Home Graph. To use this API, you must first open the Google Cloud console and enable the HomeGraph API.
In the Google Cloud console, make sure to select the project that matches your integration's <project-id>. Then, in the API Library screen for the HomeGraph API, click Enable.
3. Run the starter app
Now that you set up your development environment, you can deploy the starter project to verify everything is configured properly.
Get the source code
Click the following link to download the sample for this codelab on your development machine:
...or you can clone the GitHub repository from the command line:
git clone https://github.com/google-home/smarthome-local.git
About the project
The starter project contains the following subdirectories:
public—Frontend web UI to control and monitor the smart washerfunctions—Cloud functions implementing cloud fulfillment for the Cloud-to-cloud integrationlocal—Skeleton local fulfillment app project with intent handlers stubbed inindex.ts
The provided cloud fulfillment includes the following functions in index.js:
fakeauth—Authorization endpoint for account linkingfaketoken—Token endpoint for account linkingsmarthome—Smart home intent fulfillment endpointreportstate—Invokes the HomeGraph API on device state changesupdateDevice—Endpoint used by the virtual device to trigger Report State
Connect to Firebase
Navigate to the app-start directory, then set up the Firebase CLI with your Cloud-to-cloud integration project:
cd app-start
firebase use <project-id>
Configure Firebase project
Initialize a Firebase project.
firebase init
Select the CLI features, Realtime Database, and the Functions feature.
? Which Firebase features do you want to set up for this directory? Press Space to select features, then Enter
 to confirm your choices. (Press <space> to select, <a> to toggle all, <i> to invert selection, and <enter> to
 proceed)
>( ) Data Connect: Set up a Firebase Data Connect service
 ( ) Firestore: Configure security rules and indexes files for Firestore
 ( ) Genkit: Setup a new Genkit project with Firebase
 (*) Functions: Configure a Cloud Functions directory and its files
 ( ) App Hosting: Configure an apphosting.yaml file for App Hosting
 ( ) Hosting: Configure files for Firebase Hosting and (optionally) set up GitHub Action deploys
 ( ) Storage: Configure a security rules file for Cloud Storage
 ( ) Emulators: Set up local emulators for Firebase products
 ( ) Remote Config: Configure a template file for Remote Config
 ( ) Extensions: Set up an empty Extensions manifest
 (*) Realtime Database: Configure a security rules file for Realtime Database and (optionally) provision
default instance
 ( ) Data Connect: Set up a Firebase Data Connect service
 ( ) Firestore: Configure security rules and indexes files for Firestore
This will initialize the necessary APIs and features for your project.
When prompted, initialize Realtime Database. You can use the default location for the database instance.
? It seems like you haven't initialized Realtime Database in your project yet. Do you want to set it up?
Yes

? Please choose the location for your default Realtime Database instance:
us-central1
Since you are using the starter project code, choose the default file for the Security rules, and ensure you don't overwrite the existing database rules file.
? File database.rules.json already exists. Do you want to overwrite it with the Realtime Database Security Rules for <project-ID>-default-rtdb from the Firebase Console?
No
If you are reinitializing your project, select Overwrite when asked if you want to initialize or overwrite a codebase.
? Would you like to initialize a new codebase, or overwrite an existing one?
Overwrite
When configuring your Functions, you should use the default files, and ensure you don't overwrite the existing index.js and package.json files in the project sample.
? What language would you like to use to write Cloud Functions?
JavaScript

? Do you want to use ESLint to catch probable bugs and enforce style?
No

? File functions/package.json already exists. Overwrite?
No

? File functions/index.js already exists. Overwrite?
No
If you are reinitializing your project, select No when asked if you want to initialize or overwrite functions/.gitignore.
? File functions/.gitignore already exists. Overwrite?
No
? Do you want to install dependencies with npm now?
Yes
If ESLint was accidentally enabled, there are two methods available to disable it:
- Using the GUI, go to the
../functionsfolder under the project, select the hidden file.eslintrc.jsand delete it. Do not mistake it for the similarly named.eslintrc.json. - Using the command line:
cd functions
rm .eslintrc.js
To ensure that you have a correct and complete Firebase configuration, copy the firebase.json file from the washer-done directory to the washer-start directory, overwriting the one in washer-start.
In the washer-start directory:
cp -vp ../washer-done/firebase.json .
Deploy to Firebase
Now that you have installed the dependencies and configured your project, you are ready to run the app for the first time.
firebase deploy
This is the console output you should see:
...

✔ Deploy complete!

Project Console: https://console.firebase.google.com/project/<project-id>/overview
Hosting URL: https://<project-id>.web.app
This command deploys a web app, along with several Cloud Functions for Firebase.
Open the Hosting URL in your browser (https://<project-id>.web.app) to view the web app. You will see the following interface:
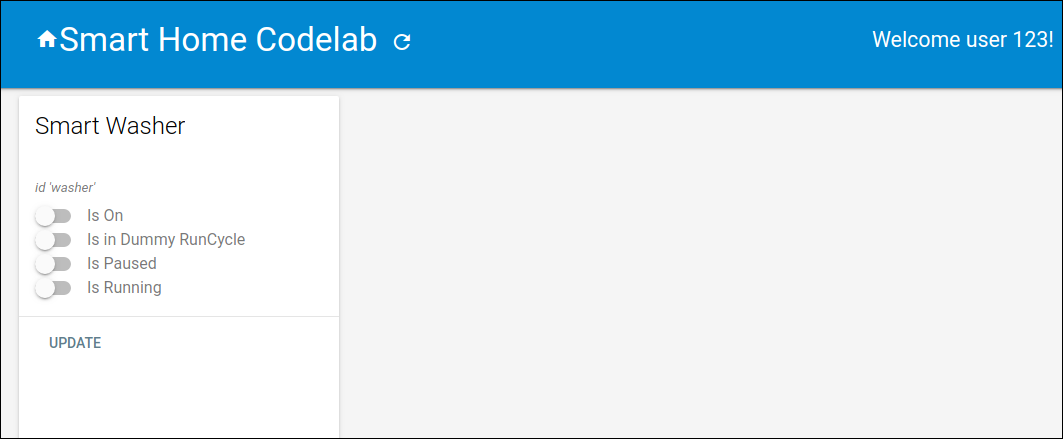
This web UI represents a third-party platform to view or modify device states. To begin populating your database with device information, click UPDATE. You won't see any changes on the page, but the current state of your washer will be stored in the database.
Now it's time to connect the cloud service you've deployed to the Google Assistant using the Developer Console
Configure your Developer Console project
On the Develop tab, add a Display Name for your interaction. This name will appear in the Google Home app.

Under App branding, upload a png file for the app icon, sized 144 x 144px, and named

To enable Account linking use these account linking settings:
Client ID |
|
Client secret |
|
Authorization URL |
|
Token URL |
|

Under Cloud fulfillment URL, enter the URL for your cloud function that provides fulfillment for the smart home intents.
https://us-central1-<project-id>.cloudfunctions.net/smarthome

Click Save to save your project configuration, then click Next: Test to enable testing on your project.

Now you can begin implementing the webhooks necessary to connect the device state with the Assistant.
Link to Google Assistant
In order to test your Cloud-to-cloud integration, you need to link your project with a Google Account. This enables testing through Google Assistant surfaces and the Google Home app that are signed in to the same account.
- On your phone, open the Google Assistant settings. Note that you should be logged in as the same account as in the console.
- Navigate to Google Assistant > Settings > Home Control (under Assistant).
- Click the search icon in the upper right.
- Search for your test app using the [test] prefix to find your specific test app.
- Select that item. The Google Assistant will then authenticate with your service and send a
SYNCrequest, asking your service to provide a list of devices for the user.
Open the Google Home app and verify that you can see your washer device.
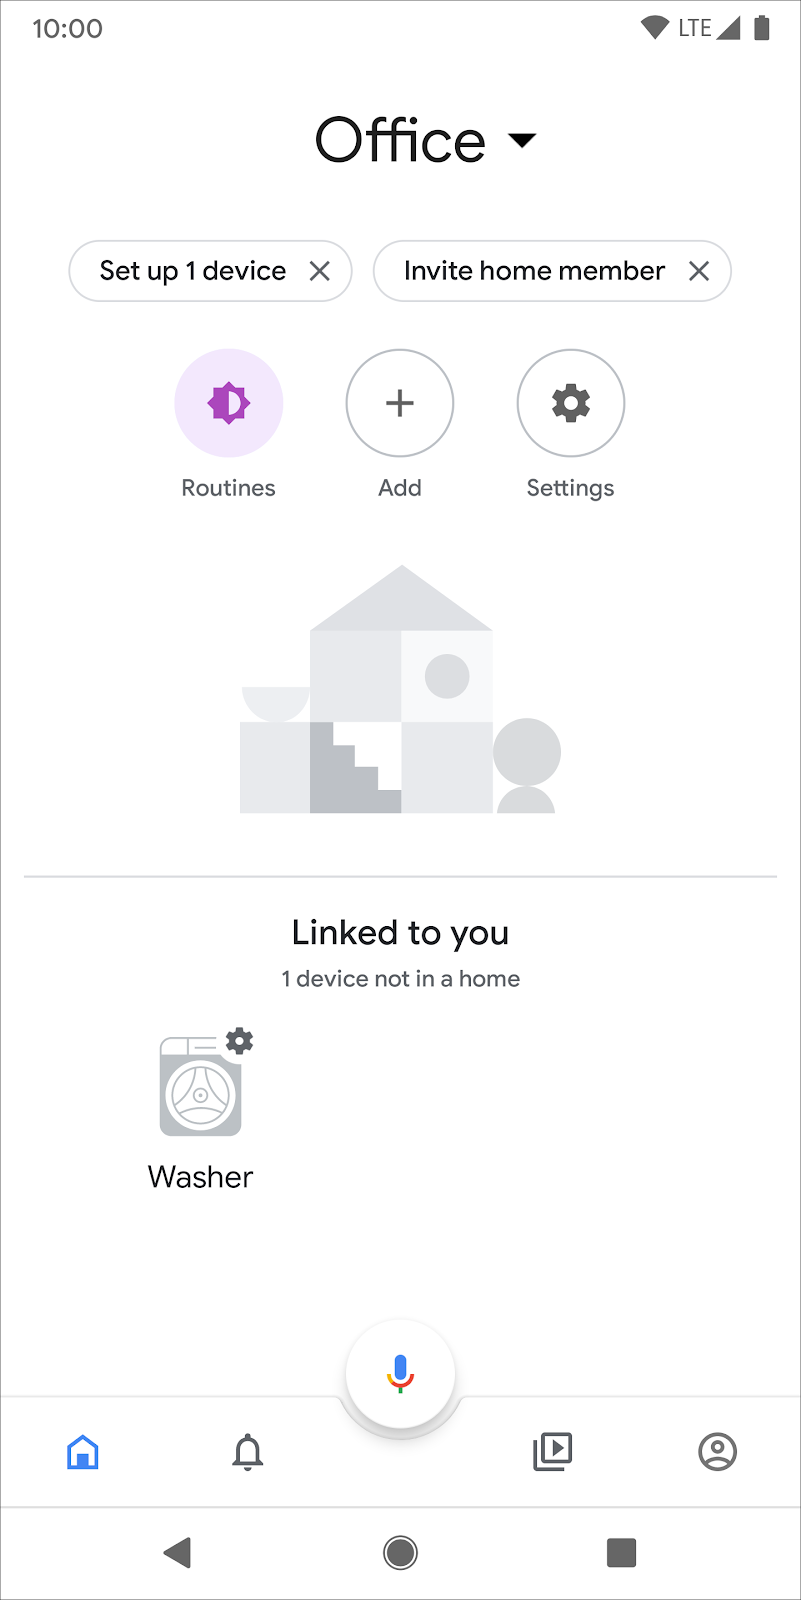
Verify that you can control the washer using voice commands in the Google Home app. You should also see the device state change in the frontend web UI of your cloud fulfillment.
Now you can begin adding local fulfillment to your integration.
4. Update cloud fulfillment
To support local fulfillment, you need to add a new per-device field called otherDeviceIds to the cloud SYNC response containing a unique local identifier for the device. This field also indicates the ability to locally control that device.
Add the otherDeviceIds field to the SYNC response as shown in the following code snippet:
functions/index.js
app.onSync((body) => {
  return {
    requestId: body.requestId,
    payload: {
      agentUserId: '123',
      devices: [{
        id: 'washer',
        type: 'action.devices.types.WASHER',
        traits: [ ... ],
        name: { ... },
        deviceInfo: { ... },
        willReportState: true,
        attributes: {
          pausable: true,
        },
        otherDeviceIds: [{
          deviceId: 'deviceid123',
        }],
      }],
    },
  };
});
Deploy the updated project to Firebase:
firebase deploy --only functions
After deployment completes, navigate to the web UI and click the Refresh button in the toolbar. This triggers a Request Sync operation so that the Assistant receives the updated
 SYNC response data.

5. Configure local fulfillment
In this section, you will add the necessary configuration options for local fulfillment to your Cloud-to-cloud integration. During development, you will publish the local fulfillment app to Firebase Hosting, where the Google Home device can access and download it.
In the Google Home Developer Console, go to Project > Cloud-to-cloud on the left side of the screen, then select Edit for the integration. In the Setup and configuration page, scroll to Local fulfillment and toggle the setting on. Enter the following URL into each test URL field, insert your project ID, and click Save:
https://<project-id>.web.app/local-home/index.html
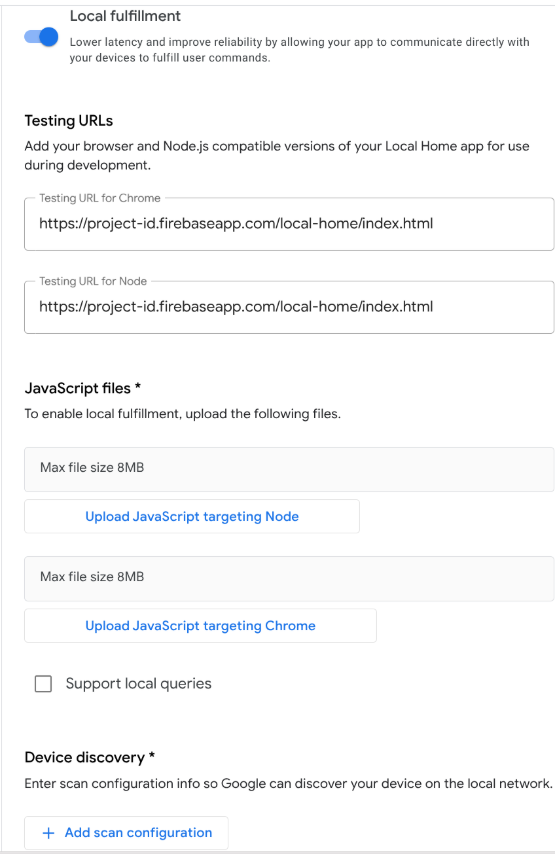
Next, we need to define how the Google Home device should discover the local smart devices. The Local Home platform supports several protocols for device discovery, including mDNS, UPnP, and UDP broadcast. You will use UDP broadcast to discover the smart washer.
Click + Add scan configuration under Device discovery to add a new scan configuration. Select UDP as the protocol, and fill in the following attributes:
Field | Description | Suggested value |
Discovery address | UDP discovery address |
|
Broadcasting port | Port where Google Home sends the UDP broadcast |
|
Listening port | Port where Google Home listens for a response |
|
Discovery packet | UDP broadcast data payload |
|
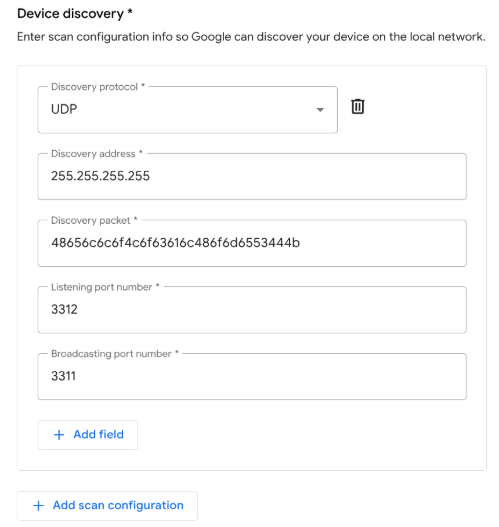
Finally, click Save at the bottom of the window to publish your changes.
6. Implement local fulfillment
You will develop your local fulfillment app in TypeScript using the Local Home SDK typings package. Look at the skeleton provided in the starter project:
local/index.ts
/// <reference types="@google/local-home-sdk" />

import App = smarthome.App;
import Constants = smarthome.Constants;
import DataFlow = smarthome.DataFlow;
import Execute = smarthome.Execute;
import Intents = smarthome.Intents;
import IntentFlow = smarthome.IntentFlow;

...

class LocalExecutionApp {

  constructor(private readonly app: App) { }

  identifyHandler(request: IntentFlow.IdentifyRequest):
      Promise<IntentFlow.IdentifyResponse> {
    // TODO: Implement device identification
  }

  executeHandler(request: IntentFlow.ExecuteRequest):
      Promise<IntentFlow.ExecuteResponse> {
    // TODO: Implement local fulfillment
  }

  ...
}

const localHomeSdk = new App('1.0.0');
const localApp = new LocalExecutionApp(localHomeSdk);
localHomeSdk
  .onIdentify(localApp.identifyHandler.bind(localApp))
  .onExecute(localApp.executeHandler.bind(localApp))
  .listen()
  .then(() => console.log('Ready'))
  .catch((e: Error) => console.error(e));
The core component of local fulfillment is the smarthome.App class. The starter project attaches handlers for the IDENTIFY and EXECUTE intents, then calls the listen() method to inform Local Home SDK that the app is ready.
Add the IDENTIFY handler
The Local Home SDK triggers your IDENTIFY handler when the Google Home device discovers unverified devices on the local network based on the scan configuration provided in the Developer Console.
Meanwhile, the platform invokes the identifyHandler with the resulting scan data when Google discovers a matching device. In your app, scanning takes place using a UDP broadcast and the scan data provided to the IDENTIFY handler includes the response payload sent by the local device.
The handler returns an IdentifyResponse instance containing a unique identifier for the local device. Add the following code to your identifyHandler method to process the UDP response coming from the local device and determine the appropriate local device ID:
local/index .ts
identifyHandler(request: IntentFlow.IdentifyRequest):
    Promise<IntentFlow.IdentifyResponse> {
  console.log("IDENTIFY intent: " + JSON.stringify(request, null, 2));

  const scanData = request.inputs[0].payload.device.udpScanData;
  if (!scanData) {
    const err = new IntentFlow.HandlerError(request.requestId,
        'invalid_request', 'Invalid scan data');
    return Promise.reject(err);
  }

  // In this codelab, the scan data contains only local device ID.
  const localDeviceId = Buffer.from(scanData.data, 'hex');

  const response: IntentFlow.IdentifyResponse = {
    intent: Intents.IDENTIFY,
    requestId: request.requestId,
    payload: {
      device: {
        id: 'washer',
        verificationId: localDeviceId.toString(),
      }
    }
  };
  console.log("IDENTIFY response: " + JSON.stringify(response, null, 2));

  return Promise.resolve(response);
}
Note that the verificationId field must match one of the otherDeviceIds values in your SYNC response, which flags the device as available for local fulfillment in the user's Home Graph. After Google finds a match, that device is considered verified and ready for local fulfillment.
Add the EXECUTE handler
The Local Home SDK triggers your EXECUTE handler when a device that supports local fulfillment receives a command. The content of the local intent is equivalent to the EXECUTE intent sent to your cloud fulfillment, so the logic for locally processing the intent resembles how you handle it in the cloud.Actions
The app can use TCP/UDP sockets or HTTP(S) requests to communicate with local devices. In this codelab, HTTP serves as the protocol used to control the virtual device. The port number is defined in index.ts as the SERVER_PORT variable.
Add the following code to your executeHandler method to process incoming commands and send them to the local device over HTTP:
local/index.ts
executeHandler(request: IntentFlow.ExecuteRequest):
    Promise<IntentFlow.ExecuteResponse> {
  console.log("EXECUTE intent: " + JSON.stringify(request, null, 2));

  const command = request.inputs[0].payload.commands[0];
  const execution = command.execution[0];
  const response = new Execute.Response.Builder()
    .setRequestId(request.requestId);

  const promises: Array<Promise<void>> = command.devices.map((device) => {
    console.log("Handling EXECUTE intent for device: " + JSON.stringify(device));

    // Convert execution params to a string for the local device
    const params = execution.params as IWasherParams;
    const payload = this.getDataForCommand(execution.command, params);

    // Create a command to send over the local network
    const radioCommand = new DataFlow.HttpRequestData();
    radioCommand.requestId = request.requestId;
    radioCommand.deviceId = device.id;
    radioCommand.data = JSON.stringify(payload);
    radioCommand.dataType = 'application/json';
    radioCommand.port = SERVER_PORT;
    radioCommand.method = Constants.HttpOperation.POST;
    radioCommand.isSecure = false;

    console.log("Sending request to the smart home device:", payload);

    return this.app.getDeviceManager()
      .send(radioCommand)
      .then(() => {
        const state = {online: true};
        response.setSuccessState(device.id, Object.assign(state, params));
        console.log(`Command successfully sent to ${device.id}`);
      })
      .catch((e: IntentFlow.HandlerError) => {
        e.errorCode = e.errorCode || 'invalid_request';
        response.setErrorState(device.id, e.errorCode);
        console.error('An error occurred sending the command', e.errorCode);
      });
  });

  return Promise.all(promises)
    .then(() => {
      return response.build();
    })
    .catch((e) => {
      const err = new IntentFlow.HandlerError(request.requestId,
          'invalid_request', e.message);
      return Promise.reject(err);
    });
}
Compile the TypeScript app
Navigate to the local/ directory and run the following commands to download the TypeScript compiler and compile the app:
cd local
npm install
npm run build
This compiles the index.ts (TypeScript) source and places the following contents into the public/local-home/ directory:
bundle.js—Compiled JavaScript output containing the local app and dependencies.index.html—Local hosting page used to serve the app for on-device testing.
Deploy the test project
Deploy the updated project files to Firebase Hosting so that you can access them from the Google Home device.
firebase deploy --only hosting
7. Start the smart washer
Now it's time to test the communication between your local fulfillment app and the smart washer! The codelab starter project includes a virtual smart washer—written in Node.js—which simulates a smart washer that users can locally control.
Configure the device
You need to configure the virtual device to use the same UDP parameters that you applied to the scan configuration for device discovery in the Developer Console. Additionally, you need to tell the virtual device which local device ID to report and the Cloud-to-cloud integration's project ID to use for Report State events when the device state changes.
Parameter | Suggested value |
deviceId |
|
discoveryPortOut |
|
discoveryPacket |
|
projectId | Your Cloud-to-cloud integration's project ID |
Start the device
Navigate to the virtual-device/ directory and run the device script, passing the configuration parameters as arguments:
cd virtual-device
npm install
npm start -- \
  --deviceId=deviceid123 --projectId=<project-id> \
  --discoveryPortOut=3311 --discoveryPacket=HelloLocalHomeSDK
Verify that the device script runs with the expected parameters:
(...): UDP Server listening on 3311
(...): Device listening on port 3388
(...): Report State successful
8. Debug the TypeScript app
In the following section, you will verify that the Google Home device can properly scan, identify, and send commands to the virtual smart washer over the local network. You can use Google Chrome Developer Tools to connect to the Google Home device, view the console logs, and debug the TypeScript app.
Connect Chrome Developer Tools
To connect the debugger to your local fulfillment app, follow these steps:
- Make sure that you linked your Google Home device to a user with permission to access the Developer Console project.
- Reboot your Google Home device, which enables it to get the URL of your HTML as well as the scan configuration that you put in the Developer Console.
- Launch Chrome on your development machine.
- Open a new Chrome tab and enter
chrome://inspectin the address field to launch the inspector.
You should see a list of devices on the page and your app URL should appear under the name of your Google Home device.

Launch the inspector
Click Inspect under your app URL to launch Chrome Developer Tools. Select the Console tab and verify that you can see the content of IDENTIFY intent printed by your TypeScript app.
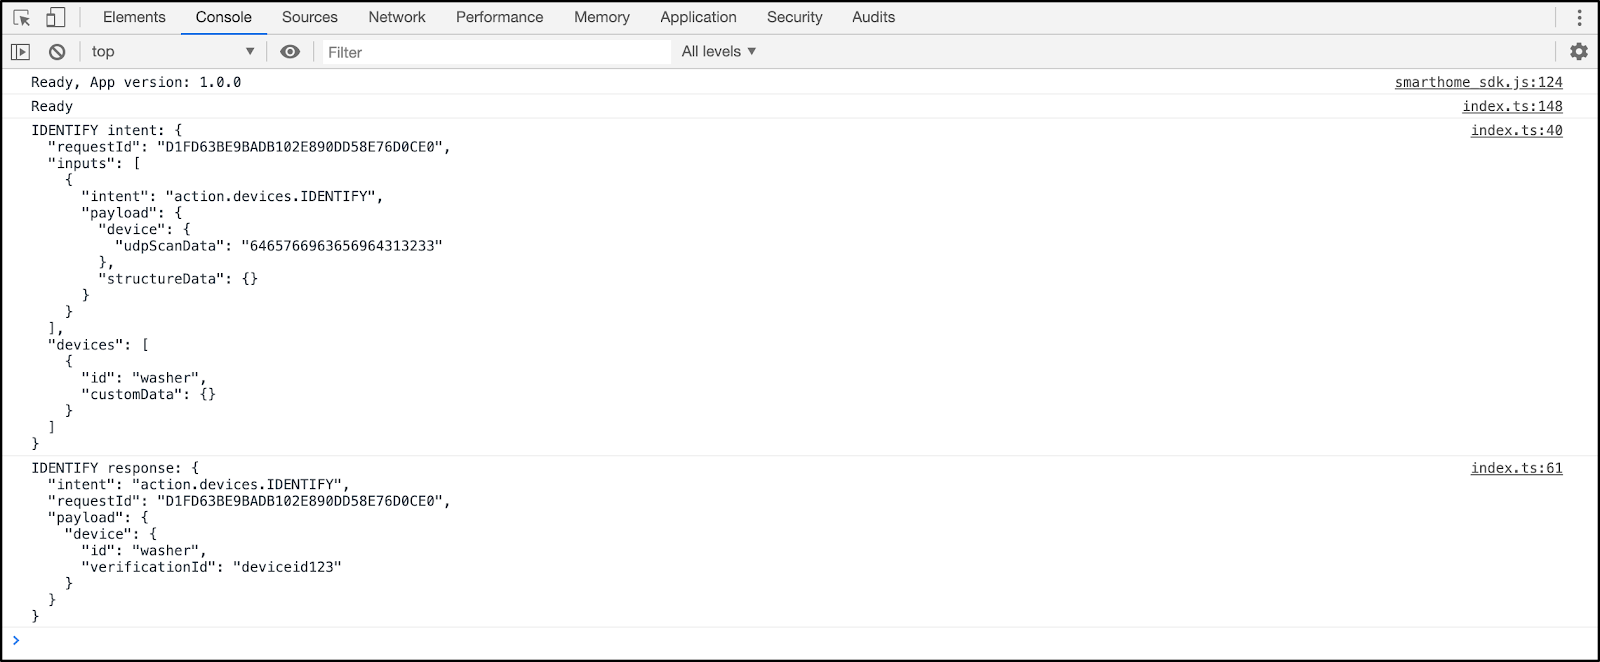
This output means that your local fulfillment app successfully discovered and identified the virtual device.
Test local fulfillment
Send commands to your device using the touch controls in the Google Home app or through voice commands to the Google Home device, such as:
"Hey Google, turn on my washer."
"Hey Google, start my washer."
"Hey Google, stop my washer."
This should trigger the platform to send an EXECUTE intent to your TypeScript app.
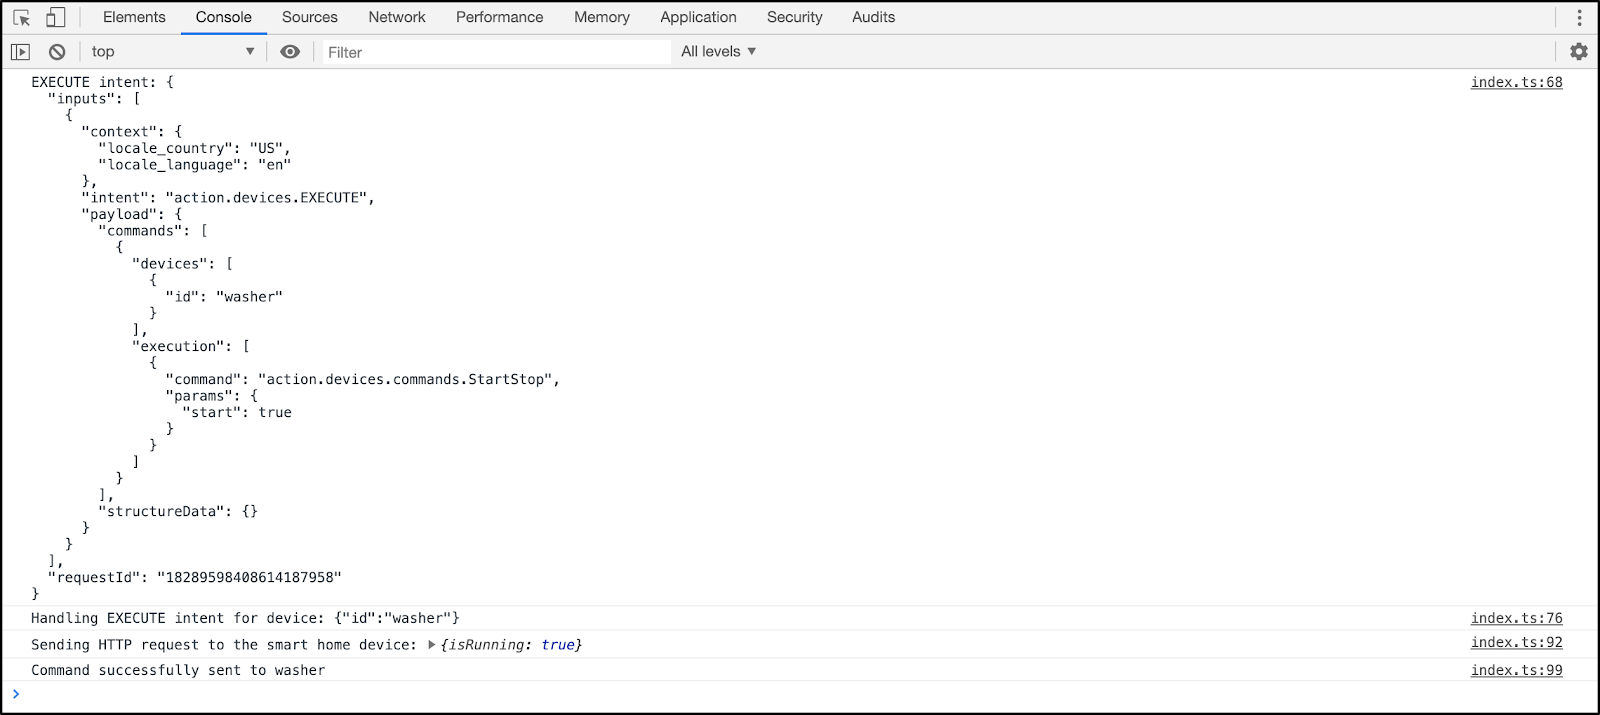
Verify that you can see the local smart washer state change with each command.
...
***** The washer is RUNNING *****
...
***** The washer is STOPPED *****
9. Congratulations
Congratulations! You used the Local Home SDK to integrate local fulfillment into a Cloud-to-cloud integration.
Learn more
Here are some additional things you can try:
- Change the scan configuration and make it work. For example, try using a different UDP port or discovery packet.
- Modify the virtual smart device codebase to run on an embedded device—such as a Raspberry Pi—and use LEDs or a display to visualize the current state.