
Setelah memiliki penerapan OAuth 2.0, Anda dapat secara opsional mengonfigurasi App Flip berbasis OAuth, yang memungkinkan pengguna Android menautkan akun mereka di sistem autentikasi Anda ke Akun Google mereka dengan lebih cepat. Bagian berikut menjelaskan cara mendesain dan menerapkan App Flip untuk integrasi Cloud-to-cloud Anda.
Panduan desain
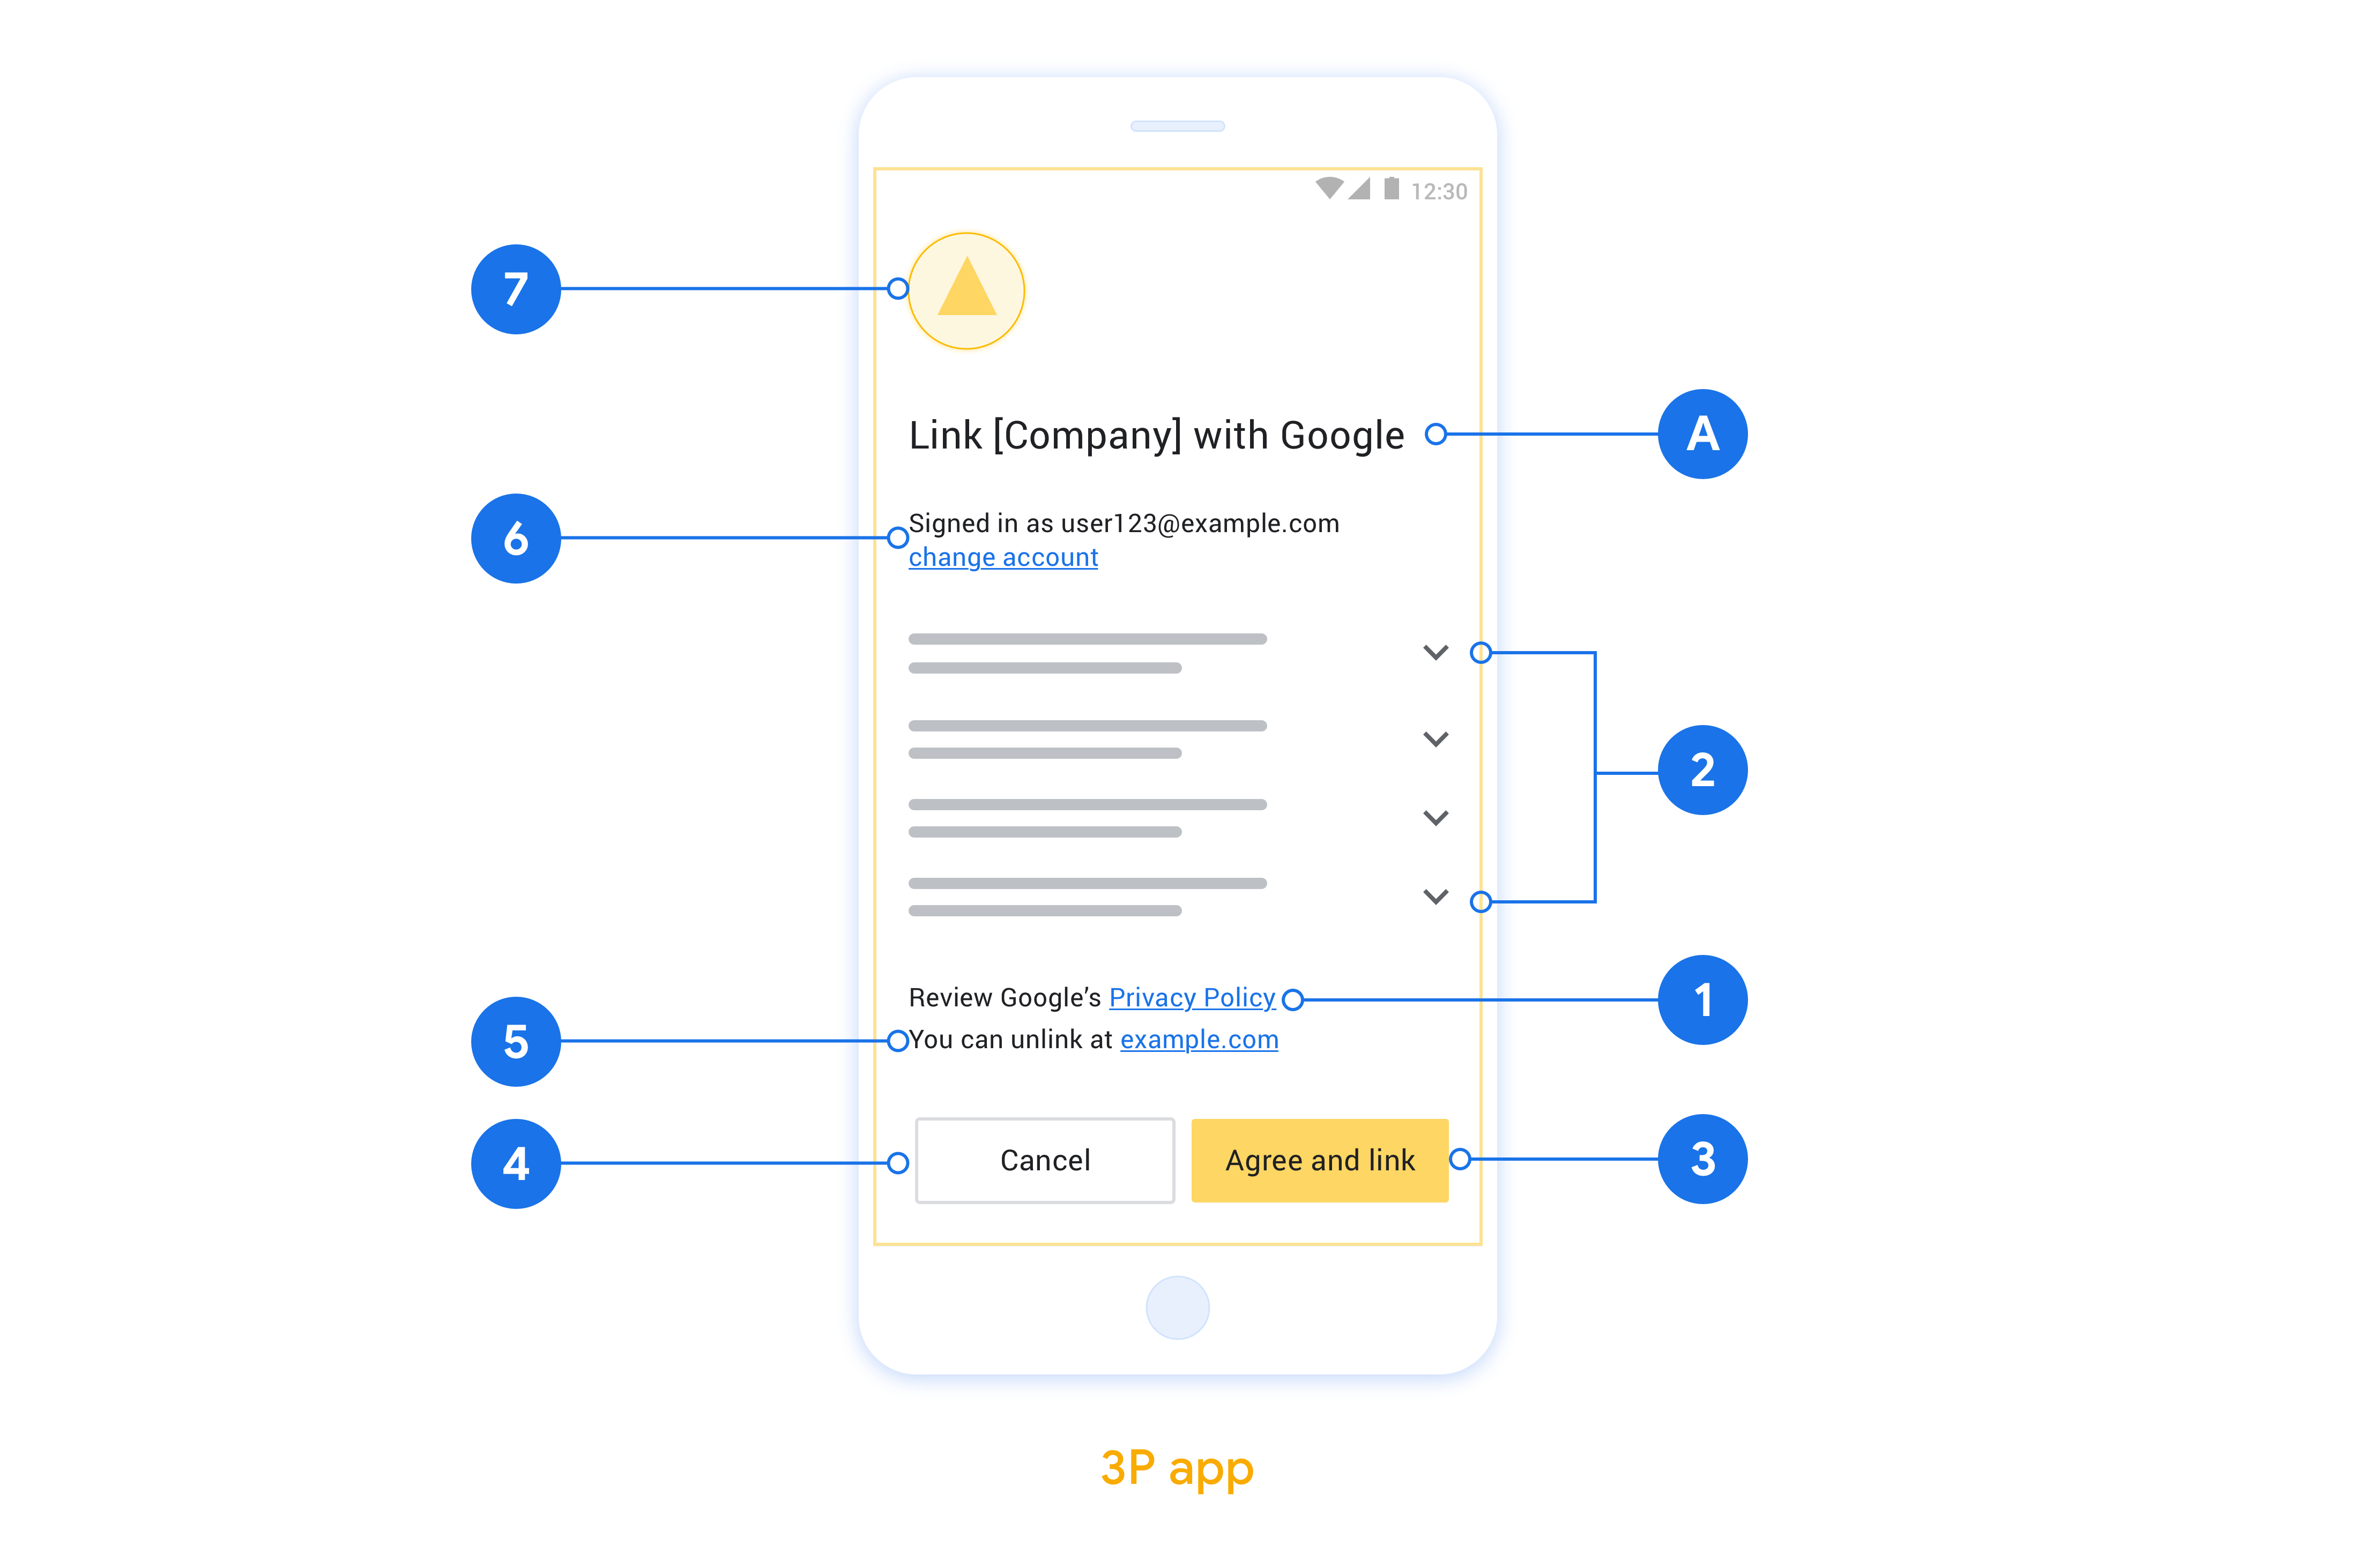
Bagian ini menjelaskan persyaratan dan rekomendasi desain untuk layar izin penautan akun App Flip. Setelah Google memanggil aplikasi Anda, aplikasi Anda akan menampilkan layar izin kepada pengguna.
Persyaratan
- Anda harus memiliki pernyataan otorisasi Google seperti "Setelah ditautkan, Google akan memiliki izin untuk mengontrol perangkat Anda."
- Anda harus mengomunikasikan bahwa akun pengguna sedang ditautkan ke Google, bukan ke produk Google tertentu, seperti Google Home atau Asisten Google.
- Anda harus menyatakan pesan ajakan (CTA) yang jelas di layar izin Anda dan menggunakan kata-kata "Setuju dan tautkan" untuk tindakan penautan. Hal ini karena pengguna perlu memahami data apa yang harus mereka bagikan kepada Google untuk menautkan akun mereka.
- Anda harus menyediakan cara bagi pengguna untuk kembali, menolak, atau membatalkan, jika mereka memilih untuk tidak menautkan. Gunakan kata "Batal" untuk tindakan pembatalan.
- Anda harus menerapkan alur kerja ini: Setelah mengklik "Setuju dan tautkan", Anda harus menampilkan keberhasilan penautan dan mengalihkan pengguna kembali ke aplikasi Google Home secara otomatis. Pengguna kini akan melihat perangkat tertaut di aplikasi Google Home dengan tindakan Anda. Setelah mengklik "Batal", Anda harus mengalihkan pengguna kembali ke aplikasi Google Home.
Rekomendasi
Sebaiknya Anda melakukan hal berikut:
Menampilkan Kebijakan Privasi Google. Sertakan link ke Kebijakan Privasi Google di layar izin.
Data yang akan dibagikan. Gunakan bahasa yang jelas dan ringkas untuk memberi tahu pengguna data apa yang diperlukan Google dari mereka dan alasannya.
Kemampuan untuk membatalkan tautan. Menawarkan mekanisme bagi pengguna untuk membatalkan tautan, seperti URL ke setelan akun mereka di platform Anda. Atau, Anda dapat menyertakan link ke Akun Google tempat pengguna dapat mengelola akun tertaut mereka.
Kemampuan untuk mengubah akun pengguna. Sarankan metode bagi pengguna untuk mengganti akun mereka. Hal ini sangat bermanfaat jika pengguna cenderung memiliki beberapa akun.
- Jika pengguna harus menutup layar izin untuk beralih akun, kirimkan error yang dapat dipulihkan ke Google agar pengguna dapat login ke akun yang diinginkan dengan penautan OAuth dan alur implisit.
Sertakan logo Anda. Menampilkan logo perusahaan Anda di layar izin. Gunakan panduan gaya Anda untuk menempatkan logo. Jika Anda ingin menampilkan logo Google juga, lihat Logo dan merek dagang.
Menyiapkan App Flip berbasis OAuth
Bagian berikut menjelaskan prasyarat untuk Pengalihan Aplikasi berbasis OAuth dan cara mengonfigurasi project Pengalihan Aplikasi di Konsol Developer Google Home.
Membuat integrasi Cloud-to-cloud dan menyiapkan server OAuth 2.0
Sebelum dapat mengonfigurasi App Flip, Anda harus melakukan hal berikut:
- Siapkan server OAuth 2.0. Untuk mengetahui informasi selengkapnya tentang cara menyiapkan server OAuth, lihat Menerapkan server OAuth 2.0.
- Buat integrasi cloud-ke-cloud. Untuk membuat integrasi, ikuti petunjuk di Membuat integrasi Cloud-to-cloud.
Mengonfigurasi Peralihan Aplikasi di Konsol Developer
Bagian berikut menjelaskan cara mengonfigurasi fitur Ganti Aplikasi di Konsol Developer.
- Isi semua kolom di bagian Informasi Klien OAuth. (Jika App Flip tidak didukung, OAuth reguler akan digunakan sebagai pengganti.)
- Di bagian Gunakan aplikasi Anda untuk penautan akun(opsional), centang Aktifkan untuk iOS.
- Isi kolom Universal Link. Untuk informasi selengkapnya tentang link universal, lihat Mengizinkan Aplikasi dan Situs Menautkan ke Konten Anda.
- Jika Anda ingin mengonfigurasi klien secara opsional, tambahkan cakupan dan klik Tambahkan cakupan di bagian Konfigurasi klien Anda (opsional).
- Klik Simpan.
Sekarang Anda dapat melanjutkan ke bagian berikutnya untuk menerapkan App Flip di aplikasi iOS atau Android Anda.
Menerapkan App Flip di aplikasi native Anda
Untuk menerapkan App Flip, Anda perlu mengubah kode otorisasi pengguna di aplikasi Anda agar dapat menerima deep link dari Google.
Menguji App Flip di perangkat Anda
Setelah membuat integrasi Cloud-to-cloud dan mengonfigurasi fitur Pergantian Aplikasi di konsol dan di aplikasi, Anda dapat menguji fitur Pergantian Aplikasi di perangkat seluler. Anda dapat menggunakan aplikasi Google Home untuk menguji fitur Pergantian Aplikasi.
Untuk menguji App Flip dari aplikasi Google Home, ikuti langkah-langkah berikut:
- Buka Konsol Developer, lalu pilih project Anda.
- Buka Cloud-to-cloud > Test.
- Memicu alur penautan akun dari aplikasi Home:
- Buka Google Home app (GHA).
- Klik tombol +.
- Klik Siapkan perangkat.
- Klik Sudah menyiapkan sesuatu?
- Pilih Integrasi cloud-ke-cloud Anda dari daftar penyedia. Aplikasi ini akan diawali dengan “[test]” dalam daftar. Saat Anda memilih integrasi [test] dari daftar, aplikasi Anda akan terbuka.
- Pastikan aplikasi Anda diluncurkan dan mulai menguji alur otorisasi Anda.