
Every Cloud-to-cloud integration must include a mechanism for authenticating users.
Authentication allows you to link your users' Google accounts with user accounts in your authentication system. This allows you to identify your users when your fulfillment receives a smart home intent. Google smart home only supports OAuth with an authorization code flow.
This page describes how to set up your OAuth 2.0 server so that it works with your Cloud-to-cloud integration.
Google Account Linking with OAuth
In the authorization code flow, you need two endpoints:
The authorization endpoint, which presents the sign-in UI to your users that aren't already signed in. The authorization endpoint also creates a short-lived authorization code to record users' consent to the requested access.
The token exchange endpoint, which is responsible for two types of exchanges:
- Exchanges an authorization code for a long-lived refresh token and a short-lived access token. This exchange happens when the user goes through the account linking flow.
- Exchanges a long-lived refresh token for a short-lived access token. This exchange happens when Google needs a new access token because the one it had expired.
Design guidelines
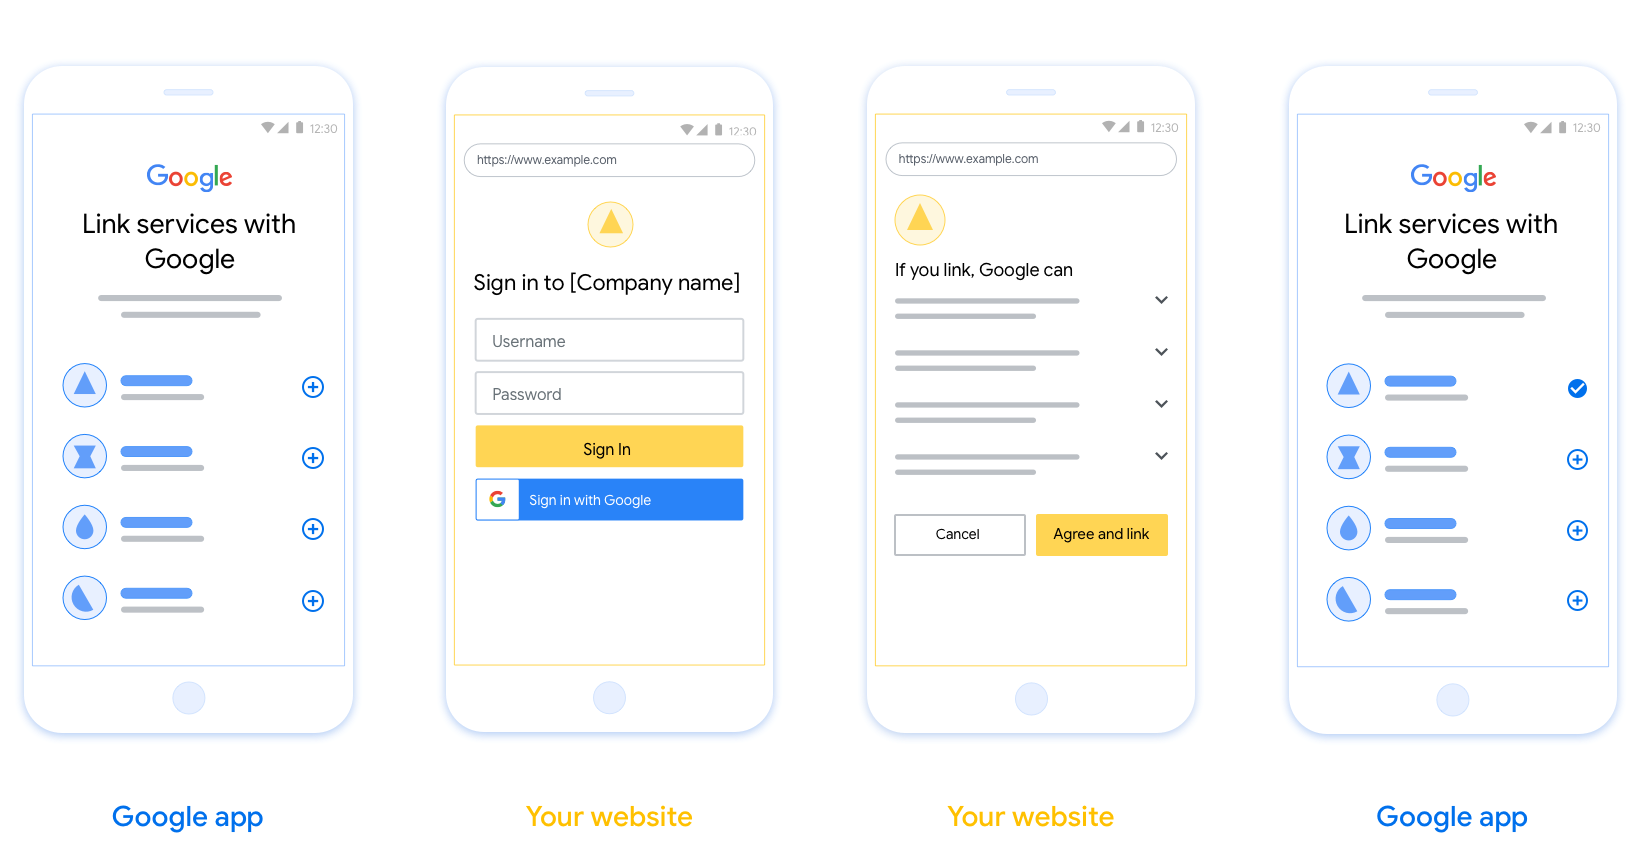
This section describes the design requirements and recommendations for the user screen that you host for OAuth linking flows. After it's called by Google's app, your platform displays a sign in to Google page and account linking consent screen to the user. The user is directed back to Google's app after giving their consent to link accounts.
Requirements
- You must communicate that the user’s account will be linked to Google, not a specific Google product like Google Home or Google Assistant.
- You must have a Google authorization statement such as "By signing in, you are authorizing Google to control your devices." See the Google Device Control Authorization section of the Google Home Developer Policies.
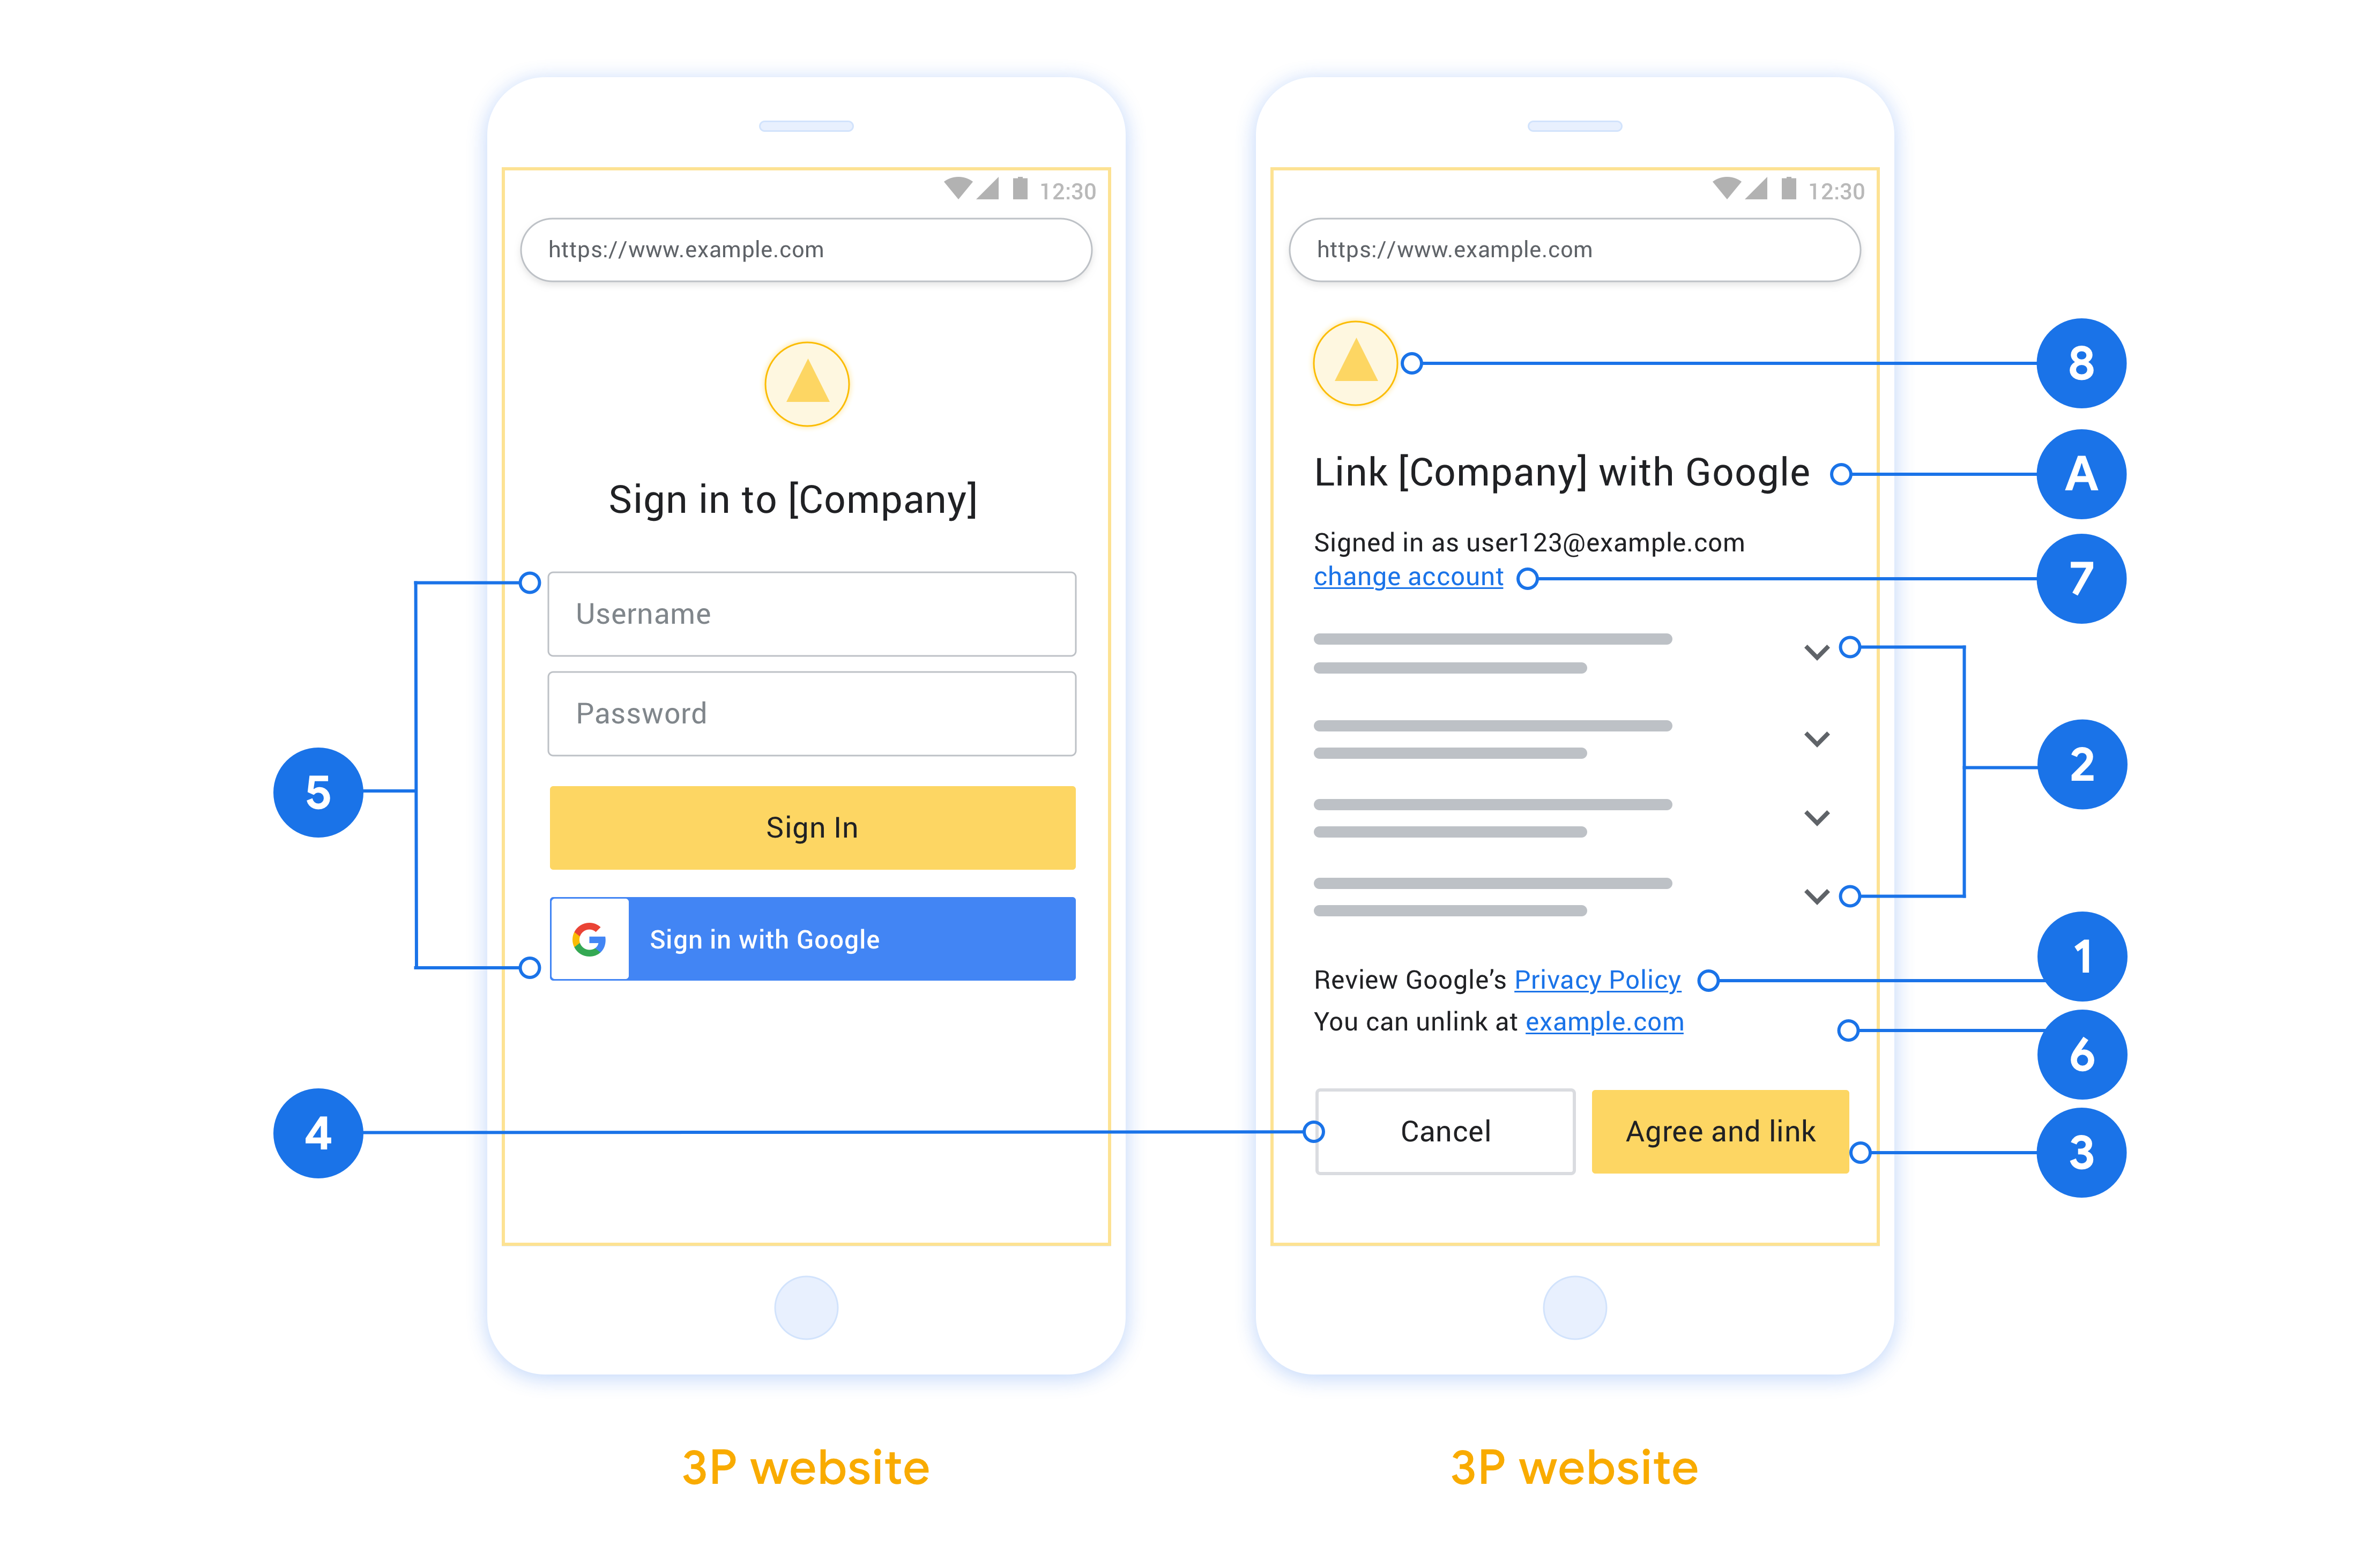
- You must open the Web OAuth linking page and ensure users have a clear method for signing in to their Google Account, such as fields for their username and password. Don't use the Google Sign-In (GSI) method that enables users to link without being taken to the Web OAuth Linking page. It is a violation of Google policy.
- You must include at least one of the following items in the OAuth linking
page to indicate the integration to which the user is linking:
- Company logo
- Company name
- Integration name
- App icon
Recommendations
We recommend that you do the following:
Display Google's Privacy Policy. Include a link to Google’s Privacy Policy on the consent screen.
Data to be shared. Use clear and concise language to tell the user what data of theirs Google requires and why, and what usage or interaction data may be shared with you by Google.
Clear call-to-action. State a clear call-to-action on your consent screen, such as “Agree and link.” This is because users need to understand what data they're required to share with Google to link their accounts.
Ability to cancel. Provide a way for users to go back or cancel, if they choose not to link.
Clear sign-in process. Ensure that users have a clear method for signing in to their Google Account, such as fields for their username and password or Sign in with Google.
Ability to unlink. Offer a mechanism for users to unlink, such as a URL to their account settings on your platform. Alternatively, you can include a link to Google Account where users can manage their linked account. If a user unlinks from your integration, use
agentUsers.deleteto notify Google of the change.Ability to change user account. Suggest a method for users to switch their account(s). This is especially beneficial if users tend to have multiple accounts.
- If a user must close the consent screen to switch accounts, send a recoverable error to Google so the user can sign in to the desired account with OAuth linking.
Include your logo. Display your company logo on the consent screen. Use your style guidelines to place your logo. If you wish to also display Google's logo, see Logos and trademarks.
Authorization code flow
An OAuth 2.0 server implementation of the authorization code flow consists of two endpoints, which your service makes available by HTTPS. The first endpoint is the authorization endpoint, which is responsible for finding or obtaining consent from users for data access. The authorization endpoint presents a sign-in UI to your users that aren't already signed in and records consent to the requested access. The second endpoint is the token exchange endpoint, which is used to obtain encrypted strings, called tokens, that authorize a user to access your service.
When a Google application needs to call one of your service's APIs, Google uses these endpoints together to get permission from your users to call these APIs on their behalf.
An OAuth 2.0 authorization code flow session initiated by Google has the following flow:
- Google opens your authorization endpoint in the user's browser. If the flow started on a voice-only device for an Action, Google transfers the execution to a phone.
- The user signs in, if not signed in already, and grants Google permission to access their data with your API, if they haven't already granted permission.
- Your service creates an authorization code and returns it to Google. To do so, redirect the user's browser back to Google with the authorization code attached to the request.
- Google sends the authorization code to your token exchange endpoint, which verifies the authenticity of the code and returns an access token and a refresh token. The access token is a short-lived token that your service accepts as credentials to access APIs. The refresh token is a long-lived token that Google can store and use to acquire new access tokens when they expire.
- After the user has completed the account linking flow, every subsequent request sent from Google contains an access token.
Handle authorization requests
When you need to perform account linking using the OAuth 2.0 authorization code flow, Google sends the user to your authorization endpoint with a request that includes the following parameters:
| Authorization endpoint parameters | |
|---|---|
client_id |
The Client ID you assigned to Google. |
redirect_uri |
The URL to which you send the response to this request. |
state |
A bookkeeping value that is passed back to Google unchanged in the redirect URI. |
scope |
Optional: A space-delimited set of scope strings that specify the data Google is requesting authorization for. |
response_type |
The type of value to return in the response. For the OAuth 2.0
authorization code flow, the response type is always code.
|
For example, if your authorization endpoint is available at
https://myservice.example.com/auth, a request might look like the following:
GET https://myservice.example.com/auth?client_id=GOOGLE_CLIENT_ID&redirect_uri=REDIRECT_URI&state=STATE_STRING&scope=REQUESTED_SCOPES&response_type=code
For your authorization endpoint to handle sign-in requests, do the following steps:
- Verify that the
client_idmatches the Client ID you assigned to Google, and that theredirect_urimatches the redirect URL provided by Google for your service. These checks are important to prevent granting access to unintended or misconfigured client apps. If you support multiple OAuth 2.0 flows, also confirm that theresponse_typeiscode. - Check if the user is signed in to your service. If the user isn't signed in, complete your service's sign-in or sign-up flow.
- Generate an authorization code for Google to use to access your API. The authorization code can be any string value, but it must uniquely represent the user, the client the token is for, and the code's expiration time, and it must not be guessable. You typically issue authorization codes that expire after approximately 10 minutes.
- Confirm that the URL specified by the
redirect_uriparameter has the following form:https://oauth-redirect.googleusercontent.com/r/YOUR_PROJECT_ID https://oauth-redirect-sandbox.googleusercontent.com/r/YOUR_PROJECT_ID
- Redirect the user's browser to the URL specified by the
redirect_uriparameter. Include the authorization code you just generated and the original, unmodified state value when you redirect by appending thecodeandstateparameters. The following is an example of the resulting URL:https://oauth-redirect.googleusercontent.com/r/YOUR_PROJECT_ID?code=AUTHORIZATION_CODE&state=STATE_STRING
Handle token exchange requests
Your service's token exchange endpoint is responsible for two kinds of token exchanges:
- Exchange authorization codes for access tokens and refresh tokens
- Exchange refresh tokens for access tokens
Token exchange requests include the following parameters:
| Token exchange endpoint parameters | |
|---|---|
client_id |
A string that identifies the request origin as Google. This string must be registered within your system as Google's unique identifier. |
client_secret |
A secret string that you registered with Google for your service. |
grant_type |
The type of token being exchanged. It's either
authorization_code or refresh_token. |
code |
When grant_type=authorization_code, this parameter is the
code Google received from either your sign-in or token exchange
endpoint. |
redirect_uri |
When grant_type=authorization_code, this parameter is the
URL used in the initial authorization request. |
refresh_token |
When grant_type=refresh_token, this parameter is the
refresh token Google received from your token exchange endpoint. |
Configure how Google sends credentials to your server
Depending on its implementation, your authorization server expects to receive client credentials either in the request body, or in the request header.
By default, Google sends the credentials in the request body. If your authorization server requires the client credentials to be in the request header, you must configure your Cloud-to-cloud integration accordingly:
From the list of projects, click Open next to the project you want to work with.
Under Cloud-to-Cloud, select Develop.
Click Open next your integration.
Scroll down to the Permissions (optional) section and select the Have Google transmit Client ID and secret via HTTP basic auth header checkbox.
Click Save to save your changes.
Exchange authorization codes for access tokens and refresh tokens
After the user signs in and your authorization endpoint returns a short-lived authorization code to Google, Google sends a request to your token exchange endpoint to exchange the authorization code for an access token and a refresh token.
For these requests, the value of grant_type is authorization_code, and the
value of code is the value of the authorization code you previously granted
to Google. The following is an example of a request to exchange an
authorization code for an access token and a refresh token:
POST /token HTTP/1.1
Host: oauth2.example.com
Content-Type: application/x-www-form-urlencoded

client_id=GOOGLE_CLIENT_ID&client_secret=GOOGLE_CLIENT_SECRET&grant_type=authorization_code&code=AUTHORIZATION_CODE&redirect_uri=REDIRECT_URI
To exchange authorization codes for an access token and a refresh token, your
token exchange endpoint responds to POST requests by executing the following
steps:
- Verify that the
client_ididentifies the request origin as an authorized origin, and that theclient_secretmatches the expected value. - Verify that the authorization code is valid and not expired, and that the client ID specified in the request matches the client ID associated with the authorization code.
- Confirm that the URL specified by the
redirect_uriparameter is identical to the value used in the initial authorization request. - If you can't verify all of the above criteria, return an HTTP
400 Bad Request error with
{"error": "invalid_grant"}as the body. - Otherwise, use the user ID from the authorization code to generate a refresh token and an access token. These tokens can be any string value, but they must uniquely represent the user and the client the token is for, and they must not be guessable. For access tokens, also record the expiration time of the token, which is typically an hour after you issue the token. Refresh tokens don't expire.
- Return the following JSON object in the body of the HTTPS response:
{
"token_type": "Bearer",
"access_token": "ACCESS_TOKEN",
"refresh_token": "REFRESH_TOKEN",
"expires_in": SECONDS_TO_EXPIRATION
}
Google stores the access token and the refresh token for the user and records the expiration of the access token. When the access token expires, Google uses the refresh token to get a new access token from your token exchange endpoint.
Exchange refresh tokens for access tokens
When an access token expires, Google sends a request to your token exchange endpoint to exchange a refresh token for a new access token.
For these requests, the value of grant_type is refresh_token, and the value
of refresh_token is the value of the refresh token you previously granted to
Google. The following is an example of a request to exchange a refresh token
for an access token:
POST /token HTTP/1.1
Host: oauth2.example.com
Content-Type: application/x-www-form-urlencoded

client_id=GOOGLE_CLIENT_ID&client_secret=GOOGLE_CLIENT_SECRET&grant_type=refresh_token&refresh_token=REFRESH_TOKEN
To exchange a refresh token for an access token, your token exchange endpoint
responds to POST requests by executing the following steps:
- Verify that the
client_ididentifies the request origin as Google, and that theclient_secretmatches the expected value. - Verify that the refresh token is valid, and that the client ID specified in the request matches the client ID associated with the refresh token.
- If you can't verify all of the above criteria, return an HTTP 400
Bad Request error with
{"error": "invalid_grant"}as the body. - Otherwise, use the user ID from the refresh token to generate an access token. These tokens can be any string value, but they must uniquely represent the user and the client the token is for, and they must not be guessable. For access tokens, also record the expiration time of the token, typically an hour after you issue the token.
- Return the following JSON object in the body of the HTTPS
response:
{
"token_type": "Bearer",
"access_token": "ACCESS_TOKEN",
"expires_in": SECONDS_TO_EXPIRATION
}
Handle userinfo requests
The userinfo endpoint is an OAuth 2.0 protected resource that return claims about the linked user. Implementing and hosting the userinfo endpoint is optional, except for the following use cases:
- Linked Account Sign-In with Google One Tap.
- Frictionless subscription on AndroidTV.
After the access token has been successfully retrieved from your token endpoint, Google sends a request to your userinfo endpoint to retrieve basic profile information about the linked user.
| userinfo endpoint request headers | |
|---|---|
Authorization header |
The access token of type Bearer. |
For example, if your userinfo endpoint is available at
https://myservice.example.com/userinfo, a request might look like the following:
GET /userinfo HTTP/1.1
Host: myservice.example.com
Authorization: Bearer ACCESS_TOKEN
For your userinfo endpoint to handle requests, do the following steps:
- Extract access token from the Authorization header and return information for the user associated with the access token.
- If the access token is invalid, return an HTTP 401 Unauthorized error with using the
WWW-AuthenticateResponse Header. Below is an example of a userinfo error response:HTTP/1.1 401 Unauthorized WWW-Authenticate: error="invalid_token", error_description="The Access Token expired"
If the access token is valid, return and HTTP 200 response with the following JSON object in the body of the HTTPS response:
{ "sub": "USER_UUID", "email": "EMAIL_ADDRESS", "given_name": "FIRST_NAME", "family_name": "LAST_NAME", "name": "FULL_NAME", "picture": "PROFILE_PICTURE", }userinfo endpoint response subA unique ID that identifies the user in your system. emailEmail address of the user. given_nameOptional: First name of the user. family_nameOptional: Last name of the user. nameOptional: Full name of the user. pictureOptional: Profile picture of the user.