
เมื่อติดตั้งใช้งาน OAuth 2.0 แล้ว คุณจะกำหนดค่า App Flip ที่อิงตาม OAuth ได้ (ไม่บังคับ) ซึ่งจะช่วยให้ผู้ใช้ Android ลิงก์บัญชีในระบบการตรวจสอบสิทธิ์กับบัญชี Google ได้เร็วขึ้น ส่วนต่อไปนี้ อธิบายวิธีออกแบบและติดตั้งใช้งาน App Flip สำหรับการผสานรวม Cloud-to-cloud
หลักเกณฑ์การออกแบบ
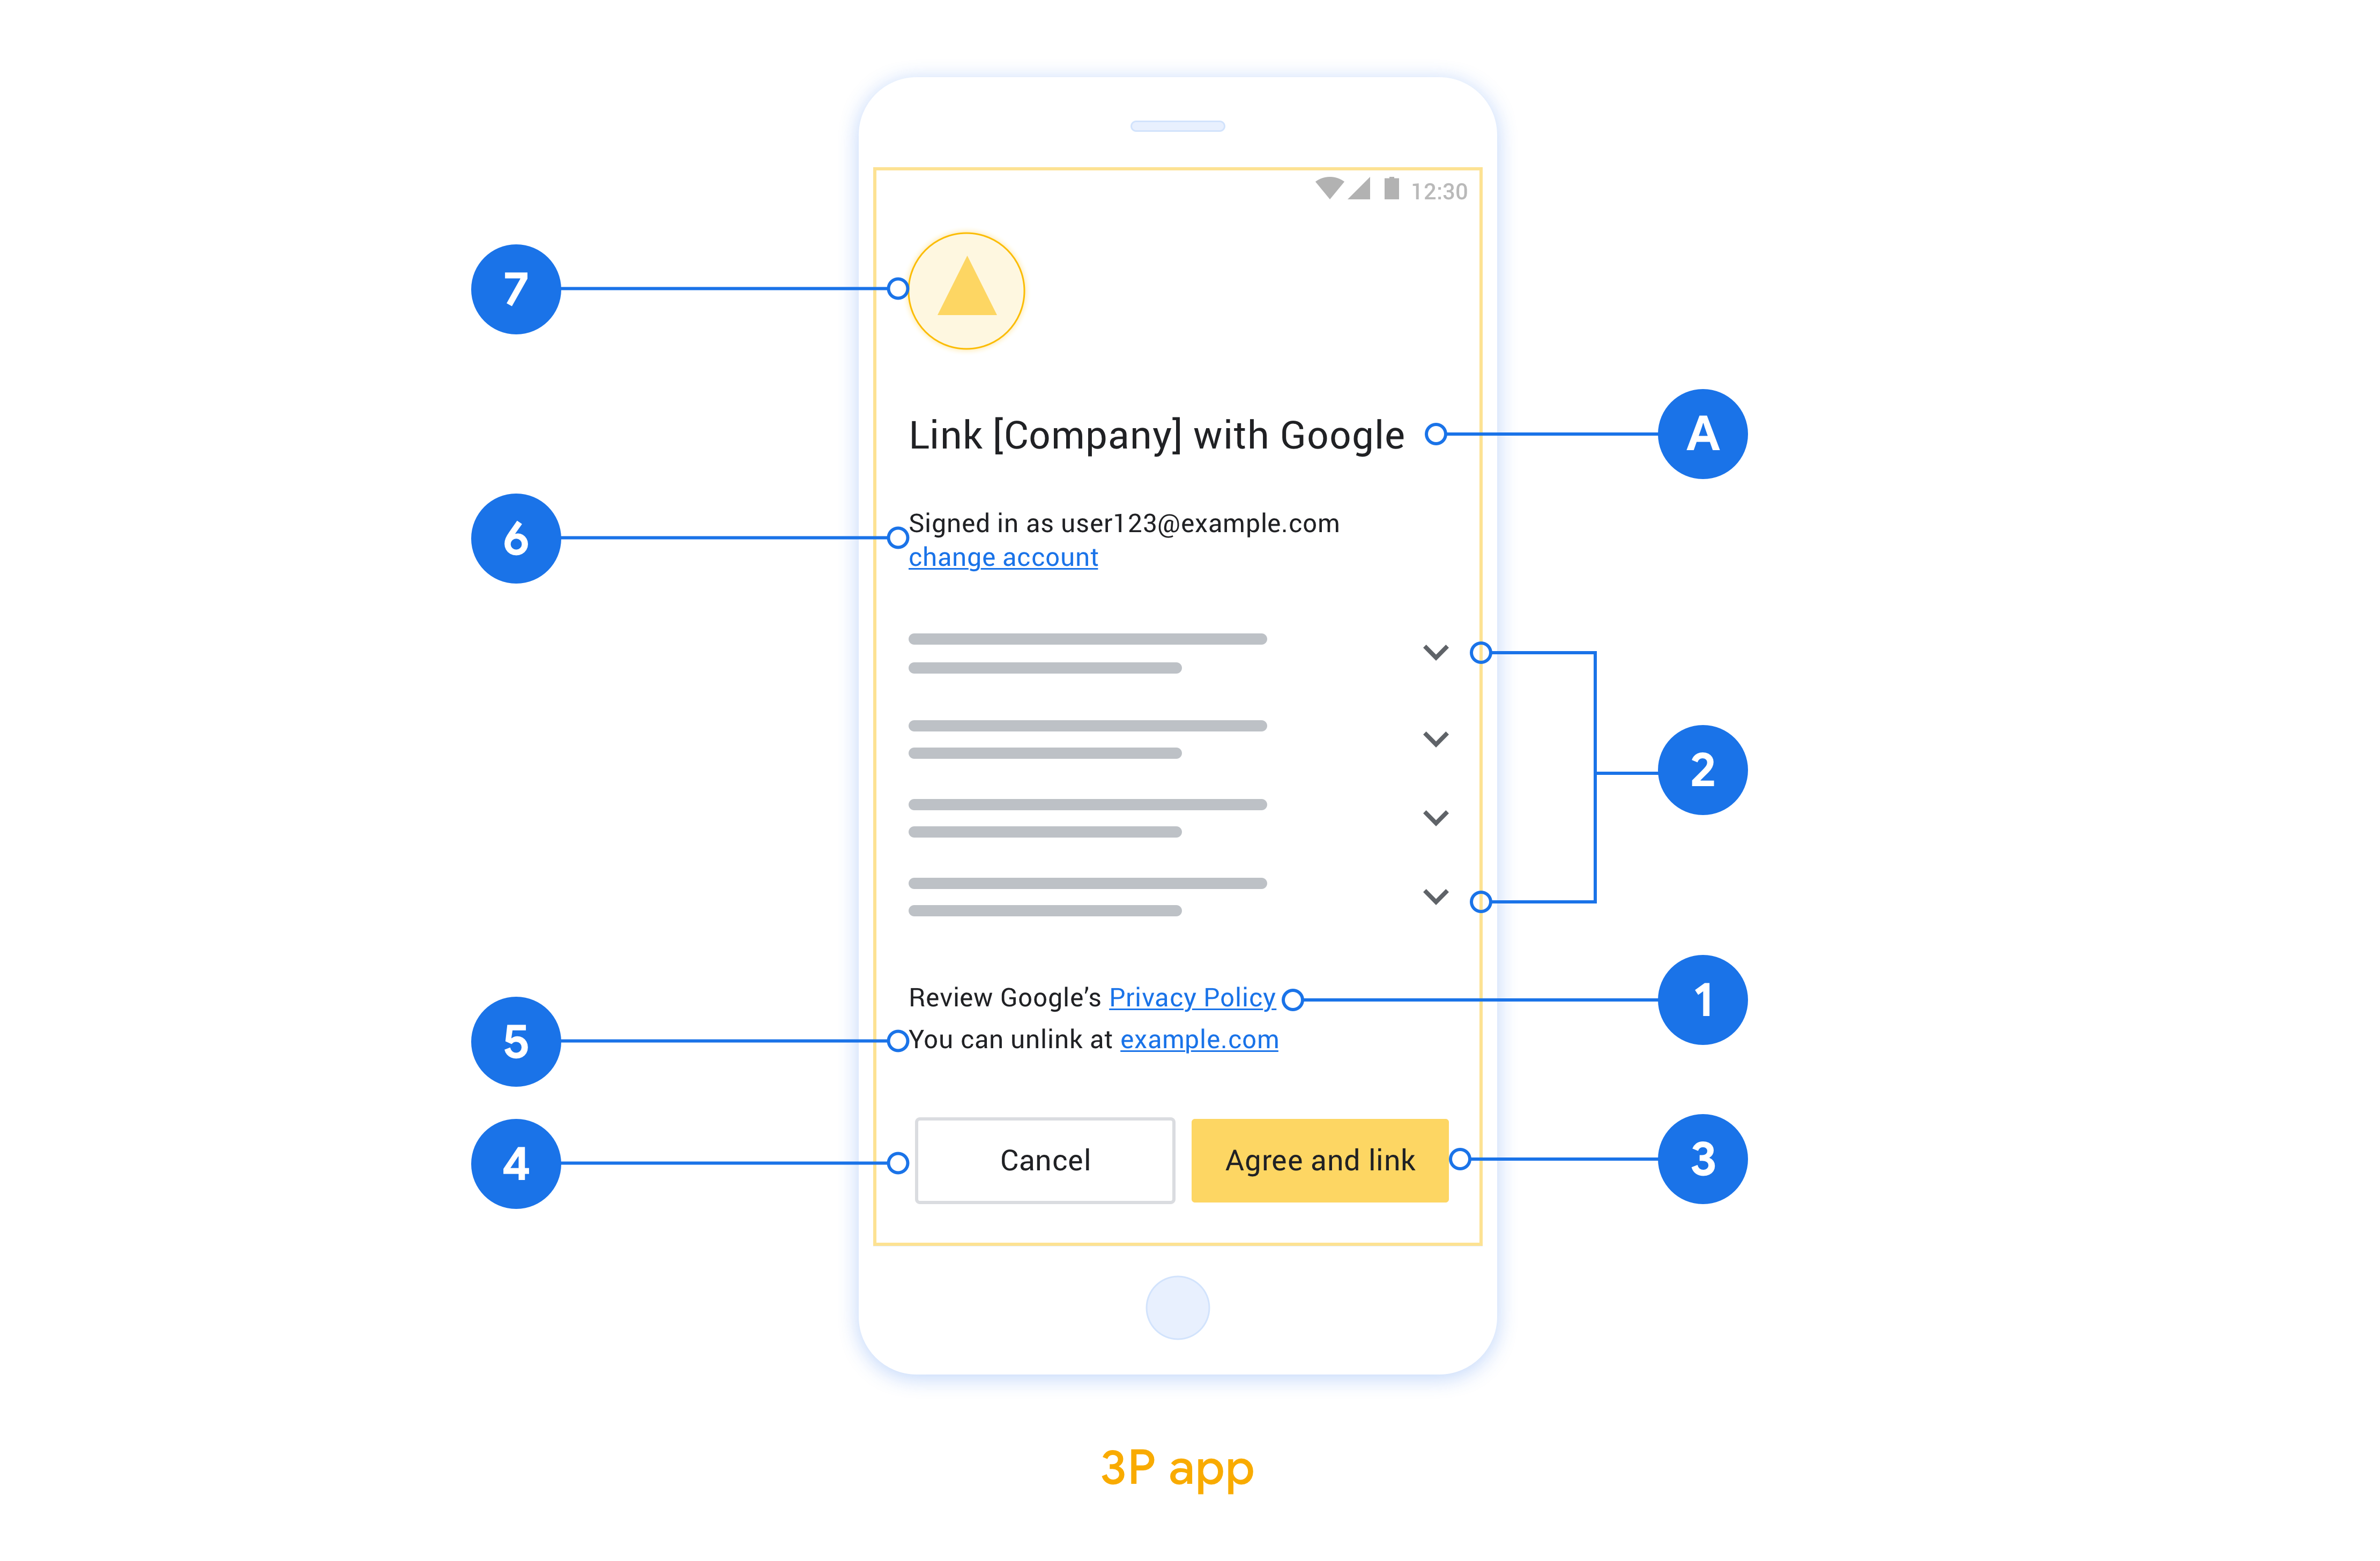
ส่วนนี้อธิบายข้อกำหนดและคำแนะนำในการออกแบบหน้าจอขอความยินยอมในการลิงก์บัญชี App Flip หลังจากที่ Google เรียกใช้แอปของคุณแล้ว แอปจะแสดงหน้าจอขอความยินยอมต่อผู้ใช้
ข้อกำหนด
- คุณต้องมีข้อความการให้สิทธิ์ของ Google เช่น "เมื่อลิงก์แล้ว Google จะมีสิทธิ์ควบคุมอุปกรณ์ของคุณ"
- คุณต้องแจ้งให้ผู้ใช้ทราบว่าบัญชีของผู้ใช้จะลิงก์กับ Google ไม่ใช่ผลิตภัณฑ์ Google ที่เฉพาะเจาะจง เช่น Google Home หรือ Google Assistant
- คุณต้องระบุคำกระตุ้นให้ดำเนินการที่ชัดเจนในหน้าจอความยินยอม และใช้คำว่า "ยอมรับและลิงก์" สำหรับการดำเนินการลิงก์ เนื่องจาก ผู้ใช้ต้องเข้าใจว่าตนเองต้องแชร์ข้อมูลใดกับ Google เพื่อ ลิงก์บัญชี
- คุณต้องระบุวิธีให้ผู้ใช้ย้อนกลับ ปฏิเสธ หรือยกเลิก หากผู้ใช้เลือกที่จะไม่ลิงก์ ใช้คำว่า "ยกเลิก" สำหรับการดำเนินการยกเลิก
- คุณต้องใช้เวิร์กโฟลว์นี้: หลังจากคลิก "ยอมรับและลิงก์" คุณต้องแสดงการลิงก์สำเร็จและเปลี่ยนเส้นทางผู้ใช้กลับไปที่แอป Google Home โดยอัตโนมัติ ตอนนี้ผู้ใช้ควรเห็นอุปกรณ์ที่ลิงก์ในแอป Google Home พร้อมกับการดำเนินการของคุณ หลังจากคลิก "ยกเลิก" คุณควรเปลี่ยนเส้นทางผู้ใช้ กลับไปที่แอป Google Home
คำแนะนำ
เราขอแนะนำให้คุณทำดังนี้
แสดงนโยบายความเป็นส่วนตัวของ Google ระบุลิงก์ไปยังนโยบายความเป็นส่วนตัวของ Google ในหน้าจอขอความยินยอม
ข้อมูลที่จะแชร์ ใช้ภาษาที่ชัดเจนและกระชับเพื่อบอกผู้ใช้ว่า Google ต้องการข้อมูลใดของผู้ใช้และเพราะเหตุใด
ความสามารถในการยกเลิกการลิงก์ มีกลไกให้ผู้ใช้ยกเลิกการลิงก์ เช่น URL ไปยังการตั้งค่าบัญชีในแพลตฟอร์มของคุณ หรือคุณจะใส่ลิงก์ไปยังบัญชี Google ที่ผู้ใช้ สามารถจัดการบัญชีที่ลิงก์ได้ก็ได้
ความสามารถในการเปลี่ยนบัญชีผู้ใช้ แนะนำวิธีให้ผู้ใช้เปลี่ยน บัญชี ซึ่งจะเป็นประโยชน์อย่างยิ่งหากผู้ใช้มีแนวโน้มที่จะมี หลายบัญชี
- หากผู้ใช้ต้องปิดหน้าจอขอความยินยอมเพื่อเปลี่ยนบัญชี ให้ส่งข้อผิดพลาดที่กู้คืนได้ไปยัง Google เพื่อให้ผู้ใช้ลงชื่อเข้าใช้บัญชีที่ต้องการได้ด้วยการลิงก์ OAuth และโฟลว์โดยนัย
ใส่โลโก้ของคุณ แสดงโลโก้บริษัทในหน้าจอคำยินยอม ใช้หลักเกณฑ์ด้านสไตล์เพื่อวางโลโก้ หากต้องการแสดงโลโก้ของ Google ด้วย โปรดดูโลโก้และเครื่องหมายการค้า
ตั้งค่าสำหรับ App Flip ที่ใช้ OAuth
ส่วนต่อไปนี้จะอธิบายข้อกำหนดเบื้องต้นสำหรับ App Flip ที่อิงตาม OAuth และวิธีกำหนดค่าโปรเจ็กต์ App Flip ใน Google Home Developer Console
สร้างการผสานรวมแบบคลาวด์ต่อคลาวด์และตั้งค่าเซิร์ฟเวอร์ OAuth 2.0
คุณต้องทำสิ่งต่อไปนี้ก่อนจึงจะกำหนดค่า App Flip ได้
- ตั้งค่าเซิร์ฟเวอร์ OAuth 2.0 ดูข้อมูลเพิ่มเติมเกี่ยวกับการตั้งค่าเซิร์ฟเวอร์ OAuth ได้ที่ติดตั้งใช้งานเซิร์ฟเวอร์ OAuth 2.0
- สร้างการผสานรวมแบบคลาวด์ต่อคลาวด์ หากต้องการสร้างการผสานรวม ให้ทำตามวิธีการใน สร้างการผสานรวมแบบคลาวด์ต่อคลาวด์
กำหนดค่า App Flip ในคอนโซลนักพัฒนาแอป
ส่วนต่อไปนี้จะอธิบายวิธีกำหนดค่า App Flip ใน Developer Console
- กรอกข้อมูลในช่องทั้งหมดในส่วนข้อมูลไคลเอ็นต์ OAuth (หากไม่รองรับ App Flip ระบบจะใช้ OAuth ปกติเป็นข้อมูลสำรอง)
- ในส่วนใช้แอปของคุณเพื่อลิงก์บัญชี(ไม่บังคับ) ให้เลือกเปิดใช้สำหรับ iOS
- กรอกข้อมูลในช่องUniversal Link ดูข้อมูลเพิ่มเติม เกี่ยวกับ Universal Link ได้ที่ การอนุญาตให้แอปและเว็บไซต์ลิงก์ไปยังเนื้อหาของคุณ
- หากต้องการกำหนดค่าไคลเอ็นต์โดยไม่บังคับ ให้เพิ่มขอบเขต แล้วคลิกเพิ่มขอบเขตในส่วนกำหนดค่าไคลเอ็นต์ (ไม่บังคับ)
- คลิกบันทึก
ตอนนี้คุณก็ไปที่ส่วนถัดไปเพื่อใช้ App Flip ในแอป iOS หรือ Android ได้แล้ว
ใช้ App Flip ในแอปที่มาพร้อมเครื่อง
หากต้องการใช้ App Flip คุณต้องแก้ไขรหัสการให้สิทธิ์ผู้ใช้ในแอปเพื่อยอมรับ Deep Link จาก Google
ทดสอบ App Flip ในอุปกรณ์
ตอนนี้คุณได้สร้างการผสานรวมแบบคลาวด์ทูคลาวด์และกำหนดค่า App Flip ในคอนโซลและ ในแอปแล้ว คุณก็สามารถทดสอบ App Flip ในอุปกรณ์เคลื่อนที่ได้ คุณใช้แอป Google Home เพื่อ ทดสอบ App Flip ได้
หากต้องการทดสอบ App Flip จากแอป Google Home ให้ทำตามขั้นตอนต่อไปนี้
- ไปที่ Developer Console แล้วเลือกโปรเจ็กต์
- ไปที่ระบบคลาวด์ต่อระบบคลาวด์ > ทดสอบ
- ทริกเกอร์ขั้นตอนการลิงก์บัญชีจากแอป Home โดยทำดังนี้
- เปิด Google Home app (GHA)
- คลิกปุ่ม +
- คลิกตั้งค่าอุปกรณ์
- คลิกมีการตั้งค่าบ้างแล้วหรือยัง
- เลือกการผสานรวมแบบคลาวด์ต่อคลาวด์จากรายชื่อผู้ให้บริการ โดยจะ มีคำนำหน้าว่า "[ทดสอบ]" ในรายการ เมื่อคุณเลือกการผสานรวม [test] จากรายการ แอปของคุณควรเปิดขึ้น
- ตรวจสอบว่าแอปเปิดตัวแล้วและเริ่มทดสอบขั้นตอนการให้สิทธิ์