
การผสานรวมแบบ Cloud-to-cloud ทุกรายการต้องมีกลไกในการ ตรวจสอบสิทธิ์ผู้ใช้
การตรวจสอบสิทธิ์ช่วยให้คุณลิงก์บัญชี Google ของผู้ใช้ กับบัญชีผู้ใช้ในระบบการตรวจสอบสิทธิ์ได้ ซึ่งจะช่วยให้คุณระบุผู้ใช้ได้เมื่อ Fulfillment ได้รับ Intent ของสมาร์ทโฮม สมาร์ทโฮมของ Google รองรับเฉพาะ OAuth ที่มี ขั้นตอนรหัสการให้สิทธิ์
หน้านี้อธิบายวิธีตั้งค่าเซิร์ฟเวอร์ OAuth 2.0 เพื่อให้ทำงานร่วมกับ การผสานรวมCloud-to-cloudของคุณได้
การลิงก์บัญชี Google กับ OAuth
ในโฟลว์ รหัสการให้สิทธิ์ คุณต้องมีปลายทาง 2 รายการ ได้แก่
ปลายทาง การให้สิทธิ์ ซึ่งแสดง UI การลงชื่อเข้าใช้แก่ผู้ใช้ที่ยังไม่ได้ลงชื่อเข้าใช้ นอกจากนี้ ปลายทางการให้สิทธิ์ยังสร้างรหัสการให้สิทธิ์แบบชั่วคราวเพื่อบันทึกความยินยอมของผู้ใช้ในการเข้าถึงที่ขอ
ปลายทาง การแลกเปลี่ยนโทเค็น ซึ่งมีหน้าที่รับผิดชอบการแลกเปลี่ยน 2 ประเภท ได้แก่
- แลกรหัสการให้สิทธิ์เป็นโทเค็นการรีเฟรชที่ใช้ได้นานและโทเค็นเพื่อการเข้าถึงที่ใช้ได้ในระยะสั้น การแลกเปลี่ยนนี้จะเกิดขึ้นเมื่อผู้ใช้ทำตามโฟลว์การลิงก์บัญชี
- แลกโทเค็นการรีเฟรชที่ใช้ได้นานเป็นโทเค็นเพื่อการเข้าถึงที่ใช้ได้ในระยะสั้น การแลกเปลี่ยนนี้จะเกิดขึ้นเมื่อ Google ต้องการโทเค็นเพื่อการเข้าถึงใหม่เนื่องจากโทเค็นเดิมหมดอายุ
หลักเกณฑ์การออกแบบ
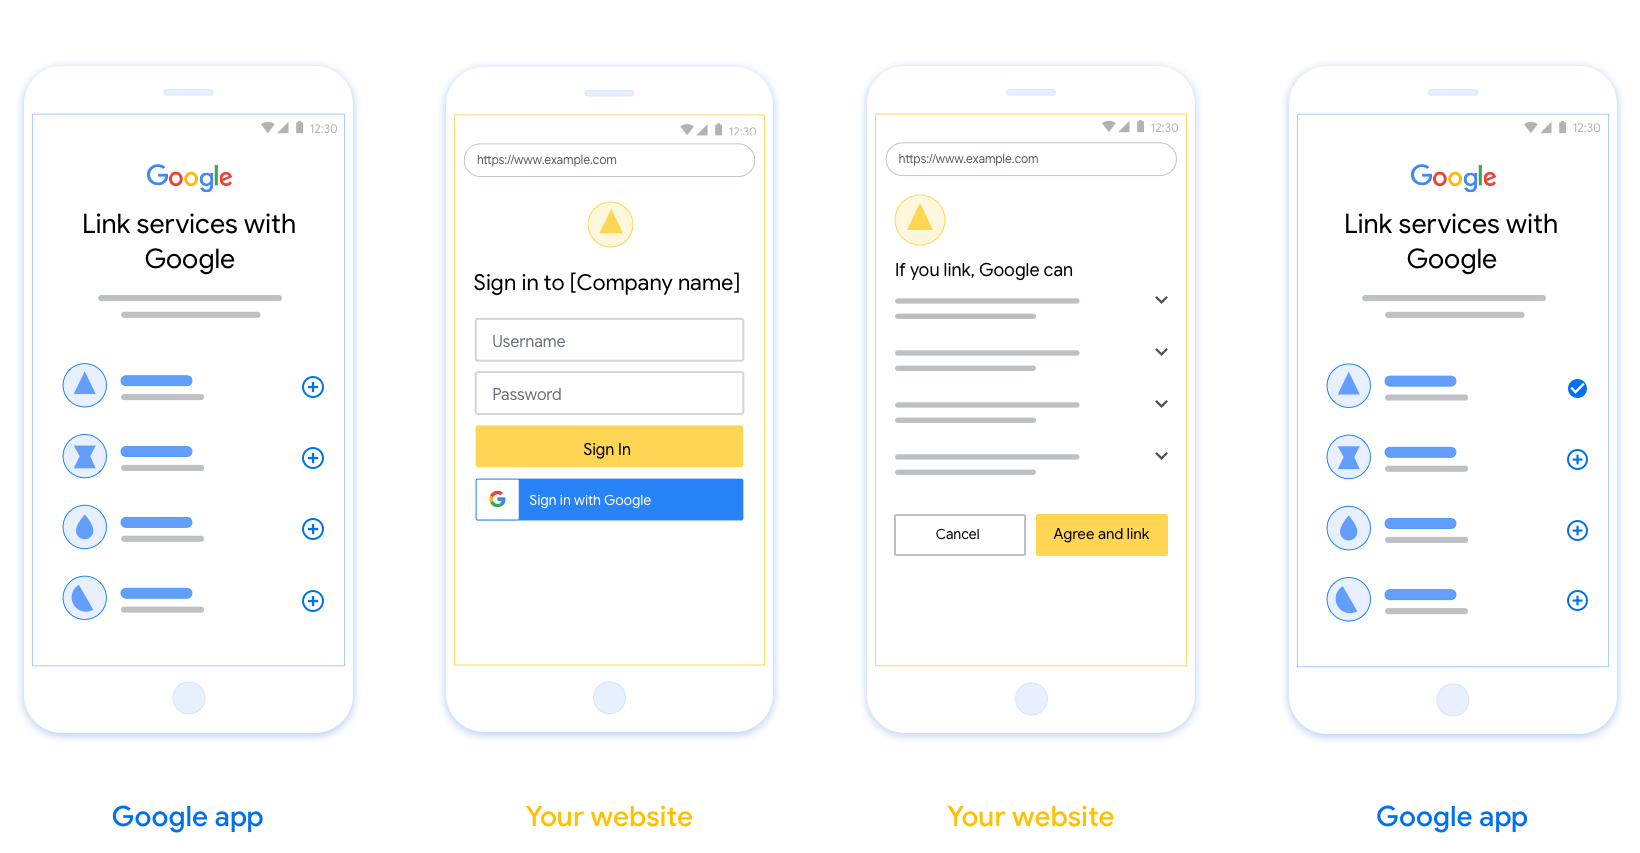
ส่วนนี้อธิบายข้อกำหนดและคำแนะนำในการออกแบบหน้าจอผู้ใช้ที่คุณโฮสต์สำหรับโฟลว์การลิงก์ OAuth หลังจากที่แอปของ Google เรียกแล้ว แพลตฟอร์มของคุณจะแสดงหน้าลงชื่อเข้าใช้ Google และหน้าจอขอความยินยอมในการลิงก์บัญชีให้ผู้ใช้เห็น ระบบจะนำผู้ใช้กลับไปที่แอปของ Google หลังจากที่ผู้ใช้ให้ความยินยอมในการลิงก์บัญชีแล้ว
ข้อกำหนด
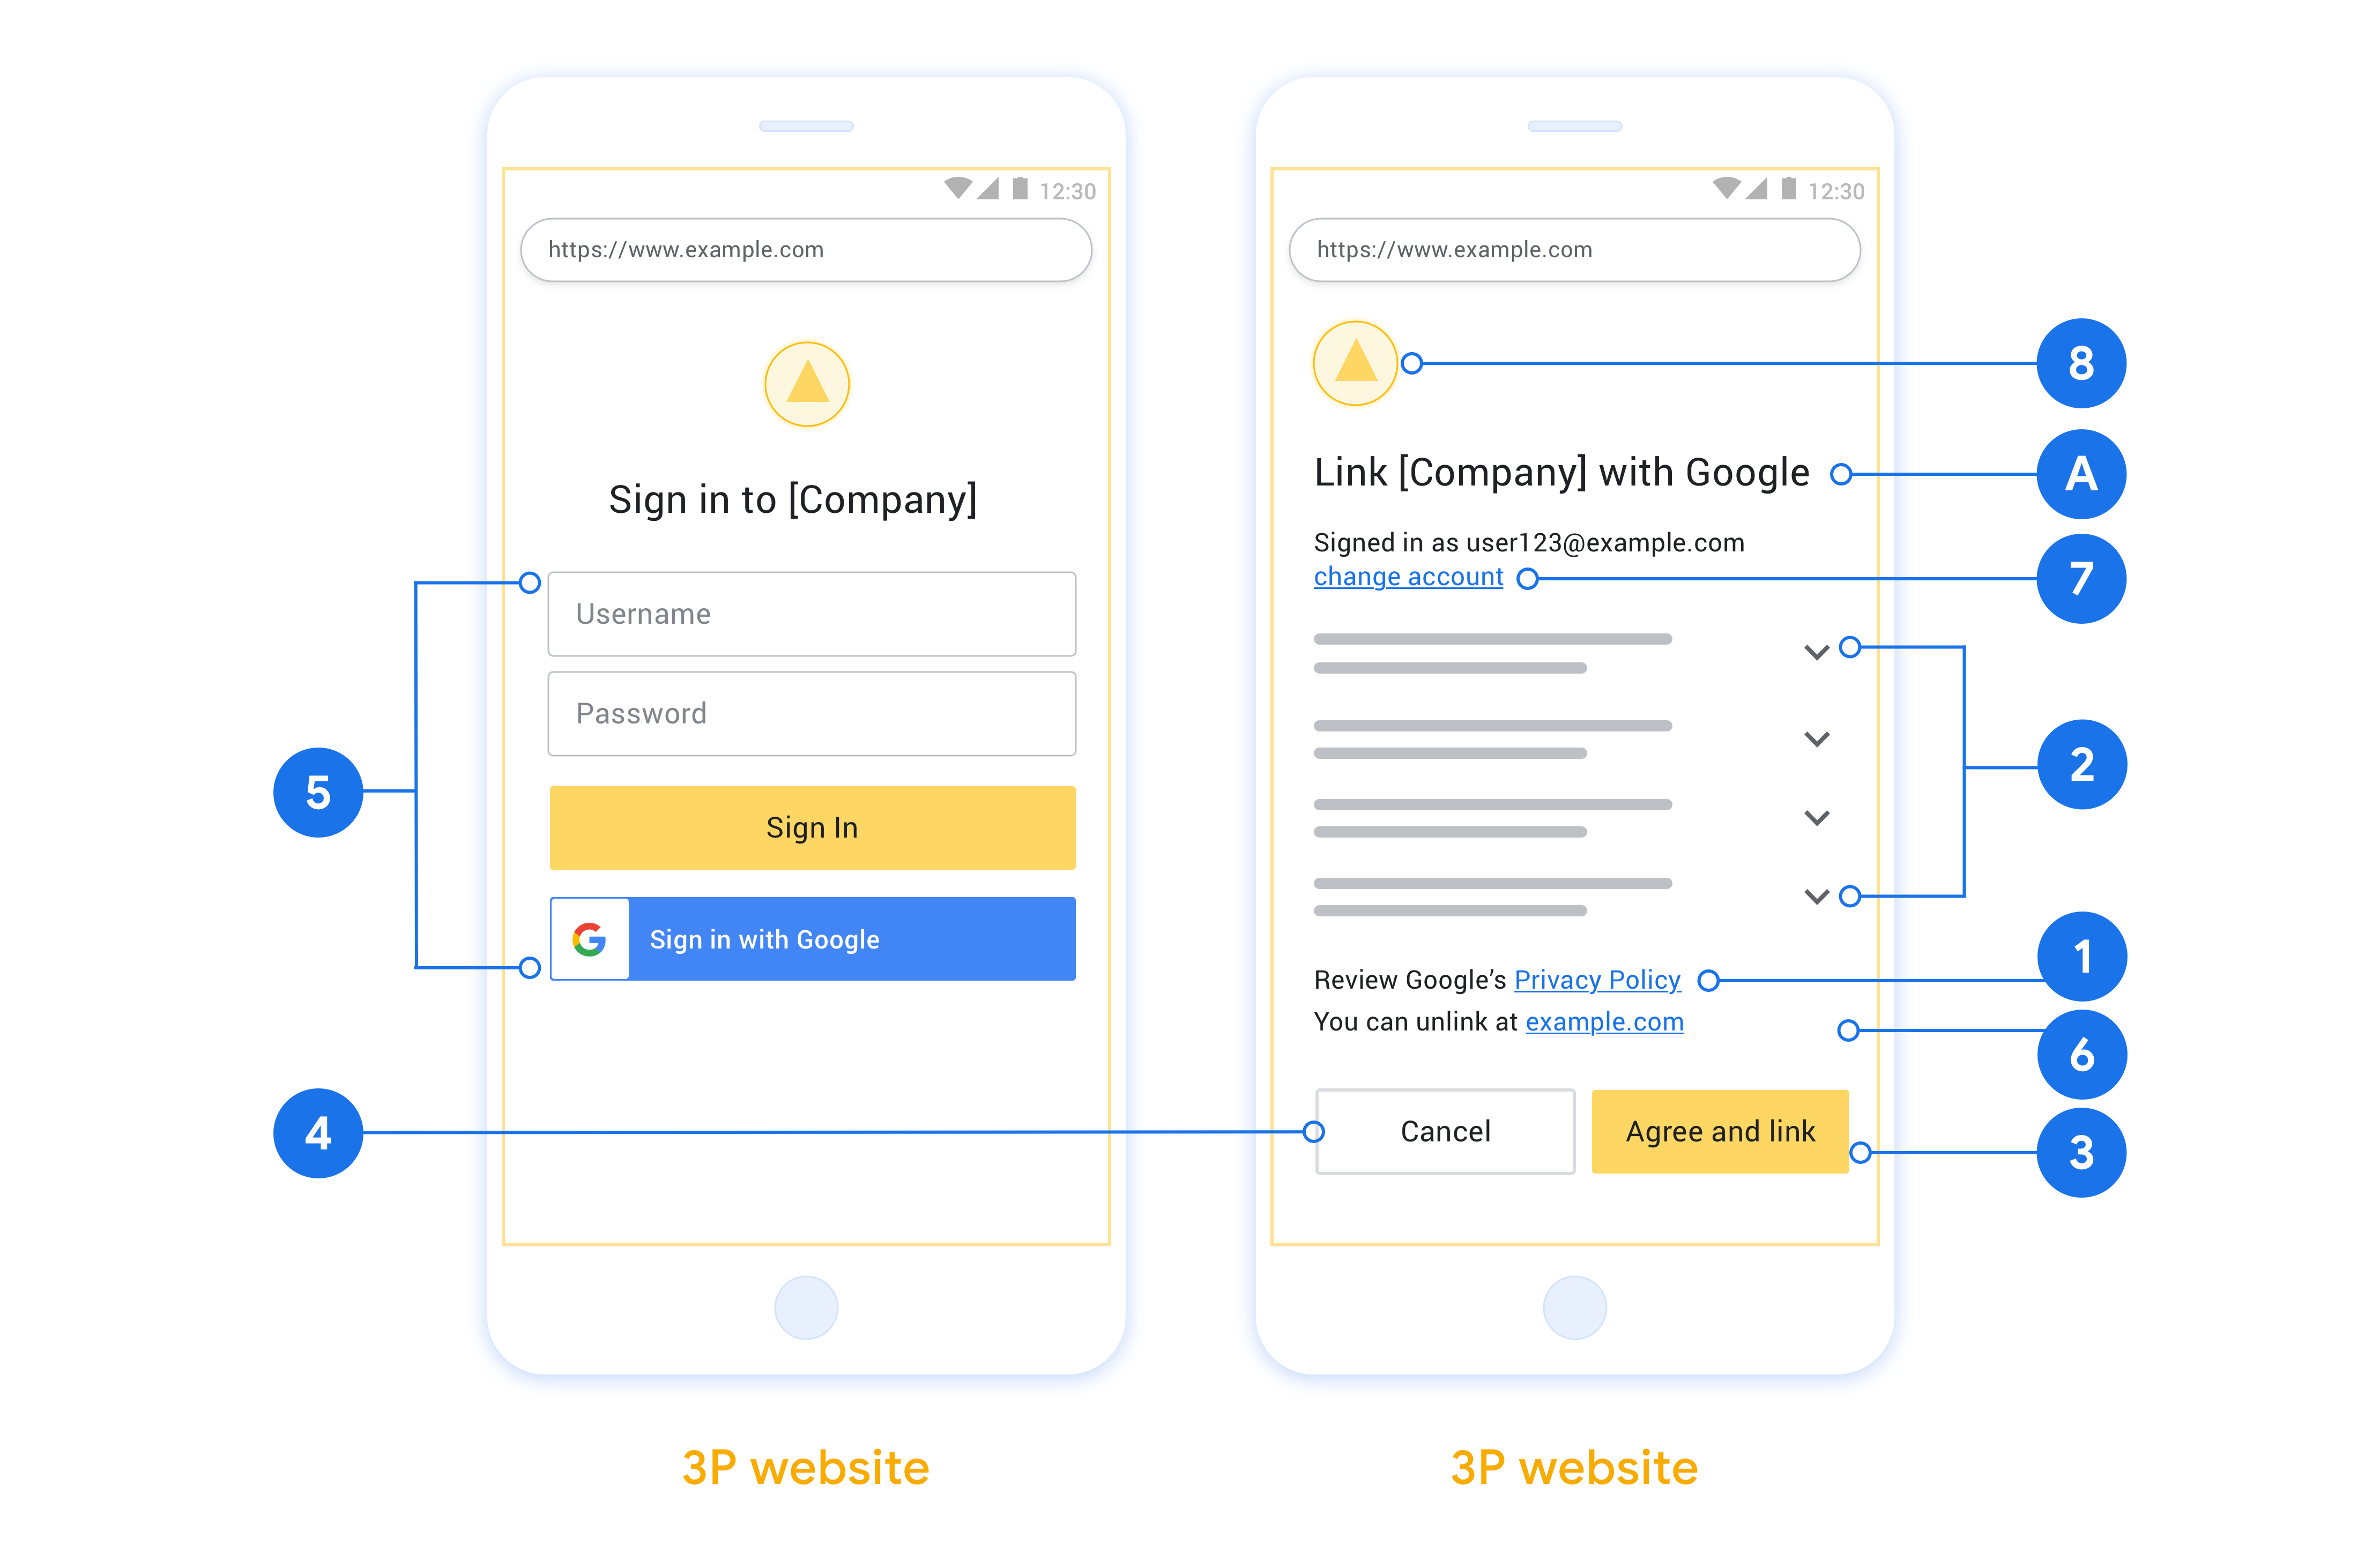
- คุณต้องแจ้งให้ผู้ใช้ทราบว่าระบบจะลิงก์บัญชีของผู้ใช้กับ Google, ไม่ใช่ ผลิตภัณฑ์ที่เฉพาะเจาะจงของ Google เช่น Google Home หรือ Google Assistant
- คุณต้องมีข้อความการให้สิทธิ์ของ Google เช่น "เมื่อลงชื่อเข้าใช้ คุณจะให้สิทธิ์ Google ในการควบคุมอุปกรณ์ของคุณ" ดูส่วนการให้สิทธิ์ควบคุมอุปกรณ์ของ Google ในนโยบายสำหรับนักพัฒนาแอป Google Home
- คุณต้องเปิดหน้าการลิงก์ Web OAuth และตรวจสอบว่าผู้ใช้มีวิธีที่ชัดเจน ในการลงชื่อเข้าใช้บัญชี Google เช่น ช่องสำหรับชื่อผู้ใช้และรหัสผ่าน อย่าใช้วิธีการลงชื่อเข้าใช้ด้วย Google (GSI) ที่ช่วยให้ผู้ใช้ลิงก์ได้โดยไม่ต้องไปที่หน้าการลิงก์ Web OAuth เนื่องจากเป็นการละเมิดนโยบายของ Google
- คุณต้องรวมรายการต่อไปนี้อย่างน้อย 1 รายการในหน้าการลิงก์ OAuth
เพื่อระบุการผสานรวมที่ผู้ใช้กำลังลิงก์:
- โลโก้บริษัท
- ชื่อบริษัท
- ชื่อการผสานรวม
- ไอคอนแอป
คำแนะนำ
เราขอแนะนำให้คุณทำดังนี้
แสดงนโยบายความเป็นส่วนตัวของ Google ใส่ลิงก์ไปยัง นโยบายความเป็นส่วนตัวของ Google ในหน้าจอขอความยินยอม
ข้อมูลที่จะแชร์ ใช้ภาษาที่ชัดเจนและกระชับเพื่อบอกผู้ใช้ว่า Google ต้องการข้อมูลใดของผู้ใช้และเหตุผลที่ต้องการ รวมถึงข้อมูลการใช้งานหรือข้อมูลการโต้ตอบที่ Google อาจแชร์กับคุณ
คำกระตุ้นการตัดสินใจที่ชัดเจน ระบุคำกระตุ้นการตัดสินใจที่ชัดเจนในหน้าจอขอความยินยอม เช่น "ยอมรับและลิงก์" เนื่องจากผู้ใช้ต้องเข้าใจว่าตนต้องแชร์ข้อมูลใดกับ Google เพื่อลิงก์บัญชี
ความสามารถในการยกเลิก จัดเตรียมวิธีให้ผู้ใช้กลับไปหรือยกเลิกได้หากเลือกที่จะไม่ลิงก์
กระบวนการลงชื่อเข้าใช้ที่ชัดเจน ตรวจสอบว่าผู้ใช้มีวิธีที่ชัดเจน ในการลงชื่อเข้าใช้บัญชี Google เช่น ช่องสำหรับ ชื่อผู้ใช้และรหัสผ่าน หรือ ลงชื่อเข้าใช้ด้วย Google
ความสามารถในการยกเลิกการลิงก์ จัดเตรียมกลไกให้ผู้ใช้ยกเลิกการลิงก์ได้ เช่น URL ไปยังการตั้งค่าบัญชีในแพลตฟอร์มของคุณ หรือคุณจะใส่ ลิงก์ไปยังบัญชี Google ที่ผู้ใช้ จัดการบัญชีที่ลิงก์ได้ก็ได้ หากผู้ใช้ยกเลิกการลิงก์จากการผสานรวมของคุณ ให้ใช้
agentUsers.deleteเพื่อแจ้งให้ Google ทราบถึงการเปลี่ยนแปลงความสามารถในการเปลี่ยนบัญชีผู้ใช้ แนะนำวิธีให้ผู้ใช้เปลี่ยนบัญชี วิธีนี้มีประโยชน์อย่างยิ่งหากผู้ใช้มีแนวโน้มที่จะมีหลายบัญชี
- หากผู้ใช้ต้องปิดหน้าจอขอความยินยอมเพื่อเปลี่ยนบัญชี ให้ส่งข้อผิดพลาดที่กู้คืนได้ไปยัง Google เพื่อให้ผู้ใช้ลงชื่อเข้าใช้บัญชีที่ต้องการด้วย การลิงก์ OAuth
ใส่โลโก้ของคุณ แสดงโลโก้บริษัทในหน้าจอขอความยินยอม ใช้หลักเกณฑ์ด้านสไตล์เพื่อวางโลโก้ หากต้องการแสดงโลโก้ของ Google ด้วย โปรดดู โลโก้และเครื่องหมายการค้า
ขั้นตอนรหัสการให้สิทธิ์
การใช้งานเซิร์ฟเวอร์ OAuth 2.0 ของขั้นตอน รหัสการให้สิทธิ์ประกอบด้วยปลายทาง 2 แห่ง ซึ่งบริการของคุณจะทำให้พร้อมใช้งานผ่าน HTTPS ปลายทางแรกคือปลายทางการให้สิทธิ์ ซึ่งมีหน้าที่ค้นหาหรือขอความยินยอมจากผู้ใช้ในการเข้าถึงข้อมูล ปลายทางการให้สิทธิ์จะแสดง UI การลงชื่อเข้าใช้แก่ผู้ใช้ที่ยังไม่ได้ลงชื่อเข้าใช้ และบันทึกความยินยอมในการเข้าถึงที่ขอ ปลายทางที่ 2 คือปลายทางการแลกเปลี่ยนโทเค็น ซึ่งใช้เพื่อรับสตริงที่เข้ารหัสที่เรียกว่าโทเค็น ซึ่งอนุญาตให้ผู้ใช้เข้าถึงบริการของคุณ
เมื่อแอปพลิเคชันของ Google ต้องเรียก API ของบริการ Google จะใช้ปลายทางเหล่านี้ร่วมกันเพื่อขอสิทธิ์จากผู้ใช้ในการเรียก API เหล่านี้ในนามของผู้ใช้
เซสชันขั้นตอนรหัสการให้สิทธิ์ OAuth 2.0 ที่ Google เริ่มต้นจะมีขั้นตอนดังนี้
- Google จะเปิดปลายทางการให้สิทธิ์ในเบราว์เซอร์ของผู้ใช้ หากขั้นตอนเริ่มต้นในอุปกรณ์ที่ใช้เสียงเท่านั้นสำหรับ Action Google จะโอนการดำเนินการไปยังโทรศัพท์
- ผู้ใช้ลงชื่อเข้าใช้ (หากยังไม่ได้ลงชื่อเข้าใช้) และให้สิทธิ์ Google ในการเข้าถึงข้อมูลของผู้ใช้ด้วย API ของคุณ หากยังไม่ได้ให้สิทธิ์
- บริการของคุณจะสร้าง รหัสการให้สิทธิ์และส่งกลับไปยัง Google โดยเปลี่ยนเส้นทางเบราว์เซอร์ของผู้ใช้กลับไปที่ Google พร้อมแนบรหัสการให้สิทธิ์กับคำขอ
- Google จะส่งรหัสการให้สิทธิ์ไปยังปลายทางการแลกเปลี่ยนโทเค็น ซึ่งจะตรวจสอบความถูกต้องของรหัสและส่งกลับ โทเค็นเพื่อการเข้าถึงและ โทเค็นการรีเฟรช โทเค็นเพื่อการเข้าถึงเป็นโทเค็นที่มีอายุสั้น ซึ่งบริการของคุณยอมรับเป็นข้อมูลเข้าสู่ระบบเพื่อเข้าถึง API โทเค็นการรีเฟรชเป็นโทเค็นที่มีอายุยาวนาน ซึ่ง Google สามารถจัดเก็บและใช้เพื่อรับโทเค็นเพื่อการเข้าถึงใหม่เมื่อโทเค็นเดิมหมดอายุ
- หลังจากที่ผู้ใช้ทำตามขั้นตอนการลิงก์บัญชีเสร็จสมบูรณ์แล้ว คำขอที่ส่งจาก Google ในครั้งต่อๆ ไปจะมีโทเค็นเพื่อการเข้าถึง
จัดการคำขอการให้สิทธิ์
เมื่อคุณต้องทำการลิงก์บัญชีโดยใช้ขั้นตอนรหัสการให้สิทธิ์ OAuth 2.0 Google จะส่งผู้ใช้ไปยังปลายทางการให้สิทธิ์พร้อมคำขอที่มีพารามิเตอร์ต่อไปนี้
| พารามิเตอร์ปลายทางการให้สิทธิ์ | |
|---|---|
client_id |
รหัสไคลเอ็นต์ที่คุณกำหนดให้กับ Google |
redirect_uri |
URL ที่คุณส่งการตอบกลับคำขอนี้ |
state |
ค่าการบันทึกที่ส่งกลับไปยัง Google โดยไม่มีการเปลี่ยนแปลงใน URI การเปลี่ยนเส้นทาง |
scope |
ไม่บังคับ: ชุดสตริงขอบเขตที่คั่นด้วยช่องว่าง ซึ่งระบุ ข้อมูลที่ Google กำลังขอการให้สิทธิ์ |
response_type |
ประเภทของค่าที่จะแสดงผลในการตอบกลับ สำหรับขั้นตอนรหัสการให้สิทธิ์ OAuth 2.0
ประเภทการตอบกลับจะเป็น code เสมอ
|
ตัวอย่างเช่น หากปลายทางการให้สิทธิ์ของคุณพร้อมใช้งานที่ https://myservice.example.com/auth คำขออาจมีลักษณะดังนี้
GET https://myservice.example.com/auth?client_id=GOOGLE_CLIENT_ID&redirect_uri=REDIRECT_URI&state=STATE_STRING&scope=REQUESTED_SCOPES&response_type=code
หากต้องการให้ปลายทางการให้สิทธิ์จัดการคำขอลงชื่อเข้าใช้ ให้ทำตามขั้นตอนต่อไปนี้
- ตรวจสอบว่า
client_idตรงกับรหัสไคลเอ็นต์ที่คุณกำหนดให้กับ Google และredirect_uriตรงกับ URL การเปลี่ยนเส้นทางที่ Google ให้ไว้สำหรับบริการของคุณ การตรวจสอบเหล่านี้มีความสำคัญในการป้องกันไม่ให้สิทธิ์เข้าถึงแก่แอปไคลเอ็นต์ที่ไม่ต้องการหรือกำหนดค่าไม่ถูกต้อง หากคุณรองรับขั้นตอน OAuth 2.0 หลายขั้นตอน ให้ยืนยันด้วยว่าresponse_typeคือcode - ตรวจสอบว่าผู้ใช้ลงชื่อเข้าใช้บริการของคุณหรือไม่ หากผู้ใช้ไม่ได้ลงชื่อเข้าใช้ ให้ทำตามขั้นตอนการลงชื่อเข้าใช้หรือลงชื่อสมัครใช้ของบริการให้เสร็จสมบูรณ์
- สร้างรหัสการให้สิทธิ์เพื่อให้ Google ใช้เข้าถึง API ของคุณ รหัสการให้สิทธิ์สามารถเป็นค่าสตริงใดก็ได้ แต่ต้องแสดงถึงผู้ใช้ ไคลเอ็นต์ที่โทเค็นมีไว้ให้ และเวลาหมดอายุของรหัสอย่างไม่ซ้ำกัน และต้องคาดเดาไม่ได้ โดยปกติแล้วคุณจะออกรหัสการให้สิทธิ์ที่หมดอายุหลังจากผ่านไปประมาณ 10 นาที
- ยืนยันว่า URL ที่ระบุโดยพารามิเตอร์
redirect_uriมีรูปแบบดังนี้https://oauth-redirect.googleusercontent.com/r/YOUR_PROJECT_ID https://oauth-redirect-sandbox.googleusercontent.com/r/YOUR_PROJECT_ID
- เปลี่ยนเส้นทางเบราว์เซอร์ของผู้ใช้ไปยัง URL ที่ระบุโดยพารามิเตอร์
redirect_uriรวมรหัสการให้สิทธิ์ที่คุณ เพิ่งสร้างและค่าสถานะเดิมที่ไม่ได้แก้ไขเมื่อเปลี่ยนเส้นทาง โดยการต่อท้ายพารามิเตอร์codeและstateตัวอย่าง URL ที่ได้มีดังนี้https://oauth-redirect.googleusercontent.com/r/YOUR_PROJECT_ID?code=AUTHORIZATION_CODE&state=STATE_STRING
จัดการคำขอแลกเปลี่ยนโทเค็น
ปลายทางการแลกเปลี่ยนโทเค็นของบริการมีหน้าที่รับผิดชอบการแลกเปลี่ยนโทเค็น 2 ประเภท ได้แก่
- แลกรหัสการให้สิทธิ์เป็นโทเค็นเพื่อการเข้าถึงและโทเค็นการรีเฟรช
- แลกโทเค็นการรีเฟรชเป็นโทเค็นเพื่อการเข้าถึง
คำขอแลกเปลี่ยนโทเค็นมีพารามิเตอร์ต่อไปนี้
| พารามิเตอร์ปลายทางการแลกเปลี่ยนโทเค็น | |
|---|---|
client_id |
สตริงที่ระบุแหล่งที่มาของคำขอเป็น Google คุณต้องลงทะเบียนสตริงนี้ ภายในระบบเป็นตัวระบุที่ไม่ซ้ำกันของ Google |
client_secret |
สตริงลับที่คุณลงทะเบียนกับ Google สำหรับบริการของคุณ |
grant_type |
ประเภทของโทเค็นที่จะแลกเปลี่ยน ซึ่งอาจเป็น
authorization_code หรือ refresh_token |
code |
เมื่อ grant_type=authorization_code พารามิเตอร์นี้คือรหัสที่ Google ได้รับจากปลายทางการลงชื่อเข้าใช้หรือปลายทางการแลกเปลี่ยนโทเค็น |
redirect_uri |
เมื่อ grant_type=authorization_code พารามิเตอร์นี้คือ
URL ที่ใช้ในคำขอการให้สิทธิ์เริ่มต้น |
refresh_token |
เมื่อ grant_type=refresh_token พารามิเตอร์นี้คือโทเค็นการรีเฟรชที่ Google ได้รับจากปลายทางการแลกเปลี่ยนโทเค็น |
กำหนดค่าวิธีที่ Google ส่งข้อมูลเข้าสู่ระบบไปยังเซิร์ฟเวอร์
เซิร์ฟเวอร์การให้สิทธิ์คาดว่าจะได้รับข้อมูลเข้าสู่ระบบไคลเอ็นต์ในเนื้อหาของคำขอหรือในส่วนหัวของคำขอ ทั้งนี้ขึ้นอยู่กับการใช้งาน
โดยค่าเริ่มต้น Google จะส่งข้อมูลเข้าสู่ระบบในเนื้อหาของคำขอ หากเซิร์ฟเวอร์การให้สิทธิ์กำหนดให้ข้อมูลเข้าสู่ระบบไคลเอ็นต์อยู่ในส่วนหัวของคำขอ คุณต้องกำหนดค่าการผสานรวม Cloud-to-cloud ตามนั้น
จากรายการโปรเจ็กต์ ให้คลิกเปิด ข้างโปรเจ็กต์ที่ต้องการใช้
ในส่วน Cloud-to-Cloud ให้เลือกพัฒนา
คลิกเปิด ข้างการผสานรวม
เลื่อนลงไปที่ส่วนสิทธิ์ (ไม่บังคับ) แล้วเลือกช่องทำเครื่องหมายให้ Google ส่งรหัสไคลเอ็นต์และรหัสลับผ่านส่วนหัวการตรวจสอบสิทธิ์พื้นฐานของ HTTP
คลิกบันทึก เพื่อบันทึกการเปลี่ยนแปลง
แลกรหัสการให้สิทธิ์เป็นโทเค็นเพื่อการเข้าถึงและโทเค็นการรีเฟรช
หลังจากที่ผู้ใช้ลงชื่อเข้าใช้และปลายทางการให้สิทธิ์ส่งรหัสการให้สิทธิ์ที่มีอายุสั้นไปยัง Google แล้ว Google จะส่งคำขอไปยังปลายทางการแลกเปลี่ยนโทเค็นเพื่อแลกรหัสการให้สิทธิ์เป็นโทเค็นเพื่อการเข้าถึงและโทเค็นการรีเฟรช
สำหรับคำขอเหล่านี้ ค่าของ grant_type คือ authorization_code และ
ค่าของ code คือค่าของรหัสการให้สิทธิ์ที่คุณให้ไว้กับ Google ก่อนหน้านี้ ตัวอย่างคำขอแลกรหัสการให้สิทธิ์เป็นโทเค็นเพื่อการเข้าถึงและโทเค็นการรีเฟรชมีดังนี้
POST /token HTTP/1.1
Host: oauth2.example.com
Content-Type: application/x-www-form-urlencoded

client_id=GOOGLE_CLIENT_ID&client_secret=GOOGLE_CLIENT_SECRET&grant_type=authorization_code&code=AUTHORIZATION_CODE&redirect_uri=REDIRECT_URI
หากต้องการแลกรหัสการให้สิทธิ์เป็นโทเค็นเพื่อการเข้าถึงและโทเค็นการรีเฟรช ปลายทางการแลกเปลี่ยนโทเค็นจะตอบสนองต่อคำขอ POST โดยทำตามขั้นตอนต่อไปนี้
- ตรวจสอบว่า
client_idระบุแหล่งที่มาของคำขอเป็นแหล่งที่มาที่ได้รับอนุญาต และclient_secretตรงกับค่าที่คาดไว้ - ตรวจสอบว่ารหัสการให้สิทธิ์ถูกต้องและยังไม่หมดอายุ และรหัสไคลเอ็นต์ที่ระบุในคำขอตรงกับรหัสไคลเอ็นต์ที่เชื่อมโยงกับรหัสการให้สิทธิ์
- ยืนยันว่า URL ที่ระบุโดยพารามิเตอร์
redirect_uriเหมือนกับค่าที่ใช้ในคำขอการให้สิทธิ์เริ่มต้น - หากคุณยืนยันเกณฑ์ทั้งหมดข้างต้นไม่ได้ ให้แสดงข้อผิดพลาด HTTP
400 Bad Request โดยมี
{"error": "invalid_grant"}เป็นเนื้อหา - หากยืนยันได้ ให้ใช้รหัสผู้ใช้จากรหัสการให้สิทธิ์เพื่อสร้างโทเค็นการรีเฟรชและโทเค็นเพื่อการเข้าถึง โทเค็นเหล่านี้สามารถเป็นค่าสตริงใดก็ได้ แต่ต้อง แสดงถึงผู้ใช้และไคลเอ็นต์ที่โทเค็นมีไว้ให้ และต้อง คาดเดาไม่ได้ สำหรับโทเค็นเพื่อการเข้าถึง ให้บันทึกเวลาหมดอายุของโทเค็นด้วย ซึ่งโดยปกติแล้วจะผ่านไป 1 ชั่วโมงหลังจากที่คุณออกโทเค็น โทเค็นการรีเฟรชไม่มีวันหมดอายุ
- แสดงออบเจ็กต์ JSON ต่อไปนี้ในเนื้อหาของการตอบกลับ HTTPS
{
"token_type": "Bearer",
"access_token": "ACCESS_TOKEN",
"refresh_token": "REFRESH_TOKEN",
"expires_in": SECONDS_TO_EXPIRATION
}
Google จะจัดเก็บโทเค็นเพื่อการเข้าถึงและโทเค็นการรีเฟรชของผู้ใช้ และบันทึกการหมดอายุของโทเค็นเพื่อการเข้าถึง เมื่อโทเค็นเพื่อการเข้าถึงหมดอายุ Google จะใช้โทเค็นการรีเฟรชเพื่อรับโทเค็นเพื่อการเข้าถึงใหม่จากปลายทางการแลกเปลี่ยนโทเค็น
แลกโทเค็นการรีเฟรชเป็นโทเค็นเพื่อการเข้าถึง
เมื่อโทเค็นเพื่อการเข้าถึงหมดอายุ Google จะส่งคำขอไปยังปลายทางการแลกเปลี่ยนโทเค็นเพื่อแลกโทเค็นการรีเฟรชเป็นโทเค็นเพื่อการเข้าถึงใหม่
สำหรับคำขอเหล่านี้ ค่าของ grant_type คือ refresh_token และค่าของ refresh_token คือค่าของโทเค็นการรีเฟรชที่คุณให้ไว้กับ Google ก่อนหน้านี้ ตัวอย่างคำขอแลกโทเค็นการรีเฟรชเป็นโทเค็นเพื่อการเข้าถึงมีดังนี้
POST /token HTTP/1.1
Host: oauth2.example.com
Content-Type: application/x-www-form-urlencoded

client_id=GOOGLE_CLIENT_ID&client_secret=GOOGLE_CLIENT_SECRET&grant_type=refresh_token&refresh_token=REFRESH_TOKEN
หากต้องการแลกโทเค็นการรีเฟรชเป็นโทเค็นเพื่อการเข้าถึง ปลายทางการแลกเปลี่ยนโทเค็นจะตอบสนองต่อคำขอ POST โดยทำตามขั้นตอนต่อไปนี้
- ตรวจสอบว่า
client_idระบุแหล่งที่มาของคำขอเป็น Google และclient_secretตรงกับค่าที่คาดไว้ - ตรวจสอบว่าโทเค็นการรีเฟรชถูกต้อง และรหัสไคลเอ็นต์ที่ระบุในคำขอตรงกับรหัสไคลเอ็นต์ที่เชื่อมโยงกับโทเค็นการรีเฟรช
- หากคุณยืนยันเกณฑ์ทั้งหมดข้างต้นไม่ได้ ให้แสดงข้อผิดพลาด HTTP 400
Bad Request โดยมี
{"error": "invalid_grant"}เป็นเนื้อหา - หากยืนยันได้ ให้ใช้รหัสผู้ใช้จากโทเค็นการรีเฟรชเพื่อสร้างโทเค็นเพื่อการเข้าถึง โทเค็นเหล่านี้สามารถเป็นค่าสตริงใดก็ได้ แต่ต้องแสดงถึงผู้ใช้และไคลเอ็นต์ที่โทเค็นมีไว้ให้ และต้องคาดเดาไม่ได้ สำหรับโทเค็นเพื่อการเข้าถึง ให้บันทึกเวลาหมดอายุของโทเค็นด้วย ซึ่งโดยปกติแล้วจะผ่านไป 1 ชั่วโมงหลังจากที่คุณออกโทเค็น
- แสดงออบเจ็กต์ JSON ต่อไปนี้ในเนื้อหาของการตอบกลับ HTTPS
{
"token_type": "Bearer",
"access_token": "ACCESS_TOKEN",
"expires_in": SECONDS_TO_EXPIRATION
}
จัดการคำขอ Userinfo
ปลายทาง userinfo เป็นทรัพยากรที่มีการป้องกันด้วย OAuth 2.0 ซึ่งส่งกลับการอ้างสิทธิ์เกี่ยวกับผู้ใช้ที่ลิงก์ การติดตั้งใช้งานและการโฮสต์ปลายทาง userinfo เป็นตัวเลือกที่ไม่บังคับ ยกเว้นกรณีการใช้งานต่อไปนี้
- ลงชื่อเข้าใช้บัญชีที่ลิงก์ด้วย Google One Tap
- การติดตามที่ราบรื่นบน AndroidTV
หลังจากเรียกโทเค็นเพื่อการเข้าถึงจากปลายทางของโทเค็นเรียบร้อยแล้ว Google จะส่งคำขอไปยังปลายทาง userinfo เพื่อดึงข้อมูลโปรไฟล์พื้นฐานเกี่ยวกับผู้ใช้ที่ลิงก์
| ส่วนหัวของคำขอปลายทางของ userinfo | |
|---|---|
Authorization header |
โทเค็นเพื่อการเข้าถึงของประเภท Bearer |
ตัวอย่างเช่น หากปลายทาง userinfo พร้อมใช้งานที่
https://myservice.example.com/userinfo คำขออาจมีลักษณะดังต่อไปนี้
GET /userinfo HTTP/1.1
Host: myservice.example.com
Authorization: Bearer ACCESS_TOKEN
หากต้องการให้ปลายทาง userinfo จัดการคำขอ ให้ทำตามขั้นตอนต่อไปนี้
- แยกโทเค็นเพื่อการเข้าถึงจากส่วนหัวการให้สิทธิ์ แล้วแสดงผลข้อมูลสำหรับผู้ใช้ที่เชื่อมโยงกับโทเค็นเพื่อการเข้าถึง
- หากโทเค็นเพื่อการเข้าถึงไม่ถูกต้อง ให้แสดงข้อผิดพลาด HTTP 401 Unauthorized ด้วยการใช้ส่วนหัวการตอบกลับ
WWW-Authenticateตัวอย่างการตอบกลับข้อผิดพลาดเกี่ยวกับ Userinfo มีดังนี้HTTP/1.1 401 Unauthorized WWW-Authenticate: error="invalid_token", error_description="The Access Token expired"
หากโทเค็นเพื่อการเข้าถึงถูกต้อง ให้แสดงผลและการตอบสนอง HTTP 200 ด้วยออบเจ็กต์ JSON ต่อไปนี้ในเนื้อหาของ HTTPS การตอบกลับ:
{ "sub": "USER_UUID", "email": "EMAIL_ADDRESS", "given_name": "FIRST_NAME", "family_name": "LAST_NAME", "name": "FULL_NAME", "picture": "PROFILE_PICTURE", }การตอบสนองของปลายทาง userinfo subรหัสที่ไม่ซ้ำกันที่ระบุผู้ใช้ในระบบ emailอีเมลของผู้ใช้ given_nameไม่บังคับ: ชื่อของผู้ใช้ family_nameไม่บังคับ: นามสกุลของผู้ใช้ nameไม่บังคับ: ชื่อเต็มของผู้ใช้ pictureไม่บังคับ: รูปโปรไฟล์ของผู้ใช้