
每个 Cloud-to-cloud 集成都必须包含用户身份验证机制。
通过身份验证,您可以将用户的 Google 账号与用户在您的身份验证系统中的账号相关联。这样,您就可以在您的执行方式接收到智能家居 intent 时识别用户。Google 智能家居仅支持包含授权代码流程的 OAuth。
本页介绍了如何设置 OAuth 2.0 服务器,以使其可与 Cloud-to-cloud 集成搭配使用。
通过 OAuth 进行 Google 账号关联
在 授权代码流程中,您需要两个端点:
授权端点,用于向尚未登录的用户显示登录界面。授权端点还会创建一个短期有效的授权代码,以记录用户对所请求访问权限的同意情况。
令牌交换端点,负责两种类型的交换:
- 将授权代码交换为长期有效的刷新令牌和短期有效的访问令牌。当用户完成账号关联流程时,会发生此交换。
- 将长期有效的刷新令牌交换为短期有效的访问令牌。 当 Google 需要新的访问令牌(因为其拥有的访问令牌已过期)时,会发生此交换。
设计准则
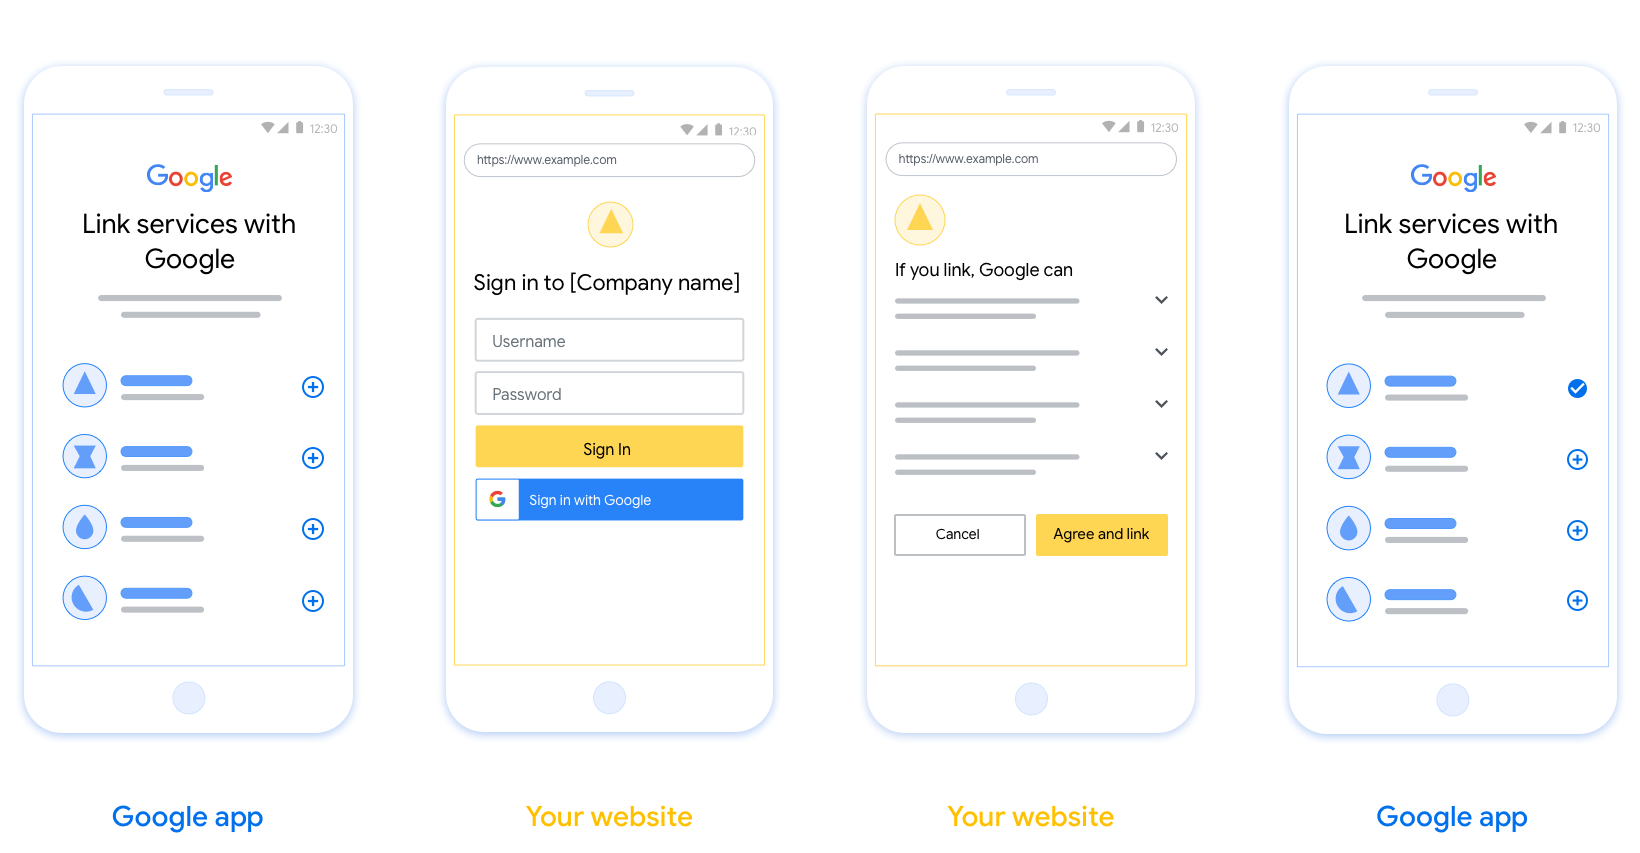
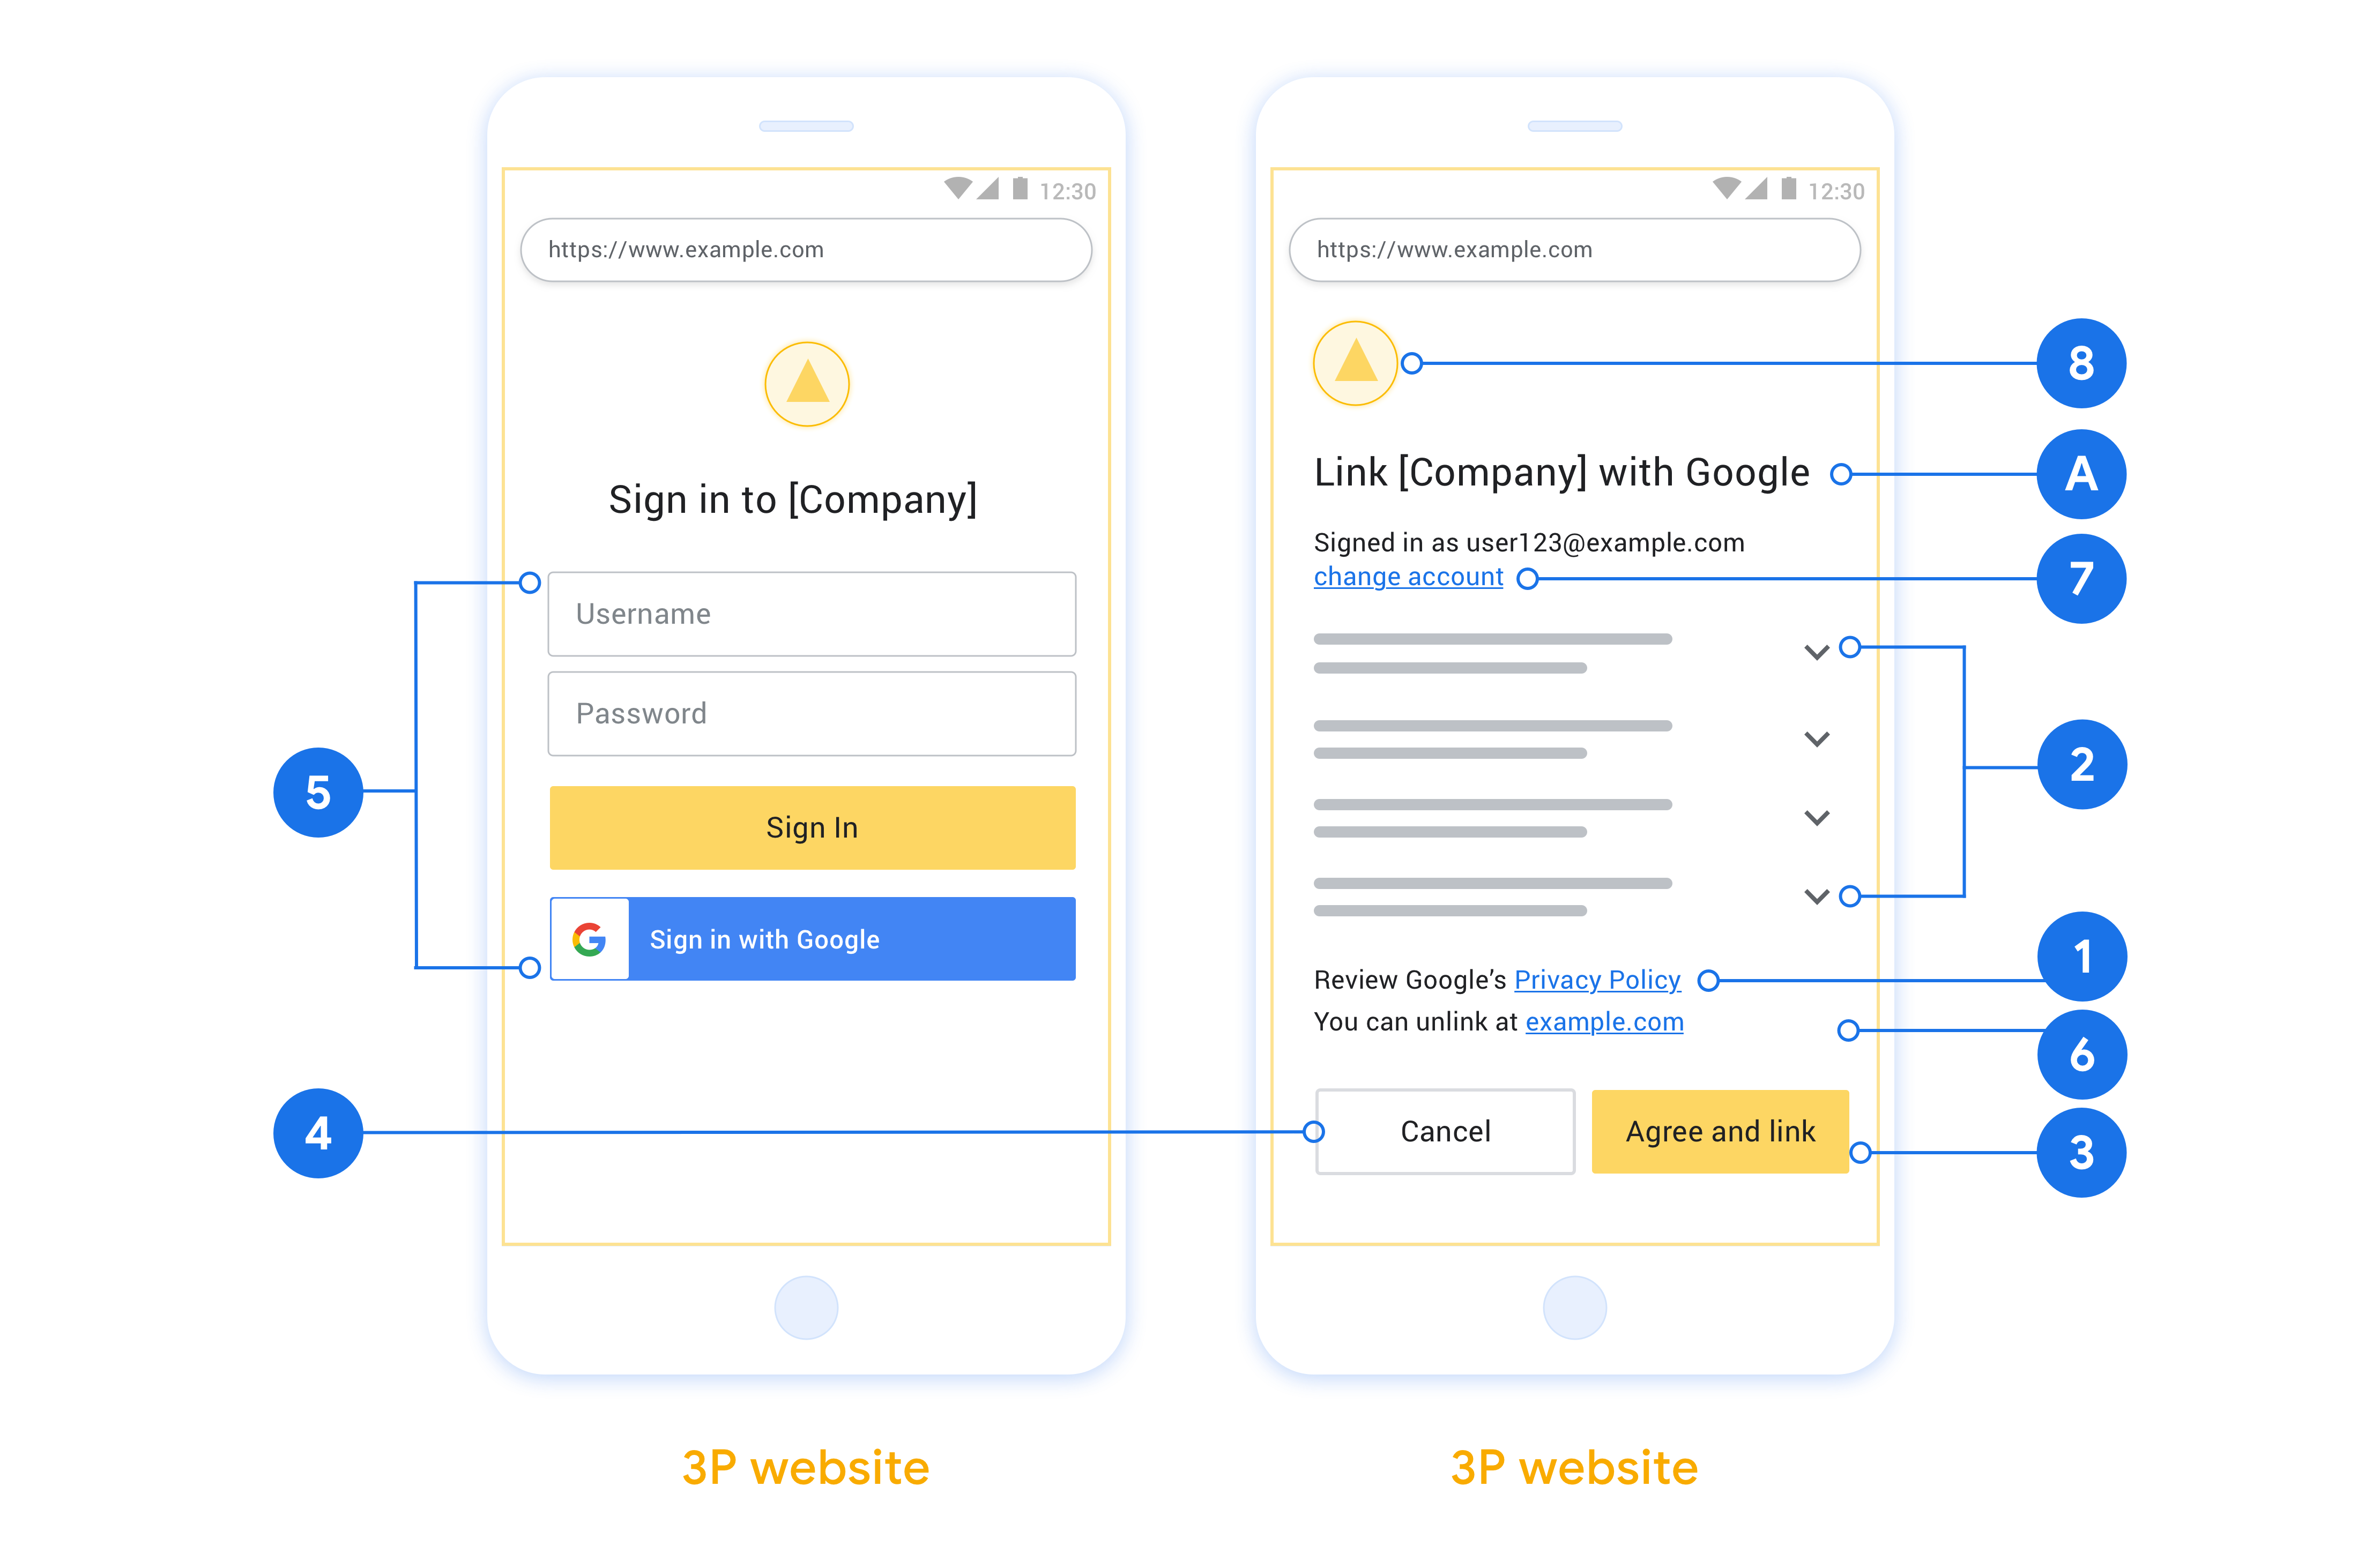
本部分介绍了您为 OAuth 关联流程托管的用户界面的设计要求和建议。在 Google 的应用调用后,您的平台会向用户显示“登录 Google”页面和账号关联同意屏幕。用户同意关联账号后,系统会将用户重定向回 Google 的应用。
要求
- 您必须告知用户,其账号将与 Google 关联, 而不是与 Google Home 或 Google 助理等特定 Google 产品关联。
- 您必须提供 Google 授权声明,例如“登录即表示您授权 Google 控制您的设备。”请参阅 Google Home 开发者政策的 Google 设备 控制授权部分。
- 您必须打开 Web OAuth 关联页面,并确保用户有明确的 Google 账号登录方法,例如用于输入用户名和密码的字段。请勿使用 Google 登录 (GSI) 方法,该方法 允许用户在不进入 Web OAuth 关联页面的情况下进行关联。这违反了 Google 政策。
- 您必须在 OAuth 关联
页面中添加以下至少一项,以指明用户要关联的集成:
- 公司徽标
- 公司名称
- 集成名称
- 应用图标
建议
建议您执行以下操作:
显示 Google 的隐私权政策。在权限请求页面上添加指向 Google 隐私权政策 的链接。
要共享的数据。使用清晰简洁的语言告知用户 Google 需要哪些用户数据及其原因,以及 Google 可能会与您共享哪些使用情况或互动数据。
明确的号召性用语。在同意屏幕上添加明确的号召性用语,例如“同意并关联”。这是因为用户需要了解他们需要与 Google 共享哪些数据才能关联账号。
能够取消。为用户提供返回或取消的方式(如果他们选择不关联)。
清晰的登录流程。确保用户有明确的 Google 账号登录方法,例如用于输入其 用户名和密码的字段或 使用 Google 账号登录。
能够取消关联。为用户提供解除关联的机制,例如指向您平台上账号设置的网址。或者,您可以 添加指向 Google 账号的链接,用户 可以在其中管理其关联的账号。如果用户取消与您的集成的关联,请使用
agentUsers.delete通知 Google 这一更改。能够更改用户账号。建议用户切换账号的方法。如果用户倾向于拥有多个账号,这一点尤其有用。
- 如果用户必须关闭权限请求页面才能切换账号,请向 Google 发送可恢复的错误,以便用户可以使用 OAuth 关联登录所需的账号。
添加您的徽标。在权限请求页面上显示您的公司徽标。请按照您的样式指南放置徽标。如果您还想显示 Google 的徽标,请参阅 徽标和商标。
授权代码流程
授权码流程的 OAuth 2.0 服务器实现包含两个端点,您的服务通过 HTTPS 提供这两个端点。第一个端点是授权端点,负责查找或获取用户对数据访问的同意。授权端点会向尚未登录的用户显示登录界面,并记录对所请求访问权限的同意。第二个端点是令牌交换端点,用于获取加密字符串(称为令牌),这些令牌可授权用户访问您的服务。
当 Google 应用需要调用您某项服务的 API 时,Google 会同时使用这些端点来征得用户同意,以便代表用户调用这些 API。
由 Google 发起的 OAuth 2.0 授权代码流程会话具有以下流程:
- Google 会在用户的浏览器中打开您的授权端点。如果流程是在仅支持语音的设备上针对某项操作启动的,Google 会将执行转移到手机。
- 用户登录(如果尚未登录),并授予 Google 权限以通过您的 API 访问其数据(如果尚未授予权限)。
- 您的服务会创建授权代码并将其返回给 Google。为此,请将用户的浏览器重定向回 Google,并在请求中附上授权代码。
- Google 会将授权代码发送到您的令牌交换端点,该端点会验证代码的真实性,并返回访问令牌和刷新令牌。访问令牌是一种短期有效的令牌,您的服务会将其作为访问 API 的凭据来接受。刷新令牌是一种长期有效的令牌,Google 可以存储该令牌,并在访问令牌过期时使用该令牌获取新的访问令牌。
- 用户完成账号关联流程后,Google 发送的每个后续请求都包含一个访问令牌。
处理授权请求
当您需要使用 OAuth 2.0 授权码流程执行账号关联时,Google 会将用户发送到您的授权端点,并发送包含以下参数的请求:
| 授权端点参数 | |
|---|---|
client_id |
您分配给 Google 的客户端 ID。 |
redirect_uri |
您将对此请求的响应发送到的网址。 |
state |
一种簿记值,在重定向 URI 中原封不动地传递回 Google。 |
scope |
可选:一组以空格分隔的范围字符串,用于指定 Google 请求授权的数据。 |
response_type |
要在响应中返回的值的类型。对于 OAuth 2.0 授权代码流程,响应类型始终为 code。
|
例如,如果您的授权端点位于 https://myservice.example.com/auth,则请求可能如下所示:
GET https://myservice.example.com/auth?client_id=GOOGLE_CLIENT_ID&redirect_uri=REDIRECT_URI&state=STATE_STRING&scope=REQUESTED_SCOPES&response_type=code
如需让授权端点处理登录请求,请执行以下步骤:
- 验证
client_id是否与您分配给 Google 的客户端 ID 相匹配,以及redirect_uri是否与 Google 为您的服务提供的重定向网址相匹配。这些检查对于防止向意外或配置错误的客户端应用授予访问权限至关重要。如果您支持多个 OAuth 2.0 流程,还请确认response_type为code。 - 检查用户是否已登录您的服务。如果用户未登录,请完成服务的登录或注册流程。
- 生成授权代码,供 Google 用于访问您的 API。 授权代码可以是任何字符串值,但必须唯一表示用户、令牌所针对的客户端和代码的过期时间,并且不得可猜测。您通常会签发大约 10 分钟后过期的授权码。
- 确认
redirect_uri参数指定的网址具有以下格式:https://oauth-redirect.googleusercontent.com/r/YOUR_PROJECT_ID https://oauth-redirect-sandbox.googleusercontent.com/r/YOUR_PROJECT_ID
- 将用户的浏览器重定向到
redirect_uri参数指定的网址。通过附加code和state参数进行重定向时,请添加您刚刚生成的授权代码和原始的未修改状态值。以下是生成的网址的示例:https://oauth-redirect.googleusercontent.com/r/YOUR_PROJECT_ID?code=AUTHORIZATION_CODE&state=STATE_STRING
处理令牌交换请求
您服务的令牌交换端点负责两种类型的令牌交换:
- 将授权代码交换为访问令牌和刷新令牌
- 将刷新令牌换成访问令牌
令牌交换请求包含以下参数:
| 令牌交换端点参数 | |
|---|---|
client_id |
此字符串用于将请求源标识为 Google。此字符串必须在您的系统中注册为 Google 的唯一标识符。 |
client_secret |
您向 Google 注册的用于服务的密钥字符串。 |
grant_type |
要兑换的令牌的类型。值为 authorization_code 或 refresh_token。 |
code |
如果值为 grant_type=authorization_code,此参数是 Google 从您的登录或令牌交换端点收到的代码。 |
redirect_uri |
如果值为 grant_type=authorization_code,则此参数是初始授权请求中使用的网址。 |
refresh_token |
如果值为 grant_type=refresh_token,则此参数是 Google 从您的令牌交换端点收到的刷新令牌。 |
配置 Google 向您的服务器发送凭据的方式
根据其实现,授权服务器希望在请求正文或请求标头中收到客户端凭据。
默认情况下,Google 会在请求正文中发送凭据。如果您的授权服务器要求客户端凭据位于请求标头中,您必须相应地配置 Cloud-to-cloud 集成:
在项目列表中,点击要处理的项目旁边的打开。
在 Cloud-to-Cloud 下,选择开发。
点击相应集成旁边的打开。
向下滚动到权限(可选)部分,然后选中允许 Google 通过 HTTP 基本 Auth 标头来传输客户端 ID 和客户端密钥复选框。
点击保存以保存更改。
将授权代码交换为访问令牌和刷新令牌
用户登录后,您的授权端点会向 Google 返回一个时效很短的授权代码,然后 Google 会向您的令牌交换端点发送请求,以将该授权代码换成访问令牌和刷新令牌。
对于这些请求,grant_type 的值为 authorization_code,code 的值为您之前授予 Google 的授权代码的值。以下示例展示了如何请求使用授权代码交换访问令牌和刷新令牌:
POST /token HTTP/1.1
Host: oauth2.example.com
Content-Type: application/x-www-form-urlencoded

client_id=GOOGLE_CLIENT_ID&client_secret=GOOGLE_CLIENT_SECRET&grant_type=authorization_code&code=AUTHORIZATION_CODE&redirect_uri=REDIRECT_URI
如需使用授权代码换取访问令牌和刷新令牌,令牌交换端点会通过执行以下步骤来响应 POST 请求:
- 验证
client_id是否将请求来源标识为授权来源,以及client_secret是否与预期值匹配。 - 验证授权代码是否有效且未过期,以及请求中指定的客户端 ID 是否与授权代码关联的客户端 ID 相符。
- 确认
redirect_uri参数指定的网址与初始授权请求中使用的值完全相同。 - 如果您无法验证上述所有条件,请返回 HTTP 400 错误请求错误,并将
{"error": "invalid_grant"}作为正文。 - 否则,请使用授权代码中的用户 ID 生成刷新令牌和访问令牌。这些令牌可以是任何字符串值,但必须能唯一表示用户和令牌所对应的客户端,并且不能是可猜测的值。对于访问令牌,还要记录令牌的过期时间,通常是在您发放令牌后一小时。刷新令牌不会过期。
- 在 HTTPS 响应的正文中返回以下 JSON 对象:
{
"token_type": "Bearer",
"access_token": "ACCESS_TOKEN",
"refresh_token": "REFRESH_TOKEN",
"expires_in": SECONDS_TO_EXPIRATION
}
Google 会存储用户的访问令牌和刷新令牌,并记录访问令牌的过期时间。当访问令牌过期时,Google 会使用刷新令牌从您的令牌交换端点获取新的访问令牌。
将刷新令牌换成访问令牌
当访问令牌过期时,Google 会向您的令牌交换端点发送请求,以将刷新令牌换成新的访问令牌。
对于这些请求,grant_type 的值为 refresh_token,refresh_token 的值为您之前授予 Google 的刷新令牌的值。以下是将刷新令牌换成访问令牌的请求示例:
POST /token HTTP/1.1
Host: oauth2.example.com
Content-Type: application/x-www-form-urlencoded

client_id=GOOGLE_CLIENT_ID&client_secret=GOOGLE_CLIENT_SECRET&grant_type=refresh_token&refresh_token=REFRESH_TOKEN
如需将刷新令牌换成访问令牌,令牌交换端点会通过执行以下步骤来响应 POST 请求:
- 验证
client_id是否将请求源标识为 Google,以及client_secret是否与预期值一致。 - 验证刷新令牌是否有效,以及请求中指定的客户端 ID 是否与刷新令牌关联的客户端 ID 相符。
- 如果您无法验证上述所有条件,请返回 HTTP 400 错误请求错误,并将
{"error": "invalid_grant"}作为正文。 - 否则,请使用刷新令牌中的用户 ID 生成访问令牌。这些令牌可以是任何字符串值,但必须唯一表示用户和令牌所针对的客户端,并且不得可猜测。对于访问令牌,还要记录令牌的过期时间,通常是在您发放令牌后一小时。
- 在 HTTPS 响应的正文中返回以下 JSON 对象:
{
"token_type": "Bearer",
"access_token": "ACCESS_TOKEN",
"expires_in": SECONDS_TO_EXPIRATION
}
处理 userinfo 请求
userinfo 端点是受 OAuth 2.0 保护的资源,会返回关联用户的声明。实现和托管 userinfo 端点是可选的,但以下用例除外:
从您的令牌端点成功检索到访问令牌后,Google 会向您的 userinfo 端点发送请求,以检索关联用户的基本个人资料信息。
| userinfo 端点请求标头 | |
|---|---|
Authorization header |
Bearer 类型的访问令牌。 |
例如,如果您的 userinfo 端点可通过
https://myservice.example.com/userinfo 时,请求可能如下所示:
GET /userinfo HTTP/1.1
Host: myservice.example.com
Authorization: Bearer ACCESS_TOKEN
为了让 userinfo 端点能够处理请求,请执行以下步骤:
- 从 Authorization 标头中提取访问令牌,并返回与访问令牌相关联的用户的信息。
- 如果访问令牌无效,则使用
WWW-Authenticate响应标头返回 HTTP 401 Unauthorized 错误。下面是一个 userinfo 错误响应示例:HTTP/1.1 401 Unauthorized WWW-Authenticate: error="invalid_token", error_description="The Access Token expired"
如果访问令牌有效,则返回 HTTPS 正文中包含以下 JSON 对象的 HTTP 200 响应 回答:
{ "sub": "USER_UUID", "email": "EMAIL_ADDRESS", "given_name": "FIRST_NAME", "family_name": "LAST_NAME", "name": "FULL_NAME", "picture": "PROFILE_PICTURE", }userinfo 端点响应 sub系统中用于识别用户的唯一 ID。 email用户的电子邮件地址。 given_name可选:用户的名字。 family_name可选:用户的姓氏。 name可选:用户的全名。 picture可选:用户的个人资料照片。