Balik Aplikasi untuk Android

Setelah memiliki implementasi OAuth 2.0, Anda dapat secara opsional mengonfigurasi App Flip berbasis OAuth, yang memungkinkan pengguna Android menautkan akun mereka dengan lebih cepat di sistem autentikasi ke Akun Google mereka. Bagian berikut menjelaskan cara mendesain dan mengimplementasikan App Flip untuk Tindakan smart home.

Panduan desain

Bagian ini menjelaskan persyaratan dan rekomendasi desain untuk layar izin penautan akun App Flip. Setelah Google memanggil aplikasi, aplikasi Anda akan menampilkan layar izin kepada pengguna.

Persyaratan

  1. Anda harus memberi tahu bahwa akun pengguna sedang ditautkan ke Google, bukan ke produk Google tertentu, seperti Google Home atau Asisten Google.

Rekomendasi

Sebaiknya lakukan hal berikut:

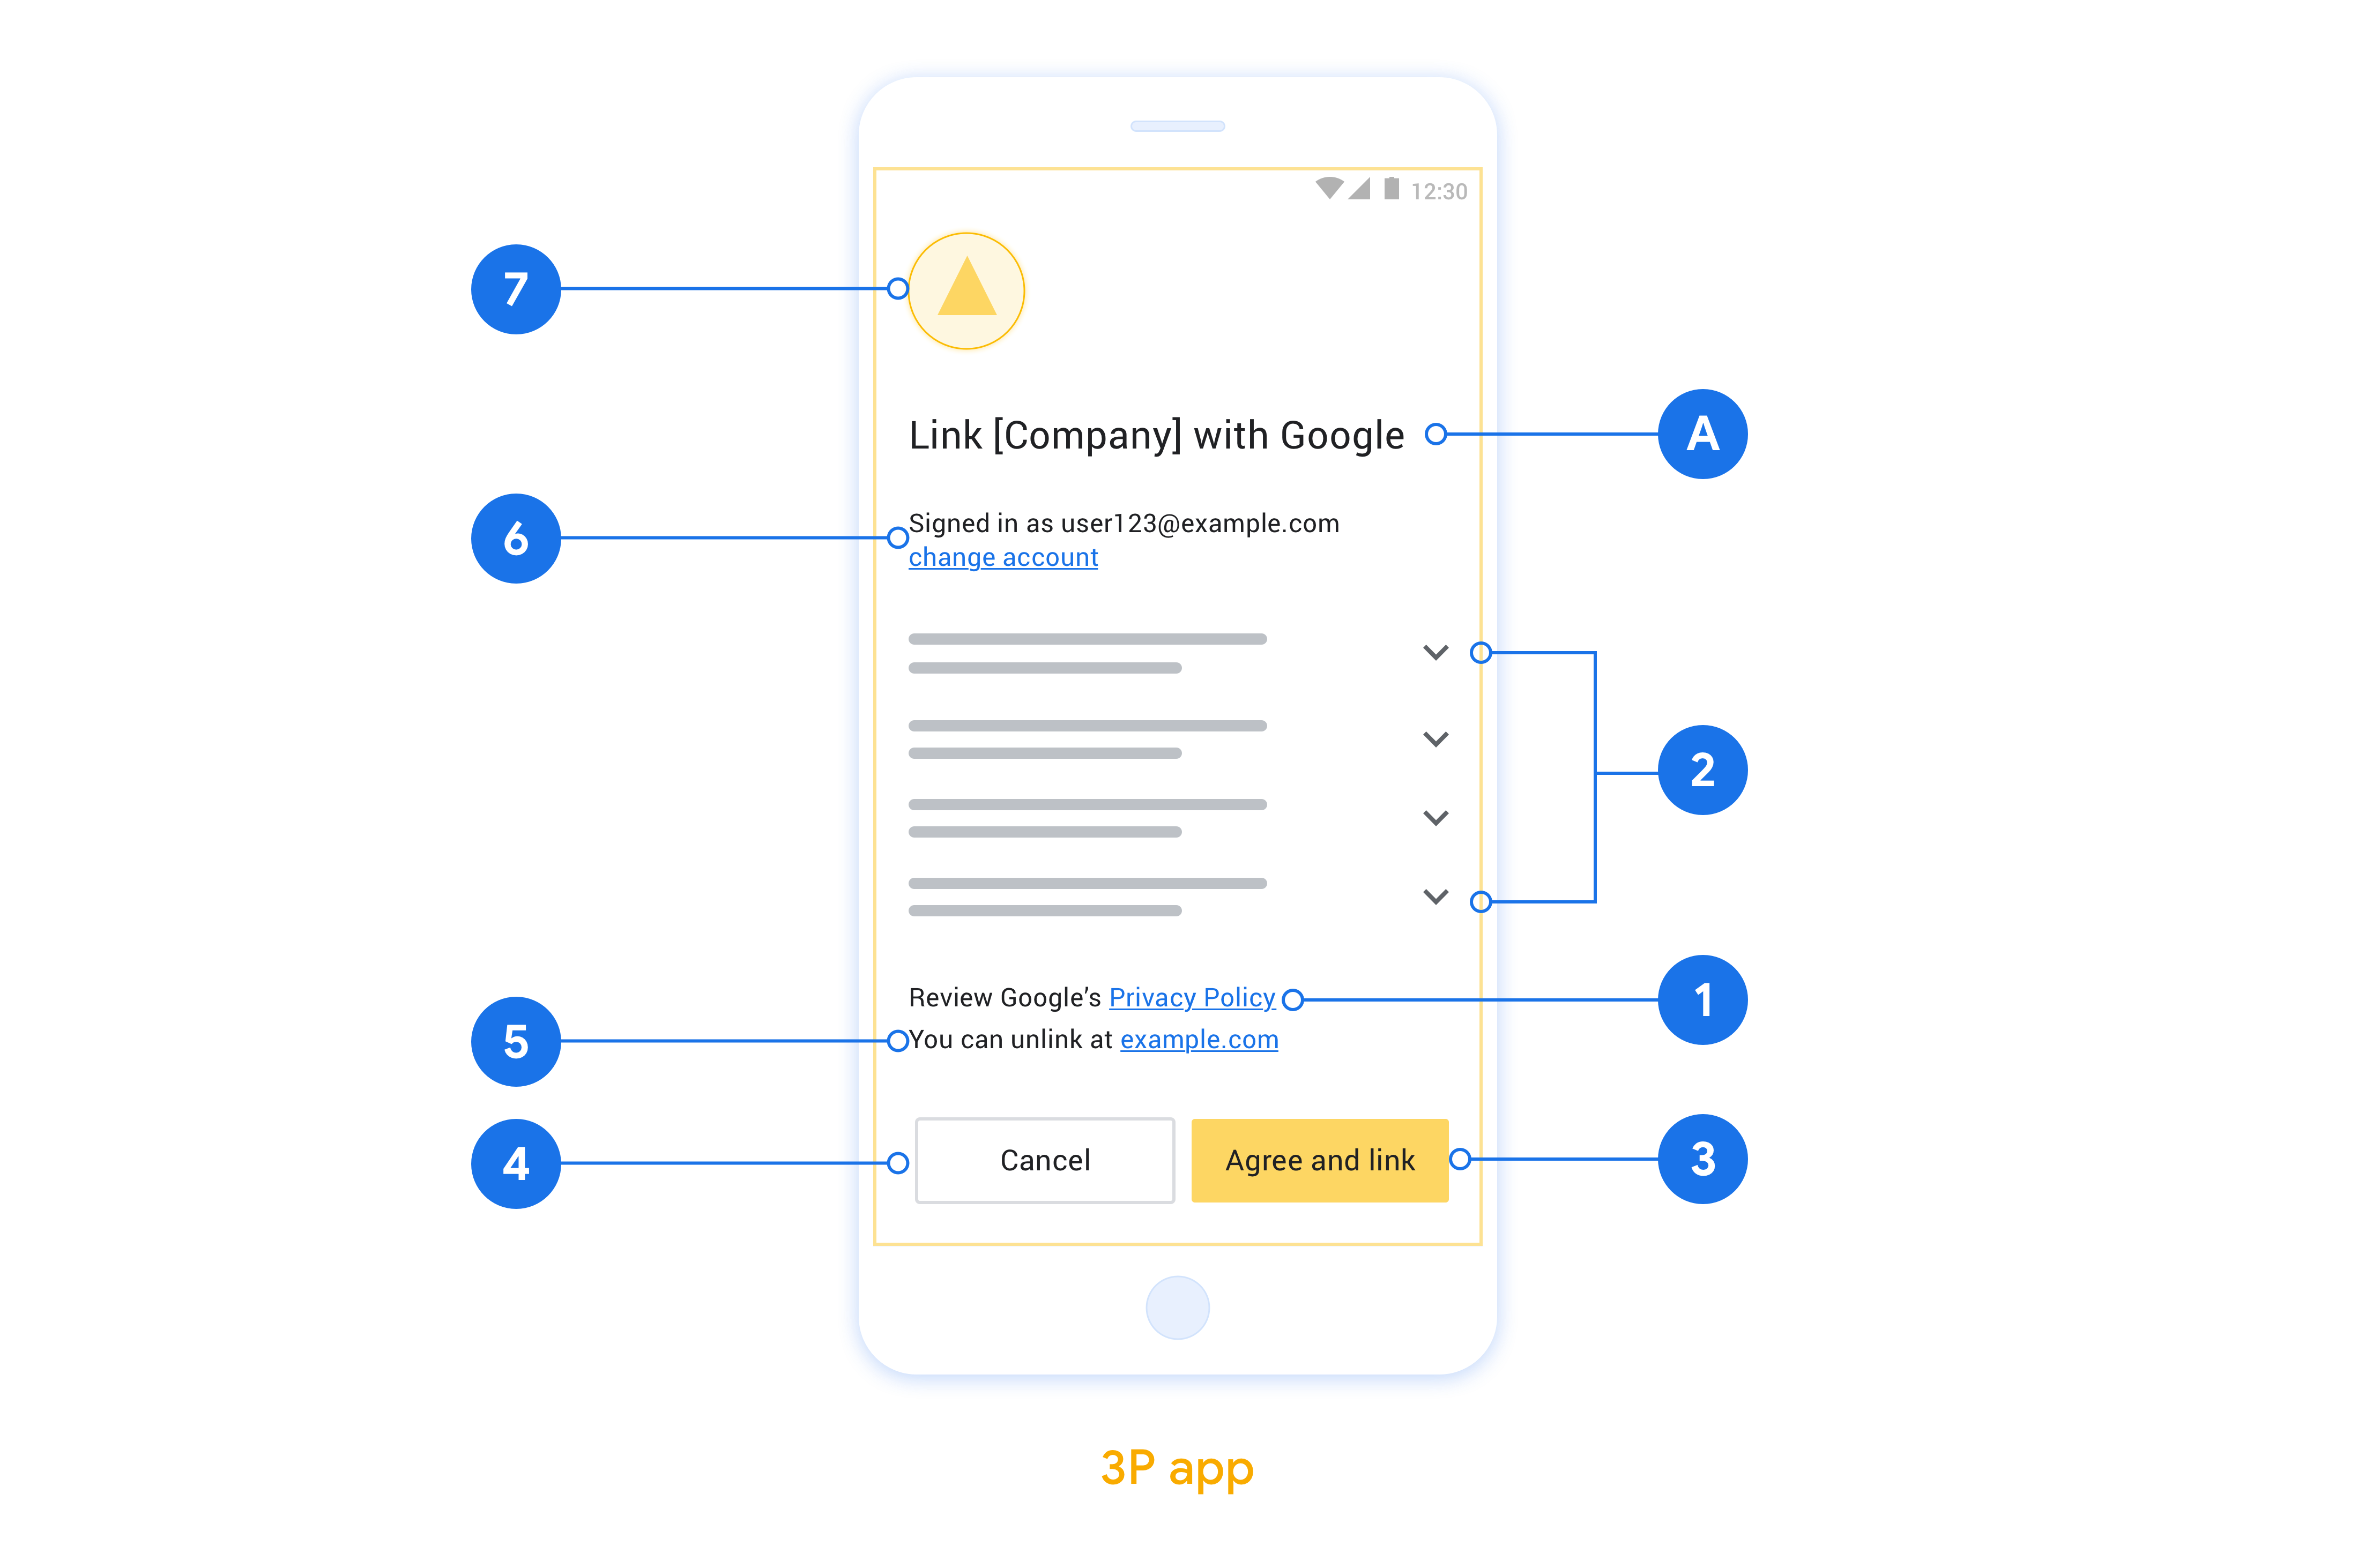
  1. Tampilkan Kebijakan Privasi Google. Sertakan link ke Kebijakan Privasi Google di layar izin.

  2. Data yang akan dibagikan. Gunakan bahasa yang jelas dan ringkas untuk memberi tahu pengguna data apa yang diperlukan Google dan alasannya.

  3. Pesan ajakan (CTA) yang jelas. Nyatakan pesan ajakan (CTA) yang jelas di layar izin Anda, seperti "Setuju dan tautkan". Hal ini karena pengguna harus memahami data yang harus mereka bagikan kepada Google untuk menautkan akun mereka.

  4. Kemampuan untuk membatalkan. Berikan cara bagi pengguna untuk kembali atau membatalkan, jika mereka memilih untuk tidak menautkan.

  5. Kemampuan untuk membatalkan tautan. Menawarkan mekanisme bagi pengguna untuk membatalkan tautan, seperti URL ke setelan akun mereka di platform Anda. Atau, Anda dapat menyertakan link ke Akun Google tempat pengguna dapat mengelola akun tertaut mereka.

  6. Kemampuan untuk mengubah akun pengguna. Menyarankan metode kepada pengguna untuk berganti akun. Hal ini sangat bermanfaat jika pengguna cenderung memiliki beberapa akun.

    • Jika pengguna harus menutup layar izin untuk beralih akun, kirim error yang dapat dipulihkan ke Google sehingga pengguna dapat login ke akun yang diinginkan dengan penautan OAuth dan alur implisit.
  7. Sertakan logo. Menampilkan logo perusahaan di layar izin. Gunakan panduan gaya untuk menempatkan logo Anda. Jika Anda ingin juga menampilkan logo Google, lihat Logo dan merek dagang.

Gambar ini menunjukkan contoh layar izin dengan keterangan untuk masing-masing persyaratan dan rekomendasi yang harus diikuti saat Anda mendesain layar izin pengguna.
Gambar 1: Panduan desain layar izin penautan akun.

Siapkan App Flip berbasis OAuth

Bagian berikut menjelaskan prasyarat untuk App Flip berbasis OAuth dan cara mengonfigurasi project App Flip Anda di konsol Actions.

Membuat Action smart home dan menyiapkan server OAuth 2.0

Sebelum dapat mengonfigurasi App Flip, Anda perlu melakukan hal berikut:

Mengonfigurasi App Flip di konsol Actions

Bagian berikut menjelaskan cara mengonfigurasi App Flip di konsol Actions.

  1. Isi semua kolom di bagian Informasi Klien OAuth. (Jika App Flip tidak didukung, OAuth reguler akan digunakan sebagai penggantian.)
  2. Di bagian Gunakan aplikasi Anda untuk penautan akun (opsional), centang Aktifkan untuk Android.
  3. Isi kolom berikut:
    • ID Aplikasi. ID Aplikasi adalah ID unik yang Anda tetapkan untuk aplikasi.
    • Tanda tangan aplikasi. Aplikasi Android harus 'ditandatangani' dengan sertifikat kunci publik sebelum dapat diinstal. Untuk informasi tentang cara mendapatkan tanda tangan aplikasi Anda, lihat Mengautentikasi Klien.
    • Intent otorisasi. Dalam kolom ini, masukkan string yang menentukan tindakan intent Anda.
  4. Jika Anda ingin mengonfigurasi klien secara opsional, tambahkan cakupan dan klik Tambahkan cakupan di bagian Mengonfigurasi klien (opsional).
  5. Klik Simpan.

Menerapkan App Flip di aplikasi Android Anda

Untuk menerapkan App Flip, Anda perlu mengubah kode otorisasi pengguna dalam aplikasi untuk menerima deep link dari Google.

OAuth-based App Flip linking (App Flip) inserts your Android app into the Google Account Linking flow. A traditional account linking flow requires the user to enter their credentials in the browser. The use of App Flip defers user sign-in to your Android app, which allows you to leverage existing authorizations. If the user is signed in to your app, they don't need to re-enter their credentials to link their account. A minimal amount of code changes are required to implement App Flip on your Android app.

In this document, you learn how to modify your Android app to support App Flip.

Try the sample

The App Flip linking sample app demonstrates an App Flip-compatible account linking integration on Android. You can use this app to verify how to respond to an incoming App Flip intent from Google mobile apps.

The sample app is preconfigured to integrate with the App Flip Test Tool for Android, which you can use to verify your Android app's integration with App Flip before you configure account linking with Google. This app simulates the intent triggered by Google mobile apps when App Flip is enabled.

How it works

The following steps are required to carry out an App Flip integration:

  1. The Google app checks if your app is installed on the device using its package name.
  2. The Google app uses a package signature check to validate that the installed app is the correct app.
  3. The Google app builds an intent to start a designated activity in your app. This intent includes additional data required for linking. It also checks to see if your app supports App Flip by resolving this intent through the Android framework.
  4. Your app validates that the request is coming from the Google app. To do so, your app checks the package signature and the provided client ID.
  5. Your app requests an authorization code from your OAuth 2.0 server. At the end of this flow, it returns either an authorization code or an error to the Google app.
  6. The Google app retrieves the result and continues with account linking. If an authorization code is provided, the token exchange happens server-to-server, the same way it does in the browser-based OAuth linking flow.

Modify your Android app to support App Flip

To support App Flip, make the following code changes to your Android app:

  1. Add an <intent-filter> to your AndroidManifest.xml file with an action string that matches the value you entered in the App Flip Intent field.

    <activity android:name="AuthActivity">
      <!-- Handle the app flip intent -->
      <intent-filter>
        <action android:name="INTENT_ACTION_FROM_CONSOLE"/>
        <category android:name="android.intent.category.DEFAULT"/>
      </intent-filter>
    </activity>
    
  2. Validate the calling app's signature.

    private fun verifyFingerprint(
            expectedPackage: String,
            expectedFingerprint: String,
            algorithm: String
    ): Boolean {
    
        callingActivity?.packageName?.let {
            if (expectedPackage == it) {
                val packageInfo =
                    packageManager.getPackageInfo(it, PackageManager.GET_SIGNATURES)
                val signatures = packageInfo.signatures
                val input = ByteArrayInputStream(signatures[0].toByteArray())
    
                val certificateFactory = CertificateFactory.getInstance("X509")
                val certificate =
                    certificateFactory.generateCertificate(input) as X509Certificate
                val md = MessageDigest.getInstance(algorithm)
                val publicKey = md.digest(certificate.encoded)
                val fingerprint = publicKey.joinToString(":") { "%02X".format(it) }
    
                return (expectedFingerprint == fingerprint)
            }
        }
        return false
    }
    
  3. Extract the client ID from the intent parameters and verify that the client ID matches the expected value.

    private const val EXPECTED_CLIENT = "<client-id-from-actions-console>"
    private const val EXPECTED_PACKAGE = "<google-app-package-name>"
    private const val EXPECTED_FINGERPRINT = "<google-app-signature>"
    private const val ALGORITHM = "SHA-256"
    ...
    
    override fun onCreate(savedInstanceState: Bundle?) {
        super.onCreate(savedInstanceState)
    
        val clientId = intent.getStringExtra("CLIENT_ID")
    
        if (clientId == EXPECTED_CLIENT &&
            verifyFingerprint(EXPECTED_PACKAGE, EXPECTED_FINGERPRINT, ALGORITHM)) {
    
            // ...authorize the user...
        }
    }
    
  4. Upon successful authorization, return the resulting authorization code back to Google.

    // Successful result
    val data = Intent().apply {
        putExtra("AUTHORIZATION_CODE", authCode)
    }
    setResult(Activity.RESULT_OK, data)
    finish()
    
  5. If an error occurred, return an error result instead.

    // Error result
    val error = Intent().apply {
        putExtra("ERROR_TYPE", 1)
        putExtra("ERROR_CODE", 1)
        putExtra("ERROR_DESCRIPTION", "Invalid Request")
    }
    setResult(-2, error)
    finish()
    

Content of the launch intent

The Android intent that launches your app includes the following fields:

  • CLIENT_ID (String): Google client_id registered under your app.
  • SCOPE (String[]): A list of scopes requested.
  • REDIRECT_URI (String): The redirect URL.

Content of the response data

The data returned to the Google app is set in your app by calling setResult(). This data includes the following:

  • AUTHORIZATION_CODE (String): The authorization code value.
  • resultCode (int): Communicates the success or failure of the process and takes one of the following values:
    • Activity.RESULT_OK: Indicates success; an authorization code is returned.
    • Activity.RESULT_CANCELLED: Signals that the user has cancelled the process. In this case, the Google app will attempt account linking using your authorization URL.
    • -2: Indicates that an error has occurred. Different types of errors are described below.
  • ERROR_TYPE (int): The type of error, which takes one of the following values:
    • 1: Recoverable error: The Google app will attempt account linking using the authorization URL.
    • 2: Unrecoverable error: The Google app aborts account linking.
    • 3: Invalid or missing request parameters.
  • ERROR_CODE (int): An integer representing the nature of the error. To see what each error code means, refer to the table of error codes.
  • ERROR_DESCRIPTION (String, optional): Human-readable status message describing the error.

A value for the AUTHORIZATION_CODE is expected when resultCode == Activity.RESULT_OK. In all other cases, the value for AUTHORIZATION_CODE needs to be empty. If resultCode == -2, then the ERROR_TYPE value is expected to be populated.

Table of error codes

The table below shows the different error codes and whether each is a recoverable or unrecoverable error:

Error code Meaning Recoverable Unrecoverable
1 INVALID_REQUEST
2 NO_INTERNET_CONNECTION
3 OFFLINE_MODE_ACTIVE
4 CONNECTION_TIMEOUT
5 INTERNAL_ERROR
6 AUTHENTICATION_SERVICE_UNAVAILABLE
8 CLIENT_VERIFICATION_FAILED
9 INVALID_CLIENT
10 INVALID_APP_ID
11 INVALID_REQUEST
12 AUTHENTICATION_SERVICE_UNKNOWN_ERROR
13 AUTHENTICATION_DENIED_BY_USER
14 CANCELLED_BY_USER
15 FAILURE_OTHER
16 USER_AUTHENTICATION_FAILED

For all error codes, you must return the error result via setResult to ensure the appropriate fallback is triggered.

Menguji App Flip di perangkat Anda

Setelah membuat Action dan mengonfigurasi App Flip di konsol dan di aplikasi, Anda dapat menguji App Flip di perangkat seluler. Anda dapat menggunakan aplikasi Asisten Google atau aplikasi Google Home untuk menguji App Flip.

Untuk menguji App Flip dari aplikasi Asisten, ikuti langkah-langkah berikut:

  1. Buka konsol Actions dan pilih project Anda.
  2. Klik Test di navigasi atas.
  3. Picu alur penautan akun dari aplikasi Asisten:
    1. Buka aplikasi Asisten Google.
    2. Klik Setelan.
    3. Di tab Asisten, klik Kontrol Rumah.
    4. Klik Tambahkan(+).
    5. Pilih Action Anda dari daftar penyedia. Nama ini akan diawali dengan “[test]” dalam daftar. Saat Anda memilih [test] Action dari daftar, tindakan ini akan membuka aplikasi Anda.
    6. Verifikasi bahwa aplikasi Anda telah diluncurkan dan mulai uji alur otorisasi Anda.

Untuk menguji App Flip dari aplikasi Home, ikuti langkah-langkah berikut:

  1. Buka konsol Actions dan pilih project Anda.
  2. Klik Test di navigasi atas.
  3. Picu alur penautan akun dari aplikasi Home:
    1. Buka aplikasi Google Home.
    2. Klik tombol +.
    3. Klik Siapkan perangkat.
    4. Klik Sudah menyiapkan sesuatu?
    5. Pilih Action smart home dari daftar penyedia. Nama ini akan diawali dengan “[test]” dalam daftar. Saat Anda memilih [test] Action dari daftar, tindakan ini akan membuka aplikasi Anda.
    6. Verifikasi bahwa aplikasi Anda telah diluncurkan dan mulai uji alur otorisasi Anda.