
Sobald Sie eine OAuth 2.0-Implementierung haben, können Sie optional eine authbasierte App Flip konfigurieren, mit der Ihre Nutzer ihre Konten in Ihrem Authentifizierungssystem schneller mit ihren Google-Konten verknüpfen können. In den folgenden Abschnitten wird beschrieben, wie du App Flip für deine smart home-Aktion konzipierst und implementierst.
Design guidelines
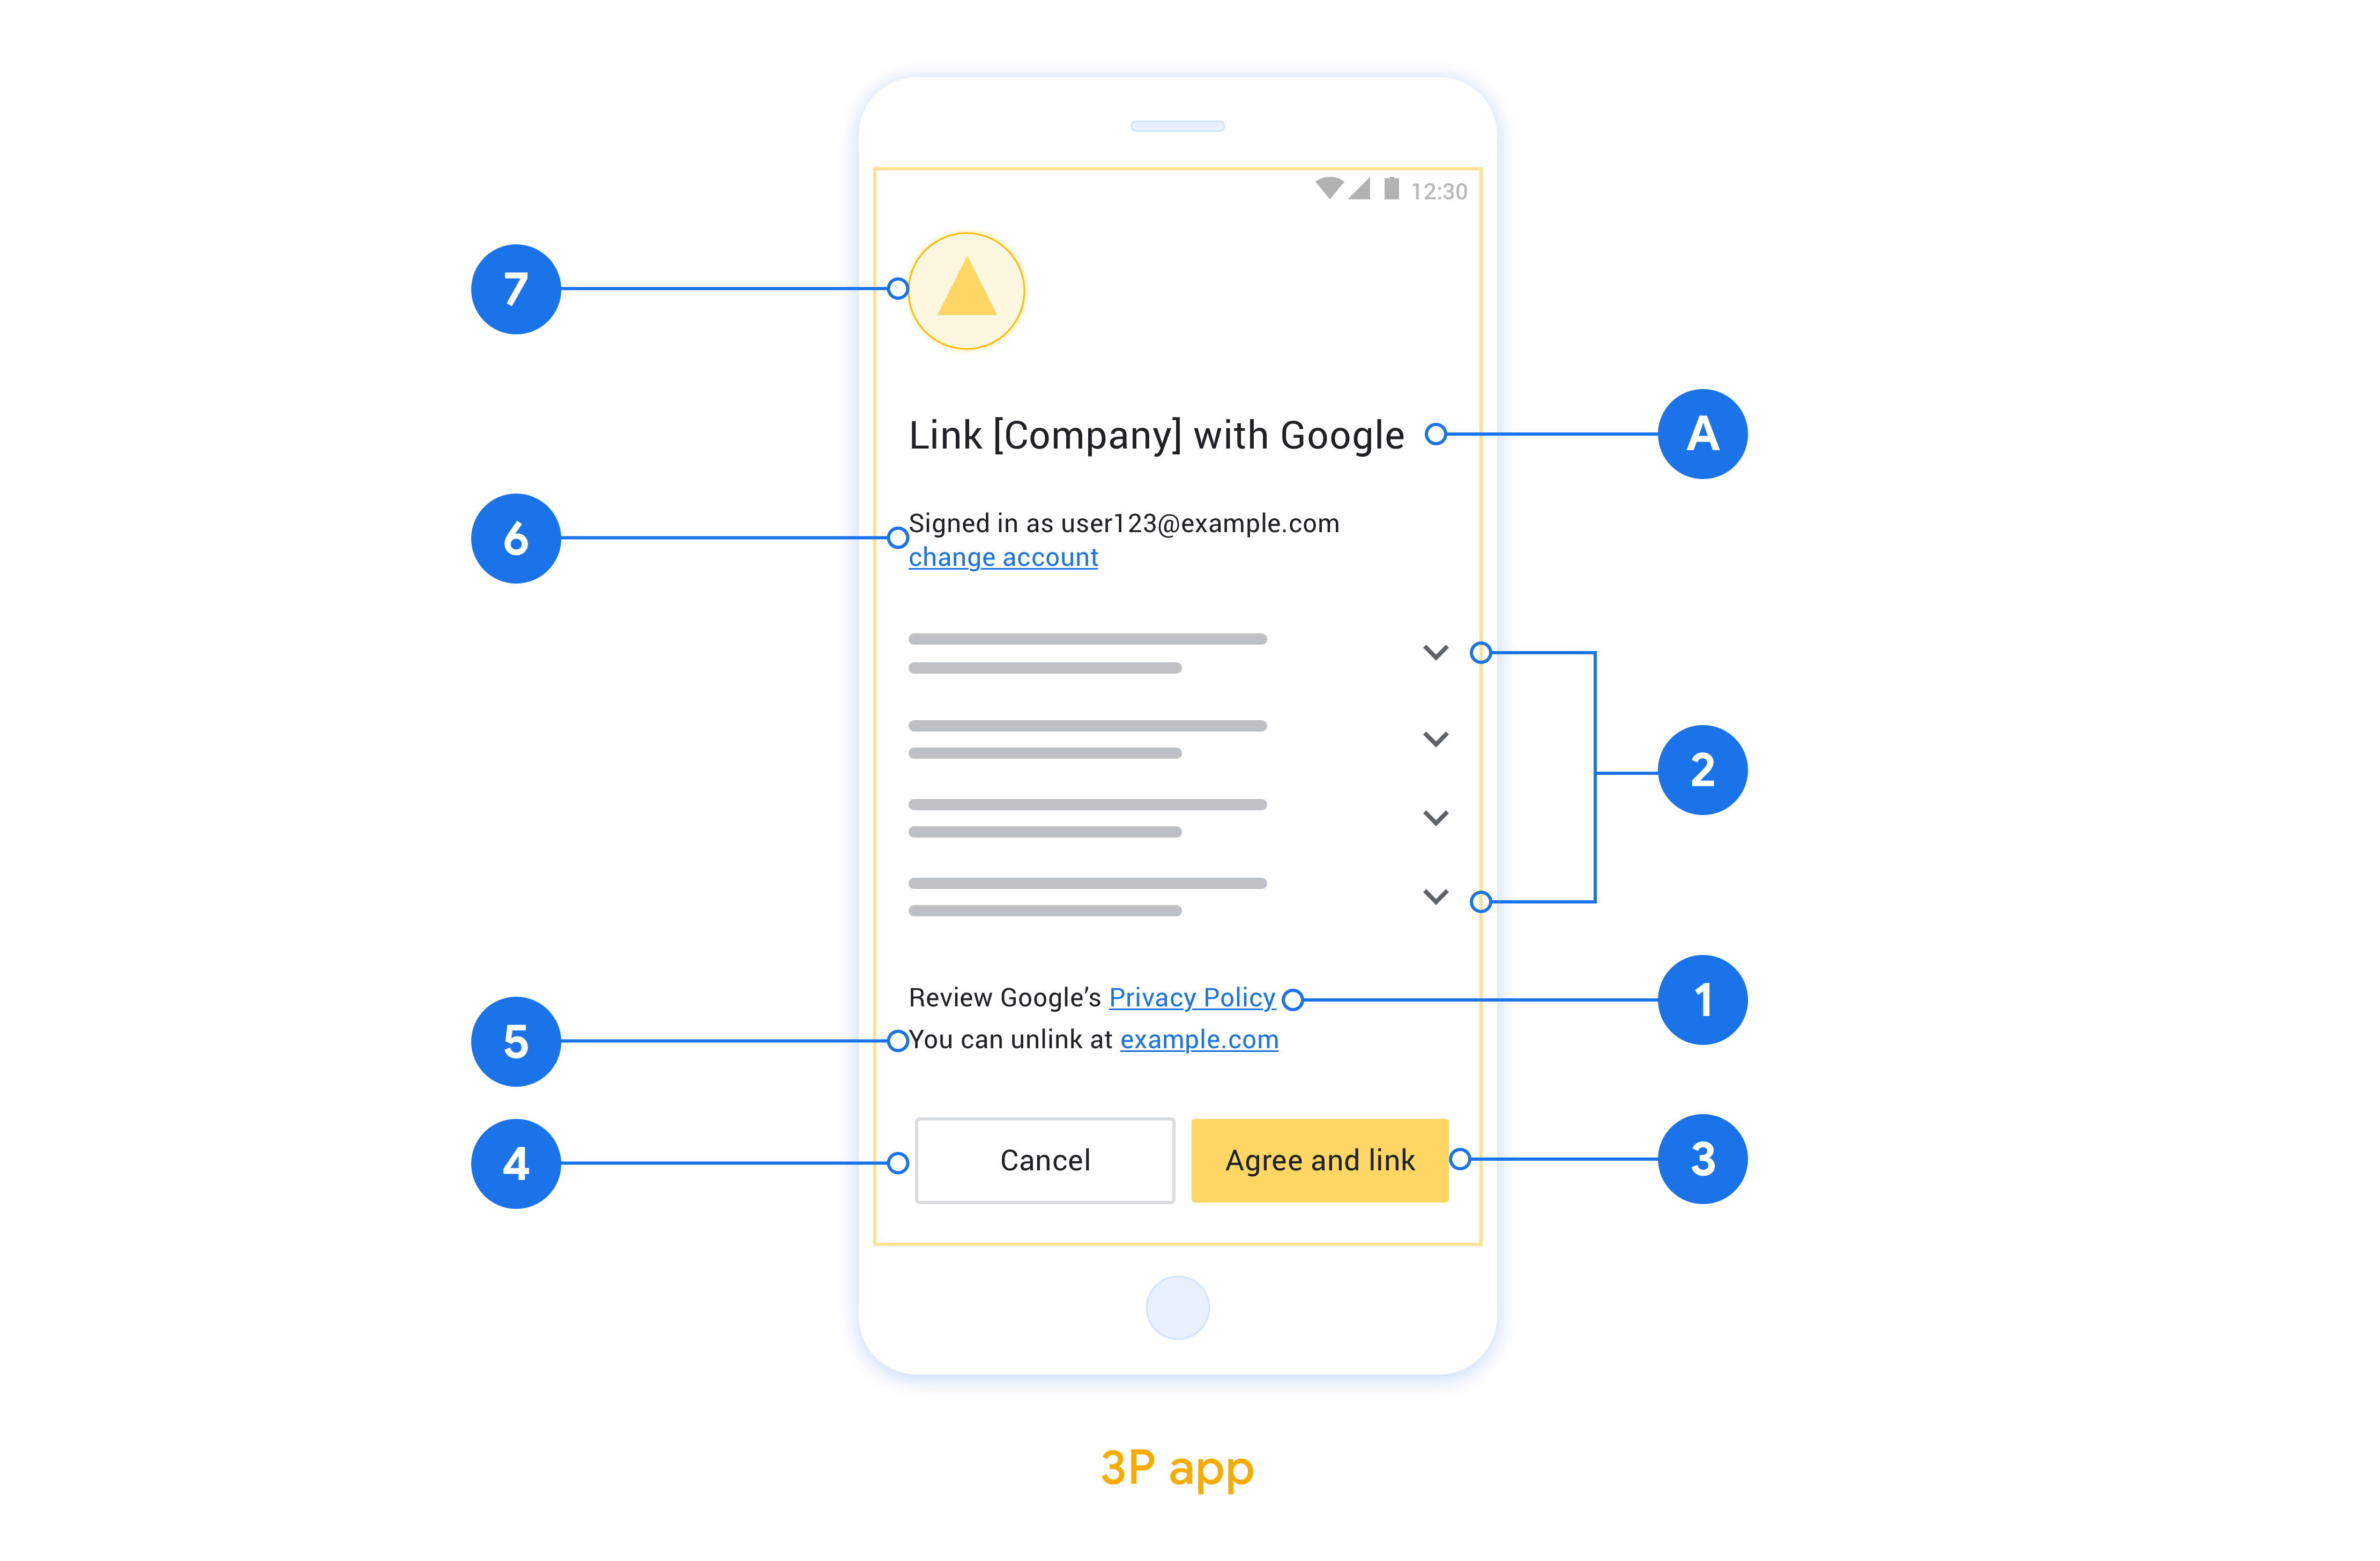
This section describes the design requirements and recommendations for the App Flip account linking consent screen. After Google calls your app, your app displays the consent screen to the user.
Requirements
- You must have a Google authorization statement such as "Once linked, Google will have permission to control your devices."
- You must communicate that the user's account is being linked to Google, not to a specific Google product, such as Google Home or Google Assistant.
- You must state a clear call-to-action on your consent screen and use the wording "Agree and link" for linking action. This is because users need to understand what data they're required to share with Google to link their accounts.
- You must provide a way for users to go back or cancel, if they choose not to link. Use the wording "Cancel" for the cancel action.
- You must implement this workflow: After clicking "Agree and link", you must show linking success and redirect the user back to the Google Home app automatically. The user should now see the linked device on the Google Home app with your action. After clicking "Cancel" you should redirect the user back to the Google Home app.
Recommendations
We recommend that you do the following:
Display Google's Privacy Policy. Include a link to Google's Privacy Policy on the consent screen.
Data to be shared. Use clear and concise language to tell the user what data of theirs Google requires and why.
Ability to unlink. Offer a mechanism for users to unlink, such as a URL to their account settings on your platform. Alternatively, you can include a link to Google Account where users can manage their linked account.
Ability to change user account. Suggest a method for users to switch their account(s). This is especially beneficial if users tend to have multiple accounts.
- If a user must close the consent screen to switch accounts, send a recoverable error to Google so the user can sign in to the desired account with OAuth linking and the implicit flow.
Include your logo. Display your company logo on the consent screen. Use your style guidelines to place your logo. If you wish to also display Google's logo, see Logos and trademarks.
Für OAuth-basiertes App Flip einrichten
In den folgenden Abschnitten werden die Voraussetzungen für das OAuth-basierte App Flip und die Konfiguration des App Flip-Projekts in der Actions Console beschrieben.
Smart-Home-Aktion erstellen und OAuth 2.0-Server einrichten
Bevor Sie App Flip konfigurieren können, müssen Sie Folgendes tun:
- Richten Sie einen OAuth 2.0-Server ein. Weitere Informationen zum Einrichten eines OAuth-Servers findest du unter OAuth 2.0-Server implementieren.
- Erstellen Sie eine Aktion. Folgen Sie der Anleitung unter Actions-Projekt erstellen, um eine Aktion zu erstellen.
App Flip in der Actions Console konfigurieren
Im folgenden Abschnitt wird beschrieben, wie App Flip in der Actions Console konfiguriert wird.
- Füllen Sie alle Felder unter OAuth-Clientinformationen aus. Wenn App Flip nicht unterstützt wird, wird reguläres OAuth als Fallback verwendet.
- Klicken Sie unter App zum Verknüpfen von Konten verwenden(optional) auf das Kästchen Für iOS aktivieren.
- Füllen Sie das Feld Universeller Link aus. Weitere Informationen zu universellen Links findest du unter Links zu deinen Inhalten in Apps und auf Websites zulassen.
- Wenn Sie den Client optional konfigurieren möchten, fügen Sie Bereiche hinzu und klicken Sie unter Client konfigurieren (optional) auf Bereich hinzufügen.
- Klicken Sie auf Speichern.
Sie können jetzt mit dem nächsten Abschnitt fortfahren, um App Flip in Ihrer iOS- oder Android-App zu implementieren.
App Flip in Ihren systemeigenen Apps implementieren
Zum Implementieren von App Flip müssen Sie den Nutzerautorisierungscode in Ihrer App so ändern, dass ein Deeplink von Google akzeptiert wird.
Teste App Flip auf deinem Gerät
Nachdem Sie nun eine Aktion erstellt und App Flip in der Console und in Ihrer App konfiguriert haben, können Sie App Flip auf Ihrem Mobilgerät testen. Sie können Google Assistant app oder Google Home app (GHA) verwenden, um App Flip zu testen.
So testen Sie App Flip aus Google Assistant app:
- Rufen Sie die Actions Console auf und wählen Sie Ihr Projekt aus.
- Klicken Sie im oberen Navigationsbereich auf Test.
- Lösen Sie den Kontoverknüpfungsvorgang über die Google Assistant App aus:
- Öffnen Sie die Google Assistant app.
- Klicke auf Einstellungen.
- Klicke auf dem Tab Assistant auf Smart-Home-Steuerung.
- Klicken Sie auf Add(+).
- Wähle deine Aktion aus der Liste der Anbieter aus. In der Liste wird ihm das Präfix „[test]“ vorangestellt. Wenn Sie Ihre [test]-Aktion aus der Liste auswählen, sollte sie Ihre App öffnen.
- Prüfen Sie, ob Ihre Anwendung gestartet wurde, und beginnen Sie mit dem Testen des Autorisierungsvorgangs.
So testest du App Flip über die Google Home App:
- Rufen Sie die Actions Console auf und wählen Sie Ihr Projekt aus.
- Klicken Sie im oberen Navigationsbereich auf Test.
- Lösen Sie den Kontoverknüpfungsvorgang über die Home App aus:
- Öffnen Sie das Google Home app (GHA).
- Klicken Sie auf die Schaltfläche +.
- Klicken Sie auf Gerät einrichten.
- Klicken Sie auf Du hast bereits Geräte eingerichtet?
- Wähle aus der Liste der Anbieter die Aktion smart home aus. In der Liste wird ihm das Präfix „[test]“ vorangestellt. Wenn Sie Ihre [test]-Aktion aus der Liste auswählen, sollte sie Ihre App öffnen.
- Prüfen Sie, ob Ihre Anwendung gestartet wurde, und beginnen Sie mit dem Testen des Autorisierungsvorgangs.