Test and debug your app
Stay organized with collections
Save and categorize content based on your preferences.
We recommend that you build your local fulfillment app using the steps described
earlier, then test your smart home integration on your own hosting environment
using the following steps:
In your own hosting environment, serve the HTML page that runs your
local fulfillment app. The following snippet shows an example of a static HTML file
that runs your local fulfillment app.
<html>
  <head>
    <!-- Local Home SDK -->
    <script src="//www.gstatic.com/eureka/smarthome/smarthome_sdk.js"></script>
    <!-- Local app under development -->
    <script src="local_execution.js"></script>
  </head>

</html>
Debug from Chrome. Use breakpoints and logs to
troubleshoot your integration.
Modify and compile your TypeScript code, then repeat these steps.
By repeating this build-and-test process, you can see your changes in action
quickly to help you debug issues with your code.
Test device control
In the Google Home Developer Console, you need to
specify the URL of your web app, which
serves the HTML that gets loaded on the Google Home or Google Nest device during local fulfillment.
To test device control with local fulfillment, follow these steps:
Chrome
In the Setup and configuration page of your Cloud-to-cloud
integration in the Google Home Developer Console,
scroll to Local fulfillment
and toggle the setting on.
Under Testing URLs >
Testing URL for Chrome, specify the development server
URL that serves the HTML that runs your local fulfillment app.
Click Save. It may take up to 30 minutes for Google to
propagate your console changes.
Reboot your test Google Home or Google Nest device.
Issue a command to your smart device. For example, if your device
implements the OnOff trait,
you could say "Hey Google, turn on the lights."
Node.js
In the Setup and configuration page of the
Google Home Developer Console,
scroll to Local fulfillment
and toggle the setting on.
Under Testing URLs >
Testing URL for Node, specify the development server URL that serves the JavaScript that runs your local fulfillment app.
Click Save. It may take up to 30 minutes for Google to
propagate your console changes.
Reboot your test Google Home or Google Nest device.
Issue a command to your smart device. For example, if your device
implements the OnOff trait,
you could say "Hey Google, turn on the lights."
For more details on which runtime is used by your device, see Supported
devices.
Debug from Chrome
You can debug your local fulfillment app using Chrome
DevTools.
Before you can debug, make sure
that your environment is correctly set up:
You have set your development URL in the console to a URL reachable by
the Google Home or Google Nest device (either on the local area network or using the internet),
Your machine is connected to the same local area network as the
Google Home or Google Nest device you are testing.
Your network doesn't block packets between devices.
You are logged in with the same Google Account on the
Google Home Developer Console and on the Google Home or Google Nest device.
In the address field of your Chrome browser, launch the Chrome inspector
by entering: chrome://inspect#devices. You should see a list of devices on
the page, and your HTML file should be listed under the name of your test
Google Home or Google Nest device.
Click the blue inspect link under your HTML to launch Chrome DevTools.
Switch to the Console tab.
The Local Home platform outputs your app version and the Local Home SDK
version in the console log. If you see the log, it means that Google has
loaded your app successfully, and is able to connect to it.
If not, reboot your Google Home or Google Nest device.
Figure 1: Local fulfillment app in chrome://inspect.
Determine the local IP address of your test device.
In the address field of your Chrome browser, launch the Chrome inspector
by entering: chrome://inspect#devices.
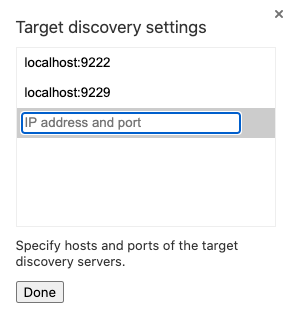
Select Configure... to open the Target discovery settings.
Figure 2: Target discovery settings in chrome://inspect.
Enter DEVICE_IP_ADDRESS:9222 in the list and
click Done.
Click the blue inspect link under your script to launch Chrome DevTools.
Switch to the Console tab.
The Local Home platform outputs your app version and the Local Home SDK
version in the console log. If you see the log, it means that Google has
loaded your app successfully, and is able to connect to it.
If not, reboot your Google Home or Google Nest device.
For more details on which runtime is used by your device, see Supported
Devices.
Debugging tips
Some additional things to keep in mind during debugging include:
Don't link multiple Google Home or Google Nest devices to your test account on the same
local network. You won't be able to control which Google Home or Google Nest device is targeted
with the local fulfillment commands.
Refresh the page in Chrome DevTools to reload your local fulfillment app container
with the latest code from your development URL. This does not reset the
Local Home platform, which may be necessary to re-trigger platform intents
(such as IDENTIFY) in your local fulfillment app. To reset the Local Home platform,
reboot your Google Home or Google Nest device.
Check that your JavaScript app loads without errors. To do this, check
the console section of the DevTools page. If there is a problem, you will see
a message like this: 'Uncaught TypeError: Cannot read property 'open' of null.'
The verificationId from the IDENTIFY response must match one of the
otherDeviceIds from the SYNC response.
For the EXECUTE handler, make sure your HTTP, TCP, or UDP commands can be
received by your device and work as expected.
Errors thrown by your local fulfillment app will appear in your project
error logs.
Prepare and launch to production
When you are ready to launch your smart home Action, follow these steps:
Open a terminal. In your project directory, run the npm run build command.
This command generates the following JavaScript bundles for your app under the
dist directory:
In the Setup and configuration page of the
Google Home Developer Console,
scroll to Local fulfillment and toggle the setting on.
Using the Upload JavaScript buttons, upload the bundle files that
you previously generated.
Figure 3: Upload your JavaScript app.
Make sure to upload both versions of the bundle files (Node, Web)
so that your Action is configured to work correctly across all runtime
environments that local fulfillment supports.
Upload your JavaScript targeting Node.js: Upload the bundle.js
file from the dist/node directory.
Upload your JavaScript targeting Chrome (browser): Upload the
bundle.js file from the dist/web directory.
Test your Action on an Assistant-enabled device, to verify that it behaves
as expected in a production environment. To learn more, see
Test and share your smart home Action.
When you are satisfied with how your Action works, submit it to Google for
production deployment by following the instructions in
Launch your smart home Action. This
includes completing the self-test and certification request steps.