
Chaque intégration Cloud-to-cloud doit inclure un mécanisme d'authentification des utilisateurs.
L'authentification vous permet d'associer les comptes Google de vos utilisateurs aux comptes utilisateur de votre système d'authentification. Cela vous permet d'identifier vos utilisateurs lorsque votre traitement reçoit une intention pour la maison connectée. La maison connectée Google n'est compatible qu'avec OAuth et un flux avec code d'autorisation.
Cette page explique comment configurer votre serveur OAuth 2.0 pour qu'il fonctionne avec votre intégration Cloud-to-cloud.
Association de compte Google avec OAuth
Dans le flux de code d'autorisation, vous avez besoin de deux points de terminaison :
Le point de terminaison authorization, qui présente l'UI de connexion à vos utilisateurs qui ne sont pas encore connectés. Le point de terminaison d'autorisation crée également un code d'autorisation à durée de vie limitée pour enregistrer le consentement des utilisateurs à l'accès demandé.
Le point de terminaison d'échange de jetons, qui est responsable de deux types d'échanges :
- Échange un code d'autorisation contre un jeton d'actualisation à longue durée de vie et un jeton d'accès à courte durée de vie. Cet échange se produit lorsque l'utilisateur suit le processus d'association de compte.
- Échange un jeton d'actualisation à longue durée de vie contre un jeton d'accès à courte durée de vie. Cet échange se produit lorsque Google a besoin d'un nouveau jeton d'accès, car celui qu'il possédait a expiré.
Principes de conception
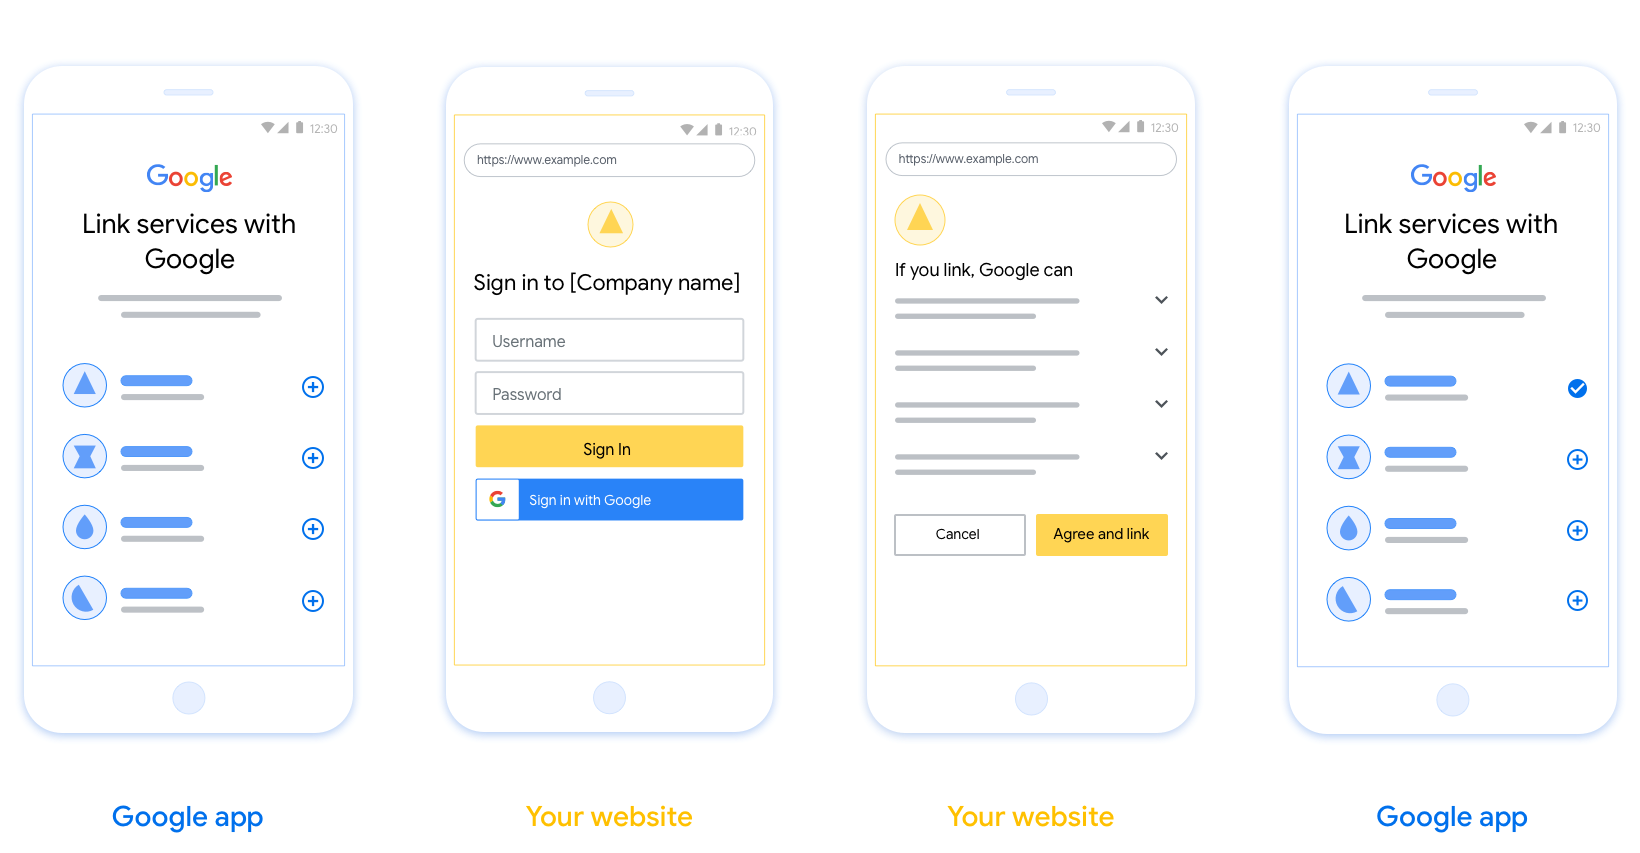
Cette section décrit les exigences et les recommandations de conception pour l'écran utilisateur que vous hébergez pour les flux d'association OAuth. Une fois appelée par l'application Google, votre plate-forme affiche une page de connexion à Google et un écran de consentement pour l'association de compte à l'utilisateur. L'utilisateur est redirigé vers l'application Google après avoir donné son consentement pour associer les comptes.
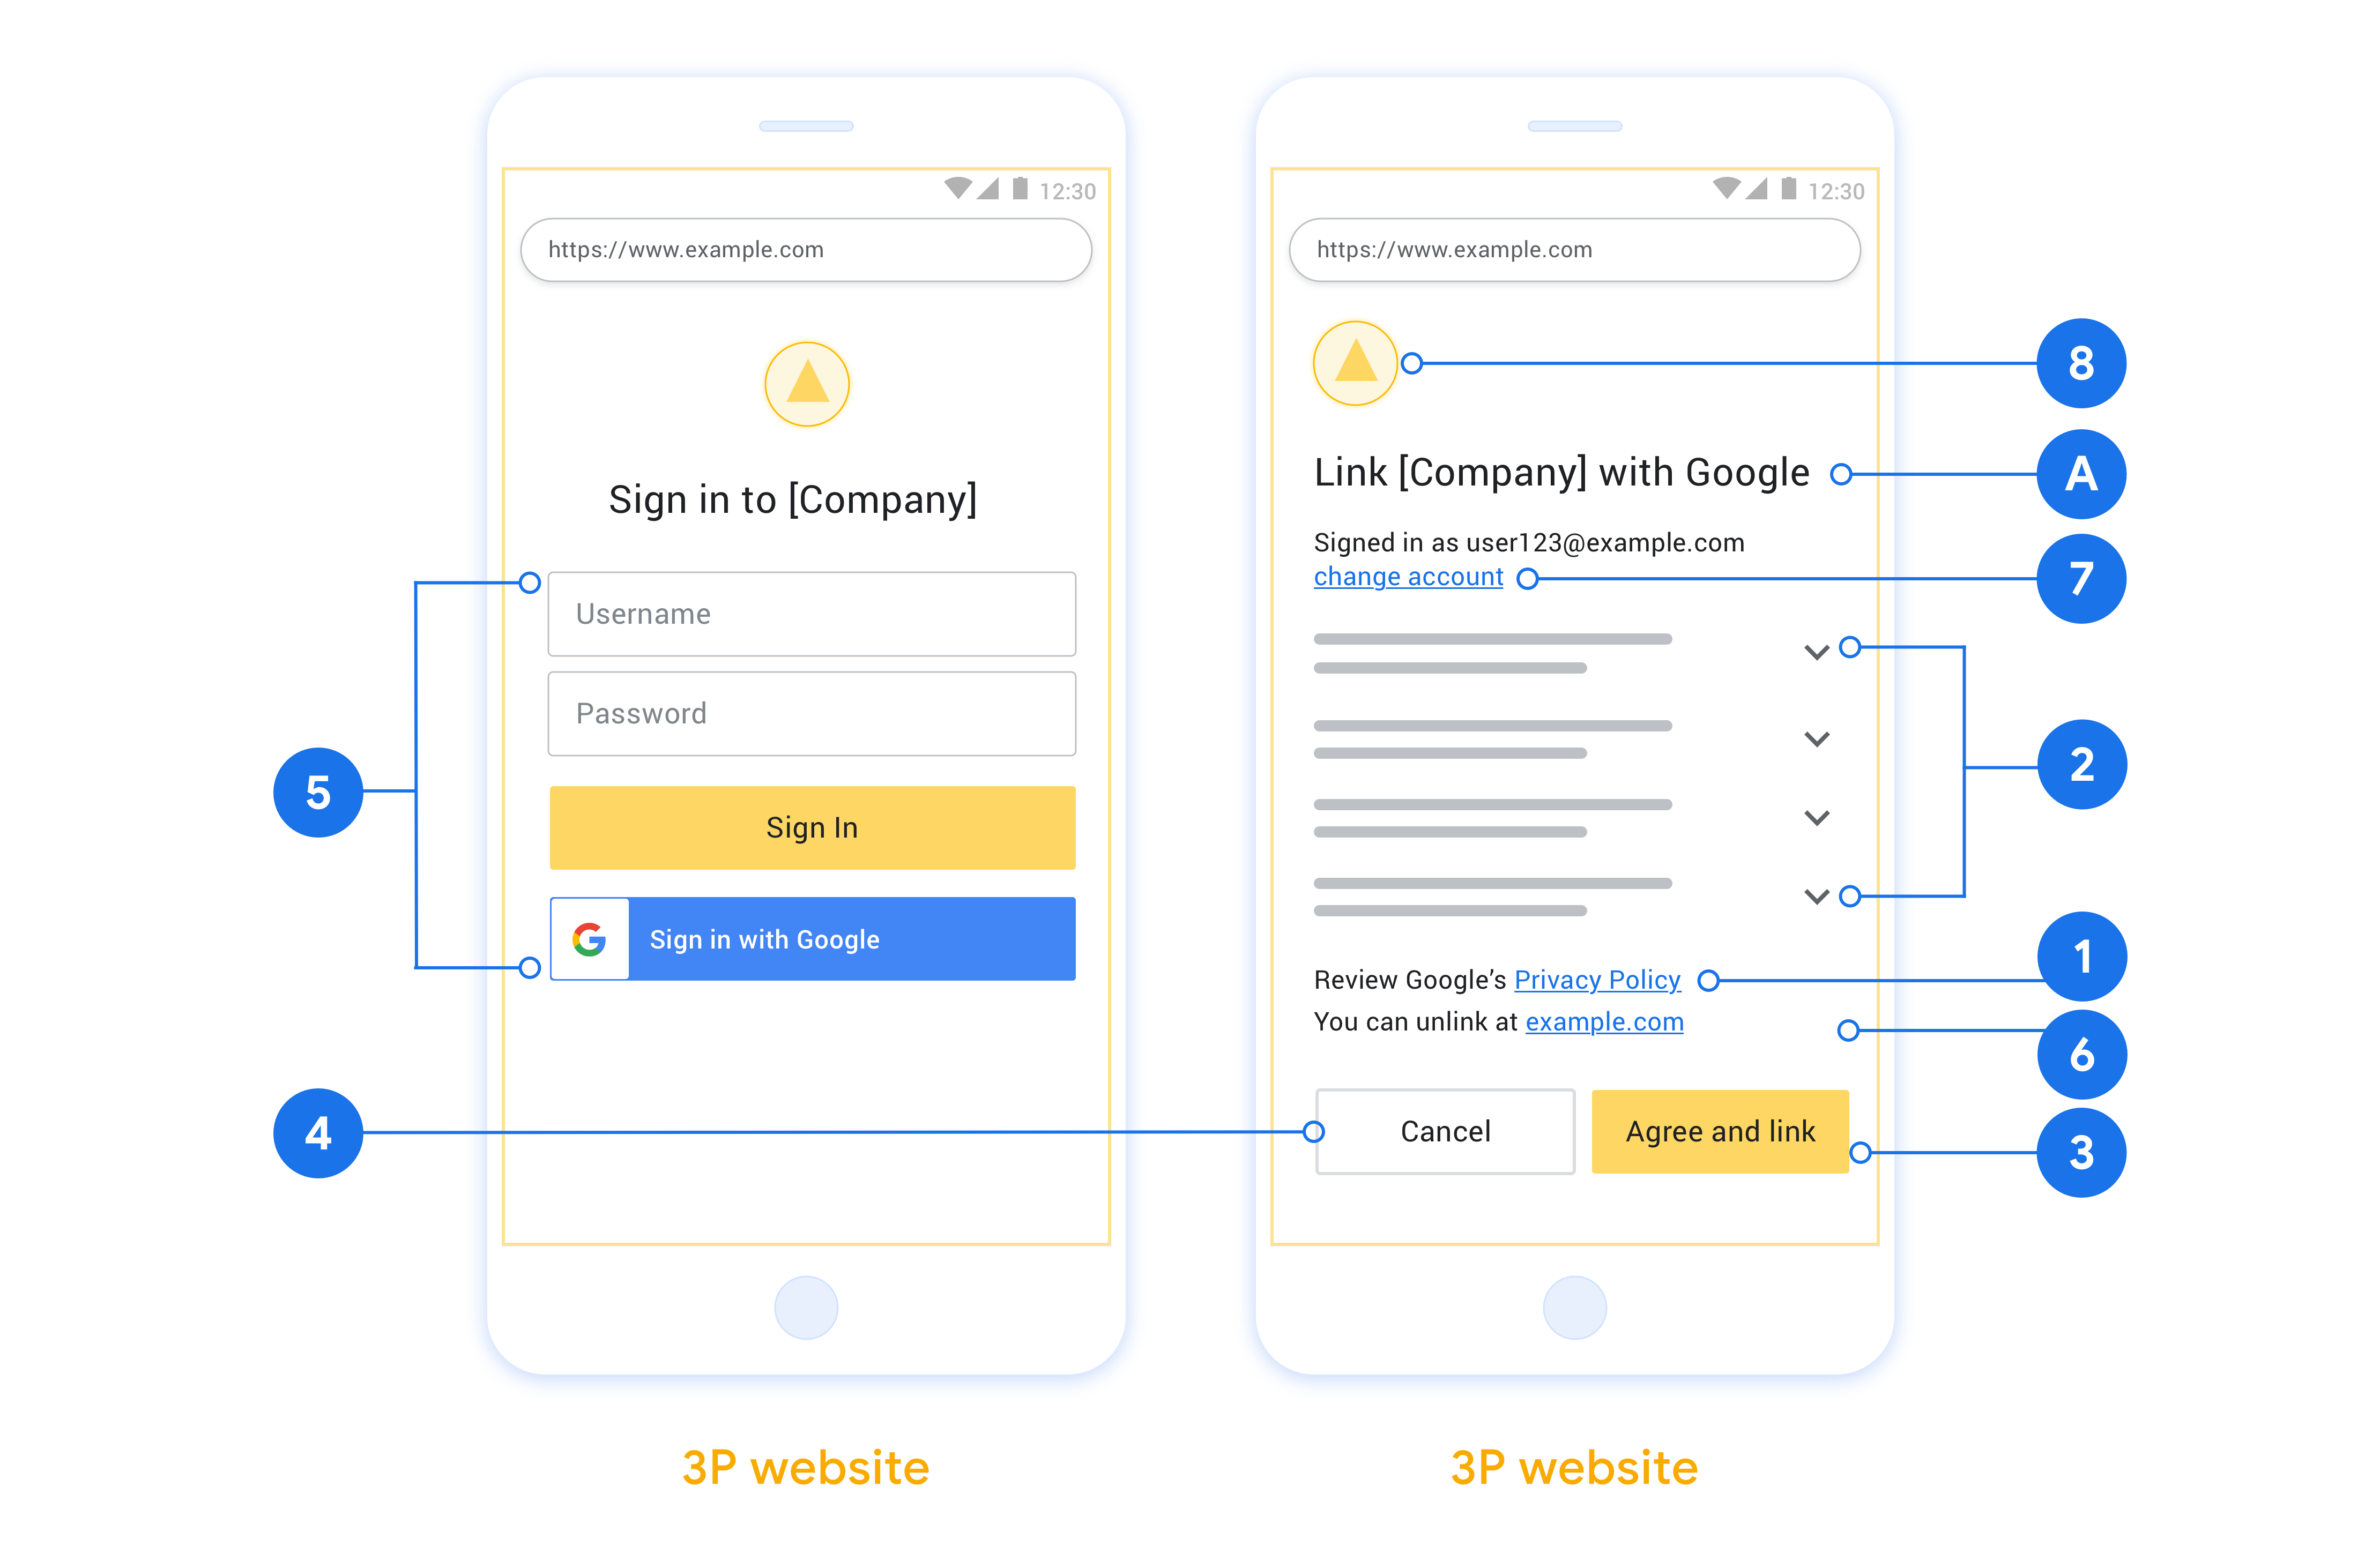
Conditions requises
- Vous devez indiquer que le compte de l'utilisateur sera associé à Google, et non à un produit Google spécifique comme Google Home ou l'Assistant Google.
- Vous devez inclure une déclaration d'autorisation Google, par exemple "En vous connectant, vous autorisez Google à contrôler vos appareils." Consultez la section Autorisation de contrôle des appareils Google des règles Google Home pour les développeurs.
- Vous devez ouvrir la page d'association Web OAuth et vous assurer que les utilisateurs disposent d'une méthode claire pour se connecter à leur compte Google, par exemple des champs pour leur nom d'utilisateur et leur mot de passe. N'utilisez pas la méthode de connexion Google (GSI) qui permet aux utilisateurs d'associer leur compte sans être redirigés vers la page d'association OAuth Web. Cela constitue un non-respect du règlement de Google.
- Vous devez inclure au moins l'un des éléments suivants sur la page d'association OAuth pour indiquer l'intégration à laquelle l'utilisateur associe son compte :
- Logo de l'entreprise
- Nom de l'entreprise
- Nom de l'intégration
- Icône de l'application
Recommandations
Nous vous recommandons d'effectuer les opérations suivantes :
Affichez les règles de confidentialité de Google. Incluez un lien vers les Règles de confidentialité de Google sur l'écran de consentement.
Données à partager : Utilisez un langage clair et concis pour indiquer à l'utilisateur quelles sont les données dont Google a besoin et pourquoi, ainsi que les données d'utilisation ou d'interaction qui peuvent être partagées avec vous par Google.
Incitation à l'action claire : Indiquez clairement l'incitation à l'action sur votre écran de consentement, par exemple "Accepter et associer". En effet, les utilisateurs doivent comprendre quelles données ils doivent partager avec Google pour associer leurs comptes.
Possibilité d'annuler : Offrez aux utilisateurs la possibilité de revenir en arrière ou d'annuler s'ils choisissent de ne pas associer leur compte.
Processus de connexion clair : Assurez-vous que les utilisateurs disposent d'une méthode claire pour se connecter à leur compte Google, par exemple des champs pour leur nom d'utilisateur et leur mot de passe, ou l'option Se connecter avec Google.
Possibilité de dissocier les comptes. Proposez aux utilisateurs un mécanisme pour dissocier leur compte, par exemple une URL vers les paramètres de leur compte sur votre plate-forme. Vous pouvez également inclure un lien vers le compte Google où les utilisateurs peuvent gérer leur compte associé. Si un utilisateur dissocie son compte de votre intégration, utilisez
agentUsers.deletepour informer Google de ce changement.Possibilité de modifier le compte utilisateur Suggérez aux utilisateurs une méthode pour changer de compte. Cela est particulièrement utile si les utilisateurs ont tendance à avoir plusieurs comptes.
- Si un utilisateur doit fermer l'écran de consentement pour changer de compte, envoyez une erreur récupérable à Google afin qu'il puisse se connecter au compte souhaité avec l'association OAuth.
Incluez votre logo. Affichez le logo de votre entreprise sur l'écran de consentement. Utilisez vos consignes de style pour placer votre logo. Si vous souhaitez également afficher le logo de Google, consultez Logos et marques déposées.
Flux avec code d'autorisation
Une implémentation de serveur OAuth 2.0 du flux de code d'autorisation se compose de deux points de terminaison que votre service met à disposition par HTTPS. Le premier point de terminaison est le point de terminaison d'autorisation, qui est chargé de trouver ou d'obtenir le consentement des utilisateurs pour l'accès aux données. Le point de terminaison d'autorisation présente une interface utilisateur de connexion à vos utilisateurs qui ne sont pas encore connectés et enregistre le consentement à l'accès demandé. Le deuxième point de terminaison est le point de terminaison d'échange de jetons, qui est utilisé pour obtenir des chaînes chiffrées, appelées jetons, qui autorisent un utilisateur à accéder à votre service.
Lorsqu'une application Google doit appeler l'une des API de votre service, Google utilise ces points de terminaison ensemble pour obtenir l'autorisation de vos utilisateurs d'appeler ces API en leur nom.
Une session de flux avec code d'autorisation OAuth 2.0 initiée par Google se déroule comme suit :
- Google ouvre votre point de terminaison d'autorisation dans le navigateur de l'utilisateur. Si le flux a commencé sur un appareil vocal uniquement pour une Action, Google transfère l'exécution vers un téléphone.
- L'utilisateur se connecte, s'il ne l'est pas déjà, et autorise Google à accéder à ses données avec votre API, s'il ne l'a pas déjà fait.
- Votre service crée un code d'autorisation et le renvoie à Google. Pour ce faire, redirigez le navigateur de l'utilisateur vers Google en joignant le code d'autorisation à la requête.
- Google envoie le code d'autorisation à votre point de terminaison d'échange de jetons, qui vérifie l'authenticité du code et renvoie un jeton d'accès et un jeton d'actualisation. Le jeton d'accès est un jeton de courte durée que votre service accepte comme identifiant pour accéder aux API. Le jeton d'actualisation est un jeton à longue durée de vie que Google peut stocker et utiliser pour acquérir de nouveaux jetons d'accès lorsqu'ils expirent.
- Une fois que l'utilisateur a terminé le parcours d'association de compte, chaque requête ultérieure envoyée par Google contient un jeton d'accès.
Gérer les demandes d'autorisation
Lorsque vous devez associer un compte à l'aide du flux de code d'autorisation OAuth 2.0, Google redirige l'utilisateur vers votre point de terminaison d'autorisation avec une requête qui inclut les paramètres suivants :
| Paramètres du point de terminaison d'autorisation | |
|---|---|
client_id |
ID client que vous avez attribué à Google. |
redirect_uri |
URL à laquelle vous envoyez la réponse à cette requête. |
state |
Valeur de suivi retransmise telle quelle à Google dans l'URI de redirection. |
scope |
Facultatif : ensemble de chaînes de portée délimitées par des espaces qui spécifient les données pour lesquelles Google demande l'autorisation. |
response_type |
Type de valeur à renvoyer dans la réponse. Pour le flux avec code d'autorisation OAuth 2.0, le type de réponse est toujours code.
|
Par exemple, si votre point de terminaison d'autorisation est disponible à l'adresse https://myservice.example.com/auth, une requête peut ressembler à ce qui suit :
GET https://myservice.example.com/auth?client_id=GOOGLE_CLIENT_ID&redirect_uri=REDIRECT_URI&state=STATE_STRING&scope=REQUESTED_SCOPES&response_type=code
Pour que votre point de terminaison d'autorisation gère les demandes de connexion, procédez comme suit :
- Vérifiez que
client_idcorrespond à l'ID client que vous avez attribué à Google et queredirect_uricorrespond à l'URL de redirection fournie par Google pour votre service. Ces vérifications sont importantes pour éviter d'accorder l'accès à des applications clientes non prévues ou mal configurées. Si vous êtes compatible avec plusieurs flux OAuth 2.0, vérifiez également queresponse_typeest défini surcode. - Vérifiez si l'utilisateur est connecté à votre service. Si l'utilisateur n'est pas connecté, suivez la procédure de connexion ou d'inscription de votre service.
- Générez un code d'autorisation que Google pourra utiliser pour accéder à votre API. Le code d'autorisation peut être n'importe quelle valeur de chaîne, mais il doit représenter de manière unique l'utilisateur, le client pour lequel le jeton est destiné et le délai d'expiration du code, et il ne doit pas être devinable. En général, vous émettez des codes d'autorisation qui expirent au bout de 10 minutes environ.
- Vérifiez que l'URL spécifiée par le paramètre
redirect_urise présente au format suivant :https://oauth-redirect.googleusercontent.com/r/YOUR_PROJECT_ID https://oauth-redirect-sandbox.googleusercontent.com/r/YOUR_PROJECT_ID
- Redirigez le navigateur de l'utilisateur vers l'URL spécifiée par le paramètre
redirect_uri. Incluez le code d'autorisation que vous venez de générer et la valeur d'état d'origine et non modifiée lorsque vous redirigez l'utilisateur en ajoutant les paramètrescodeetstate. Voici un exemple de l'URL obtenue :https://oauth-redirect.googleusercontent.com/r/YOUR_PROJECT_ID?code=AUTHORIZATION_CODE&state=STATE_STRING
Traiter les demandes d'échange de jetons
Le point de terminaison d'échange de jetons de votre service est responsable de deux types d'échanges de jetons :
- Échanger des codes d'autorisation contre des jetons d'accès et d'actualisation
- Échanger des jetons d'actualisation contre des jetons d'accès
Les demandes d'échange de jetons incluent les paramètres suivants :
| Paramètres du point de terminaison d'échange de jetons | |
|---|---|
client_id |
Chaîne qui identifie l'origine de la demande comme étant Google. Cette chaîne doit être enregistrée dans votre système comme identifiant unique de Google. |
client_secret |
Chaîne secrète que vous avez enregistrée auprès de Google pour votre service. |
grant_type |
Type de jeton échangé. Il s'agit de authorization_code ou de refresh_token. |
code |
Lorsque la valeur est grant_type=authorization_code, ce paramètre correspond au code que Google a reçu de votre point de terminaison de connexion ou d'échange de jetons. |
redirect_uri |
Lorsque la valeur est grant_type=authorization_code, ce paramètre correspond à l'URL utilisée dans la demande d'autorisation initiale. |
refresh_token |
Lorsque la valeur est grant_type=refresh_token, ce paramètre correspond au jeton d'actualisation que Google a reçu de votre point de terminaison d'échange de jetons. |
Configurer la façon dont Google envoie les identifiants à votre serveur
Selon son implémentation, votre serveur d'autorisation s'attend à recevoir les identifiants du client dans le corps ou l'en-tête de la requête.
Par défaut, Google envoie les identifiants dans le corps de la requête. Si votre serveur d'autorisation exige que les identifiants du client figurent dans l'en-tête de la requête, vous devez configurer votre intégration Cloud-to-cloud en conséquence :
Accéder à la console pour les développeurs
Dans la liste des projets, cliquez sur Ouvrir à côté du projet sur lequel vous souhaitez travailler.
Sous Cloud à cloud, sélectionnez Développer.
Cliquez sur Ouvrir à côté de votre intégration.
Faites défiler la page jusqu'à la section Autorisations (facultatif), puis cochez la case Demander à Google de transmettre l'ID client et le code secret via l'en-tête d'authentification de base HTTP.
Cliquez sur Enregistrer pour enregistrer les modifications.
Échanger des codes d'autorisation contre des jetons d'accès et d'actualisation
Une fois que l'utilisateur s'est connecté et que votre point de terminaison d'autorisation renvoie un code d'autorisation temporaire à Google, Google envoie une requête à votre point de terminaison d'échange de jetons pour échanger le code d'autorisation contre un jeton d'accès et un jeton d'actualisation.
Pour ces requêtes, la valeur de grant_type est authorization_code et la valeur de code correspond à la valeur du code d'autorisation que vous avez précédemment accordé à Google. Voici un exemple de requête permettant d'échanger un code d'autorisation contre un jeton d'accès et un jeton d'actualisation :
POST /token HTTP/1.1
Host: oauth2.example.com
Content-Type: application/x-www-form-urlencoded

client_id=GOOGLE_CLIENT_ID&client_secret=GOOGLE_CLIENT_SECRET&grant_type=authorization_code&code=AUTHORIZATION_CODE&redirect_uri=REDIRECT_URI
Pour échanger des codes d'autorisation contre un jeton d'accès et un jeton d'actualisation, votre point de terminaison d'échange de jetons répond aux requêtes POST en exécutant les étapes suivantes :
- Vérifiez que
client_ididentifie l'origine de la requête comme une origine autorisée et queclient_secretcorrespond à la valeur attendue. - Vérifiez que le code d'autorisation est valide et n'a pas expiré, et que l'ID client spécifié dans la requête correspond à l'ID client associé au code d'autorisation.
- Vérifiez que l'URL spécifiée par le paramètre
redirect_uriest identique à la valeur utilisée dans la demande d'autorisation initiale. - Si vous ne pouvez pas valider tous les critères ci-dessus, renvoyez une erreur HTTP 400 "Bad Request" (Mauvaise requête) avec
{"error": "invalid_grant"}comme corps. - Sinon, utilisez l'ID utilisateur du code d'autorisation pour générer un jeton d'actualisation et un jeton d'accès. Ces jetons peuvent être n'importe quelle valeur de chaîne, mais ils doivent représenter de manière unique l'utilisateur et le client pour lesquels le jeton est destiné, et ils ne doivent pas être devinables. Pour les jetons d'accès, enregistrez également leur délai d'expiration, qui est généralement d'une heure après leur émission. Les jetons d'actualisation n'expirent pas.
- Renvoie l'objet JSON suivant dans le corps de la réponse HTTPS :
{
"token_type": "Bearer",
"access_token": "ACCESS_TOKEN",
"refresh_token": "REFRESH_TOKEN",
"expires_in": SECONDS_TO_EXPIRATION
}
Google stocke le jeton d'accès et le jeton d'actualisation de l'utilisateur, et enregistre l'expiration du jeton d'accès. Lorsque le jeton d'accès expire, Google utilise le jeton d'actualisation pour obtenir un nouveau jeton d'accès à partir de votre point de terminaison d'échange de jetons.
Échanger des jetons d'actualisation contre des jetons d'accès
Lorsqu'un jeton d'accès expire, Google envoie une requête à votre point de terminaison d'échange de jetons pour échanger un jeton d'actualisation contre un nouveau jeton d'accès.
Pour ces requêtes, la valeur de grant_type est refresh_token et la valeur de refresh_token correspond à la valeur du jeton d'actualisation que vous avez précédemment accordé à Google. Voici un exemple de requête permettant d'échanger un jeton d'actualisation contre un jeton d'accès :
POST /token HTTP/1.1
Host: oauth2.example.com
Content-Type: application/x-www-form-urlencoded

client_id=GOOGLE_CLIENT_ID&client_secret=GOOGLE_CLIENT_SECRET&grant_type=refresh_token&refresh_token=REFRESH_TOKEN
Pour échanger un jeton d'actualisation contre un jeton d'accès, votre point de terminaison d'échange de jetons répond aux requêtes POST en exécutant les étapes suivantes :
- Vérifiez que
client_ididentifie l'origine de la requête comme étant Google et queclient_secretcorrespond à la valeur attendue. - Vérifiez que le jeton d'actualisation est valide et que l'ID client spécifié dans la requête correspond à l'ID client associé au jeton d'actualisation.
- Si vous ne pouvez pas valider tous les critères ci-dessus, renvoyez une erreur HTTP 400 "Bad Request" (Mauvaise requête) avec
{"error": "invalid_grant"}comme corps. - Sinon, utilisez l'ID utilisateur du jeton d'actualisation pour générer un jeton d'accès. Ces jetons peuvent correspondre à n'importe quelle valeur de chaîne, mais ils doivent représenter de manière unique l'utilisateur et le client pour lesquels le jeton est destiné, et ils ne doivent pas être devinables. Pour les jetons d'accès, enregistrez également leur délai d'expiration, généralement une heure après leur émission.
- Renvoie l'objet JSON suivant dans le corps de la réponse HTTPS :
{
"token_type": "Bearer",
"access_token": "ACCESS_TOKEN",
"expires_in": SECONDS_TO_EXPIRATION
}
Gérer les requêtes userinfo
Le point de terminaison userinfo est une ressource protégée par OAuth 2.0 qui renvoie les revendications concernant l'utilisateur associé. L'implémentation et l'hébergement du point de terminaison userinfo sont facultatifs, sauf dans les cas d'utilisation suivants:
- Connexion à un compte associé avec Google One Tap.
- Abonnement simplifié sur Android TV.
Une fois que le jeton d'accès a été récupéré avec succès à partir du point de terminaison de votre jeton, Google envoie une demande à ce point de terminaison pour récupérer les informations de base du profil sur l'utilisateur associé.
| En-têtes de requête du point de terminaison userinfo | |
|---|---|
Authorization header |
Jeton d'accès de type Bearer. |
Par exemple, si votre point de terminaison userinfo est disponible à l'adresse
https://myservice.example.com/userinfo, une requête peut se présenter comme suit:
GET /userinfo HTTP/1.1
Host: myservice.example.com
Authorization: Bearer ACCESS_TOKEN
Pour que votre point de terminaison userinfo traite les requêtes, procédez comme suit:
- Extrayez le jeton d'accès de l'en-tête "Authorization" et renvoyez les informations concernant l'utilisateur associé au jeton d'accès.
- Si le jeton d'accès n'est pas valide, renvoyez une erreur HTTP 401 Opération non autorisée à l'aide de l'en-tête de réponse
WWW-Authenticate. Voici un exemple de réponse d'erreur userinfo:HTTP/1.1 401 Unauthorized WWW-Authenticate: error="invalid_token", error_description="The Access Token expired"
Si le jeton d'accès est valide, renvoyez une réponse HTTP 200 avec l'objet JSON suivant dans le corps de la requête réponse:
{ "sub": "USER_UUID", "email": "EMAIL_ADDRESS", "given_name": "FIRST_NAME", "family_name": "LAST_NAME", "name": "FULL_NAME", "picture": "PROFILE_PICTURE", }Réponse du point de terminaison userinfo subIdentifiant unique qui identifie l'utilisateur dans votre système. emailAdresse e-mail de l'utilisateur. given_nameFacultatif:prénom de l'utilisateur. family_nameFacultatif:nom de l'utilisateur. nameFacultatif:nom complet de l'utilisateur. pictureFacultatif:photo de profil de l'utilisateur.