
Jede Cloud-to-cloud-Integration muss einen Mechanismus zur Authentifizierung von Nutzern enthalten.
Über die Authentifizierung kannst du die Google-Konten deiner Nutzer mit Nutzerkonten in deinem Authentifizierungssystem verknüpfen. So kannst du Nutzer identifizieren, wenn deine Auftragsausführung einen Smart-Home-Intent empfängt. Google Smart Home unterstützt nur OAuth mit einem Autorisierungscode-Ablauf.
Auf dieser Seite wird beschrieben, wie Sie Ihren OAuth 2.0-Server so einrichten, dass er mit Ihrer Cloud-to-cloud-Integration funktioniert.
Google-Kontoverknüpfung mit OAuth
Beim Autorisierungscode-Ablauf benötigen Sie zwei Endpunkte:
Der Autorisierungsendpunkt, über den die Anmeldeoberfläche für Nutzer angezeigt wird, die noch nicht angemeldet sind. Am Autorisierungsendpunkt wird auch ein kurzlebiger Autorisierungscode erstellt, um die Einwilligung der Nutzer für den angeforderten Zugriff aufzuzeichnen.
Der Tokenaustausch-Endpunkt, der für zwei Arten von Austauschvorgängen zuständig ist:
- Tauscht einen Autorisierungscode gegen ein langlebiges Aktualisierungstoken und ein kurzlebiges Zugriffstoken ein. Dieser Austausch findet statt, wenn der Nutzer den Ablauf zur Kontoverknüpfung durchläuft.
- Tauscht ein langlebiges Aktualisierungstoken gegen ein kurzlebiges Zugriffstoken ein. Dieser Austausch erfolgt, wenn Google ein neues Zugriffstoken benötigt, weil das vorhandene abgelaufen ist.
Gestaltungsrichtlinien
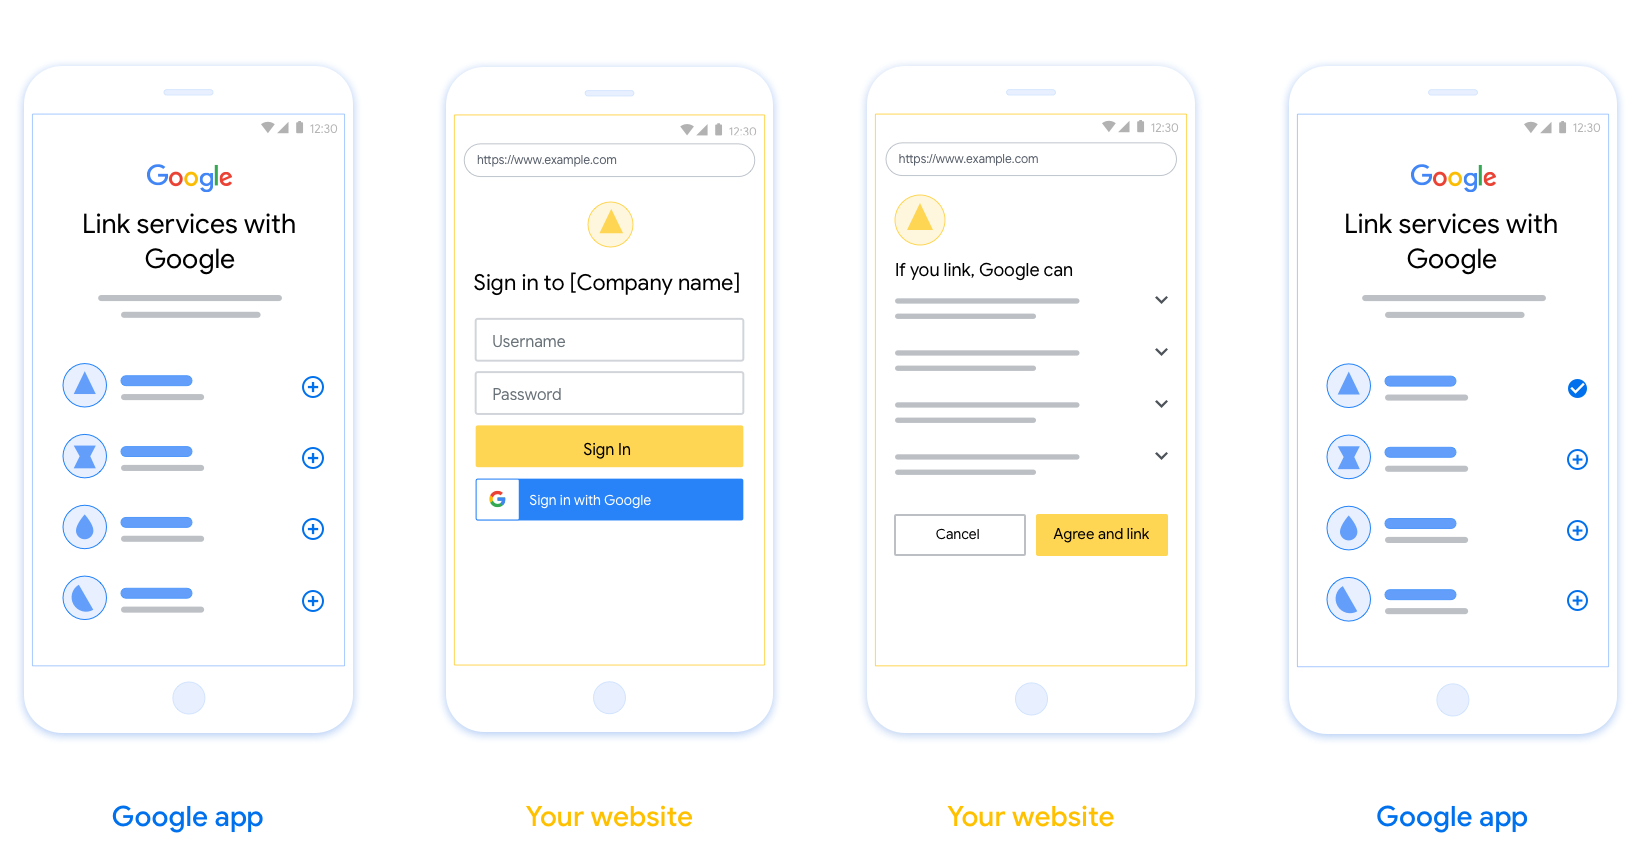
In diesem Abschnitt werden die Designanforderungen und ‑empfehlungen für den Nutzerbildschirm beschrieben, den Sie für OAuth-Verknüpfungsabläufe hosten. Nachdem die Funktion von der Google-App aufgerufen wurde, zeigt Ihre Plattform dem Nutzer eine Anmeldeseite für Google und einen Bildschirm zur Einwilligung in die Kontoverknüpfung an. Nachdem der Nutzer der Kontoverknüpfung zugestimmt hat, wird er zur Google-App zurückgeleitet.
Voraussetzungen
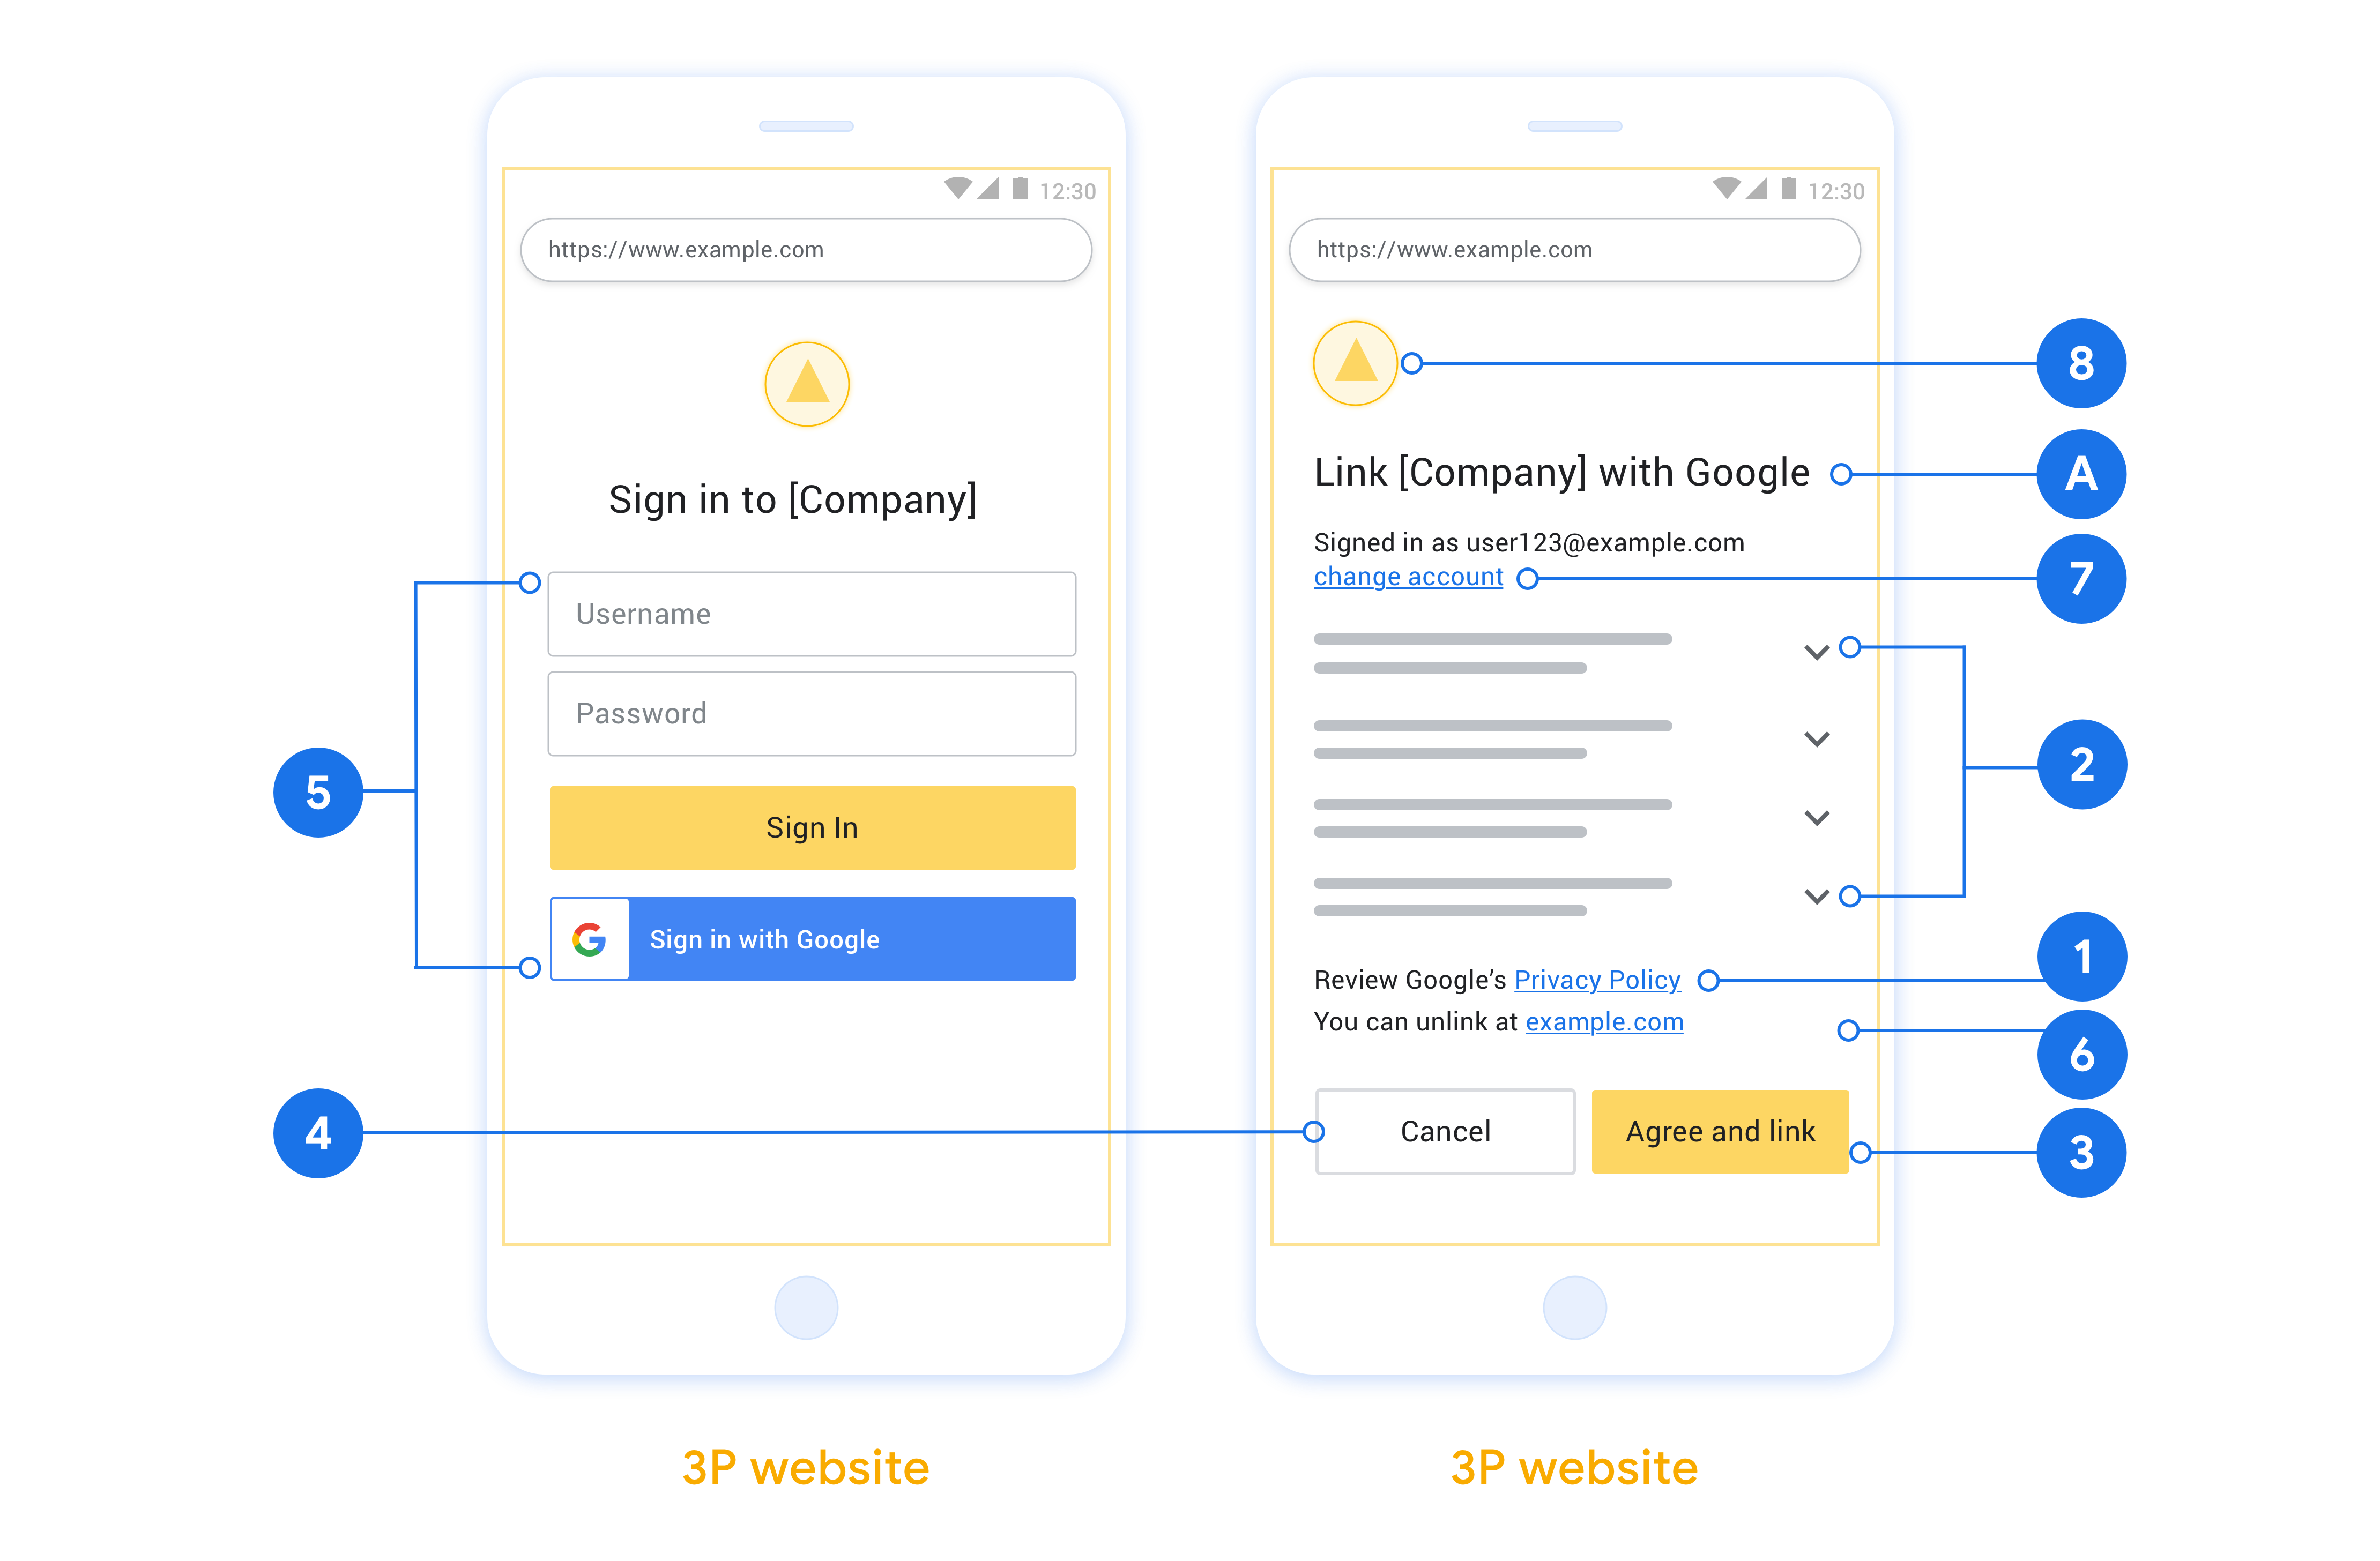
- Sie müssen dem Nutzer mitteilen, dass sein Konto mit Google verknüpft wird, nicht mit einem bestimmten Google-Produkt wie Google Home oder Google Assistant.
- Du musst über eine Google-Autorisierungserklärung verfügen, z. B. „Durch die Anmeldung autorisierst du Google, deine Geräte zu steuern.“ Weitere Informationen finden Sie im Abschnitt Google Device Control Authorization (Google-Autorisierung für die Gerätesteuerung) in den Google Home-Entwicklerrichtlinien.
- Sie müssen die Web-OAuth-Verknüpfungsseite öffnen und dafür sorgen, dass Nutzer sich auf einfache Weise in ihrem Google-Konto anmelden können, z. B. über Felder für ihren Nutzernamen und ihr Passwort. Verwenden Sie nicht die Google-Anmeldemethode (GSI), mit der Nutzer verknüpfen können, ohne zur Web-OAuth-Verknüpfungsseite weitergeleitet zu werden. Es stellt einen Verstoß gegen die Google-Richtlinien dar.
- Sie müssen mindestens eines der folgenden Elemente auf der OAuth-Verknüpfungsseite angeben, um die Integration anzugeben, mit der der Nutzer eine Verknüpfung herstellt:
- Firmenlogo
- Name des Unternehmens
- Name der Integration
- App-Symbol
Empfehlungen
Wir empfehlen Folgendes:
Datenschutzerklärung von Google anzeigen Fügen Sie auf dem Zustimmungsbildschirm einen Link zur Datenschutzerklärung von Google ein.
Zu teilende Daten: Verwenden Sie eine klare und prägnante Sprache, um dem Nutzer mitzuteilen, welche seiner Daten Google benötigt und warum, und welche Nutzungs- oder Interaktionsdaten von Google an Sie weitergegeben werden dürfen.
Klarer Call-to-Action: Geben Sie auf dem Einwilligungsbildschirm einen eindeutigen Call-to-Action an, z. B. „Zustimmen und verknüpfen“. Nutzer müssen wissen, welche Daten sie mit Google teilen müssen, um ihre Konten zu verknüpfen.
Möglichkeit zur Kündigung: Bieten Sie Nutzern die Möglichkeit, zurückzugehen oder den Vorgang abzubrechen, wenn sie keine Verknüpfung herstellen möchten.
Übersichtlicher Anmeldevorgang: Nutzer müssen sich auf einfache Weise in ihrem Google-Konto anmelden können, z. B. über Felder für Nutzername und Passwort oder über Mit Google anmelden.
Möglichkeit, die Verknüpfung aufzuheben: Bieten Sie Nutzern eine Möglichkeit, die Verknüpfung aufzuheben, z. B. über eine URL zu ihren Kontoeinstellungen auf Ihrer Plattform. Alternativ können Sie einen Link zu Google-Konto einfügen, über den Nutzer ihr verknüpftes Konto verwalten können. Wenn ein Nutzer die Verknüpfung zu Ihrer Integration aufhebt, benachrichtigen Sie Google mit
agentUsers.deleteüber die Änderung.Nutzerkonto ändern: Schlagen Sie Nutzern eine Methode vor, mit der sie ihr(e) Konto(s) wechseln können. Das ist besonders dann von Vorteil, wenn Nutzer mehrere Konten haben.
- Wenn ein Nutzer den Zustimmungsbildschirm schließen muss, um das Konto zu wechseln, senden Sie einen behebaren Fehler an Google, damit sich der Nutzer mit OAuth-Verknüpfung im gewünschten Konto anmelden kann.
Fügen Sie Ihr Logo ein. Ihr Unternehmenslogo auf dem Zustimmungsbildschirm anzeigen Platzieren Sie Ihr Logo gemäß Ihren Style-Richtlinien. Wenn Sie auch das Google-Logo anzeigen möchten, lesen Sie den Abschnitt Logos und Marken.
Autorisierungscode-Ablauf
Eine OAuth 2.0-Serverimplementierung des Autorisierungscodeablaufs besteht aus zwei Endpunkten, die Ihr Dienst über HTTPS zur Verfügung stellt. Der erste Endpunkt ist der Autorisierungsendpunkt, der dafür zuständig ist, die Zustimmung von Nutzern für den Datenzugriff zu finden oder einzuholen. Der Autorisierungsendpunkt präsentiert Ihren Nutzern, die noch nicht angemeldet sind, eine Anmeldeoberfläche und erfasst die Zustimmung zum angeforderten Zugriff. Der zweite Endpunkt ist der Tokenaustausch-Endpunkt, der verwendet wird, um verschlüsselte Strings, sogenannte Tokens, zu erhalten, die einen Nutzer zum Zugriff auf Ihren Dienst autorisieren.
Wenn eine Google-Anwendung eine der APIs Ihres Dienstes aufrufen muss, verwendet Google diese Endpunkte zusammen, um die Erlaubnis Ihrer Nutzer zu erhalten, diese APIs in ihrem Namen aufzurufen.
Eine von Google initiierte OAuth 2.0-Sitzung mit Autorisierungscode-Vorgang hat den folgenden Ablauf:
- Google öffnet Ihren Autorisierungsendpunkt im Browser des Nutzers. Wenn der Ablauf auf einem reinen Sprachgerät für eine Aktion gestartet wurde, überträgt Google die Ausführung auf ein Smartphone.
- Der Nutzer meldet sich an, falls er noch nicht angemeldet ist, und erteilt Google die Erlaubnis, mit Ihrer API auf seine Daten zuzugreifen, falls er diese Erlaubnis noch nicht erteilt hat.
- Ihr Dienst erstellt einen Autorisierungscode und gibt ihn an Google zurück. Dazu leiten Sie den Browser des Nutzers mit dem Autorisierungscode, der an die Anfrage angehängt ist, zurück zu Google.
- Google sendet den Autorisierungscode an Ihren Tokenaustausch-Endpunkt, der die Authentizität des Codes überprüft und ein Zugriffstoken und ein Aktualisierungstoken zurückgibt. Das Zugriffstoken ist ein kurzlebiges Token, das Ihr Dienst als Anmeldedaten für den Zugriff auf APIs akzeptiert. Das Aktualisierungstoken ist ein langlebiges Token, das Google speichern und verwenden kann, um neue Zugriffstokens zu erhalten, wenn diese ablaufen.
- Nachdem der Nutzer den Ablauf für die Kontoverknüpfung abgeschlossen hat, enthält jede nachfolgende Anfrage von Google ein Zugriffstoken.
Autorisierungsanfragen verarbeiten
Wenn Sie die Kontoverknüpfung mit dem OAuth 2.0-Autorisierungscodeablauf durchführen müssen, sendet Google den Nutzer mit einer Anfrage, die die folgenden Parameter enthält, an Ihren Autorisierungsendpunkt:
| Parameter des Autorisierungsendpunkts | |
|---|---|
client_id |
Die Client-ID, die Sie Google zugewiesen haben. |
redirect_uri |
Die URL, an die Sie die Antwort auf diese Anfrage senden. |
state |
Ein Buchhaltungswert, der in der Weiterleitungs-URI unverändert an Google zurückgegeben wird. |
scope |
Optional: Eine durch Leerzeichen getrennte Menge von Bereichsstrings, die die Daten angeben, für die Google eine Autorisierung anfordert. |
response_type |
Der Typ des Werts, der in der Antwort zurückgegeben werden soll. Für den OAuth 2.0 Autorisierungscode-Vorgang ist der Antworttyp immer code.
|
Wenn Ihr Autorisierungsendpunkt beispielsweise unter https://myservice.example.com/auth verfügbar ist, könnte eine Anfrage so aussehen:
GET https://myservice.example.com/auth?client_id=GOOGLE_CLIENT_ID&redirect_uri=REDIRECT_URI&state=STATE_STRING&scope=REQUESTED_SCOPES&response_type=code
Damit Ihr Autorisierungsendpunkt Anmeldeanfragen verarbeiten kann, führen Sie die folgenden Schritte aus:
- Prüfen Sie, ob die
client_idmit der Client-ID übereinstimmt, die Sie Google zugewiesen haben, und ob dieredirect_urimit der von Google für Ihren Dienst bereitgestellten Weiterleitungs-URL übereinstimmt. Diese Prüfungen sind wichtig, um zu verhindern, dass nicht beabsichtigten oder falsch konfigurierten Client-Apps Zugriff gewährt wird. Wenn Sie mehrere OAuth 2.0-Abläufe unterstützen, prüfen Sie auch, obresponse_typeaufcodegesetzt ist. - Prüfen Sie, ob der Nutzer in Ihrem Dienst angemeldet ist. Wenn der Nutzer nicht angemeldet ist, führen Sie den Anmelde- oder Registrierungsablauf Ihres Dienstes aus.
- Generieren Sie einen Autorisierungscode, mit dem Google auf Ihre API zugreifen kann. Der Autorisierungscode kann ein beliebiger Stringwert sein, muss aber den Nutzer, den Client, für den das Token bestimmt ist, und die Ablaufzeit des Codes eindeutig darstellen und darf nicht erraten werden können. In der Regel geben Sie Autorisierungscodes aus, die nach etwa 10 Minuten ablaufen.
- Prüfen Sie, ob die durch den Parameter
redirect_uriangegebene URL das folgende Format hat:https://oauth-redirect.googleusercontent.com/r/YOUR_PROJECT_ID https://oauth-redirect-sandbox.googleusercontent.com/r/YOUR_PROJECT_ID
- Leiten Sie den Browser des Nutzers an die URL weiter, die durch den
redirect_uriParameter angegeben wird. Fügen Sie beim Weiterleiten den gerade generierten Autorisierungscode und den ursprünglichen, unveränderten Statuswert ein, indem Sie diecodeundstateParameter anhängen. Die resultierende URL könnte beispielsweise so aussehen:https://oauth-redirect.googleusercontent.com/r/YOUR_PROJECT_ID?code=AUTHORIZATION_CODE&state=STATE_STRING
Tokenaustauschanfragen verarbeiten
Der Tokenaustausch-Endpunkt Ihres Dienstes ist für zwei Arten von Tokenaustausch zuständig:
- Autorisierungscodes gegen Zugriffstokens und Aktualisierungstokens austauschen
- Aktualisierungstokens gegen Zugriffstokens austauschen
Tokenaustauschanfragen enthalten die folgenden Parameter:
| Parameter des Tokenaustausch-Endpunkts | |
|---|---|
client_id |
Ein String, der Google als Ursprung der Anfrage identifiziert. Dieser String muss in Ihrem System als eindeutige Kennung von Google registriert sein. |
client_secret |
Ein geheimer String, den Sie bei Google für Ihren Dienst registriert haben. |
grant_type |
Der Typ des Tokens, das ausgetauscht wird. Er ist entweder
authorization_code oder refresh_token. |
code |
Wenn grant_type=authorization_code, ist dieser Parameter der
Code, den Google von Ihrem Anmelde- oder Tokenaustausch
Endpunkt erhalten hat. |
redirect_uri |
Wenn grant_type=authorization_code, ist dieser Parameter die
URL, die in der ursprünglichen Autorisierungsanfrage verwendet wurde. |
refresh_token |
Wenn grant_type=refresh_token, ist dieser Parameter das
Aktualisierungstoken, das Google von Ihrem Tokenaustausch-Endpunkt erhalten hat. |
Konfigurieren, wie Google Anmeldedaten an Ihren Server sendet
Je nach Implementierung erwartet Ihr Autorisierungsserver, dass die Client-Anmeldedaten entweder im Anfragetext oder im Anfrageheader enthalten sind.
Standardmäßig sendet Google die Anmeldedaten im Anfragetext. Wenn Ihr Autorisierungsserver die Client-Anmeldedaten im Anfrage header benötigt, müssen Sie Ihre Cloud-to-cloud Integration entsprechend konfigurieren:
Klicken Sie in der Liste der Projekte neben dem Projekt, mit dem Sie arbeiten möchten, auf Öffnen.
Wählen Sie unter Cloud-zu-Cloud die Option Entwickeln aus.
Klicken Sie neben Ihrer Integration auf Öffnen.
Scrollen Sie nach unten zum Abschnitt Berechtigungen (optional) und wählen Sie das Kästchen Zulassen, dass Google die Client-ID und den Clientschlüssel über den Header für die HTTP-Basic-Authentifizierung überträgt aus.
Klicken Sie auf Speichern , um Ihre Änderungen zu übernehmen.
Autorisierungscodes gegen Zugriffstokens und Aktualisierungstokens austauschen
Nachdem sich der Nutzer angemeldet hat und Ihr Autorisierungsendpunkt einen kurzlebigen Autorisierungscode an Google zurückgegeben hat, sendet Google eine Anfrage an Ihren Tokenaustausch-Endpunkt, um den Autorisierungscode gegen ein Zugriffstoken und ein Aktualisierungstoken auszutauschen.
Für diese Anfragen ist der Wert von grant_type authorization_code und der
Wert von code ist der Wert des Autorisierungscodes, den Sie Google zuvor gewährt haben. Das folgende Beispiel zeigt eine Anfrage zum Austauschen eines Autorisierungscodes gegen ein Zugriffstoken und ein Aktualisierungstoken:
POST /token HTTP/1.1
Host: oauth2.example.com
Content-Type: application/x-www-form-urlencoded

client_id=GOOGLE_CLIENT_ID&client_secret=GOOGLE_CLIENT_SECRET&grant_type=authorization_code&code=AUTHORIZATION_CODE&redirect_uri=REDIRECT_URI
Um Autorisierungscodes gegen ein Zugriffstoken und ein Aktualisierungstoken auszutauschen, antwortet Ihr Tokenaustausch-Endpunkt auf POST-Anfragen, indem er die folgenden Schritte ausführt:
- Prüfen Sie, ob die
client_idden Ursprung der Anfrage als autorisierten Ursprung identifiziert und ob dieclient_secretmit dem erwarteten Wert übereinstimmt. - Prüfen Sie, ob der Autorisierungscode gültig und nicht abgelaufen ist und ob die in der Anfrage angegebene Client-ID mit der Client-ID übereinstimmt, die mit dem Autorisierungscode verknüpft ist.
- Prüfen Sie, ob die durch den Parameter
redirect_uriangegebene URL mit dem Wert übereinstimmt, der in der ursprünglichen Autorisierungsanfrage verwendet wurde. - Wenn Sie nicht alle oben genannten Kriterien bestätigen können, geben Sie einen HTTP
400-Fehler „Bad Request“ mit
{"error": "invalid_grant"}als Text zurück. - Andernfalls verwenden Sie die Nutzer-ID aus dem Autorisierungscode, um ein Aktualisierungstoken und ein Zugriffstoken zu generieren. Diese Tokens können beliebige Stringwerte sein, müssen aber den Nutzer und den Client, für den das Token bestimmt ist, eindeutig darstellen und dürfen nicht erraten werden können. Für Zugriffstokens müssen Sie auch die Ablaufzeit des Tokens aufzeichnen, die in der Regel eine Stunde nach der Ausstellung des Tokens liegt. Aktualisierungstokens laufen nicht ab.
- Geben Sie das folgende JSON-Objekt im Text der HTTPS-Antwort zurück:
{
"token_type": "Bearer",
"access_token": "ACCESS_TOKEN",
"refresh_token": "REFRESH_TOKEN",
"expires_in": SECONDS_TO_EXPIRATION
}
Google speichert das Zugriffstoken und das Aktualisierungstoken für den Nutzer und erfasst den Ablauf des Zugriffstokens. Wenn das Zugriffstoken abläuft, verwendet Google das Aktualisierungstoken, um ein neues Zugriffstoken von Ihrem Tokenaustausch-Endpunkt zu erhalten.
Aktualisierungstokens gegen Zugriffstokens austauschen
Wenn ein Zugriffstoken abläuft, sendet Google eine Anfrage an Ihren Tokenaustausch-Endpunkt, um ein Aktualisierungstoken gegen ein neues Zugriffstoken auszutauschen.
Für diese Anfragen ist der Wert von grant_type refresh_token und der Wert von refresh_token ist der Wert des Aktualisierungstokens, das Sie Google zuvor gewährt haben. Das folgende Beispiel zeigt eine Anfrage zum Austauschen eines Aktualisierungstokens gegen ein Zugriffstoken:
POST /token HTTP/1.1
Host: oauth2.example.com
Content-Type: application/x-www-form-urlencoded

client_id=GOOGLE_CLIENT_ID&client_secret=GOOGLE_CLIENT_SECRET&grant_type=refresh_token&refresh_token=REFRESH_TOKEN
Um ein Aktualisierungstoken gegen ein Zugriffstoken auszutauschen, antwortet Ihr Tokenaustausch-Endpunkt auf POST-Anfragen, indem er die folgenden Schritte ausführt:
- Prüfen Sie, ob die
client_idGoogle als Ursprung der Anfrage identifiziert und ob dieclient_secretmit dem erwarteten Wert übereinstimmt. - Prüfen Sie, ob das Aktualisierungstoken gültig ist und ob die in der Anfrage angegebene Client-ID mit der Client-ID übereinstimmt, die mit dem Aktualisierungstoken verknüpft ist.
- Wenn Sie nicht alle oben genannten Kriterien bestätigen können, geben Sie einen HTTP-400
Fehler „Bad Request“ mit
{"error": "invalid_grant"}als Text zurück. - Andernfalls verwenden Sie die Nutzer-ID aus dem Aktualisierungstoken, um ein Zugriffstoken zu generieren. Diese Tokens können beliebige Stringwerte sein, müssen aber den Nutzer und den Client, für den das Token bestimmt ist, eindeutig darstellen und dürfen nicht erraten werden können. Für Zugriffstokens müssen Sie auch die Ablaufzeit des Tokens aufzeichnen, die in der Regel eine Stunde nach der Ausstellung des Tokens liegt.
- Geben Sie das folgende JSON-Objekt im Text der HTTPS-Antwort zurück:
{
"token_type": "Bearer",
"access_token": "ACCESS_TOKEN",
"expires_in": SECONDS_TO_EXPIRATION
}
userinfo-Anfragen verarbeiten
Der userinfo-Endpunkt ist eine geschützte OAuth 2.0-Ressource, die Ansprüche über den verknüpften Nutzer zurückgibt. Die Implementierung und das Hosten des userinfo-Endpunkts sind mit Ausnahme der folgenden Anwendungsfälle optional:
- Anmeldung in einem verknüpften Konto über Google One Tap.
- Reibungsloses Abo auf Android TV
Nachdem das Zugriffstoken erfolgreich von Ihrem Tokenendpunkt abgerufen wurde, sendet Google eine Anfrage an Ihren userinfo-Endpunkt, um grundlegende Profilinformationen über den verknüpften Nutzer abzurufen.
| Anfrageheader für userinfo-Endpunkt | |
|---|---|
Authorization header |
Das Zugriffstoken vom Typ „Bearer“. |
Wenn Ihr userinfo-Endpunkt beispielsweise unter
https://myservice.example.com/userinfo, kann eine Anfrage so aussehen:
GET /userinfo HTTP/1.1
Host: myservice.example.com
Authorization: Bearer ACCESS_TOKEN
Führen Sie die folgenden Schritte aus, damit der userinfo-Endpunkt Anfragen verarbeiten kann:
- Extrahieren Sie das Zugriffstoken aus dem Autorisierungs-Header und geben Sie Informationen für den Nutzer zurück, der mit dem Zugriffstoken verknüpft ist.
- Wenn das Zugriffstoken ungültig ist, gib den Fehler „HTTP 401 Unauthorized“ mit dem Antwortheader
WWW-Authenticatezurück. Hier ist ein Beispiel für eine Userinfo-Fehlerantwort:HTTP/1.1 401 Unauthorized WWW-Authenticate: error="invalid_token", error_description="The Access Token expired"
Wenn das Zugriffstoken gültig ist, geben Sie eine HTTP 200-Antwort mit dem folgenden JSON-Objekt im Text des HTTPS-Objekts zurück. Antwort:
{ "sub": "USER_UUID", "email": "EMAIL_ADDRESS", "given_name": "FIRST_NAME", "family_name": "LAST_NAME", "name": "FULL_NAME", "picture": "PROFILE_PICTURE", }Userinfo-Endpunktantwort subEine eindeutige ID, die den Nutzer in Ihrem System identifiziert. emailE-Mail-Adresse des Nutzers given_nameOptional:Vorname des Nutzers. family_nameOptional:Nachname des Nutzers. nameOptional:Vollständiger Name des Nutzers. pictureOptional:Profilbild des Nutzers.