
すべてのCloud-to-cloud連携には、ユーザーを認証するための 仕組みを組み込む必要があります。
認証を使用すると、ユーザーの Google アカウント と認証システム内のユーザー アカウントを関連付けることができます。これにより、フルフィルメントでスマートホームインテントを受け取ったときにユーザーを識別できます。Google スマートホームは、認可コードフローを使用した OAuth のみ対応します。
このページでは、OAuth 2.0 サーバーを設定して Cloud-to-cloud連携と連携させる方法について説明します。
OAuth を使用した Google アカウントのリンク
認証コードフローでは、次の 2 つのエンドポイントが必要になります。
認可エンドポイント。ログインしていないユーザーにログイン用の UI を表示します。認可エンドポイントは、リクエストされたアクセスに対するユーザーの同意を記録するための短期間の認証コードも作成します。
トークン交換エンドポイント。次の 2 種類の交換を処理します。
- 長期の更新トークンと短期のアクセス トークンの認可コードを交換します。この処理は、ユーザーがアカウントのリンクフローを行ったときに発生します。
- 長期の更新トークンを短期のアクセス トークンと交換します。この処理は、トークンが期限切れになり、新しいアクセス トークンが必要になった場合に発生します。
設計ガイドライン
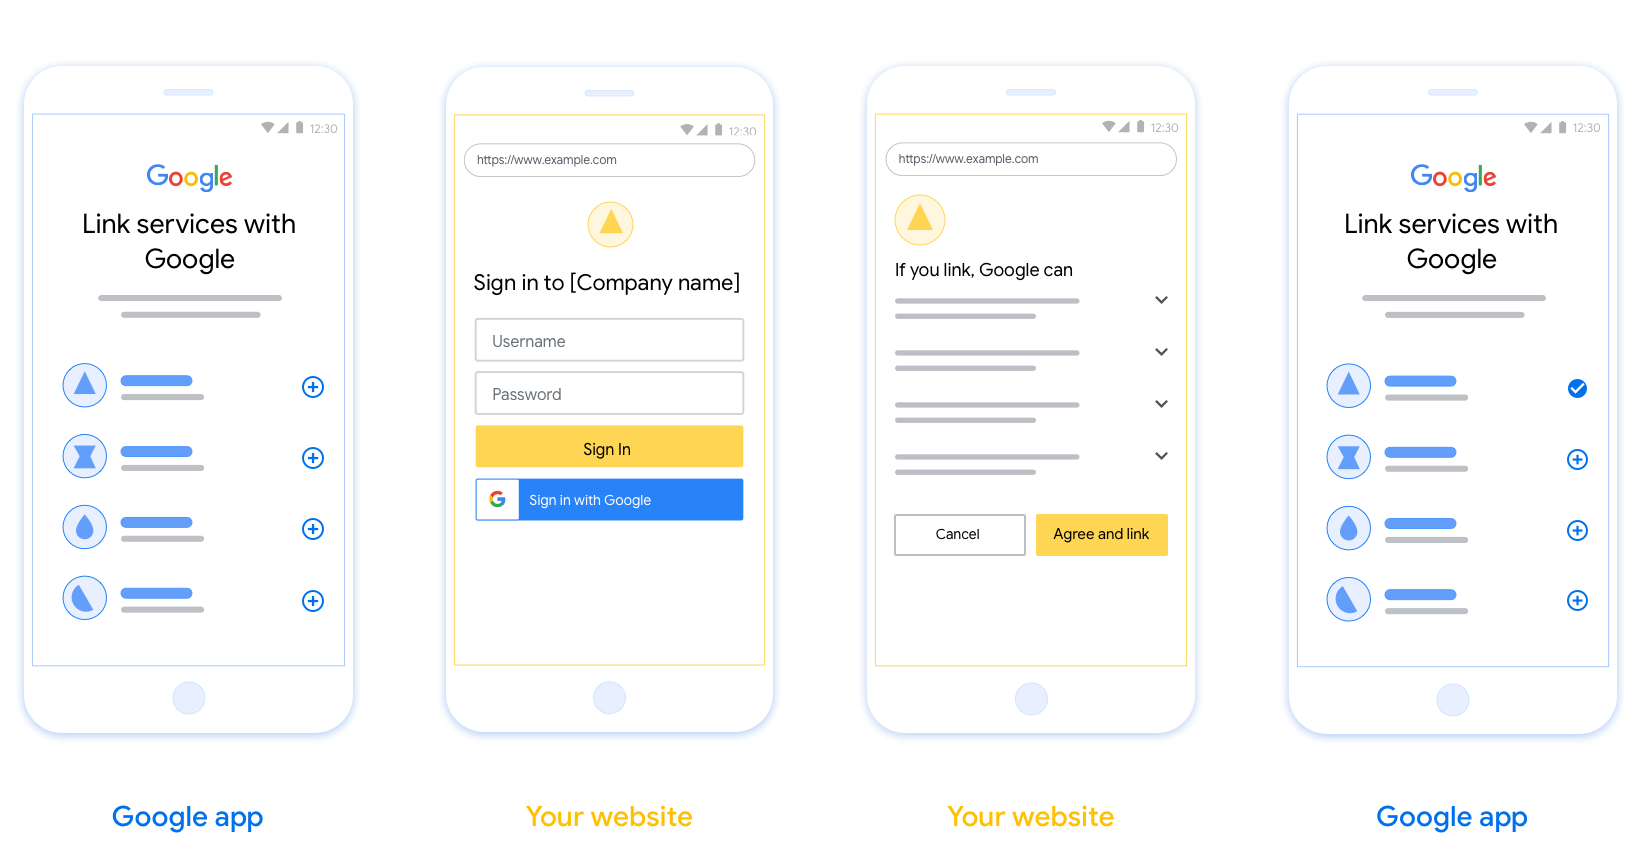
このセクションでは、OAuth リンクフロー用にホストするユーザー画面の設計要件と推奨事項について説明します。Google のアプリから呼び出されると、プラットフォームは Google へのログインページとアカウントのリンクに関する同意画面をユーザーに表示します。ユーザーがアカウントのリンクに同意すると、Google のアプリにリダイレクトされます。
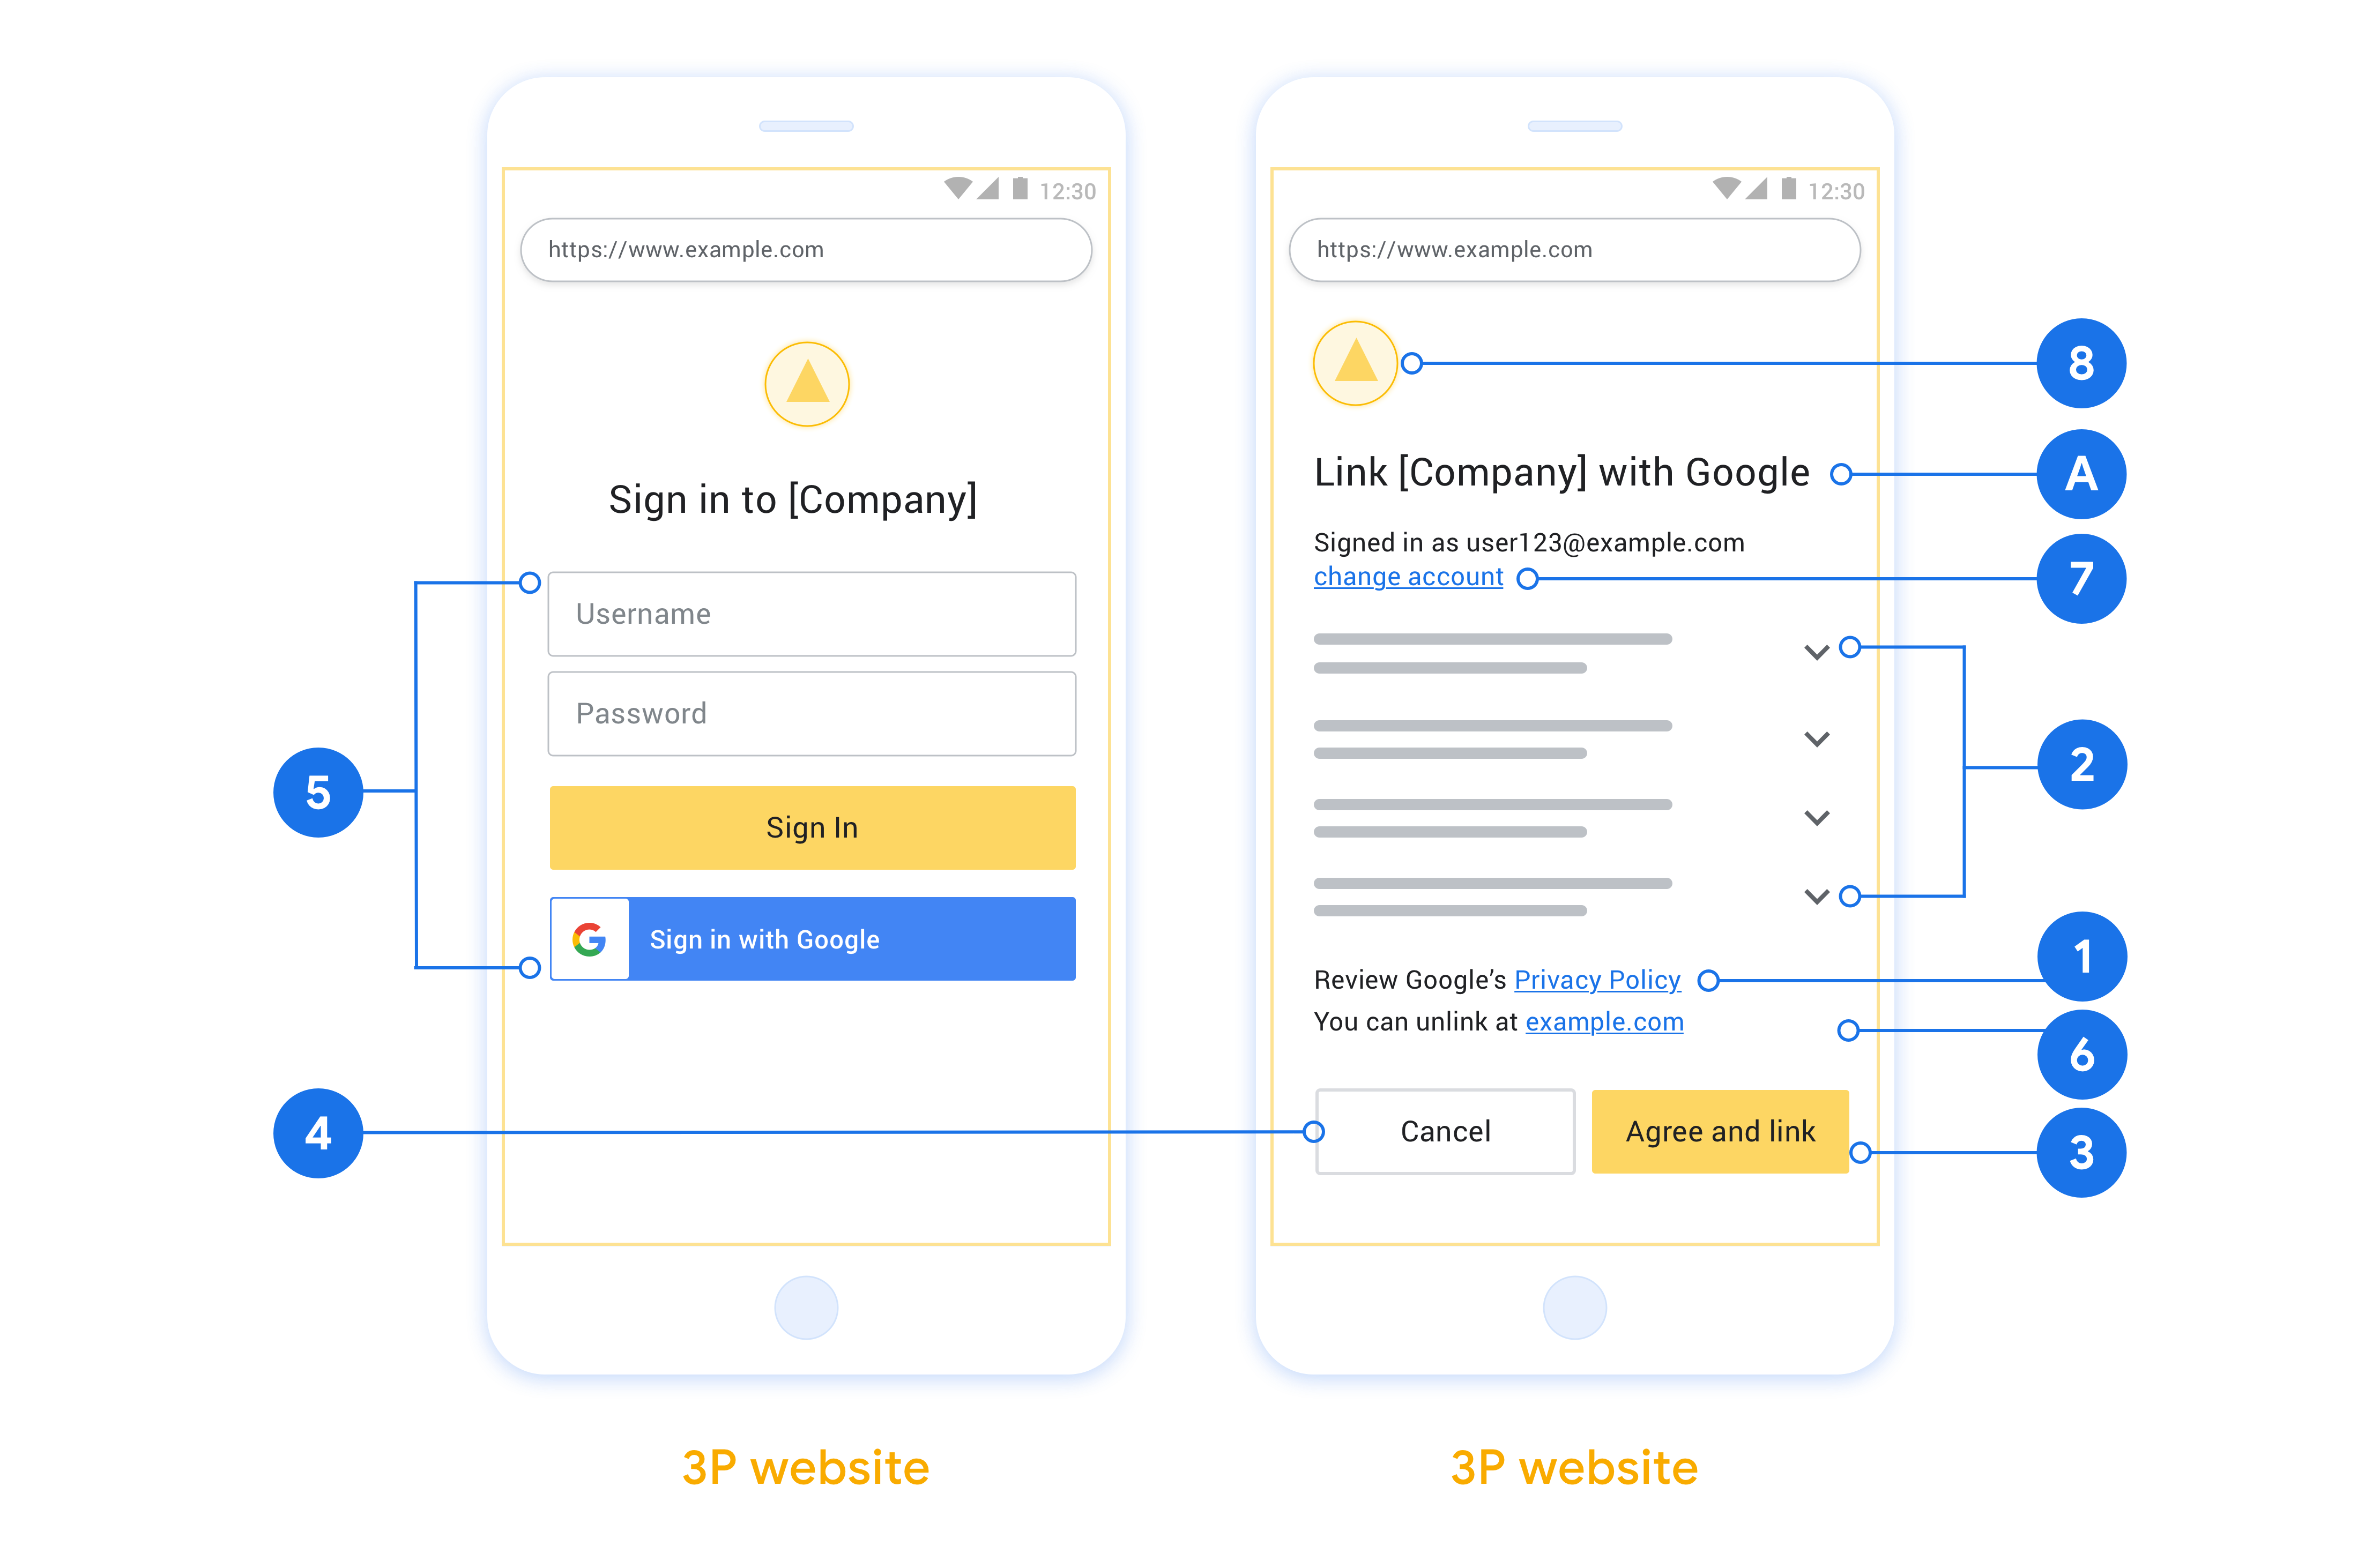
要件
- ユーザーのアカウントは Google にリンクされ、Google Home や Google アシスタントなどの特定の Google サービスにはリンクされないことを伝える必要があります。
- 「ログインすると、Google がデバイスを操作することを承認したことになります。」などの Google 承認文言が必要です。Google Home デベロッパー ポリシーの Google デバイス制御の承認に関するセクションをご覧ください。
- ウェブ OAuth リンクページを開き、ユーザーが Google アカウントにログインするための明確な方法(ユーザー名とパスワードのフィールドなど)があることを確認する必要があります。ユーザーがウェブ OAuth リンクページに移動せずにリンクできる Google ログイン(GSI)メソッドは使用しないでください。これは Google のポリシー違反に該当します。
- ユーザーがリンクしている統合を示すため、OAuth リンクページに次の項目のうち少なくとも 1 つを含める必要があります。
- 会社のロゴ
- 会社名
- 連携名
- アプリのアイコン
推奨事項
次のことをおすすめします。
Google のプライバシー ポリシーを表示します。同意画面に Google のプライバシー ポリシーへのリンクを含めます。
共有されるデータ。Google がユーザーのどのデータを必要とするか、その理由、Google がデベロッパーと共有する可能性のある使用状況やインタラクションのデータについて、明確かつ簡潔な言葉でユーザーに伝えます。
行動を促す明確なフレーズがある。同意画面に「同意してリンク」などの明確な行動を促すフレーズを記載します。これは、ユーザーがアカウントをリンクするために Google と共有する必要があるデータを理解する必要があるためです。
解約できること。リンクしないことを選択した場合に、ユーザーが戻ったりキャンセルしたりできる方法を提供します。
明確なログイン プロセス。ユーザー名とパスワードの入力欄や [Google でログイン] など、ユーザーが Google アカウントにログインするための明確な方法を用意してください。
リンクを解除できること。ユーザーがリンクを解除できる仕組み(プラットフォームのアカウント設定への URL など)を提供します。または、ユーザーがリンクされたアカウントを管理できる Google アカウントへのリンクを含めることもできます。ユーザーが統合からリンクを解除した場合は、
agentUsers.deleteを使用して Google に変更を通知します。ユーザー アカウントを変更する機能。ユーザーがアカウントを切り替える方法を提案します。これは、ユーザーが複数のアカウントを持っている場合に特に便利です。
- アカウントを切り替えるために同意画面を閉じる必要がある場合は、回復可能なエラーを Google に送信して、ユーザーが OAuth リンクを使用して目的のアカウントにログインできるようにします。
ロゴを含めます。同意画面に会社のロゴを表示します。スタイル ガイドラインに沿ってロゴを配置します。Google のロゴも表示する場合は、ロゴと商標をご覧ください。
認可コードフロー
認可コードフローの OAuth 2.0 サーバーは 2 つのエンドポイントで構成されます。これらのエンドポイントには HTTPS 経由でアクセスできます。 最初のエンドポイントは認可エンドポイントで、これはデータアクセスに対するユーザーの同意を検索または取得する処理を担当します。認可エンドポイントは、ログインしていないユーザーにログイン用の UI を表示し、リクエストされたアクセスへの同意を記録します。2 つ目のエンドポイントはトークン交換エンドポイントで、トークンという暗号化された文字列を取得し、ユーザーにサービスへのアクセスを許可します。
Google アプリケーションでサービスの API を呼び出す必要がある場合、Google はこれらのエンドポイントを使用して、API の呼び出し許可をユーザーから取得します。
Google が開始する OAuth 2.0 認可コードフローのセッションは次のような流れになります。
- Google がユーザーのブラウザで認可エンドポイントを開きます。アクションのフローが音声専用デバイスで開始した場合、Google は実行をスマートフォンに転送します。
- ユーザーがログインしていない場合はログインし、まだ許可を与えていない場合は、Google に API を使用してデータにアクセスする権限を付与します。
- サービスが認証コードを作成し、その認証コードを Google に返します。そのため、リダイレクト URL に認証コードを追加して、ユーザーのブラウザを Google に戻します。
- Google が認証コードをトークン交換エンドポイントに送信します。トークン交換エンドポイントはコードの真正性を検証し、アクセス トークンと更新トークンを返します。アクセス トークンは短期のトークンで、API にアクセスするための認証情報として使用されます。更新トークンは長期のトークンで、Google が保存してアクセス トークンが期限切れになったときに新しいトークンを取得するために使用できます。
- ユーザーがアカウント リンクフローを完了すると、それ以降 Google から送信されるすべてのリクエストにアクセス トークンが含まれます。
認可リクエストの処理
OAuth 2.0 認可コードフローを使用してアカウント リンクを行う必要がある場合、Google は、次のパラメータを含むリクエストを使用して、ユーザーを認可エンドポイントに送信します。
| 認可エンドポイントのパラメータ | |
|---|---|
client_id |
Google に割り当てたクライアント ID。 |
redirect_uri |
このリクエストに対するレスポンスを送信する宛先 URL。 |
state |
リダイレクト URL で変更されずに Google に返される会計上の値。 |
scope |
省略可: Google が許可を求めている データ範囲を表す、スペースで区切られた文字列。 |
response_type |
レスポンスで返される値のタイプ。OAuth 2.0
認可コードフローの場合、レスポンス タイプは常にcodeです。
|
たとえば、認可エンドポイントが https://myservice.example.com/auth の場合、リクエストは次のようになります。
GET https://myservice.example.com/auth?client_id=GOOGLE_CLIENT_ID&redirect_uri=REDIRECT_URI&state=STATE_STRING&scope=REQUESTED_SCOPES&response_type=code
認可エンドポイントでログイン リクエストを処理する場合は、次の手順に従います。
client_idが、Google に割り当てたクライアント ID と一致することを確認します。さらに、redirect_uriが、Google からサービスに提供されたリダイレクト URL と一致することを確認します。これにより、対象外のクライアント アプリや誤って構成されたクライアント アプリによるアクセスを防ぐことができるため、このチェックは重要です。複数の OAuth 2.0 フローをサポートしている場合は、response_typeがcodeであることも確認してください。- ユーザーがサービスにログインしているかどうか確認します。ユーザーがログインしていない場合は、サービスのログインまたは登録フローを完了します。
- Google が API へのアクセスで使用する認証コードを生成します。認可コードには任意の文字列値を設定できますが、トークンを使用するユーザーとクライアント、コードの有効期限を一意に表す必要があります。また、簡単に推測されない文字列にする必要があります。通常、約 10 分後に期限切れになる認可コードを発行します。
redirect_uriパラメータで指定された URL が次の形式であることを確認します。https://oauth-redirect.googleusercontent.com/r/YOUR_PROJECT_ID https://oauth-redirect-sandbox.googleusercontent.com/r/YOUR_PROJECT_ID
- ユーザーのブラウザを
redirect_uriパラメータで指定された URL にリダイレクトします。リダイレクトする場合は、生成した認可コードと、元の変更されていない state 値をcodeとstateパラメータに追加します。結果として得られる URL の例を次に示します。https://oauth-redirect.googleusercontent.com/r/YOUR_PROJECT_ID?code=AUTHORIZATION_CODE&state=STATE_STRING
トークン交換リクエストの処理
サービスのトークン交換エンドポイントは、次の 2 種類のトークン交換を処理します。
- 認可コードをアクセス トークンと更新トークンに交換する
- 更新トークンとアクセス トークンの交換
トークン交換リクエストには、次のパラメータが含まれます。
| トークン交換エンドポイントのパラメータ | |
|---|---|
client_id |
リクエスト元を Google として識別する文字列。この文字列は、Google の一意の識別子としてシステムに登録されている必要があります。 |
client_secret |
Google に登録したサービスのシークレット文字列。 |
grant_type |
交換されるトークンの種類。
または authorization_code refresh_token です。 |
code |
grant_type=authorization_code の場合、このパラメータは Google がログインまたはトークン交換エンドポイントから受け取ったコードです。 |
redirect_uri |
grant_type=authorization_code の場合、このパラメータは
最初の認可リクエストで使用された URL です。 |
refresh_token |
grant_type=refresh_token の場合、このパラメータは Google がトークン交換エンドポイントから受け取った更新トークンです。 |
Google がサーバーに認証情報を送信する方法を構成する
認可サーバーは、実装に応じて、リクエスト本文またはリクエスト ヘッダーでクライアント認証情報を受け取ることを想定しています。
デフォルトでは、Google はリクエスト本文で認証情報を送信します。認可サーバーでクライアント認証情報をリクエスト ヘッダーに含める必要がある場合は、Cloud-to-cloud統合を 適切に構成する必要があります。
プロジェクトのリストで、操作するプロジェクトの横にある [開く] をクリックします。
[Cloud-to-Cloud] で [開発] を選択します。
統合の横にある [開く] をクリックします。
[権限(省略可)] セクションまでスクロールし、[Google が HTTP 基本認証ヘッダーを介してクライアント ID とシークレットを送信する] チェックボックスをオンにします。
[保存] をクリックして、変更を保存します。
認可コードをアクセス トークンと更新トークンに交換する
ユーザーがログインして認可エンドポイントが短期の認証コードを Google に返すと、Google がリクエストをトークン交換エンドポイントに送信し、アクセス トークンと更新トークンの認証コードを交換します。
このリクエストの場合、grant_type の値は authorization_code で、
code の値は以前に Google
に付与した認証コードの値になります。アクセス トークンと更新トークンの認証コードの交換リクエストは次のようになります。
POST /token HTTP/1.1
Host: oauth2.example.com
Content-Type: application/x-www-form-urlencoded

client_id=GOOGLE_CLIENT_ID&client_secret=GOOGLE_CLIENT_SECRET&grant_type=authorization_code&code=AUTHORIZATION_CODE&redirect_uri=REDIRECT_URI
アクセス トークンと更新トークンの認可コードを交換するため、トークン交換エンドポイントが次の処理を行い、POST リクエストに応答します。
client_idによってリクエスト元が認証済みオリジンであること確認し、client_secretが期待値と一致していることを確認します。- 認証コードが有効で、期限が切れていないことを確認します。さらに、リクエストで指定されたクライアント ID が認証コードに関連付けられたクライアント ID と一致することを確認します。
redirect_uriパラメータで指定された URL が、最初の認可リクエストで使用された値と同一であることを確認します。- 上記の条件をすべて確認できない場合は、本文に
{"error": "invalid_grant"}を含めて HTTP 400 Bad Request エラーを返します。 - それ以外の場合は、認証コードのユーザー ID を使用して、更新トークンとアクセス トークンを生成します。これらのトークンには任意の文字列値を設定できますが、トークンを使用するユーザーとクライアントを一意に表す必要があります。また、簡単に推測されない文字列にする必要があります。アクセス トークンには、トークンの有効期限(通常はトークンを発行してから 1 時間)も記録します。 更新トークンに有効期限はありません。
- HTTPS レスポンスの本文で次の JSON オブジェクトを返します。
{
"token_type": "Bearer",
"access_token": "ACCESS_TOKEN",
"refresh_token": "REFRESH_TOKEN",
"expires_in": SECONDS_TO_EXPIRATION
}
Google は、ユーザーのアクセス トークンと更新トークンを保存し、アクセス トークンの有効期限を記録します。アクセス トークンの有効期限が切れると、Google は更新トークンを使用してトークン交換エンドポイントから新しいアクセス トークンを取得します。
更新トークンとアクセス トークンの交換
アクセス トークンが期限切れになると、Google は、更新トークンを新しいアクセス トークンと交換するためのリクエストをトークン交換エンドポイントに送信します。
このリクエストの場合、grant_type の値は refresh_token で、refresh_token の値は以前に Google
に付与した更新トークンの値になります。更新トークンとアクセス トークンの交換リクエストは次のようになります。
POST /token HTTP/1.1
Host: oauth2.example.com
Content-Type: application/x-www-form-urlencoded

client_id=GOOGLE_CLIENT_ID&client_secret=GOOGLE_CLIENT_SECRET&grant_type=refresh_token&refresh_token=REFRESH_TOKEN
更新トークンをアクセス トークンと交換するため、トークン交換エンドポイントは次の手順に従って POST リクエストに応答します。
client_idによってリクエスト元が Google であることを確認し、client_secretが期待値と一致していることを確認します。- 更新トークンが有効で、リクエストで指定されたクライアント ID が更新トークンに関連付けられたクライアント ID と一致していることを確認します。
- 上記の条件をすべて確認できない場合は、本文に
{"error": "invalid_grant"}を含めて HTTP 400 Bad Request エラーを返します。 - それ以外の場合は、更新トークンのユーザー ID を使用してアクセス トークンを生成します。これらのトークンには任意の文字列値を設定できますが、トークンを使用するユーザーとクライアントを一意に 表す必要があります。また、簡単に推測されない文字列にする必要があります。アクセス トークンには、トークンの有効期限(通常はトークンを発行してから 1 時間)も記録します。
- HTTPS レスポンスの本文で次の JSON オブジェクトを返します。
{
"token_type": "Bearer",
"access_token": "ACCESS_TOKEN",
"expires_in": SECONDS_TO_EXPIRATION
}
userinfo リクエストを処理する
userinfo エンドポイントは、OAuth 2.0 で保護されたリソースで、リンクされたユーザーに関するクレームを返します。userinfo エンドポイントの実装とホストは任意ですが、以下のユースケースを除きます。
- Google One タップによるリンクされたアカウントへのログイン。
- Android TV のスムーズな定期購入。
トークン エンドポイントからアクセス トークンが正常に取得されると、Google は、リンクされたユーザーに関する基本的なプロフィール情報を取得するためのリクエストを userinfo エンドポイントに送信します。
| userinfo エンドポイント リクエスト ヘッダー | |
|---|---|
Authorization header |
Bearer タイプのアクセス トークン。 |
たとえば、userinfo エンドポイントが
https://myservice.example.com/userinfo の場合、リクエストは次のようになります。
GET /userinfo HTTP/1.1
Host: myservice.example.com
Authorization: Bearer ACCESS_TOKEN
userinfo エンドポイントでリクエストを処理するには、次の手順を行います。
- Authorization ヘッダーからアクセス トークンを抽出し、そのアクセス トークンに関連付けられたユーザーの情報を返します。
- アクセス トークンが無効な場合は、
WWW-Authenticateレスポンス ヘッダーを使用して HTTP 401 Unauthorized エラーを返します。userinfo エラー レスポンスの例を次に示します。HTTP/1.1 401 Unauthorized WWW-Authenticate: error="invalid_token", error_description="The Access Token expired"
アクセス トークンが有効な場合は、HTTPS の本文に次の JSON オブジェクトを含む HTTP 200 レスポンスを返します。 レスポンス:
{
"sub": "USER_UUID",
"email": "EMAIL_ADDRESS",
"given_name": "FIRST_NAME",
"family_name": "LAST_NAME",
"name": "FULL_NAME",
"picture": "PROFILE_PICTURE",
}
userinfo エンドポイント レスポンス subシステム内でユーザーを識別する一意の ID。 emailユーザーのメールアドレス。 given_name省略可: ユーザーの名。 family_name省略可: ユーザーの姓。 name省略可: ユーザーの氏名。 picture省略可: ユーザーのプロフィール写真。