
Każda integracja Cloud-to-cloud musi zawierać mechanizm uwierzytelniania użytkowników.
Uwierzytelnianie umożliwia powiązanie kont Google użytkowników z kontami użytkowników w Twoim systemie uwierzytelniania. Dzięki temu możesz identyfikować użytkowników, gdy usługa realizacji otrzyma intencję inteligentnego domu. Inteligentny dom Google obsługuje tylko OAuth z przepływem kodu autoryzacji.
Na tej stronie opisujemy, jak skonfigurować serwer OAuth 2.0, aby działał z integracją Cloud-to-cloud.
Łączenie z kontem Google przy użyciu protokołu OAuth
W przypadku przepływu kodu autoryzacji potrzebujesz 2 punktów końcowych:
Punkt końcowy autoryzacji, który wyświetla interfejs logowania użytkownikom, którzy nie są jeszcze zalogowani. Punkt końcowy autoryzacji tworzy też krótkotrwały kod autoryzacji, aby rejestrować zgodę użytkowników na żądany dostęp.
Punkt końcowy wymiany tokenów, który odpowiada za 2 rodzaje wymian:
- Wymienia kod autoryzacji na długoterminowy token odświeżania i krótkoterminowy token dostępu. Wymiana następuje, gdy użytkownik przechodzi proces łączenia kont.
- Wymienia długotrwały token odświeżania na krótkotrwały token dostępu. Ta wymiana następuje, gdy Google potrzebuje nowego tokena dostępu, ponieważ poprzedni wygasł.
Wskazówki dotyczące wyglądu
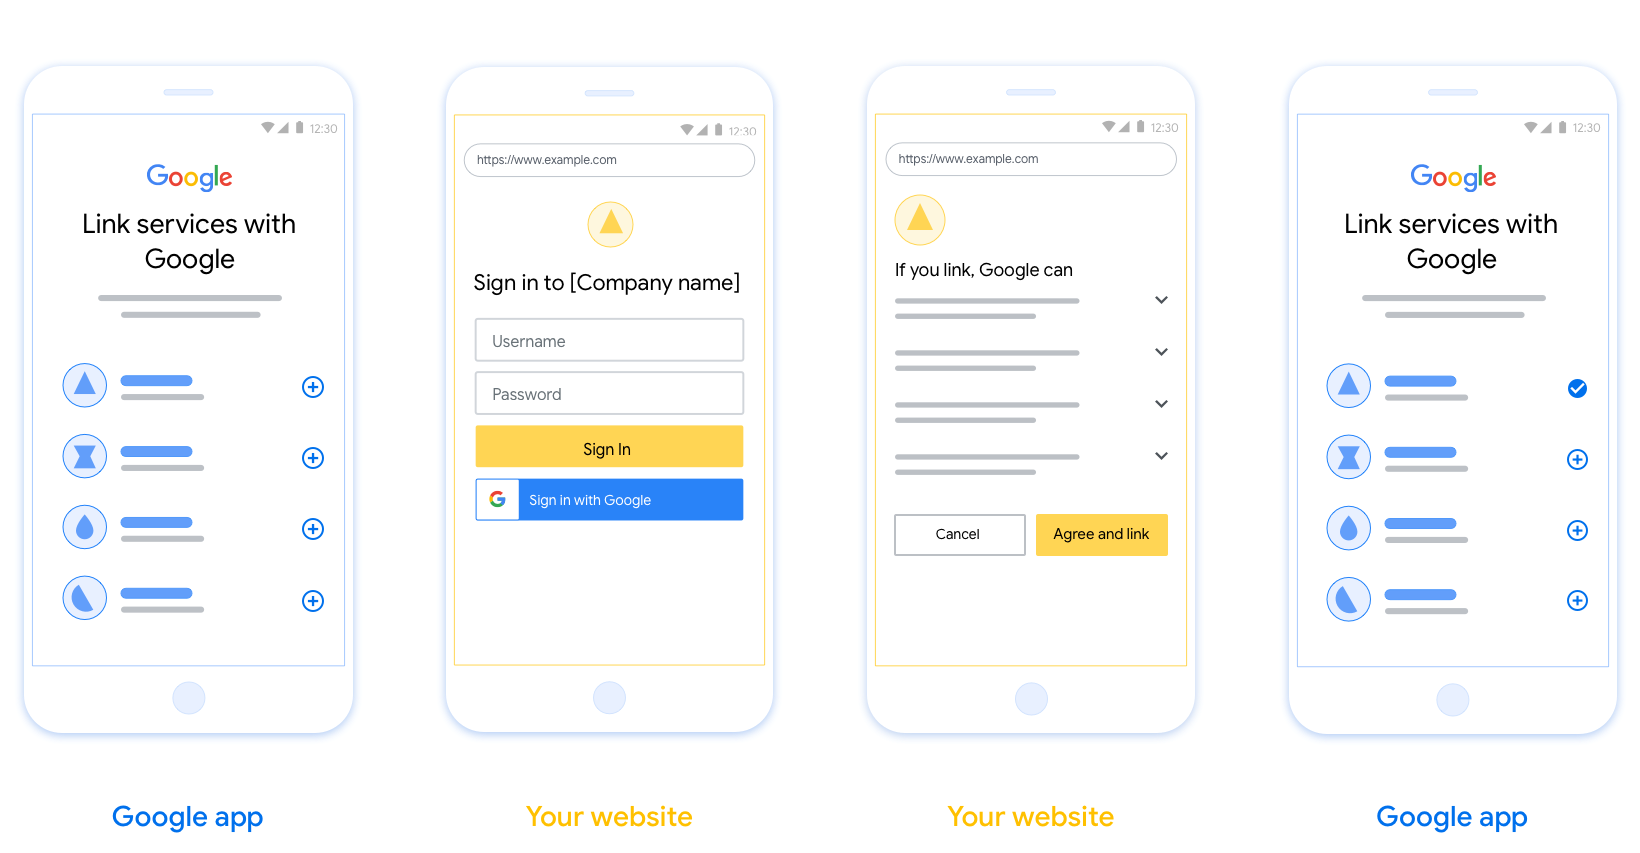
W tej sekcji opisujemy wymagania i zalecenia dotyczące projektu ekranu użytkownika, który hostujesz w przypadku przepływów łączenia protokołu OAuth. Gdy aplikacja Google wywoła tę funkcję, platforma wyświetli użytkownikowi stronę logowania w Google i ekran zgody na połączenie kont. Po wyrażeniu zgody na połączenie kont użytkownik zostaje przekierowany z powrotem do aplikacji Google.
Wymagania
- Musisz poinformować użytkownika, że jego konto zostanie połączone z Google, a nie z konkretnym produktem Google, taką jak Google Home czy Asystent Google.
- Musisz mieć oświadczenie o autoryzacji Google, np. „Logując się, upoważniasz Google do sterowania Twoimi urządzeniami”. Zapoznaj się z sekcją Autoryzacja sterowania urządzeniami Google w Zasadach dla deweloperów Google Home.
- Musisz otworzyć stronę łączenia OAuth w internecie i zapewnić użytkownikom przejrzystą metodę logowania się na konto Google, np. pola na nazwę użytkownika i hasło. Nie używaj metody logowania przez Google (GSI), która umożliwia użytkownikom łączenie kont bez przekierowywania ich na stronę łączenia kont za pomocą protokołu OAuth w internecie. Stanowi to naruszenie zasad Google.
- Na stronie łączenia OAuth musisz umieścić co najmniej 1 z tych elementów, aby wskazać integrację, z którą użytkownik się łączy:
- Logo firmy
- Nazwa firmy
- Nazwa integracji
- Ikona aplikacji
Rekomendacje
Zalecamy wykonanie tych czynności:
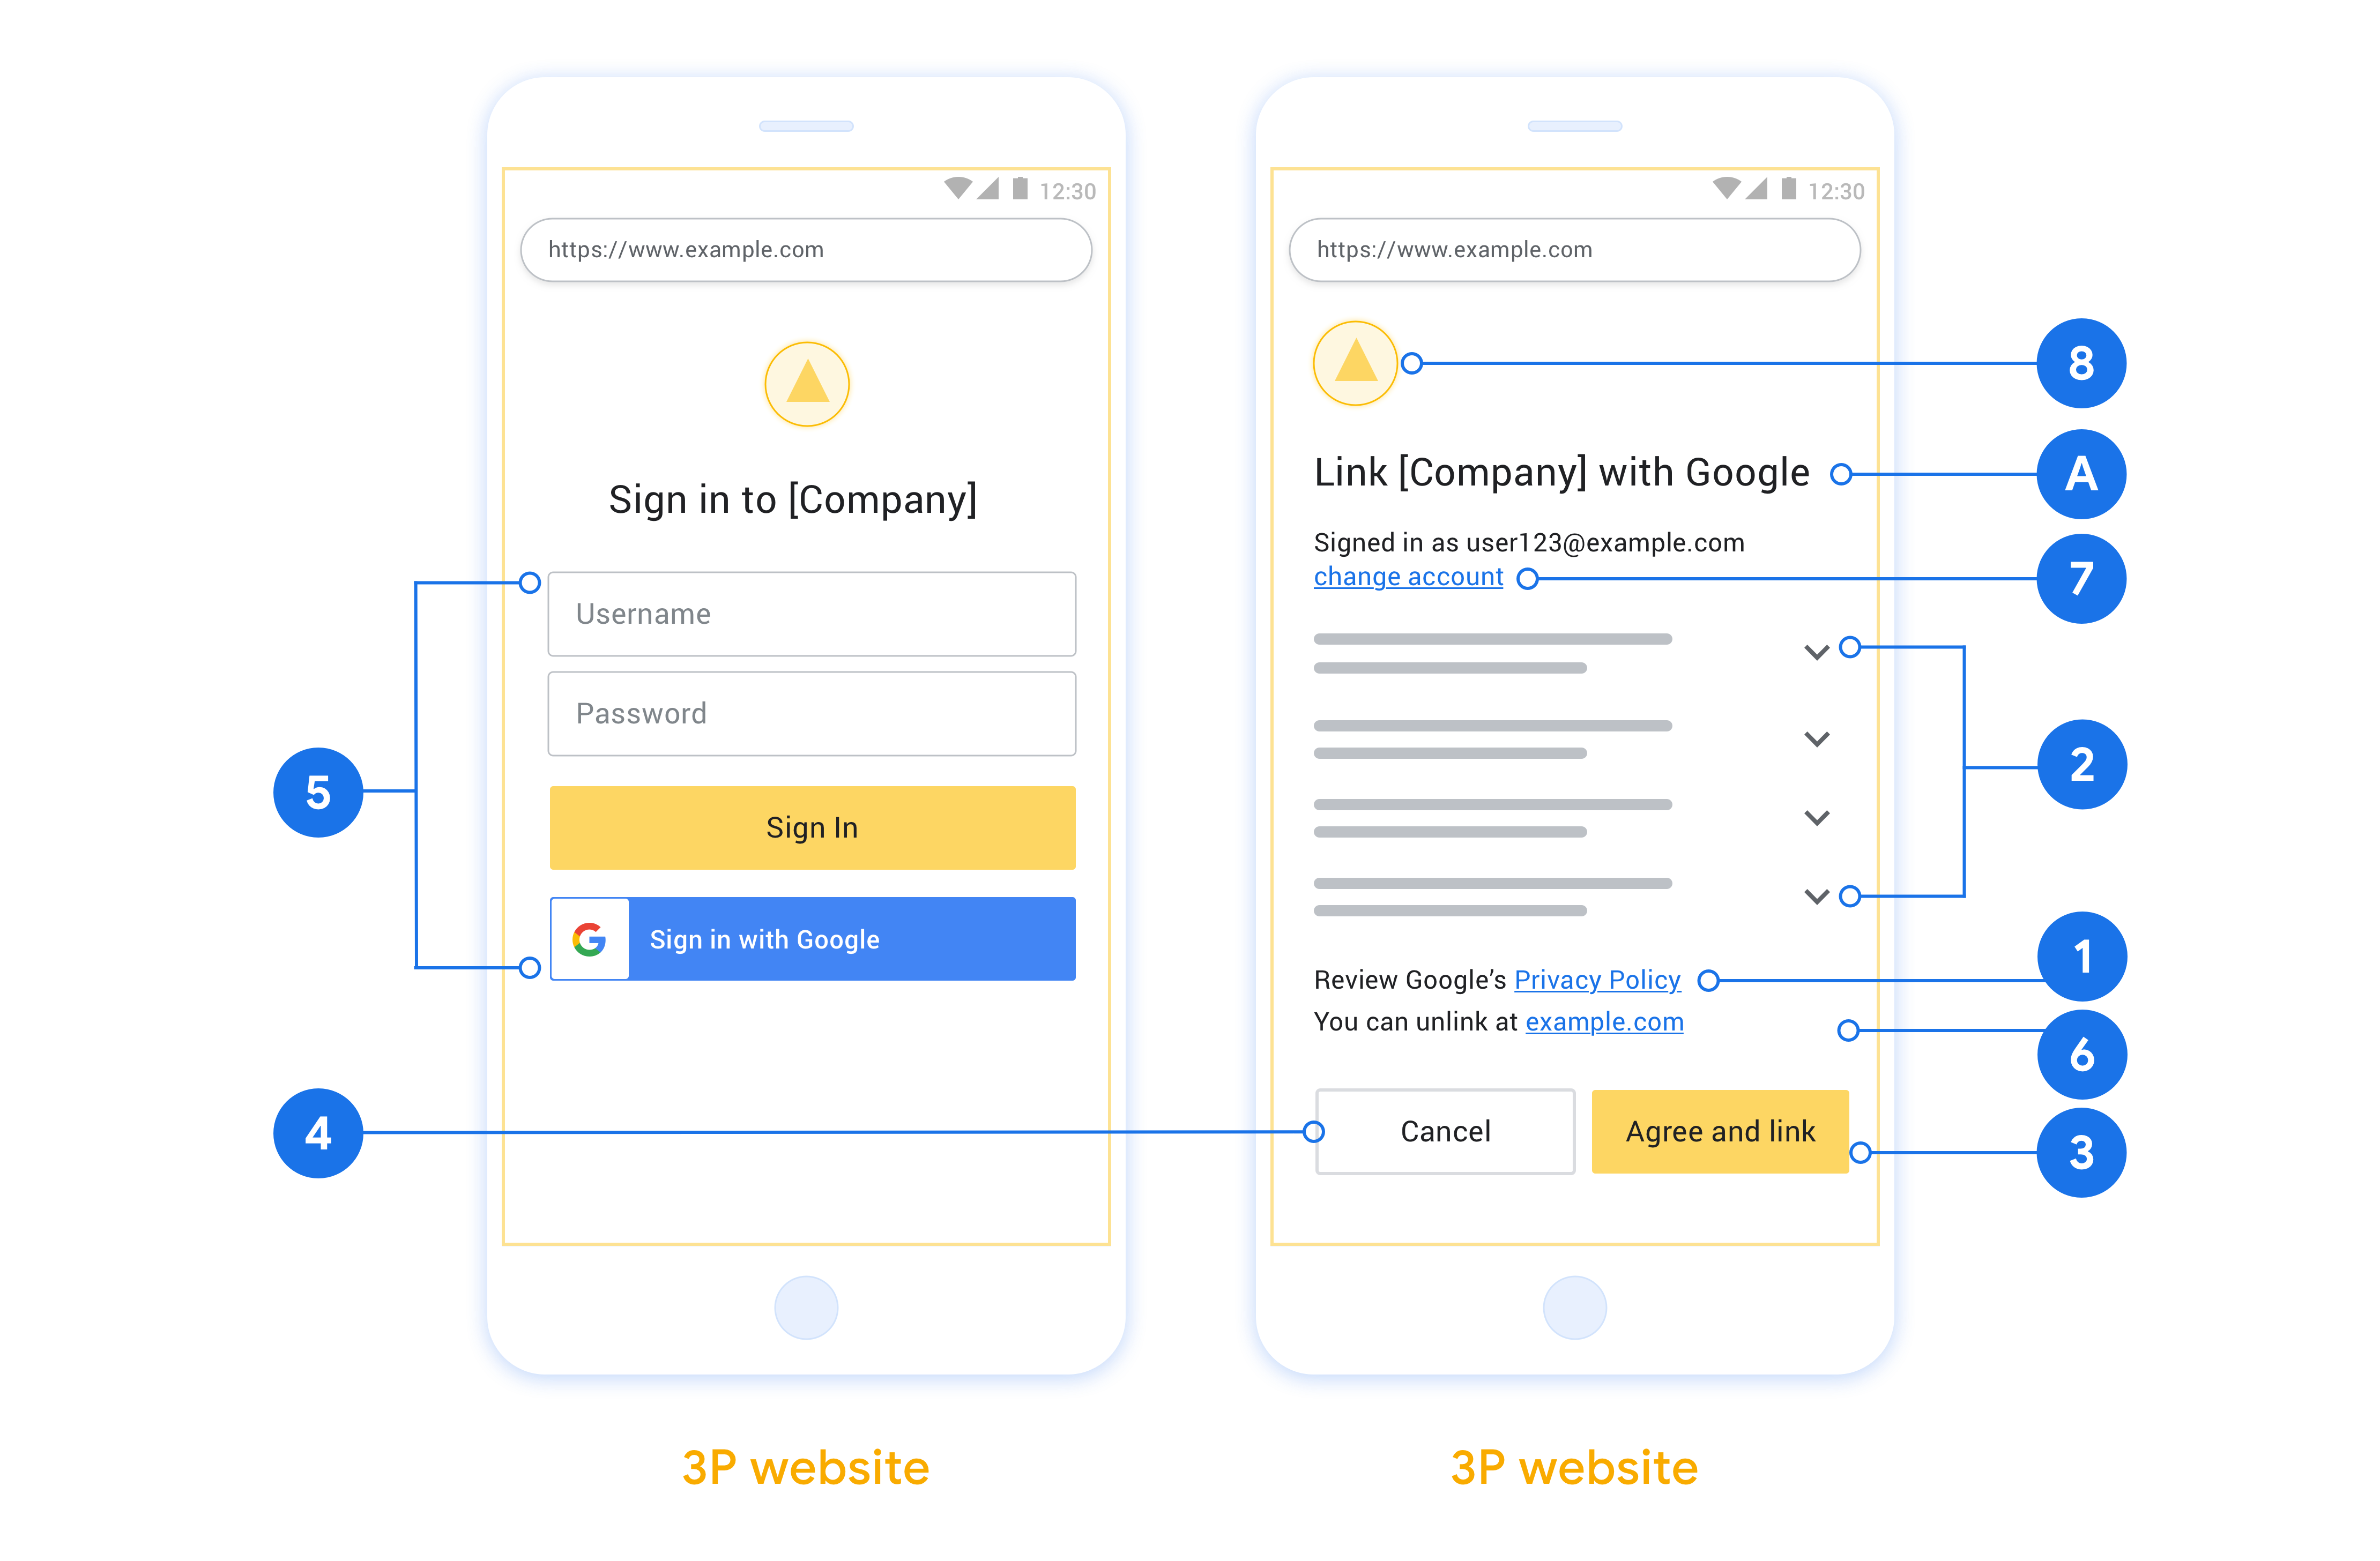
Wyświetl Politykę prywatności Google. Na ekranie zgody umieść link do Polityki prywatności Google.
Dane, które mają być udostępniane. Używaj jasnego i zwięzłego języka, aby informować użytkowników, jakich danych wymaga Google i dlaczego, oraz jakie dane o użytkowaniu lub interakcjach mogą być udostępniane Ci przez Google.
Jednoznaczne wezwanie do działania Na ekranie zgody umieść jasne wezwanie do działania, np. „Zgadzam się i łączę”. Użytkownicy muszą wiedzieć, jakie dane muszą udostępnić Google, aby połączyć swoje konta.
Możliwość anulowania. Zapewnij użytkownikom możliwość powrotu lub anulowania, jeśli nie chcą połączyć kont.
Prosty proces logowania. Upewnij się, że użytkownicy mają jasną metodę logowania się na konto Google, np. pola na nazwę użytkownika i hasło lub przycisk Zaloguj się przez Google.
Możliwość odłączenia Udostępnij użytkownikom mechanizm odłączania, np. adres URL do ustawień konta na Twojej platformie. Możesz też dodać link do konta Google, na którym użytkownicy mogą zarządzać połączonym kontem. Jeśli użytkownik odłączy się od Twojej integracji, użyj metody
agentUsers.delete, aby powiadomić Google o tej zmianie.Możliwość zmiany konta użytkownika. Zaproponuj użytkownikom metodę przełączania kont. Jest to szczególnie korzystne, jeśli użytkownicy mają zwykle kilka kont.
- Jeśli użytkownik musi zamknąć ekran zgody, aby przełączyć konta, wyślij do Google błąd, który można naprawić, aby użytkownik mógł zalogować się na wybrane konto za pomocą połączenia OAuth.
Dodaj logo. wyświetlać logo firmy na ekranie zgody; Umieść logo zgodnie z wytycznymi dotyczącymi stylu. Jeśli chcesz wyświetlać logo Google, zapoznaj się z sekcją Loga i znaki towarowe.
Przepływ kodu autoryzacji
Implementacja serwera OAuth 2.0 z przepływem kodu autoryzacji składa się z 2 punktów końcowych, które Twoja usługa udostępnia przez HTTPS. Pierwszy punkt końcowy to punkt końcowy autoryzacji, który odpowiada za znajdowanie lub uzyskiwanie zgody użytkowników na dostęp do danych. Punkt końcowy autoryzacji wyświetla użytkownikom, którzy nie są jeszcze zalogowani, interfejs logowania i rejestruje zgodę na żądany dostęp. Drugi punkt końcowy to punkt końcowy wymiany tokenów, który służy do uzyskiwania zaszyfrowanych ciągów znaków, zwanych tokenami, które autoryzują użytkownika do korzystania z Twojej usługi.
Gdy aplikacja Google musi wywołać jeden z interfejsów API Twojej usługi, Google używa tych punktów końcowych razem, aby uzyskać od użytkowników zgodę na wywoływanie tych interfejsów API w ich imieniu.
Sesja przepływu kodu autoryzacji OAuth 2.0 zainicjowana przez Google ma następujący przebieg:
- Google otwiera punkt końcowy autoryzacji w przeglądarce użytkownika. Jeśli przepływ został rozpoczęty na urządzeniu obsługującym tylko głos w przypadku działania, Google przenosi wykonanie na telefon.
- Użytkownik loguje się (jeśli nie jest jeszcze zalogowany) i przyznaje Google uprawnienia dostępu do swoich danych za pomocą Twojego interfejsu API, jeśli nie zrobił tego wcześniej.
- Twoja usługa tworzy kod autoryzacji i zwraca go do Google. Aby to zrobić, przekieruj przeglądarkę użytkownika z powrotem do Google, dołączając do żądania kod autoryzacji.
- Google wysyła kod autoryzacji do punktu końcowego wymiany tokenów, który weryfikuje autentyczność kodu i zwraca token dostępu oraz token odświeżania. Token dostępu to token ważny przez krótki czas, który Twoja usługa akceptuje jako dane logowania do interfejsów API. Token odświeżania to token ważny przez długi czas, który Google może przechowywać i używać do uzyskiwania nowych tokenów dostępu, gdy te wygasną.
- Gdy użytkownik zakończy proces łączenia kont, każde kolejne żądanie wysyłane z Google będzie zawierać token dostępu.
Obsługa żądań autoryzacji
Gdy musisz połączyć konta za pomocą przepływu kodu autoryzacji OAuth 2.0, Google wysyła użytkownika do punktu końcowego autoryzacji z żądaniem zawierającym te parametry:
| Parametry punktu końcowego autoryzacji | |
|---|---|
client_id |
Identyfikator klienta przypisany przez Ciebie do Google. |
redirect_uri |
Adres URL, na który wysyłasz odpowiedź na to żądanie. |
state |
Wartość księgowa, która jest przekazywana z powrotem do Google bez zmian w identyfikatorze URI przekierowania. |
scope |
Opcjonalnie: rozdzielony spacjami zestaw ciągów znaków zakresu, które określają dane, do których Google prosi o autoryzację. |
response_type |
Typ wartości, która ma zostać zwrócona w odpowiedzi. W przypadku przepływu kodu autoryzacji OAuth 2.0
typ odpowiedzi jest zawsze code.
|
Jeśli na przykład punkt końcowy autoryzacji jest dostępny pod adresem https://myservice.example.com/auth, żądanie może wyglądać tak:
GET https://myservice.example.com/auth?client_id=GOOGLE_CLIENT_ID&redirect_uri=REDIRECT_URI&state=STATE_STRING&scope=REQUESTED_SCOPES&response_type=code
Aby punkt końcowy autoryzacji obsługiwał żądania logowania:
- Sprawdź, czy
client_idodpowiada identyfikatorowi klienta przypisanemu przez Ciebie do Google, aredirect_uri– adresowi URL przekierowania podanemu przez Google w przypadku Twojej usługi. Te sprawdzenia są ważne, aby zapobiec przyznaniu dostępu niepożądanym lub nieprawidłowo skonfigurowanym aplikacjom klienckim. Jeśli obsługujesz wiele przepływów OAuth 2.0, sprawdź też, czyresponse_typema wartośćcode. - Sprawdź, czy użytkownik jest zalogowany w Twojej usłudze. Jeśli użytkownik nie jest zalogowany, dokończ proces logowania lub rejestracji w usłudze.
- Wygeneruj kod autoryzacji, którego Google może użyć do uzyskania dostępu do Twojego interfejsu API. Kod autoryzacji może być dowolnym ciągiem znaków, ale musi jednoznacznie reprezentować użytkownika, klienta, dla którego jest przeznaczony token, i czas ważności kodu, a także nie może być łatwy do odgadnięcia. Zwykle wydajesz kody autoryzacji, które wygasają po około 10 minutach.
- Sprawdź, czy adres URL określony przez parametr
redirect_urima następującą postać:https://oauth-redirect.googleusercontent.com/r/YOUR_PROJECT_ID https://oauth-redirect-sandbox.googleusercontent.com/r/YOUR_PROJECT_ID
- Przekieruj przeglądarkę użytkownika na adres URL określony przez
redirect_uriparametr. Podczas przekierowania dołącz wygenerowany kod autoryzacji i oryginalną, niezmodyfikowaną wartość stanu, dodając parametrycodeistate. Oto przykład wynikowego adresu URL:https://oauth-redirect.googleusercontent.com/r/YOUR_PROJECT_ID?code=AUTHORIZATION_CODE&state=STATE_STRING
Obsługa żądań wymiany tokenów
Punkt końcowy wymiany tokenów Twojej usługi odpowiada za 2 rodzaje wymiany tokenów:
- Wymiana kodów autoryzacji na tokeny dostępu i tokeny odświeżania.
- Wymiana tokenów odświeżania na tokeny dostępu.
Żądania wymiany tokenów zawierają te parametry:
| Parametry punktu końcowego wymiany tokenów | |
|---|---|
client_id |
Ciąg znaków, który identyfikuje źródło żądania jako Google. Ten ciąg znaków musi być zarejestrowany w Twoim systemie jako unikalny identyfikator Google. |
client_secret |
Tajny ciąg znaków zarejestrowany w Google w przypadku Twojej usługi. |
grant_type |
Typ wymienianego tokena. Może to być
authorization_code lub refresh_token. |
code |
Gdy grant_type=authorization_code, ten parametr jest kodem, który Google otrzymało z Twojego punktu końcowego logowania lub wymiany tokenów. |
redirect_uri |
Gdy grant_type=authorization_code, ten parametr jest
adresem URL używanym w początkowym żądaniu autoryzacji. |
refresh_token |
Gdy grant_type=refresh_token, ten parametr jest tokenem odświeżania, który Google otrzymało z Twojego punktu końcowego wymiany tokenów. |
Konfigurowanie sposobu wysyłania danych logowania przez Google na Twój serwer
W zależności od implementacji serwer autoryzacji oczekuje otrzymania danych logowania klienta w treści żądania lub w nagłówku żądania.
Domyślnie Google wysyła dane logowania w treści żądania. Jeśli serwer autoryzacji wymaga, aby dane logowania klienta znajdowały się w nagłówku żądania, musisz odpowiednio skonfigurować integrację Cloud-to-cloud zgodnie z wymaganiami:
Na liście projektów kliknij Otwórz obok projektu, nad którym chcesz pracować.
W sekcji Cloud-to-cloud kliknij Opracuj.
Kliknij Otwórz obok integracji.
Przewiń w dół do sekcji Uprawnienia (opcjonalnie) i zaznacz pole Google ma przesyłać identyfikator klienta i tajny klucz w nagłówku HTTP basic auth.
Kliknij Zapisz , aby zapisać zmiany.
Wymiana kodów autoryzacji na tokeny dostępu i tokeny odświeżania
Gdy użytkownik się zaloguje, a punkt końcowy autoryzacji zwróci do Google ważny przez krótki czas kod autoryzacji, Google wyśle żądanie do punktu końcowego wymiany tokenów, aby wymienić kod autoryzacji na token dostępu i token odświeżania.
W przypadku tych żądań wartość grant_type to authorization_code, a
wartość code to wartość kodu autoryzacji, którą wcześniej przyznałeś(-aś)
Google. Oto przykład żądania wymiany kodu autoryzacji na token dostępu i token odświeżania:
POST /token HTTP/1.1
Host: oauth2.example.com
Content-Type: application/x-www-form-urlencoded

client_id=GOOGLE_CLIENT_ID&client_secret=GOOGLE_CLIENT_SECRET&grant_type=authorization_code&code=AUTHORIZATION_CODE&redirect_uri=REDIRECT_URI
Aby wymieniać kody autoryzacji na token dostępu i token odświeżania, punkt końcowy wymiany tokenów odpowiada na żądania POST, wykonując te czynności:
- Sprawdź, czy
client_ididentyfikuje źródło żądania jako autoryzowane, aclient_secretodpowiada oczekiwanej wartości. - Sprawdź, czy kod autoryzacji jest prawidłowy i nie wygasł oraz czy identyfikator klienta podany w żądaniu odpowiada identyfikatorowi klienta powiązanemu z kodem autoryzacji.
- Sprawdź, czy adres URL określony przez parametr
redirect_urijest identyczny z wartością używaną w początkowym żądaniu autoryzacji. - Jeśli nie możesz zweryfikować wszystkich powyższych kryteriów, zwróć błąd HTTP
400 Bad Request z treścią
{"error": "invalid_grant"}. - W przeciwnym razie użyj identyfikatora użytkownika z kodu autoryzacji, aby wygenerować token odświeżania i token dostępu. Te tokeny mogą być dowolnym ciągiem znaków, ale muszą jednoznacznie reprezentować użytkownika i klienta, dla którego jest przeznaczony token, a także nie mogą być łatwe do odgadnięcia. W przypadku tokenów dostępu zapisz też czas ich ważności, który zwykle wynosi godzinę od momentu wydania tokena. Tokeny odświeżania nie wygasają.
- W treści odpowiedzi HTTPS zwróć ten obiekt JSON:
{
"token_type": "Bearer",
"access_token": "ACCESS_TOKEN",
"refresh_token": "REFRESH_TOKEN",
"expires_in": SECONDS_TO_EXPIRATION
}
Google przechowuje token dostępu i token odświeżania użytkownika oraz rejestruje wygaśnięcie tokena dostępu. Gdy token dostępu wygaśnie, Google użyje tokena odświeżania, aby uzyskać nowy token dostępu z punktu końcowego wymiany tokenów.
Wymiana tokenów odświeżania na tokeny dostępu
Gdy token dostępu wygaśnie, Google wyśle żądanie do punktu końcowego wymiany tokenów, aby wymienić token odświeżania na nowy token dostępu.
W przypadku tych żądań wartość grant_type to refresh_token, a wartość refresh_token to wartość tokena odświeżania, którą wcześniej przyznałeś(-aś) Google. Oto przykład żądania wymiany tokena odświeżania na token dostępu:
POST /token HTTP/1.1
Host: oauth2.example.com
Content-Type: application/x-www-form-urlencoded

client_id=GOOGLE_CLIENT_ID&client_secret=GOOGLE_CLIENT_SECRET&grant_type=refresh_token&refresh_token=REFRESH_TOKEN
Aby wymieniać token odświeżania na token dostępu, punkt końcowy wymiany tokenów odpowiada na żądania POST, wykonując te czynności:
- Sprawdź, czy
client_ididentyfikuje źródło żądania jako Google, aclient_secretodpowiada oczekiwanej wartości. - Sprawdź, czy token odświeżania jest prawidłowy oraz czy identyfikator klienta podany w żądaniu odpowiada identyfikatorowi klienta powiązanemu z tokenem odświeżania.
- Jeśli nie możesz zweryfikować wszystkich powyższych kryteriów, zwróć błąd HTTP 400
Bad Request z treścią
{"error": "invalid_grant"}. - W przeciwnym razie użyj identyfikatora użytkownika z tokena odświeżania, aby wygenerować token dostępu. Te tokeny mogą być dowolnym ciągiem znaków, ale muszą jednoznacznie reprezentować użytkownika i klienta, dla którego jest przeznaczony token, a także nie mogą być łatwe do odgadnięcia. W przypadku tokenów dostępu zapisz też czas ich ważności, który zwykle wynosi godzinę od momentu wydania tokena.
- W treści odpowiedzi HTTPS zwróć ten obiekt JSON:
{
"token_type": "Bearer",
"access_token": "ACCESS_TOKEN",
"expires_in": SECONDS_TO_EXPIRATION
}
Obsługa żądań informacji o użytkowniku
Punkt końcowy informacji o użytkowniku jest chronionym przez OAuth 2.0 zasobem, który zwraca deklaracje dotyczące połączonego użytkownika. Wdrożenie i hosting punktu końcowego informacji o użytkowniku jest opcjonalne. Wyjątkiem są te przypadki użycia:
- Logowanie się na połączone konto za pomocą Google One Tap
- Bezproblemowa subskrypcja na AndroidTV.
Po pobraniu tokena dostępu z punktu końcowego tokena Google wysyła żądanie do punktu końcowego informacji o użytkowniku, aby pobrać podstawowe informacje profilowe połączonego użytkownika.
| nagłówki żądań punktu końcowego informacji o użytkowniku | |
|---|---|
Authorization header |
Token dostępu typu okaziciela. |
Jeśli na przykład punkt końcowy informacji o użytkowniku jest dostępny pod adresem
https://myservice.example.com/userinfo, żądanie może wyglądać tak:
GET /userinfo HTTP/1.1
Host: myservice.example.com
Authorization: Bearer ACCESS_TOKEN
Aby punkt końcowy informacji o użytkowniku mógł obsługiwać żądania, wykonaj te czynności:
- Wyodrębnij token dostępu z nagłówka autoryzacji i zwróć informacje o użytkowniku powiązanym z tym tokenem.
- Jeśli token dostępu jest nieprawidłowy, zwróć błąd HTTP 401 (Brak autoryzacji) i użyj nagłówka odpowiedzi
WWW-Authenticate. Poniżej znajduje się przykładowa odpowiedź na pytanie o błąd w informacjach o użytkowniku:HTTP/1.1 401 Unauthorized WWW-Authenticate: error="invalid_token", error_description="The Access Token expired"
Jeśli token dostępu jest prawidłowy, zwróć odpowiedź HTTP 200 z podanym niżej obiektem JSON w treści HTTPS odpowiedź:
{ "sub": "USER_UUID", "email": "EMAIL_ADDRESS", "given_name": "FIRST_NAME", "family_name": "LAST_NAME", "name": "FULL_NAME", "picture": "PROFILE_PICTURE", }odpowiedź dotycząca punktu końcowego informacji o użytkowniku subUnikalny identyfikator, który identyfikuje użytkownika w Twoim systemie. emailAdres e-mail użytkownika. given_nameOpcjonalnie: imię użytkownika. family_nameOpcjonalnie: nazwisko użytkownika. nameOpcjonalnie: pełna nazwa użytkownika. pictureOpcjonalnie: zdjęcie profilowe użytkownika.