
Любая интеграция Cloud-to-cloud должна включать механизм аутентификации пользователей.
Аутентификация позволяет связать учетные записи Google ваших пользователей с учетными записями пользователей в вашей системе аутентификации. Это позволяет идентифицировать ваших пользователей, когда ваш запрос на выполнение получает намерение, связанное с умным домом. Google Smart Home поддерживает только OAuth с потоком кода авторизации.
На этой странице описано, как настроить сервер OAuth 2.0 для работы с вашей Cloud-to-cloud интеграцией.
Привязка учетной записи Google с помощью OAut
В процессе авторизации с использованием кода авторизации вам потребуются две конечные точки:
Конечная точка авторизации , которая отображает пользовательский интерфейс входа в систему для пользователей, которые еще не авторизованы. Конечная точка авторизации также создает кратковременный код авторизации для регистрации согласия пользователей на запрашиваемый доступ.
Конечная точка обмена токенов , отвечающая за два типа обмена:
- Обменивает код авторизации на долгосрочный токен обновления и краткосрочный токен доступа. Этот обмен происходит, когда пользователь проходит процедуру привязки учетной записи.
- Обменивает долгосрочный токен обновления на краткосрочный токен доступа. Этот обмен происходит, когда Google требуется новый токен доступа, поскольку срок действия предыдущего истек.
Рекомендации по проектированию
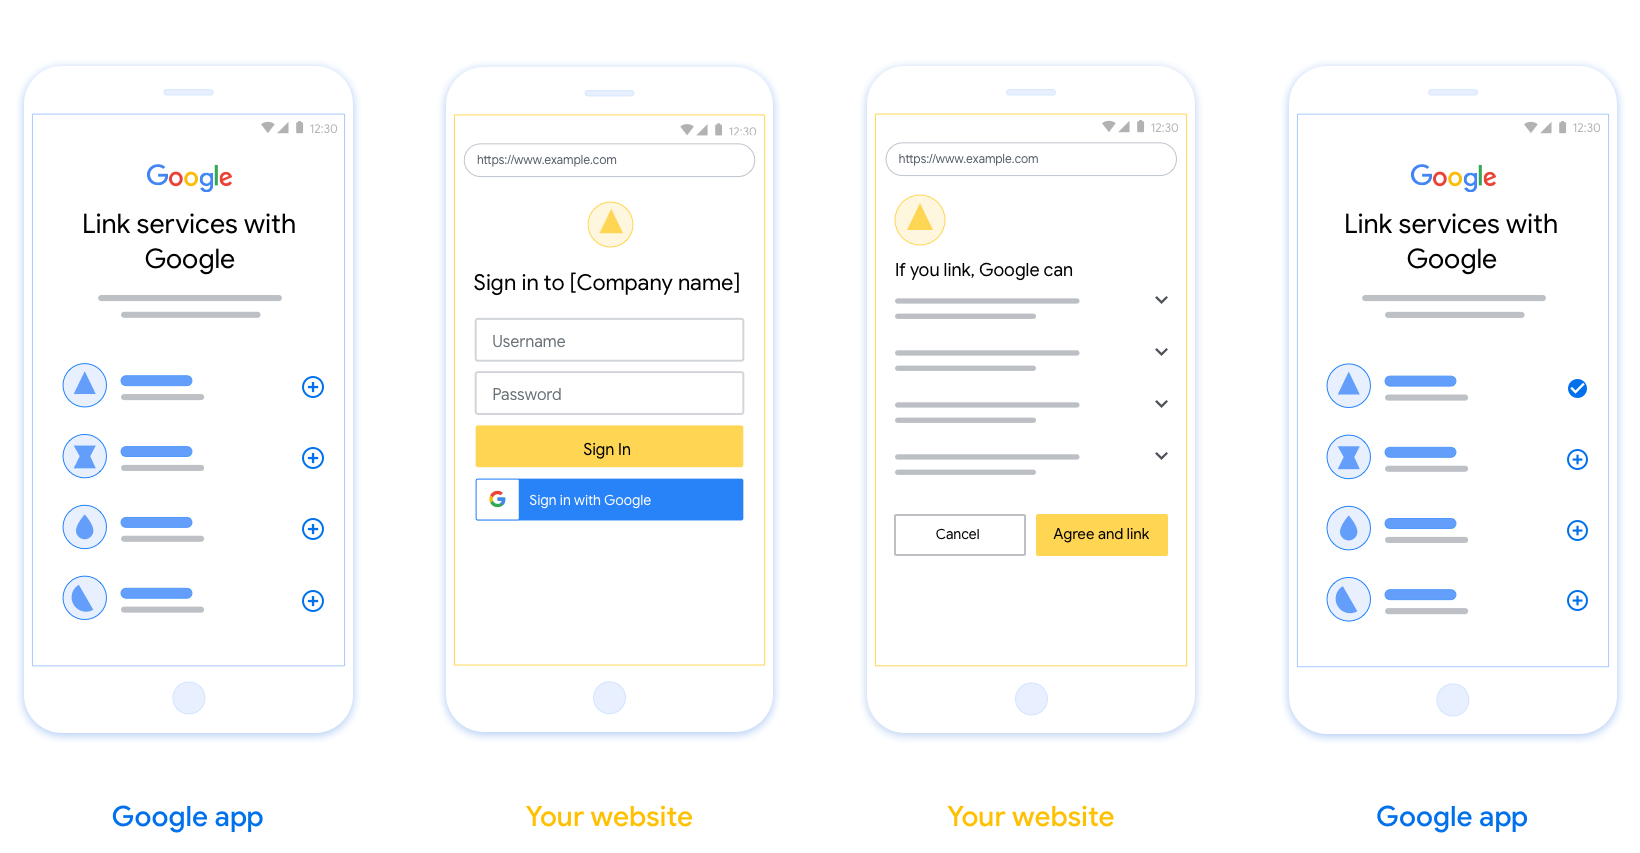
В этом разделе описываются требования к дизайну и рекомендации для пользовательского экрана, который вы размещаете для потоков привязки OAuth. После вызова из приложения Google ваша платформа отображает пользователю страницу входа в Google и экран согласия на привязку учетной записи. Пользователь возвращается в приложение Google после предоставления согласия на привязку учетных записей.
Требования
- Необходимо сообщить пользователю, что его учетная запись будет привязана к Google, а не к конкретному продукту Google, такому как Google Home или Google Assistant.
- Вам потребуется подтверждение авторизации от Google, например: «Входя в систему, вы разрешаете Google управлять вашими устройствами». См. раздел «Авторизация управления устройствами Google » в Политике разработчиков Google Home.
- Необходимо открыть страницу сопряжения Web OAuth и убедиться, что у пользователей есть понятный способ входа в свою учетную запись Google, например, поля для имени пользователя и пароля. Не используйте метод входа через Google (GSI), который позволяет пользователям входить в систему без перехода на страницу сопряжения Web OAuth. Это является нарушением политики Google.
- Для указания интеграции, на которую ссылается пользователь, на странице OAuth необходимо включить как минимум один из следующих элементов:
- Логотип компании
- Название компании
- Название интеграции
- значок приложения
Рекомендации
Мы рекомендуем вам сделать следующее:
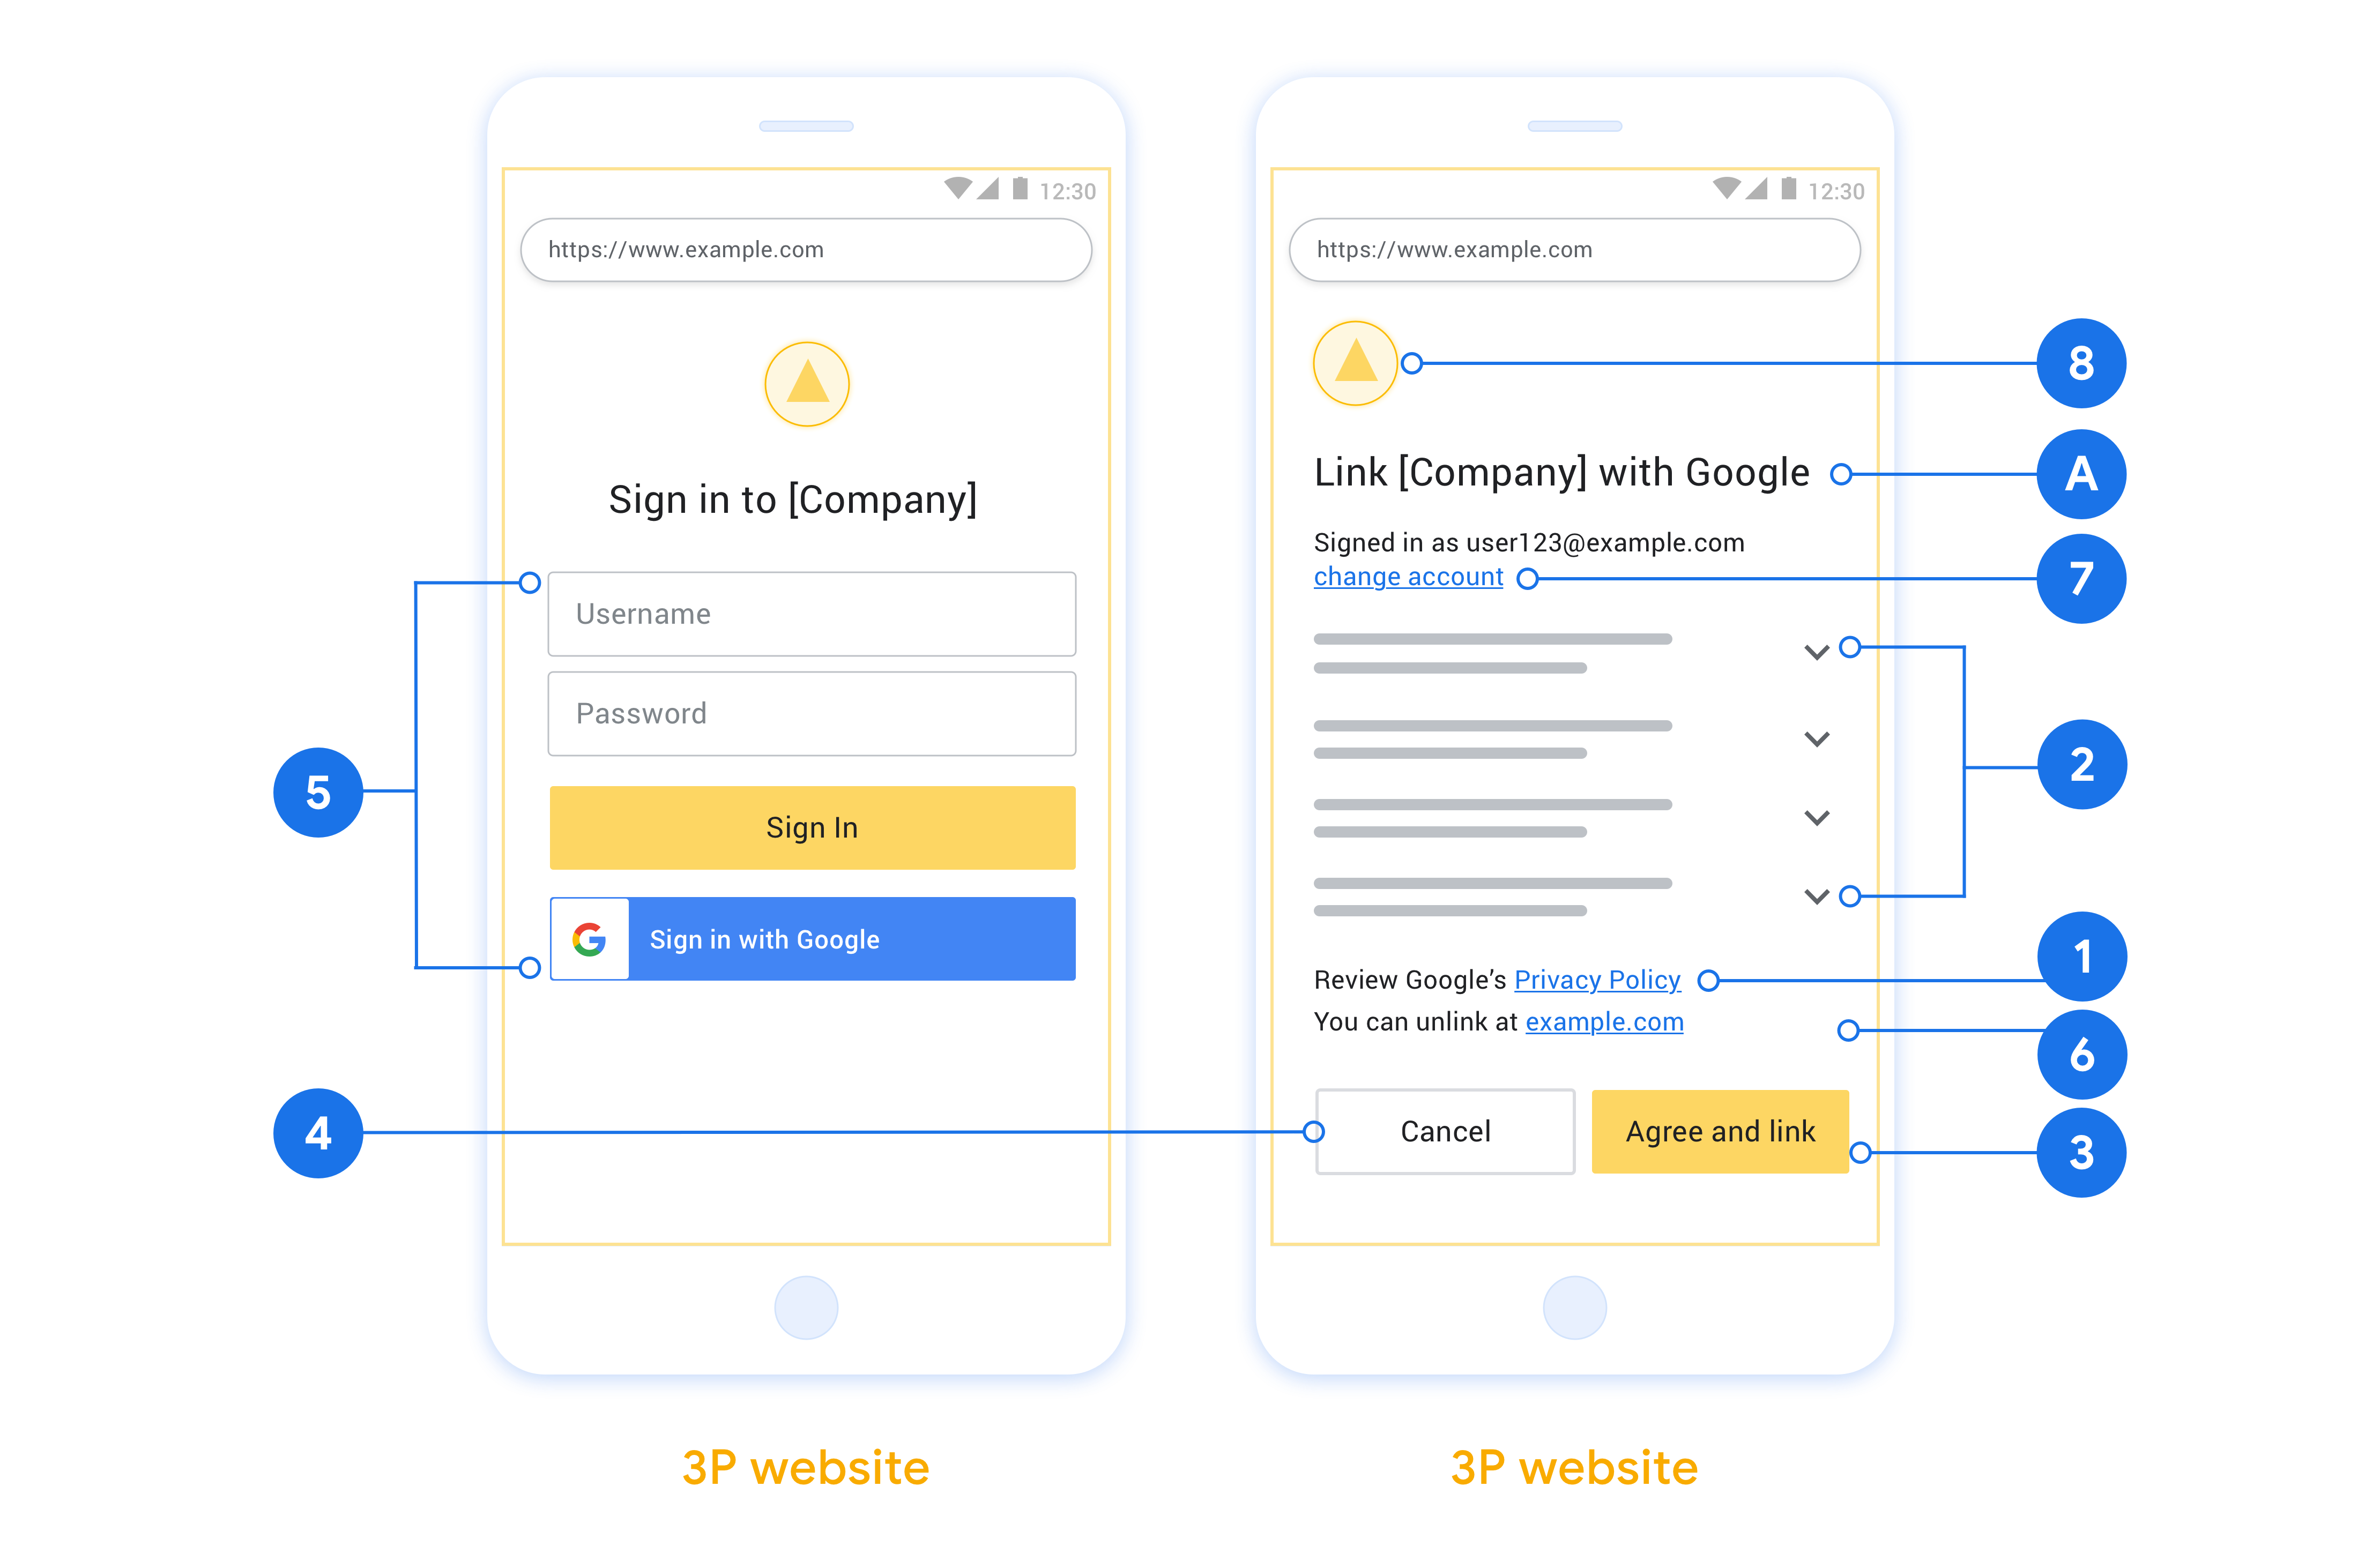
Отобразите политику конфиденциальности Google. Включите ссылку на политику конфиденциальности Google на экране согласия.
Данные, которыми необходимо поделиться. Используйте ясный и лаконичный язык, чтобы сообщить пользователю, какие его данные Google запрашивает и почему, а также какие данные об использовании или взаимодействии могут быть переданы вам компанией Google.
Четкий призыв к действию. На экране согласия четко сформулируйте призыв к действию, например, «Согласиться и связать». Это необходимо, поскольку пользователи должны понимать, какие данные им необходимо предоставить Google для связи своих учетных записей.
Возможность отмены. Предоставьте пользователям возможность вернуться назад или отменить подписку, если они не захотят использовать ссылку.
Четкий процесс входа в систему. Убедитесь, что у пользователей есть понятный способ входа в свою учетную запись Google, например, поля для имени пользователя и пароля или возможность входа через Google .
Возможность отсоединения. Предоставьте пользователям механизм для отсоединения, например, URL-адрес настроек их учетной записи на вашей платформе. В качестве альтернативы вы можете включить ссылку на учетную запись Google , где пользователи могут управлять своей связанной учетной записью. Если пользователь отсоединяет учетную запись от вашей интеграции, используйте
agentUsers.delete, чтобы уведомить Google об изменении.Возможность смены учетной записи пользователя. Предложите пользователям способ смены учетных записей. Это особенно полезно, если у пользователей обычно несколько учетных записей.
- Если пользователю необходимо закрыть экран согласия для переключения между учетными записями, отправьте в Google устранимую ошибку, чтобы пользователь мог войти в нужную учетную запись с помощью привязки OAuth .
Добавьте свой логотип. Отобразите логотип вашей компании на экране согласия. Используйте свои рекомендации по стилю для размещения логотипа. Если вы также хотите отобразить логотип Google, см. раздел «Логотипы и товарные знаки» .
Поток авторизационного кода
Реализация потока авторизационного кода на сервере OAuth 2.0 состоит из двух конечных точек, которые ваш сервис предоставляет по протоколу HTTPS. Первая конечная точка — это точка авторизации, которая отвечает за поиск или получение согласия пользователей на доступ к данным. Точка авторизации отображает пользовательский интерфейс входа в систему для пользователей, которые еще не авторизованы, и регистрирует согласие на запрошенный доступ. Вторая конечная точка — это точка обмена токенами, которая используется для получения зашифрованных строк, называемых токенами, которые авторизуют пользователя для доступа к вашему сервису.
Когда приложению Google необходимо вызвать один из API вашего сервиса, Google использует эти конечные точки вместе, чтобы получить разрешение от ваших пользователей на вызов этих API от их имени.
Сессия авторизации OAuth 2.0, инициированная Google, имеет следующий порядок действий:
- Google открывает вашу точку авторизации в браузере пользователя. Если процесс начался на устройстве, поддерживающем только голосовое управление, для действия, Google переносит выполнение на телефон.
- Пользователь входит в систему, если он еще не вошел, и предоставляет Google разрешение на доступ к своим данным через ваш API, если он еще не предоставил такое разрешение.
- Ваш сервис создает код авторизации и возвращает его в Google. Для этого перенаправьте браузер пользователя обратно на сайт Google, прикрепив к запросу код авторизации.
- Google отправляет код авторизации на вашу конечную точку обмена токенов, которая проверяет подлинность кода и возвращает токен доступа и токен обновления . Токен доступа — это кратковременный токен, который ваш сервис принимает в качестве учетных данных для доступа к API. Токен обновления — это долговременный токен, который Google может хранить и использовать для получения новых токенов доступа по истечении срока действия предыдущих.
- После завершения пользователем процедуры привязки учетной записи каждый последующий запрос, отправляемый Google, будет содержать токен доступа.
Обработка запросов на авторизацию
Когда вам необходимо выполнить привязку учетной записи с использованием потока авторизационного кода OAuth 2.0, Google направляет пользователя на вашу конечную точку авторизации с запросом, содержащим следующие параметры:
| Параметры конечной точки авторизации | |
|---|---|
client_id | Идентификатор клиента, который вы присвоили Google. |
redirect_uri | URL-адрес, на который вы отправляете ответ на этот запрос. |
state | Бухгалтерское значение, которое передается обратно в Google в неизмененном виде в URI перенаправления. |
scope | Необязательно: набор строк области действия, разделенных пробелами, которые указывают, для каких данных Google запрашивает авторизацию. |
response_type | Тип возвращаемого значения в ответе. Для потока авторизации по коду OAuth 2.0 тип ответа всегда равен code . |
Например, если ваша точка авторизации доступна по адресу https://myservice.example.com/auth , запрос может выглядеть следующим образом:
GET https://myservice.example.com/auth?client_id=GOOGLE_CLIENT_ID&redirect_uri=REDIRECT_URI&state=STATE_STRING&scope=REQUESTED_SCOPES&response_type=code
Для обработки запросов на вход в систему через точку авторизации выполните следующие действия:
- Убедитесь, что
client_idсовпадает с идентификатором клиента, который вы присвоили Google, и чтоredirect_uriсовпадает с URL-адресом перенаправления, предоставленным Google для вашего сервиса. Эти проверки важны для предотвращения предоставления доступа непредусмотренным или неправильно настроенным клиентским приложениям. Если вы поддерживаете несколько потоков OAuth 2.0, также убедитесь, чтоresponse_typeимеет значениеcode. - Проверьте, вошел ли пользователь в вашу систему. Если пользователь не вошел в систему, завершите процедуру входа или регистрации в вашей системе.
- Сгенерируйте код авторизации для Google, который будет использоваться для доступа к вашему API. Код авторизации может быть любым строковым значением, но он должен однозначно представлять пользователя, клиента, для которого предназначен токен, и время истечения срока действия кода, и его нельзя угадать. Обычно выдаются коды авторизации, срок действия которых истекает примерно через 10 минут.
- Убедитесь, что URL-адрес, указанный параметром
redirect_uri, имеет следующий вид:https://oauth-redirect.googleusercontent.com/r/YOUR_PROJECT_ID https://oauth-redirect-sandbox.googleusercontent.com/r/YOUR_PROJECT_ID
- Перенаправьте браузер пользователя на URL-адрес, указанный параметром
redirect_uri. При перенаправлении добавьте к параметрамcodeиstateсгенерированный вами код авторизации и исходное, неизмененное значение состояния. Ниже приведен пример результирующего URL-адреса:https://oauth-redirect.googleusercontent.com/r/YOUR_PROJECT_ID?code=AUTHORIZATION_CODE&state=STATE_STRING
Обработка запросов на обмен токенов
Конечная точка обмена токенов вашего сервиса отвечает за два типа обмена токенов:
- Обменивайте коды авторизации на токены доступа и токены обновления.
- Обменяйте токены обновления на токены доступа.
Запросы на обмен токенов включают следующие параметры:
| Параметры конечной точки обмена токенов | |
|---|---|
client_id | Строка, идентифицирующая источник запроса как Google. Эта строка должна быть зарегистрирована в вашей системе как уникальный идентификатор Google. |
client_secret | Секретная строка, которую вы зарегистрировали в Google для своего сервиса. |
grant_type | Тип обмениваемого токена. Это либо authorization_code , либо refresh_token . |
code | Если grant_type=authorization_code , то этот параметр представляет собой код, полученный Google либо от вашей точки входа в систему, либо от точки обмена токенами. |
redirect_uri | Если grant_type=authorization_code , то этот параметр представляет собой URL-адрес, использованный в первоначальном запросе на авторизацию. |
refresh_token | Если grant_type=refresh_token , то этот параметр представляет собой токен обновления, полученный Google от вашей конечной точки обмена токенами. |
Настройте способ отправки учетных данных Google на ваш сервер.
В зависимости от реализации, ваш сервер авторизации ожидает получения учетных данных клиента либо в теле запроса, либо в заголовке запроса.
По умолчанию Google отправляет учетные данные в теле запроса. Если ваш сервер авторизации требует, чтобы учетные данные клиента находились в заголовке запроса, вам необходимо соответствующим образом настроить интеграцию Cloud-to-cloud :
Перейдите в консоль разработчика.
В списке проектов нажмите кнопку «Открыть» рядом с проектом, с которым хотите работать.
В разделе «Облако-облако» выберите «Разработка» .
Нажмите «Открыть» рядом с вашей интеграцией.
Прокрутите вниз до раздела «Разрешения (необязательно)» и установите флажок « Разрешить Google передавать идентификатор клиента и секрет через заголовок базовой аутентификации HTTP» .
Нажмите «Сохранить» , чтобы сохранить изменения.
Обменивайте коды авторизации на токены доступа и токены обновления.
После того, как пользователь войдет в систему и ваша точка авторизации вернет Google кратковременный код авторизации, Google отправит запрос на вашу точку обмена токенов для обмена кода авторизации на токен доступа и токен обновления.
Для таких запросов значение параметра grant_type равно authorization_code , а значение параметра code — это значение кода авторизации, который вы ранее предоставили Google. Ниже приведен пример запроса на обмен кода авторизации на токен доступа и токен обновления:
POST /token HTTP/1.1
Host: oauth2.example.com
Content-Type: application/x-www-form-urlencoded

client_id=GOOGLE_CLIENT_ID&client_secret=GOOGLE_CLIENT_SECRET&grant_type=authorization_code&code=AUTHORIZATION_CODE&redirect_uri=REDIRECT_URI
Для обмена кодов авторизации на токен доступа и токен обновления ваша конечная точка обмена токенов отвечает на POST запросы, выполняя следующие действия:
- Убедитесь, что
client_idидентифицирует источник запроса как авторизованный, и чтоclient_secretсоответствует ожидаемому значению. - Убедитесь, что код авторизации действителен и не просрочен, а также что идентификатор клиента, указанный в запросе, совпадает с идентификатором клиента, связанным с кодом авторизации.
- Убедитесь, что URL-адрес, указанный параметром
redirect_uri, идентичен значению, использованному в первоначальном запросе авторизации. - Если вы не можете проверить все вышеперечисленные критерии, верните ошибку HTTP 400 Bad Request с телом запроса
{"error": "invalid_grant"}. - В противном случае используйте идентификатор пользователя из кода авторизации для генерации токена обновления и токена доступа. Эти токены могут иметь любое строковое значение, но они должны однозначно представлять пользователя и клиент, для которого предназначен токен, и их нельзя угадать. Для токенов доступа также укажите время истечения срока действия токена, которое обычно составляет час после его выдачи. Токены обновления не имеют срока действия.
- В теле HTTPS-ответа возвращается следующий JSON-объект:
{
"token_type": "Bearer",
"access_token": "ACCESS_TOKEN",
"refresh_token": "REFRESH_TOKEN",
"expires_in": SECONDS_TO_EXPIRATION
}
Google хранит токен доступа и токен обновления для пользователя и регистрирует истечение срока действия токена доступа. Когда срок действия токена доступа истекает, Google использует токен обновления для получения нового токена доступа от вашей конечной точки обмена токенами.
Обменяйте токены обновления на токены доступа.
Когда срок действия токена доступа истекает, Google отправляет запрос на вашу конечную точку обмена токенов для обмена токена обновления на новый токен доступа.
Для таких запросов значение параметра grant_type равно refresh_token , а значение refresh_token — это значение токена обновления, который вы ранее предоставили Google. Ниже приведен пример запроса на обмен токена обновления на токен доступа:
POST /token HTTP/1.1
Host: oauth2.example.com
Content-Type: application/x-www-form-urlencoded

client_id=GOOGLE_CLIENT_ID&client_secret=GOOGLE_CLIENT_SECRET&grant_type=refresh_token&refresh_token=REFRESH_TOKEN
Для обмена токена обновления на токен доступа ваша конечная точка обмена токенов отвечает на POST запросы, выполняя следующие действия:
- Убедитесь, что
client_idидентифицирует источник запроса как Google, и чтоclient_secretсоответствует ожидаемому значению. - Убедитесь, что токен обновления действителен и что идентификатор клиента, указанный в запросе, совпадает с идентификатором клиента, связанным с токеном обновления.
- Если вы не можете проверить все вышеперечисленные критерии, верните ошибку HTTP 400 Bad Request с телом запроса
{"error": "invalid_grant"}. - В противном случае используйте идентификатор пользователя из токена обновления для генерации токена доступа. Эти токены могут иметь любое строковое значение, но они должны однозначно представлять пользователя и клиент, для которого предназначен токен, и их нельзя угадать. Для токенов доступа также следует указать время истечения срока действия токена, обычно это час после его выдачи.
- В теле HTTPS-ответа возвращается следующий JSON-объект:
{
"token_type": "Bearer",
"access_token": " ACCESS_TOKEN ",
"expires_in": SECONDS_TO_EXPIRATION
}
Обработка запросов информации о пользователях
Конечная точка userinfo — это ресурс, защищенный OAuth 2.0, который возвращает утверждения о связанном пользователе. Реализация и размещение конечной точки userinfo не является обязательной, за исключением следующих случаев использования:
- Вход в связанную учетную запись с помощью Google One Tap.
- Простая подписка на AndroidTV.
После того как токен доступа был успешно получен из конечной точки вашего токена, Google отправляет запрос в конечную точку информации о пользователе, чтобы получить основную информацию профиля связанного пользователя.
| заголовки запроса конечной точки userinfo | |
|---|---|
Authorization header | Токен доступа типа Bearer. |
Например, если ваша конечная точка userinfo доступна по адресу https://myservice.example.com/userinfo , запрос может выглядеть следующим образом:
GET /userinfo HTTP/1.1
Host: myservice.example.com
Authorization: Bearer ACCESS_TOKEN
Чтобы ваша конечная точка userinfo могла обрабатывать запросы, выполните следующие действия:
- Извлеките токен доступа из заголовка авторизации и верните информацию для пользователя, связанного с токеном доступа.
- Если токен доступа недействителен, верните ошибку HTTP 401 Unauthorized с использованием заголовка ответа
WWW-Authenticate. Ниже приведен пример ответа об ошибке с информацией о пользователе:HTTP/1.1 401 Unauthorized WWW-Authenticate: error="invalid_token", error_description="The Access Token expired"
Если токен доступа действителен, верните ответ HTTP 200 со следующим объектом JSON в теле ответа HTTPS:
{ "sub": "USER_UUID", "email": "EMAIL_ADDRESS", "given_name": "FIRST_NAME", "family_name": "LAST_NAME", "name": "FULL_NAME", "picture": "PROFILE_PICTURE", }ответ конечной точки с информацией о пользователе subУникальный идентификатор, идентифицирующий пользователя в вашей системе. emailАдрес электронной почты пользователя. given_nameНеобязательно: Имя пользователя. family_nameНеобязательно: фамилия пользователя. nameНеобязательно: Полное имя пользователя. pictureНеобязательно: изображение профиля пользователя.