
Her Cloud-to-cloud entegrasyonu, kullanıcıların kimliğini doğrulama mekanizması içermelidir.
Kimlik doğrulama, kullanıcılarınızın Google Hesaplarını kimlik doğrulama sisteminizdeki kullanıcı hesaplarıyla bağlamanıza olanak tanır. Bu sayede, karşılamanız bir akıllı ev amacı aldığında kullanıcılarınızı tanımlayabilirsiniz. Google akıllı ev yalnızca yetkilendirme kodu akışıyla OAuth'u destekler.
Bu sayfada, OAuth 2.0 sunucunuzu Cloud-to-cloud entegrasyonunuzla çalışacak şekilde nasıl ayarlayacağınız açıklanmaktadır.
OAuth ile Google Hesabı bağlantısı
Yetkilendirme kodu akışında iki uç nokta gerekir:
Oturum açmamış kullanıcılarınıza oturum açma kullanıcı arayüzünü sunan yetkilendirme uç noktası. Yetkilendirme uç noktası, istenen erişime kullanıcıların iznini kaydetmek için kısa ömürlü bir yetkilendirme kodu da oluşturur.
İki tür değişimden sorumlu olan jeton değişimi uç noktası:
- Yetkilendirme kodunu uzun ömürlü bir yenileme jetonu ve kısa ömürlü bir erişim jetonuyla değiştirir. Bu değişim, kullanıcı hesap bağlama akışından geçtiğinde gerçekleşir.
- Uzun ömürlü bir yenileme jetonunu kısa ömürlü bir erişim jetonuyla değiştirir. Bu değişim, Google'ın elindeki erişim jetonunun süresi dolduğu için yeni bir erişim jetonuna ihtiyaç duyduğunda gerçekleşir.
Tasarım yönergeleri
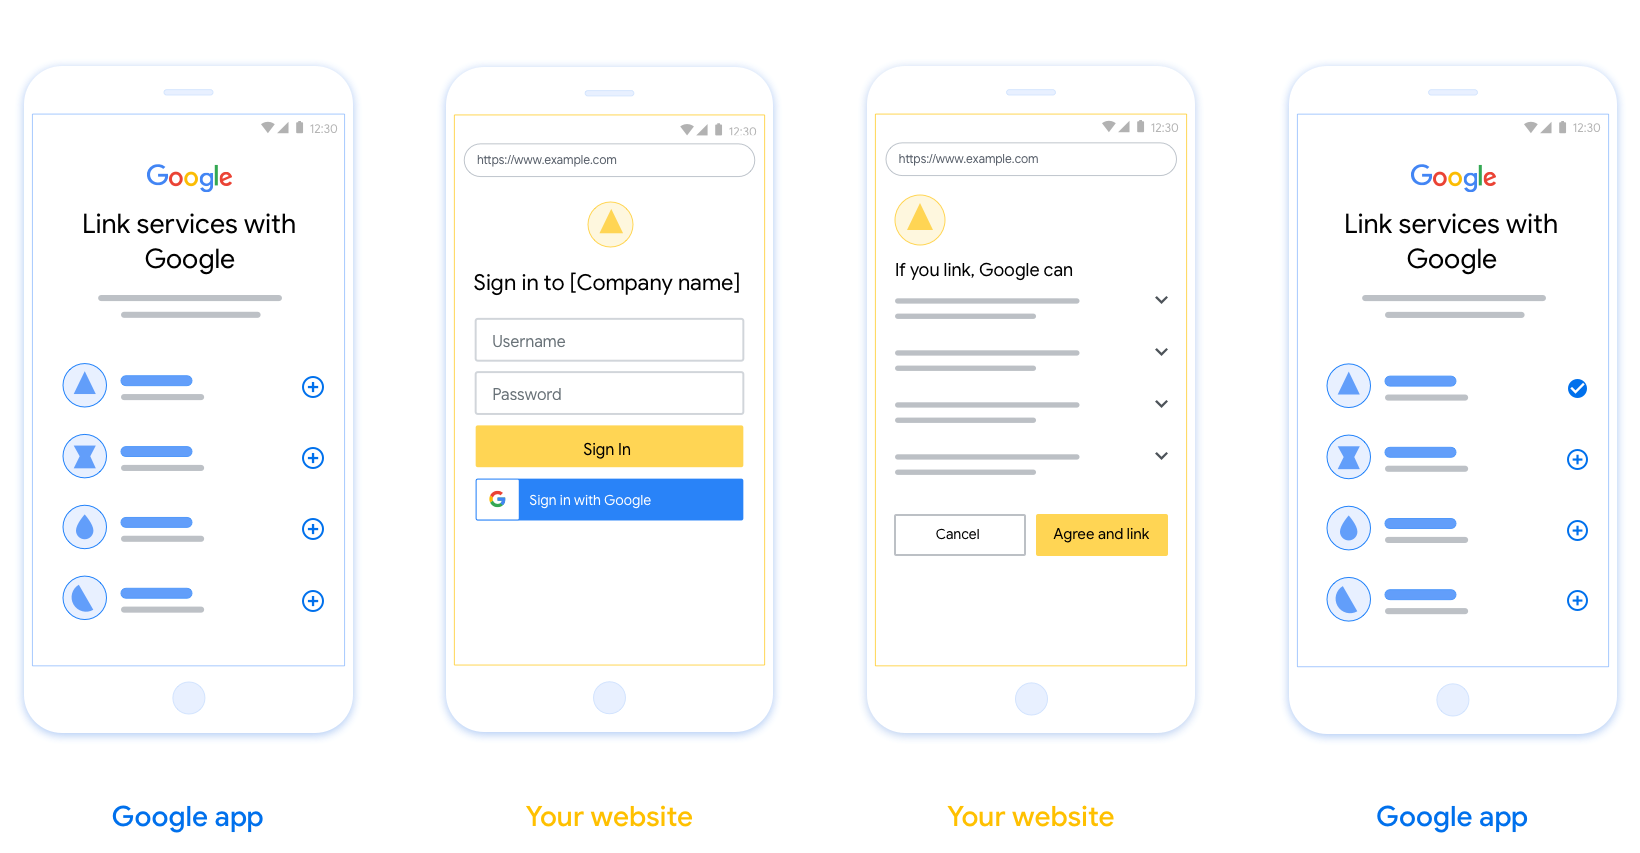
Bu bölümde, OAuth bağlantı akışları için barındırdığınız kullanıcı ekranıyla ilgili tasarım koşulları ve önerileri açıklanmaktadır. Google'ın uygulaması tarafından çağrıldıktan sonra platformunuz, kullanıcıya Google'da oturum açma sayfasını ve hesap bağlama izni ekranını gösterir. Kullanıcı, hesapları bağlamayı kabul ettikten sonra Google'ın uygulamasına geri yönlendirilir.
Şartlar
- Kullanıcı hesabının Google Home veya Google Asistan gibi belirli bir Google ürününe değil Google'a bağlanacağını belirtmeniz gerekir.
- "Oturum açarak Google'ın cihazlarınızı kontrol etmesine yetki veriyorsunuz." gibi bir Google yetkilendirme beyanınız olmalıdır. Google Home Geliştirici Politikaları'nın Google Cihaz Kontrolü Yetkilendirme bölümüne bakın.
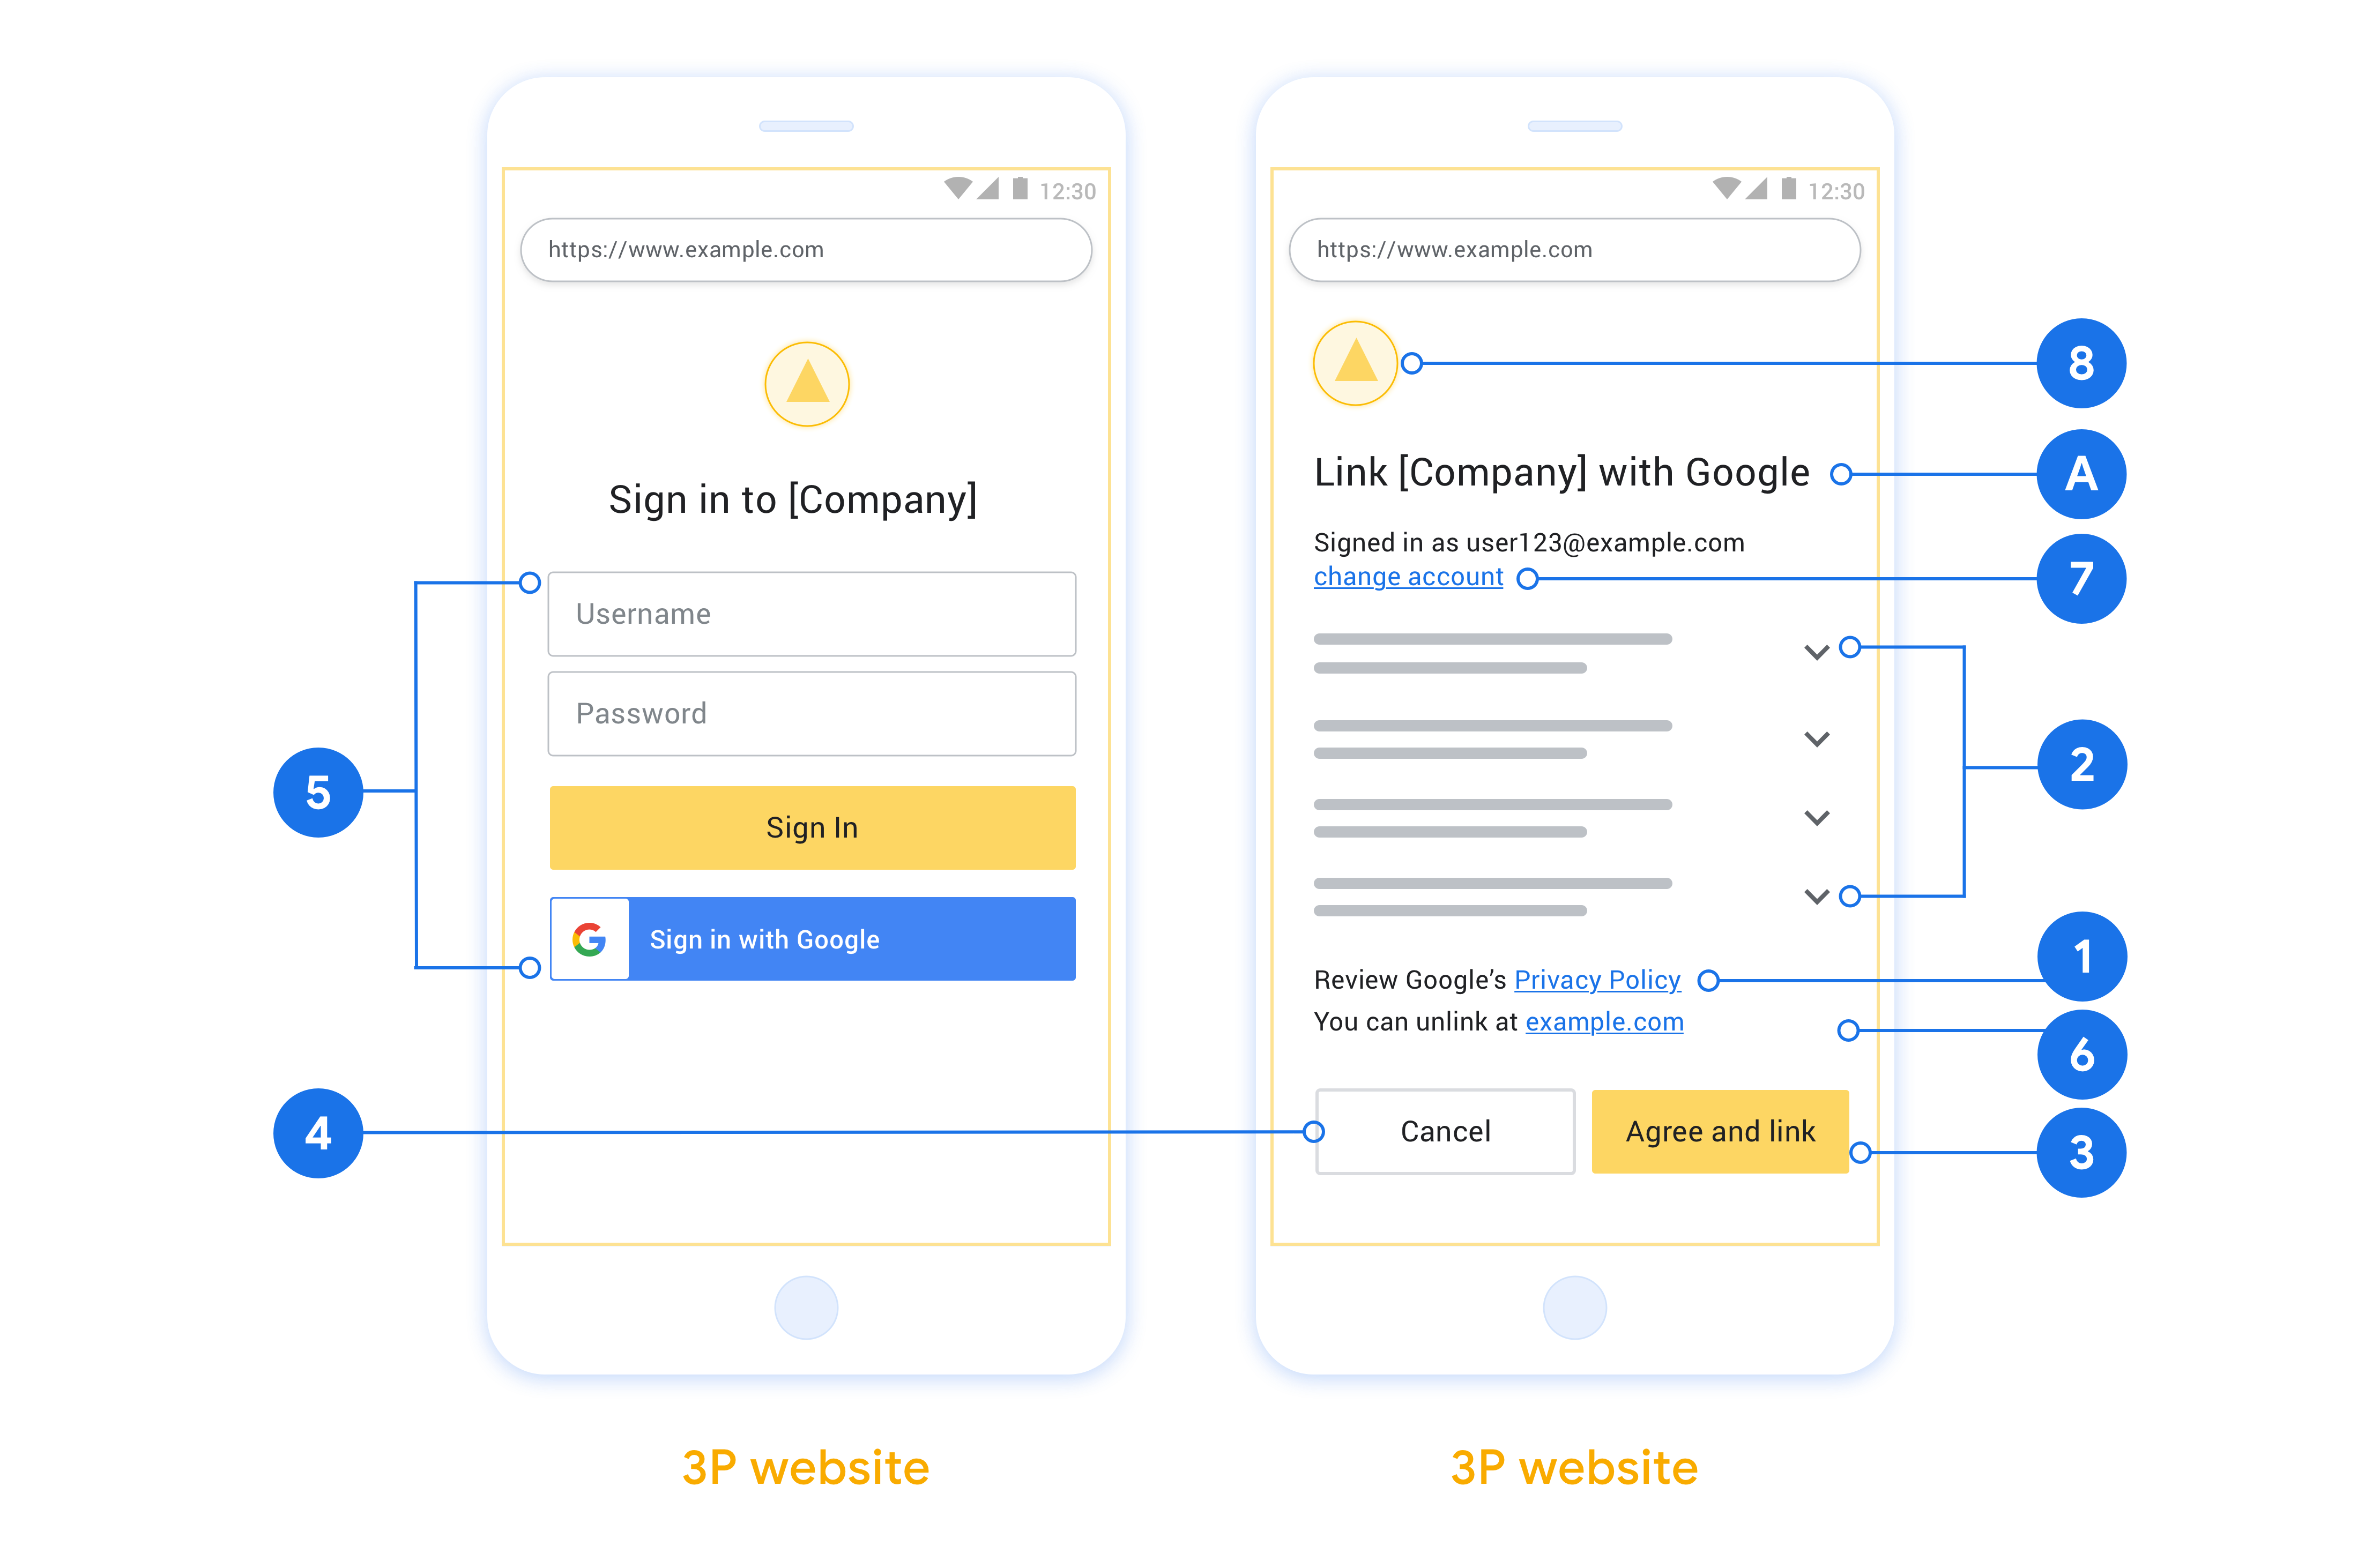
- Web OAuth bağlantı oluşturma sayfasını açmanız ve kullanıcıların Google Hesaplarında oturum açmak için net bir yönteme sahip olmasını sağlamanız gerekir. Örneğin, kullanıcı adı ve şifre alanları gibi. Kullanıcıların Web OAuth Bağlantısı sayfasına yönlendirilmeden bağlantı oluşturmasına olanak tanıyan Google ile Oturum Açma (GSI) yöntemini kullanmayın. Bu durum, Google politikasının ihlalidir.
- Kullanıcının bağlandığı entegrasyonu belirtmek için OAuth bağlama sayfasına aşağıdaki öğelerden en az birini eklemeniz gerekir:
- Şirket logosu
- Şirket adı
- Entegrasyon adı
- Uygulama simgesi
Öneriler
Aşağıdakileri yapmanızı öneririz:
Google'ın Gizlilik Politikası'nı gösterin. Kullanıcı rızası ekranına Google'ın Gizlilik Politikası'nın bağlantısını ekleyin.
Paylaşılacak veriler. Kullanıcıya, Google'ın hangi verilerini neden istediğini ve hangi kullanım ya da etkileşim verilerinin Google tarafından sizinle paylaşılabileceğini açık ve net bir dille anlatın.
Net harekete geçirici mesaj. İzin ekranınızda "Kabul et ve bağla" gibi net bir harekete geçirici mesaj belirtin. Bunun nedeni, kullanıcıların hesaplarını bağlamak için Google ile hangi verileri paylaşmaları gerektiğini anlamalarıdır.
İptal etme imkanı. Bağlantı oluşturmayı tercih etmeyen kullanıcılara geri dönme veya işlemi iptal etme olanağı tanıyın.
Net oturum açma süreci. Kullanıcıların Google Hesaplarında oturum açmak için net bir yöntemi olduğundan emin olun. Örneğin, kullanıcı adı ve şifre alanları veya Google ile oturum açma.
Bağlantıyı kaldırma özelliği. Kullanıcılara bağlantıyı kaldırma mekanizması sunun. Örneğin, platformunuzdaki hesap ayarlarına yönlendiren bir URL. Alternatif olarak, kullanıcıların bağlı hesaplarını yönetebileceği Google Hesabı'na bir bağlantı ekleyebilirsiniz. Bir kullanıcı entegrasyonunuzun bağlantısını kaldırırsa Google'ı bu değişiklikten haberdar etmek için
agentUsers.deletekullanın.Kullanıcı hesabını değiştirme Kullanıcılara hesaplarını değiştirmeleri için bir yöntem önerin. Bu özellik, özellikle kullanıcıların birden fazla hesabı olduğu durumlarda faydalıdır.
- Kullanıcının hesap değiştirmek için kullanıcı rızası ekranını kapatması gerekiyorsa Google'a kurtarılabilir bir hata gönderin. Böylece kullanıcı, OAuth bağlantısı ile istediği hesapta oturum açabilir.
Logonuzu ekleyin. Kullanıcı rızası ekranında şirket logonuzu gösterin. Logonuzu yerleştirmek için stil kurallarınızı kullanın. Google'ın logosunu da göstermek istiyorsanız Logolar ve ticari markalar bölümüne bakın.
Yetkilendirme kodu akışı
Yetkilendirme kodu akışının OAuth 2.0 sunucu uygulaması, hizmetinizin HTTPS üzerinden kullanılabilir hale getirdiği iki uç noktadan oluşur. İlk uç nokta, yetkilendirme uç noktasıdır. Bu uç nokta, veri erişimi için kullanıcılardan izin bulmaktan veya izin almaktan sorumludur. Yetkilendirme uç noktası, henüz oturum açmamış kullanıcılarınıza bir oturum açma kullanıcı arayüzü sunar ve istenen erişim için izni kaydeder. İkinci uç nokta, jeton değişimi uç noktasıdır. Bu uç nokta, bir kullanıcının hizmetinize erişmesine yetki veren, jeton adı verilen şifrelenmiş dizeleri almak için kullanılır.
Bir Google uygulamasının hizmetinizin API'lerinden birini çağırması gerektiğinde Google, kullanıcılarınızdan bu API'leri onlar adına çağırmak için izin almak üzere bu uç noktaları birlikte kullanır.
Google tarafından başlatılan bir OAuth 2.0 yetkilendirme kodu akışı oturumu aşağıdaki akışa sahiptir:
- Google, yetkilendirme uç noktanızı kullanıcının tarayıcısında açar. İşlem için akış yalnızca sesli bir cihazda başlatıldıysa Google, yürütmeyi telefona aktarır.
- Kullanıcı, henüz oturum açmadıysa oturum açar ve Google'a, henüz izin vermediyse API'nizle verilerine erişme izni verir.
- Hizmetiniz bir yetkilendirme kodu oluşturur ve bunu Google'a döndürür. Bunu yapmak için kullanıcının tarayıcısını, isteğe eklenmiş yetkilendirme koduyla birlikte Google'a geri yönlendirin.
- Google, yetkilendirme kodunu jeton değişimi uç noktanıza gönderir. Bu uç nokta, kodun gerçekliğini doğrulayıp bir erişim jetonu ve bir yenileme jetonu döndürür. Erişim jetonu, hizmetinizin API'lere erişmek için kimlik bilgisi olarak kabul ettiği kısa ömürlü bir jetondur. Yenileme jetonu, Google'ın saklayabileceği ve süresi dolduğunda yeni erişim jetonları almak için kullanabileceği uzun ömürlü bir jetondur.
- Kullanıcı, hesap bağlama akışını tamamladıktan sonra Google'dan gönderilen her sonraki istekte bir erişim jetonu bulunur.
Yetkilendirme isteklerini işleme
OAuth 2.0 yetkilendirme kodu akışını kullanarak hesap bağlama işlemini gerçekleştirmeniz gerektiğinde Google, kullanıcıyı yetkilendirme uç noktanıza aşağıdaki parametreleri içeren bir istekle yönlendirir:
| Yetkilendirme uç noktası parametreleri | |
|---|---|
client_id |
Google'a atadığınız istemci kimliği. |
redirect_uri |
Bu isteğe verilen yanıtı göndereceğiniz URL. |
state |
Yönlendirme URI'sinde Google'a değiştirilmeden geri aktarılan bir muhasebe değeri. |
scope |
İsteğe bağlı: Google'ın yetkilendirme isteğinde bulunduğu verileri belirten, boşlukla ayrılmış bir kapsam dizeleri grubu. |
response_type |
Yanıt içinde döndürülecek değerin türü. OAuth 2.0
yetkilendirme kodu akışı için yanıt türü her zaman code olur.
|
Örneğin, yetkilendirme uç noktanız https://myservice.example.com/auth adresinde kullanılabiliyorsa istek şu şekilde görünebilir:
GET https://myservice.example.com/auth?client_id=GOOGLE_CLIENT_ID&redirect_uri=REDIRECT_URI&state=STATE_STRING&scope=REQUESTED_SCOPES&response_type=code
Yetkilendirme uç noktanızın oturum açma isteklerini işlemesi için aşağıdaki adımları uygulayın:
client_iddeğerinin, Google'a atadığınız istemci kimliğiyle,redirect_urideğerinin ise Google'ın hizmetiniz için sağladığı yönlendirme URL'siyle eşleştiğini doğrulayın. Bu kontroller, amaçlanmayan veya yanlış yapılandırılmış istemci uygulamalarına erişim verilmesini önlemek için önemlidir. Birden fazla OAuth 2.0 akışını destekliyorsanızresponse_typedeğerinincodeolduğunu da onaylayın.- Kullanıcının hizmetinizde oturum açıp açmadığını kontrol edin. Kullanıcı oturum açmamışsa hizmetinizin oturum açma veya kaydolma akışını tamamlayın.
- Google'ın API'nize erişmek için kullanacağı bir yetkilendirme kodu oluşturun. Yetkilendirme kodu herhangi bir dize değeri olabilir ancak kullanıcıyı, jetonun ait olduğu istemciyi ve kodun geçerlilik bitiş zamanını benzersiz bir şekilde temsil etmeli ve tahmin edilebilir olmamalıdır. Genellikle yaklaşık 10 dakika sonra geçerliliğini yitiren yetkilendirme kodları veriyorsunuz.
redirect_uriparametresiyle belirtilen URL'nin aşağıdaki biçimde olduğunu doğrulayın:https://oauth-redirect.googleusercontent.com/r/YOUR_PROJECT_ID https://oauth-redirect-sandbox.googleusercontent.com/r/YOUR_PROJECT_ID
- Kullanıcının tarayıcısını
redirect_uriparametresiyle belirtilen URL'ye yönlendirin.codevestateparametrelerini ekleyerek yönlendirme yaptığınızda, yeni oluşturduğunuz yetkilendirme kodunu ve orijinal, değiştirilmemiş durum değerini ekleyin. Aşağıda, sonuç URL'sine dair bir örnek verilmiştir:https://oauth-redirect.googleusercontent.com/r/YOUR_PROJECT_ID?code=AUTHORIZATION_CODE&state=STATE_STRING
Jeton değişimi isteklerini işleme
Hizmetinizin jeton değişimi uç noktası iki tür jeton değişiminden sorumludur:
- Erişim jetonları ve yenileme jetonları için yetkilendirme kodlarını değiştirme
- Yenileme jetonlarını erişim jetonlarıyla değiştirme
Jeton değişimi istekleri aşağıdaki parametreleri içerir:
| Jeton değişimi uç noktası parametreleri | |
|---|---|
client_id |
İstek kaynağını Google olarak tanımlayan bir dize. Bu dize, sisteminizde Google'ın benzersiz tanımlayıcısı olarak kaydedilmelidir. |
client_secret |
Hizmetiniz için Google'a kaydettirdiğiniz gizli dize. |
grant_type |
Değiştirilen jetonun türü. authorization_code veya refresh_token olmalıdır. |
code |
grant_type=authorization_code olduğunda bu parametre, Google'ın oturum açma veya jeton değişimi uç noktanızdan aldığı koddur. |
redirect_uri |
grant_type=authorization_code olduğunda bu parametre, ilk yetkilendirme isteğinde kullanılan URL'dir. |
refresh_token |
grant_type=refresh_token olduğunda bu parametre, Google'ın jeton değişimi uç noktanızdan aldığı yenileme jetonudur. |
Google'ın sunucunuza kimlik bilgilerini nasıl göndereceğini yapılandırma
Yetkilendirme sunucunuz, uygulanma şekline bağlı olarak istemci kimlik bilgilerini istek gövdesinde veya istek başlığında almayı bekler.
Google, kimlik bilgilerini varsayılan olarak istek gövdesinde gönderir. Yetkilendirme sunucunuz, istemci kimlik bilgilerinin istek üstbilgisinde olmasını gerektiriyorsa Cloud-to-cloud entegrasyonunuzu buna göre yapılandırmanız gerekir:
Proje listesinde, üzerinde çalışmak istediğiniz projenin yanındaki Aç'ı tıklayın.
Cloud-to-Cloud bölümünde Develop'u (Geliştir) seçin.
Entegrasyonunuzun yanındaki Aç'ı tıklayın.
İzinler (isteğe bağlı) bölümüne gidin ve Google, istemci kimliğini ve gizliyi HTTP temel kimlik doğrulama üstbilgisi üzerinden iletsin onay kutusunu işaretleyin.
Değişikliklerinizi kaydetmek için Kaydet'i tıklayın.
Erişim jetonları ve yenileme jetonları için yetkilendirme kodlarını değiştirme
Kullanıcı oturum açtıktan ve yetkilendirme uç noktanız Google'a kısa ömürlü bir yetkilendirme kodu döndürdükten sonra Google, yetkilendirme kodunu erişim jetonu ve yenileme jetonu ile değiştirmek için jeton değişimi uç noktanıza bir istek gönderir.
Bu isteklerde grant_type değişkeninin değeri authorization_code, code değişkeninin değeri ise daha önce Google'a verdiğiniz yetkilendirme kodunun değeridir. Aşağıda, yetkilendirme kodunu erişim jetonu ve yenileme jetonuyla değiştirme isteğine ilişkin bir örnek verilmiştir:
POST /token HTTP/1.1
Host: oauth2.example.com
Content-Type: application/x-www-form-urlencoded

client_id=GOOGLE_CLIENT_ID&client_secret=GOOGLE_CLIENT_SECRET&grant_type=authorization_code&code=AUTHORIZATION_CODE&redirect_uri=REDIRECT_URI
Yetkilendirme kodlarını erişim jetonu ve yenileme jetonuyla değiştirmek için jeton değişimi uç noktanız, aşağıdaki adımları uygulayarak POST isteklerine yanıt verir:
client_iddeğerinin, isteğin kaynağını yetkili bir kaynak olarak tanımladığını veclient_secretdeğerinin beklenen değerle eşleştiğini doğrulayın.- Yetkilendirme kodunun geçerli ve süresinin dolmadığını, ayrıca istekte belirtilen istemci kimliğinin yetkilendirme koduyla ilişkili istemci kimliğiyle eşleştiğini doğrulayın.
redirect_uriparametresiyle belirtilen URL'nin, ilk yetkilendirme isteğinde kullanılan değerle aynı olduğunu doğrulayın.- Yukarıdaki ölçütlerin tümünü doğrulayamıyorsanız gövde olarak
{"error": "invalid_grant"}ile bir HTTP 400 Bad Request hatası döndürün. - Aksi takdirde, yenileme jetonu ve erişim jetonu oluşturmak için yetkilendirme kodundaki kullanıcı kimliğini kullanın. Bu jetonlar herhangi bir dize değeri olabilir ancak jetonun ait olduğu kullanıcıyı ve istemciyi benzersiz şekilde temsil etmeli ve tahmin edilebilir olmamalıdır. Erişim jetonları için jetonun geçerlilik bitiş zamanını da kaydedin. Bu süre genellikle jetonu yayınladıktan bir saat sonra sona erer. Yenileme jetonlarının süresi dolmaz.
- HTTPS yanıtının gövdesinde aşağıdaki JSON nesnesini döndürün:
{
"token_type": "Bearer",
"access_token": "ACCESS_TOKEN",
"refresh_token": "REFRESH_TOKEN",
"expires_in": SECONDS_TO_EXPIRATION
}
Google, kullanıcının erişim jetonunu ve yenileme jetonunu saklar ve erişim jetonunun geçerlilik süresinin dolmasını kaydeder. Erişim jetonunun geçerlilik süresi dolduğunda Google, jeton değişimi uç noktanızdan yeni bir erişim jetonu almak için yenileme jetonunu kullanır.
Yenileme jetonlarını erişim jetonlarıyla değiştirme
Erişim jetonunun süresi dolduğunda Google, yenileme jetonunu yeni bir erişim jetonuyla değiştirmek için jeton değişimi uç noktanıza bir istek gönderir.
Bu isteklerde grant_type değeri refresh_token, refresh_token değeri ise daha önce Google'a verdiğiniz yenileme jetonunun değeridir. Aşağıda, yenileme jetonunu erişim jetonuyla değiştirme isteğine dair bir örnek verilmiştir:
POST /token HTTP/1.1
Host: oauth2.example.com
Content-Type: application/x-www-form-urlencoded

client_id=GOOGLE_CLIENT_ID&client_secret=GOOGLE_CLIENT_SECRET&grant_type=refresh_token&refresh_token=REFRESH_TOKEN
Yenileme jetonunu erişim jetonuyla değiştirmek için jeton değişimi uç noktanız, POST isteklerine aşağıdaki adımları uygulayarak yanıt verir:
client_idparametresinin istek kaynağını Google olarak tanımladığını veclient_secretparametresinin beklenen değerle eşleştiğini doğrulayın.- Yenileme jetonunun geçerli olduğunu ve istekte belirtilen istemci kimliğinin, yenileme jetonuyla ilişkilendirilmiş istemci kimliğiyle eşleştiğini doğrulayın.
- Yukarıdaki ölçütlerin tümünü doğrulayamıyorsanız gövde olarak
{"error": "invalid_grant"}ile bir HTTP 400 Bad Request hatası döndürün. - Aksi takdirde, yenileme jetonundaki kullanıcı kimliğini kullanarak erişim jetonu oluşturun. Bu jetonlar herhangi bir dize değeri olabilir ancak jetonun ait olduğu kullanıcıyı ve istemciyi benzersiz şekilde temsil etmeli ve tahmin edilebilir olmamalıdır. Erişim jetonları için jetonun geçerlilik bitiş zamanını da kaydedin. Bu süre genellikle jetonu yayınladıktan bir saat sonra sona erer.
- HTTPS yanıtının gövdesinde aşağıdaki JSON nesnesini döndürün:
{
"token_type": "Bearer",
"access_token": "ACCESS_TOKEN",
"expires_in": SECONDS_TO_EXPIRATION
}
Kullanıcı bilgileri isteklerini işleme
userinfo uç noktası, bağlı kullanıcıyla ilgili hak taleplerini döndüren, OAuth 2.0 korumalı bir kaynaktır. Kullanıcı bilgileri uç noktasını uygulamak ve barındırmak, aşağıdaki kullanım alanları hariç isteğe bağlıdır:
- Google One Tap ile Bağlı Hesapta Oturum Açma.
- AndroidTV'de sorunsuz abonelik.
Erişim jetonu, jeton uç noktanızdan başarıyla alındıktan sonra Google, bağlı kullanıcıyla ilgili temel profil bilgilerini almak için kullanıcı bilgileri uç noktanıza bir istek gönderir.
| kullanıcı bilgileri uç nokta istek başlıkları | |
|---|---|
Authorization header |
Taşıyıcı türündeki erişim jetonu. |
Örneğin, kullanıcı bilgileri uç noktanız
https://myservice.example.com/userinfo, talep aşağıdaki gibi görünebilir:
GET /userinfo HTTP/1.1
Host: myservice.example.com
Authorization: Bearer ACCESS_TOKEN
Kullanıcı bilgileri uç noktanızın istekleri işlemesi için aşağıdaki adımları uygulayın:
- Yetkilendirme başlığından erişim jetonunu çıkarın ve erişim jetonuyla ilişkilendirilmiş kullanıcının bilgilerini döndürün.
- Erişim jetonu geçersizse
WWW-Authenticateyanıt üstbilgisini kullanarak HTTP 401 Yetkilendirilmemiş hatası döndürün. Aşağıda kullanıcı bilgileri hata yanıtı örneği verilmiştir:HTTP/1.1 401 Unauthorized WWW-Authenticate: error="invalid_token", error_description="The Access Token expired"
Erişim jetonu geçerliyse HTTPS gövdesinde aşağıdaki JSON nesnesiyle HTTP 200 yanıtını döndürün ve HTTP 200 yanıtını alın yanıt:
{ "sub": "USER_UUID", "email": "EMAIL_ADDRESS", "given_name": "FIRST_NAME", "family_name": "LAST_NAME", "name": "FULL_NAME", "picture": "PROFILE_PICTURE", }userinfo uç nokta yanıtı subSisteminizdeki kullanıcıyı tanımlayan benzersiz bir kimlik. emailKullanıcının e-posta adresi. given_nameİsteğe bağlı: Kullanıcının adı. family_nameİsteğe bağlı: Kullanıcının soyadı. nameİsteğe bağlı: Kullanıcının tam adı. pictureİsteğe bağlı: Kullanıcının profil resmi.