
Ogni integrazione di Cloud-to-cloud deve includere un meccanismo per autenticare gli utenti.
L'autenticazione ti consente di collegare gli Account Google dei tuoi utenti con gli account utente nel tuo sistema di autenticazione. In questo modo puoi identificare i tuoi utenti quando il tuo fulfillment riceve un intent per la smart home. Google Home per la smart home supporta solo OAuth con un flusso del codice di autorizzazione.
Questa pagina descrive come configurare il server OAuth 2.0 in modo che funzioni con l'integrazione di Cloud-to-cloud.
Collegamento dell'account Google con OAuth
Nel flusso del codice di autorizzazione, sono necessari due endpoint:
L'endpoint di autorizzazione, che mostra l'interfaccia utente di accesso agli utenti che non hanno ancora eseguito l'accesso. L'endpoint di autorizzazione crea anche un codice di autorizzazione di breve durata per registrare il consenso degli utenti all'accesso richiesto.
L'endpoint di scambio di token, che è responsabile di due tipi di scambi:
- Scambia un codice di autorizzazione con un token di aggiornamento a lunga durata e un token di accesso a breve durata. Questo scambio avviene quando l'utente segue il flusso di collegamento dell'account.
- Scambia un token di aggiornamento di lunga durata con un token di accesso di breve durata. Questo scambio avviene quando Google ha bisogno di un nuovo token di accesso perché quello in suo possesso è scaduto.
Istruzioni sul design
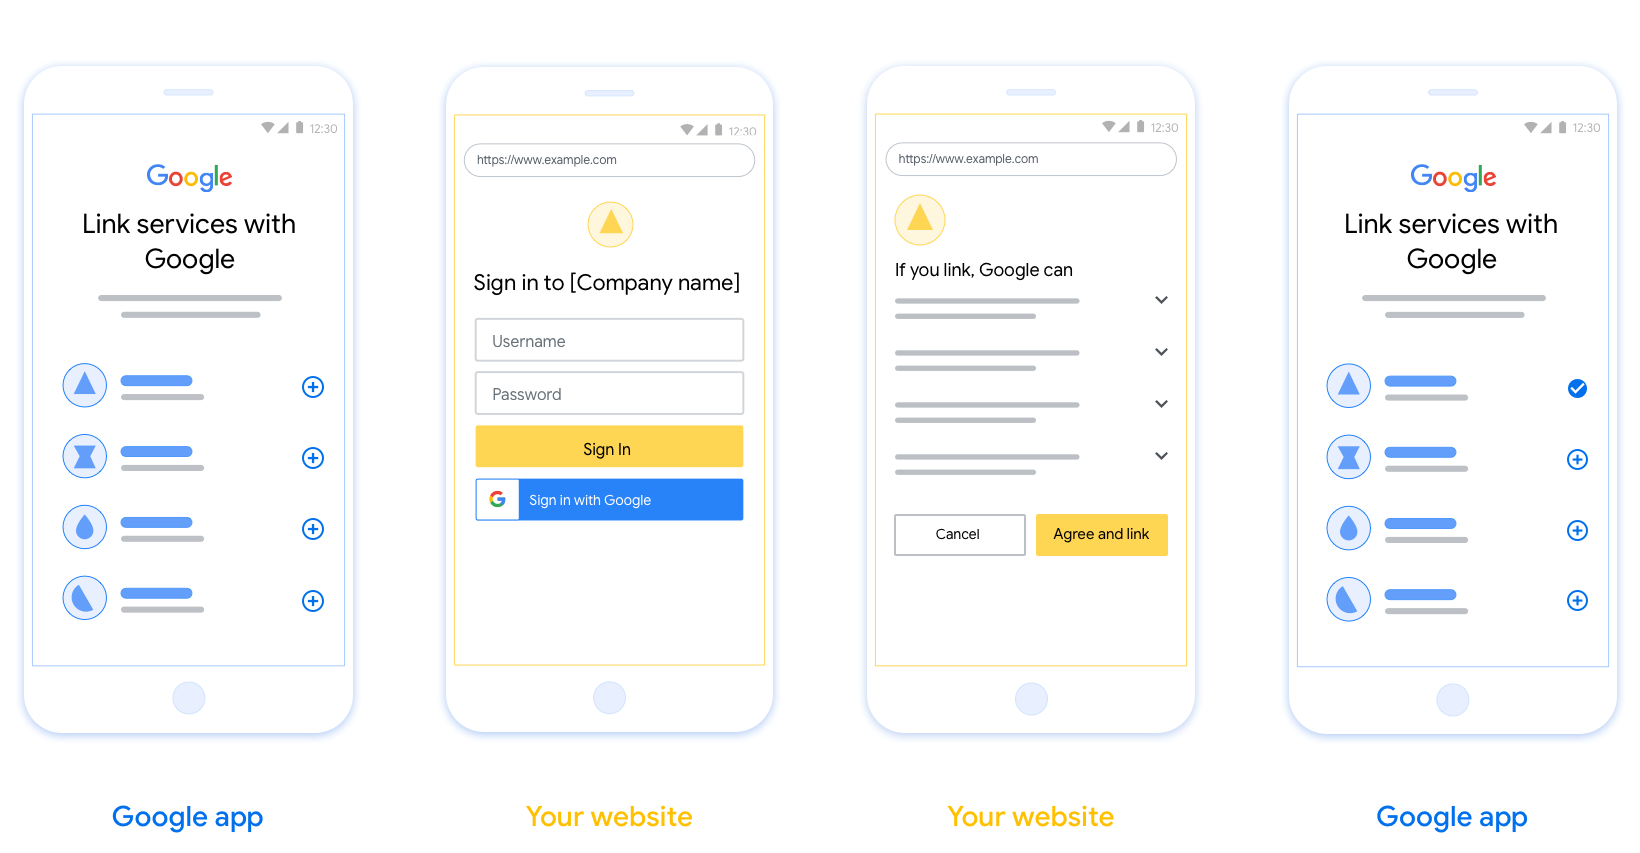
Questa sezione descrive i requisiti e i consigli di progettazione per la schermata utente che ospiti per i flussi di collegamento OAuth. Dopo essere stata chiamata dall'app di Google, la tua piattaforma mostra all'utente una pagina di accesso a Google e una schermata di consenso per il collegamento dell'account. Dopo aver dato il consenso per collegare gli account, l'utente viene reindirizzato all'app di Google.
Requisiti
- Devi comunicare che l'account dell'utente verrà collegato a Google, non a un prodotto Google specifico come Google Home o l'Assistente Google.
- Devi avere una dichiarazione di autorizzazione di Google, ad esempio "Accedendo, autorizzi Google a controllare i tuoi dispositivi". Consulta la sezione Autorizzazione controllo dispositivi Google delle Norme per gli sviluppatori di Google Home.
- Devi aprire la pagina di collegamento OAuth web e assicurarti che gli utenti dispongano di un metodo chiaro per accedere al proprio Account Google, ad esempio campi per il nome utente e la password. Non utilizzare il metodo Accedi con Google (GSI) che consente agli utenti di collegare gli account senza essere reindirizzati alla pagina di collegamento OAuth web. Si tratta di una violazione delle norme di Google.
- Devi includere almeno uno dei seguenti elementi nella pagina di collegamento OAuth per indicare l'integrazione a cui l'utente si sta collegando:
- Logo aziendale
- Nome azienda
- Nome integrazione
- Icona dell'app
Consigli
Ti consigliamo di procedere come segue:
Visualizza le Norme sulla privacy di Google. Includi un link alle Norme sulla privacy di Google nella schermata per il consenso.
Dati da condividere. Utilizza un linguaggio chiaro e conciso per comunicare all'utente quali dati richiede Google e perché, nonché quali dati di utilizzo o interazione potrebbero essere condivisi con te da Google.
Invito all'azione chiaro. Indica un invito all'azione chiaro nella schermata del consenso, ad esempio "Accetta e collega". Questo perché gli utenti devono capire quali dati sono tenuti a condividere con Google per collegare i propri account.
Possibilità di annullare l'abbonamento. Offri agli utenti un modo per tornare indietro o annullare l'operazione se scelgono di non collegare gli account.
Procedura di accesso chiara. Assicurati che gli utenti dispongano di un metodo chiaro per accedere al proprio Account Google, ad esempio campi per il nome utente e la password o Accedi con Google.
Possibilità di scollegare. Offri agli utenti un meccanismo per scollegare, ad esempio un URL alle impostazioni dell'account sulla tua piattaforma. In alternativa, puoi includere un link all'Account Google in cui gli utenti possono gestire il proprio account collegato. Se un utente scollega l'integrazione, utilizza
agentUsers.deleteper comunicare la modifica a Google.Possibilità di cambiare account utente. Suggerisci un metodo per consentire agli utenti di cambiare i propri account. Ciò è particolarmente utile se gli utenti tendono ad avere più account.
- Se un utente deve chiudere la schermata per il consenso per cambiare account, invia un errore recuperabile a Google in modo che l'utente possa accedere all'account desiderato con il collegamento OAuth.
Includi il tuo logo. Mostra il logo della tua azienda nella schermata per il consenso. Utilizza le linee guida di stile per posizionare il logo. Se vuoi mostrare anche il logo di Google, consulta Loghi e marchi.

Flusso del codice di autorizzazione
Un'implementazione del flusso del codice di autorizzazione di un server OAuth 2.0 è costituita da due endpoint, che il tuo servizio rende disponibili tramite HTTPS. Il primo endpoint è l'endpoint di autorizzazione, che ha la responsabilità di trovare o ottenere il consenso degli utenti per l'accesso ai dati. L'endpoint di autorizzazione presenta un'interfaccia utente di accesso agli utenti che non hanno ancora eseguito l'accesso e registra il consenso all'accesso richiesto. Il secondo endpoint è l'endpoint di scambio dei token, che viene utilizzato per ottenere stringhe criptate, chiamate token, che autorizzano un utente ad accedere al tuo servizio.
Quando un'applicazione Google deve chiamare una delle API del tuo servizio, Google utilizza questi endpoint insieme per ottenere l'autorizzazione dagli utenti a chiamare queste API per loro conto.
Una sessione del flusso del codice di autorizzazione OAuth 2.0 avviata da Google ha il seguente flusso:
- Google apre l'endpoint di autorizzazione nel browser dell'utente. Se il flusso è iniziato su un dispositivo solo vocale per un'azione, Google trasferisce l'esecuzione a uno smartphone.
- Se non ha già eseguito l'accesso, l'utente accede e concede a Google l'autorizzazione ad accedere ai suoi dati con la tua API.
- Il tuo servizio crea un codice di autorizzazione e lo restituisce a Google. Per farlo, reindirizza il browser dell'utente a Google con il codice di autorizzazione allegato alla richiesta.
- Google invia il codice di autorizzazione all'endpoint di scambio dei token, che verifica l'autenticità del codice e restituisce un token di accesso e un token di aggiornamento. Il token di accesso è un token di breve durata che il tuo servizio accetta come credenziali per accedere alle API. Il token di aggiornamento è un token di lunga durata che Google può archiviare e utilizzare per acquisire nuovi token di accesso quando scadono.
- Una volta completato il flusso di collegamento dell'account, ogni richiesta successiva inviata da Google contiene un token di accesso.
Gestire le richieste di autorizzazione
Quando devi eseguire il collegamento dell'account utilizzando il flusso del codice di autorizzazione OAuth 2.0, Google invia l'utente all'endpoint di autorizzazione con una richiesta che include i seguenti parametri:
| Parametri dell'endpoint di autorizzazione | |
|---|---|
client_id |
L'ID client che hai assegnato a Google. |
redirect_uri |
L'URL a cui invii la risposta a questa richiesta. |
state |
Un valore di riferimento che viene restituito a Google senza modifiche nell' URI di reindirizzamento. |
scope |
Facoltativo: un insieme di stringhe di ambito delimitate da spazi che specificano i dati per cui Google sta richiedendo l'autorizzazione. |
response_type |
Il tipo di valore da restituire nella risposta. Per il flusso del codice di autorizzazione OAuth 2.0
il tipo di risposta è sempre code.
|
Ad esempio, se l'endpoint di autorizzazione è disponibile all'indirizzo https://myservice.example.com/auth, una richiesta potrebbe avere il seguente aspetto:
GET https://myservice.example.com/auth?client_id=GOOGLE_CLIENT_ID&redirect_uri=REDIRECT_URI&state=STATE_STRING&scope=REQUESTED_SCOPES&response_type=code
Per consentire all'endpoint di autorizzazione di gestire le richieste di accesso:
- Verifica che
client_idcorrisponda all'ID client che hai assegnato a Google e cheredirect_uricorrisponda all'URL di reindirizzamento fornito da Google per il tuo servizio. Questi controlli sono importanti per impedire la concessione dell'accesso ad app client non intenzionali o configurate in modo errato. Se supporti più flussi OAuth 2.0, verifica anche cheresponse_typesiacode. - Verifica se l'utente ha eseguito l'accesso al tuo servizio. Se l'utente non ha eseguito l'accesso, completa il flusso di accesso o registrazione del tuo servizio.
- Genera un codice di autorizzazione che Google possa utilizzare per accedere alla tua API. Il codice di autorizzazione può essere qualsiasi valore stringa, ma deve rappresentare in modo univoco l'utente, il client per cui è destinato il token e l'ora di scadenza del codice e non deve essere intuibile. In genere, i codici di autorizzazione scadono dopo circa 10 minuti.
- Verifica che l'URL specificato dal parametro
redirect_uriabbia il seguente formato:https://oauth-redirect.googleusercontent.com/r/YOUR_PROJECT_ID https://oauth-redirect-sandbox.googleusercontent.com/r/YOUR_PROJECT_ID
- Reindirizza il browser dell'utente all'URL specificato dal
redirect_uriparametro. Quando esegui il reindirizzamento, includi il codice di autorizzazione appena generato e il valore dello stato originale e non modificato aggiungendo i parametricodeestate. Di seguito è riportato un esempio dell'URL risultante:https://oauth-redirect.googleusercontent.com/r/YOUR_PROJECT_ID?code=AUTHORIZATION_CODE&state=STATE_STRING
Gestire le richieste di scambio dei token
L'endpoint di scambio dei token del tuo servizio è responsabile di due tipi di scambi di token:
- Scambio di codici di autorizzazione con token di accesso e token di aggiornamento
- Scambio di token di aggiornamento con token di accesso
Le richieste di scambio dei token includono i seguenti parametri:
| Parametri dell'endpoint di scambio dei token | |
|---|---|
client_id |
Una stringa che identifica l'origine della richiesta come Google. Questa stringa deve essere registrata nel tuo sistema come identificatore univoco di Google. |
client_secret |
Una stringa segreta registrata con Google per il tuo servizio. |
grant_type |
Il tipo di token scambiato. Può essere
authorization_code o refresh_token. |
code |
Quando grant_type=authorization_code, questo parametro è il
codice che Google ha ricevuto dal tuo endpoint di accesso o di scambio dei token. |
redirect_uri |
Quando grant_type=authorization_code, questo parametro è l'
URL utilizzato nella richiesta di autorizzazione iniziale. |
refresh_token |
Quando grant_type=refresh_token, questo parametro è il
token di aggiornamento che Google ha ricevuto dal tuo endpoint di scambio dei token. |
Configurare la modalità di invio delle credenziali da parte di Google al tuo server
A seconda dell'implementazione, il server di autorizzazione prevede di ricevere le credenziali client nel corpo della richiesta o nell'intestazione della richiesta.
Per impostazione predefinita, Google invia le credenziali nel corpo della richiesta. Se il tuo server di autorizzazione richiede che le credenziali client siano nell'intestazione della richiesta, devi configurare di conseguenza la tua integrazione Cloud-to-cloud:
Nell'elenco dei progetti, fai clic su Apri accanto al progetto con cui vuoi lavorare.
In Da cloud a cloud, seleziona Sviluppa.
Fai clic su Apri accanto all'integrazione.
Scorri verso il basso fino alla sezione Autorizzazioni (facoltativo) e seleziona la casella di controllo Fai in modo che Google trasmetta l'ID client e il segreto tramite l'intestazione di autenticazione di base HTTP.
Fai clic su Salva per salvare le modifiche.
Scambiare codici di autorizzazione con token di accesso e token di aggiornamento
Dopo che l'utente ha eseguito l'accesso e l'endpoint di autorizzazione restituisce a Google un codice di autorizzazione di breve durata, Google invia una richiesta all'endpoint di scambio dei token per scambiare il codice di autorizzazione con un token di accesso e un token di aggiornamento.
Per queste richieste, il valore di grant_type è authorization_code e il
valore di code è il valore del codice di autorizzazione che hai concesso in precedenza
a Google. Di seguito è riportato un esempio di richiesta di scambio di un codice di autorizzazione con un token di accesso e un token di aggiornamento:
POST /token HTTP/1.1
Host: oauth2.example.com
Content-Type: application/x-www-form-urlencoded

client_id=GOOGLE_CLIENT_ID&client_secret=GOOGLE_CLIENT_SECRET&grant_type=authorization_code&code=AUTHORIZATION_CODE&redirect_uri=REDIRECT_URI
Per scambiare i codici di autorizzazione con un token di accesso e un token di aggiornamento, l'endpoint di scambio dei token risponde alle richieste POST eseguendo i seguenti passaggi:
- Verifica che
client_ididentifichi l'origine della richiesta come origine autorizzata e checlient_secretcorrisponda al valore previsto. - Verifica che il codice di autorizzazione sia valido e non scaduto e che l'ID client specificato nella richiesta corrisponda all'ID client associato al codice di autorizzazione.
- Verifica che l'URL specificato dal parametro
redirect_urisia identico al valore utilizzato nella richiesta di autorizzazione iniziale. - Se non riesci a verificare tutti i criteri sopra indicati, restituisci un errore HTTP
400 Richiesta errata con
{"error": "invalid_grant"}come corpo. - In caso contrario, utilizza l'ID utente del codice di autorizzazione per generare un token di aggiornamento e un token di accesso. Questi token possono essere qualsiasi valore stringa, ma devono rappresentare in modo univoco l'utente e il client per cui è destinato il token e non devono essere intuibili. Per i token di accesso, registra anche l'ora di scadenza del token, che in genere è un'ora dopo l'emissione del token. I token di aggiornamento non scadono.
- Restituisci il seguente oggetto JSON nel corpo della risposta HTTPS:
{
"token_type": "Bearer",
"access_token": "ACCESS_TOKEN",
"refresh_token": "REFRESH_TOKEN",
"expires_in": SECONDS_TO_EXPIRATION
}
Google archivia il token di accesso e il token di aggiornamento per l'utente e registra la scadenza del token di accesso. Quando il token di accesso scade, Google utilizza il token di aggiornamento per ottenere un nuovo token di accesso dall'endpoint di scambio dei token.
Scambiare token di aggiornamento con token di accesso
Quando un token di accesso scade, Google invia una richiesta all'endpoint di scambio dei token per scambiare un token di aggiornamento con un nuovo token di accesso.
Per queste richieste, il valore di grant_type è refresh_token e il valore di refresh_token è il valore del token di aggiornamento che hai concesso in precedenza a Google. Di seguito è riportato un esempio di richiesta di scambio di un token di aggiornamento con un token di accesso:
POST /token HTTP/1.1
Host: oauth2.example.com
Content-Type: application/x-www-form-urlencoded

client_id=GOOGLE_CLIENT_ID&client_secret=GOOGLE_CLIENT_SECRET&grant_type=refresh_token&refresh_token=REFRESH_TOKEN
Per scambiare un token di aggiornamento con un token di accesso, l'endpoint di scambio dei token risponde alle richieste POST eseguendo i seguenti passaggi:
- Verifica che
client_ididentifichi l'origine della richiesta come Google e checlient_secretcorrisponda al valore previsto. - Verifica che il token di aggiornamento sia valido e che l'ID client specificato nella richiesta corrisponda all'ID client associato al token di aggiornamento.
- Se non riesci a verificare tutti i criteri sopra indicati, restituisci un errore HTTP 400
Richiesta errata con
{"error": "invalid_grant"}come corpo. - In caso contrario, utilizza l'ID utente del token di aggiornamento per generare un token di accesso. Questi token possono essere qualsiasi valore stringa, ma devono rappresentare in modo univoco l'utente e il client per cui è destinato il token e non devono essere intuibili. Per i token di accesso, registra anche l'ora di scadenza del token, in genere un'ora dopo l'emissione del token.
- Restituisci il seguente oggetto JSON nel corpo della risposta HTTPS:
{
"token_type": "Bearer",
"access_token": "ACCESS_TOKEN",
"expires_in": SECONDS_TO_EXPIRATION
}
Gestire le richieste di informazioni utente
L'endpoint userinfo è una risorsa protetta da OAuth 2.0 che restituisce attestazioni sull'utente collegato. L'implementazione e l'hosting dell'endpoint userinfo sono facoltative, ad eccezione dei seguenti casi d'uso:
- Accesso a un account collegato con Google One Tap.
- Abbonamento senza problemi su AndroidTV.
Dopo che il token di accesso è stato recuperato correttamente dall'endpoint del token, Google invia una richiesta all'endpoint userinfo per recuperare le informazioni di base del profilo dell'utente collegato.
| intestazioni delle richieste endpoint userinfo | |
|---|---|
Authorization header |
Il token di accesso di tipo Bearer. |
Ad esempio, se l'endpoint userinfo è disponibile su
https://myservice.example.com/userinfo, una richiesta potrebbe avere il seguente aspetto:
GET /userinfo HTTP/1.1
Host: myservice.example.com
Authorization: Bearer ACCESS_TOKEN
Affinché l'endpoint userinfo possa gestire le richieste, segui questi passaggi:
- Estrai il token di accesso dall'intestazione Autorizzazione e restituisci le informazioni per l'utente associato al token di accesso.
- Se il token di accesso non è valido, restituisce un errore HTTP 401 Autorizzazione non autorizzata utilizzando l'intestazione della risposta
WWW-Authenticate. Di seguito è riportato un esempio di risposta di errore userinfo:HTTP/1.1 401 Unauthorized WWW-Authenticate: error="invalid_token", error_description="The Access Token expired"
Se il token di accesso è valido, restituisce e invia una risposta HTTP 200 con il seguente oggetto JSON nel corpo dell'HTTPS risposta:
{ "sub": "USER_UUID", "email": "EMAIL_ADDRESS", "given_name": "FIRST_NAME", "family_name": "LAST_NAME", "name": "FULL_NAME", "picture": "PROFILE_PICTURE", }risposta endpoint userinfo subUn ID univoco che identifica l'utente nel sistema. emailIndirizzo email dell'utente. given_nameFacoltativo:nome dell'utente. family_nameFacoltativo:il cognome dell'utente. nameFacoltativo:nome completo dell'utente. picture(Facoltativo) Immagine del profilo dell'utente.