
כל שילוב של Cloud-to-cloud חייב לכלול מנגנון לאימות משתמשים.
אימות מאפשר לכם לקשר בין חשבונות Google של המשתמשים לבין חשבונות משתמשים במערכת האימות שלכם. כך תוכלו לזהות את המשתמשים שלכם כשהמערכת שלכם מקבלת כוונה של בית חכם. הבית החכם של Google תומך רק ב-OAuth עם הרשאה באמצעות קוד.
בדף הזה מוסבר איך להגדיר את שרת OAuth 2.0 כך שיפעל עם השילוב של Cloud-to-cloud.
קישור של חשבון Google באמצעות OAuth
בתהליך קוד ההרשאה, נדרשות שתי נקודות קצה:
נקודת הקצה של הרשאה, שבה מוצג ממשק המשתמש לכניסה למשתמשים שלא מחוברים כבר. נקודת הקצה של ההרשאה יוצרת גם קוד הרשאה לזמן קצר כדי לתעד את ההסכמה של המשתמשים לגישה המבוקשת.
נקודת הקצה (endpoint) של החלפת אסימונים, שאחראית על שני סוגים של החלפות:
- הפונקציה מחליפה קוד הרשאה באסימון רענון לטווח ארוך ובאסימון גישה לטווח קצר. ההחלפה הזו מתרחשת כשהמשתמש עובר את תהליך קישור החשבון.
- החלפת אסימון רענון לטווח ארוך באסימון גישה לטווח קצר. ההחלפה הזו מתרחשת כש-Google צריכה אסימון גישה חדש כי פג התוקף של האסימון שהיה לה.
הנחיות עיצוב
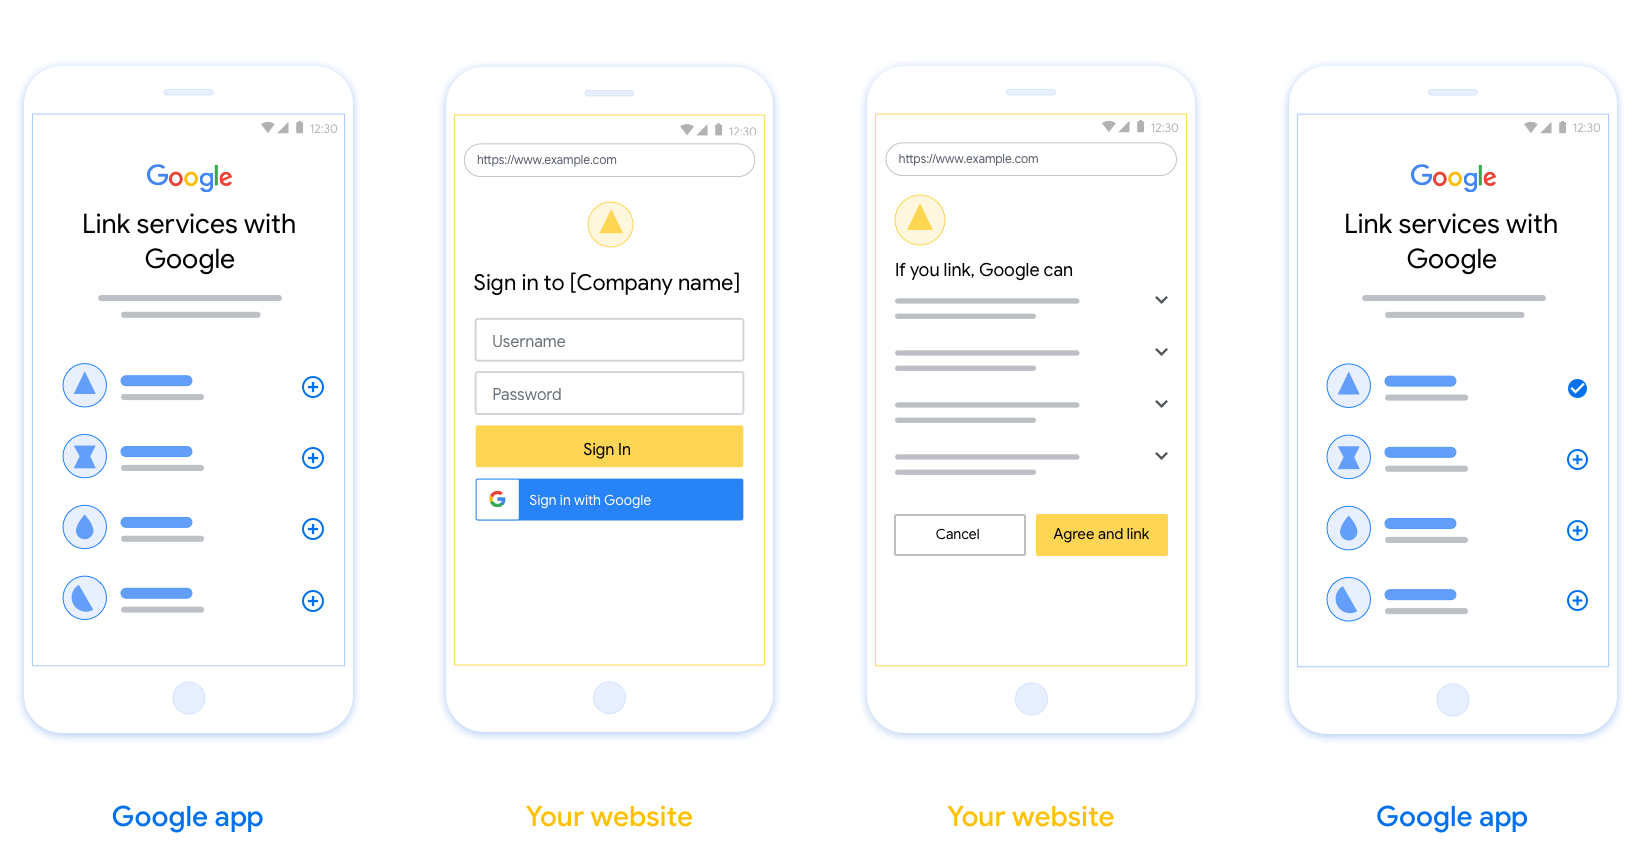
בקטע הזה מוסברות הדרישות וההמלצות לעיצוב של מסך המשתמש שאתם מארחים לתהליכי קישור OAuth. אחרי שהפלטפורמה שלכם נקראת על ידי האפליקציה של Google, מוצגים למשתמש דף כניסה לחשבון Google ומסך הסכמה לקישור החשבון. אחרי שהמשתמש מביע את הסכמתו לקישור החשבונות, הוא מועבר חזרה לאפליקציה של Google.
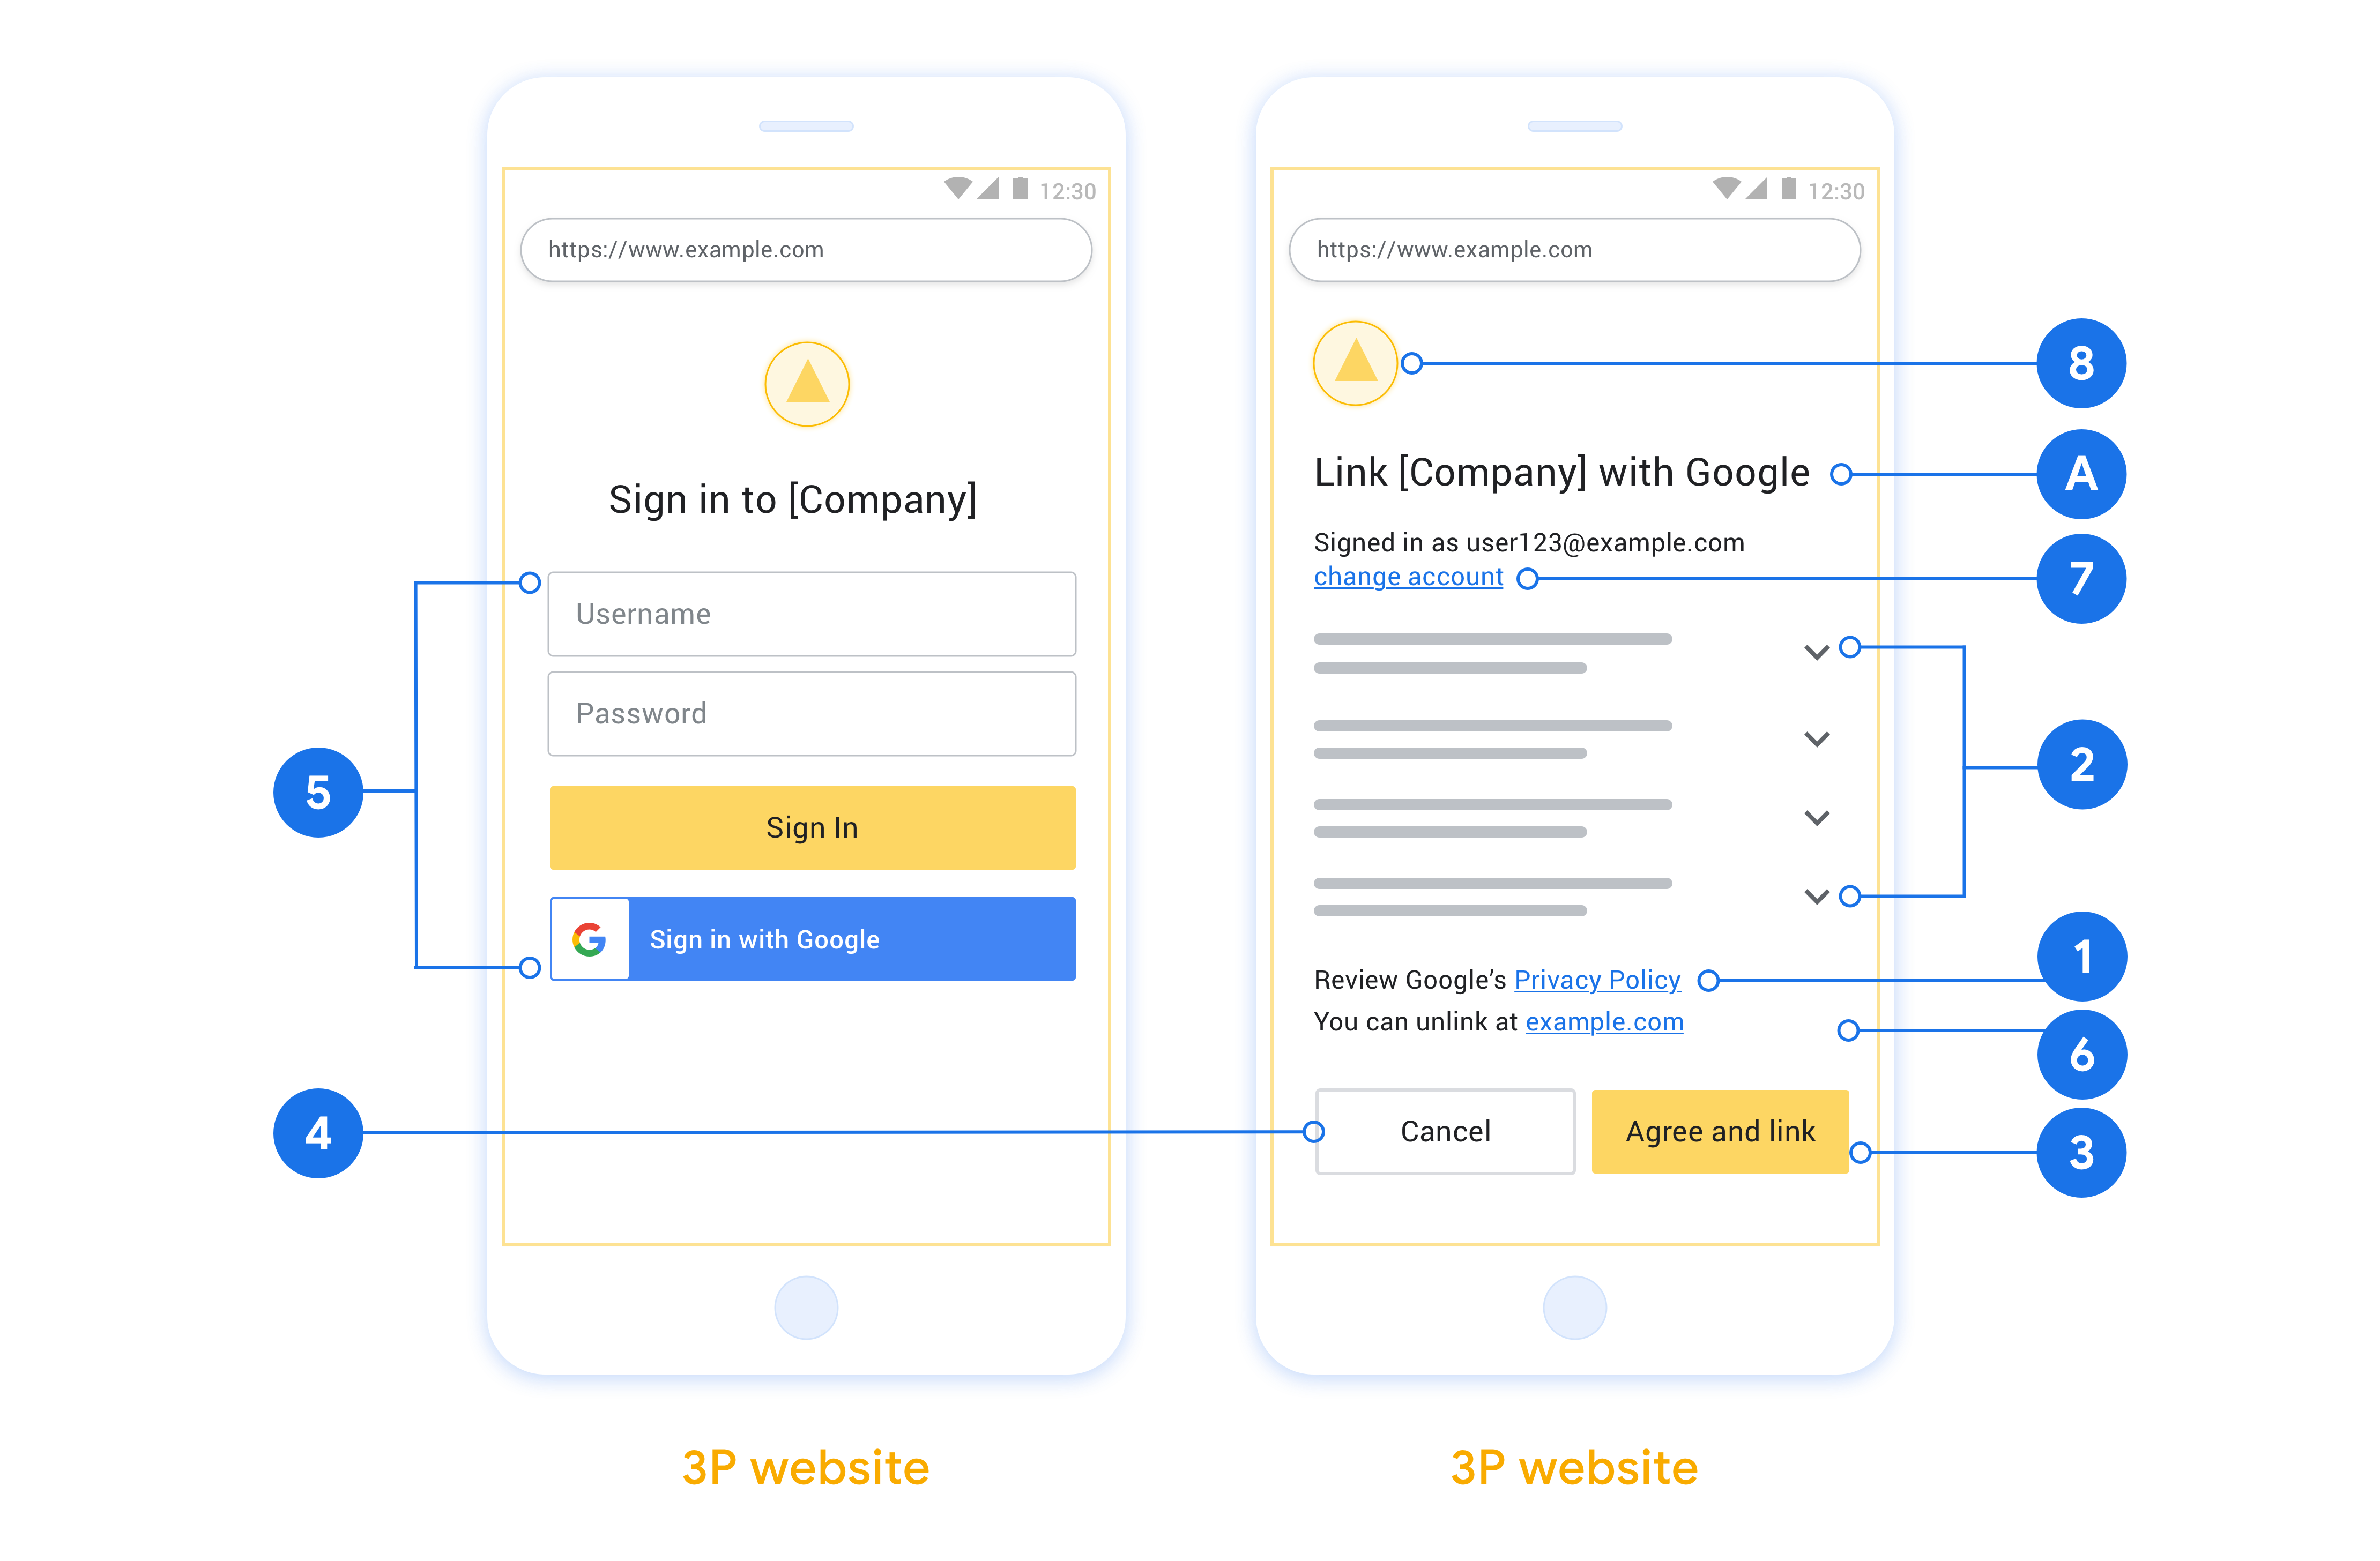
דרישות
- אתם צריכים להבהיר למשתמש שהחשבון שלו יקושר ל-Google, ולא למוצר ספציפי של Google כמו Google Home או Google Assistant.
- צריך להציג הצהרת הרשאה של Google, כמו "הכניסה לחשבון מאשרת ל-Google לשלוט במכשירים שלך". אפשר לעיין בקטע הרשאת שליטה במכשיר Google במדיניות למפתחים של Google Home.
- צריך לפתוח את דף הקישור של OAuth באינטרנט ולוודא שלמשתמשים יש שיטה ברורה להתחברות לחשבון Google שלהם, כמו שדות לשם המשתמש ולסיסמה. אל תשתמשו בשיטת הכניסה באמצעות חשבון Google (GSI) שמאפשרת למשתמשים לקשר חשבונות בלי שהם מועברים לדף קישור חשבונות באמצעות OAuth באינטרנט. זו הפרה של מדיניות Google.
- כדי לציין את השילוב שאליו המשתמש מקשר את החשבון, צריך לכלול לפחות אחד מהפריטים הבאים בדף הקישור של OAuth:
- לוגו של החברה
- שם החברה
- שם השילוב
- סמל האפליקציה
המלצות
מה אתם יכולים לעשות?
הצגת מדיניות הפרטיות של Google במסך ההסכמה, צריך לכלול קישור למדיניות הפרטיות של Google.
הנתונים שישותפו. להשתמש בשפה ברורה ותמציתית כדי להסביר למשתמש אילו נתונים שלו נדרשים ל-Google ולמה, וגם אילו נתונים על השימוש או על האינטראקציה שלו עשויים להיות משותפים איתכם על ידי Google.
קריאה ברורה לפעולה. חשוב להציג קריאה ברורה לפעולה במסך ההסכמה, כמו 'הסכמה וקישור'. הסיבה לכך היא שהמשתמשים צריכים להבין אילו נתונים הם נדרשים לשתף עם Google כדי לקשר את החשבונות שלהם.
אפשרות ביטול. אפשר לספק למשתמשים אפשרות לחזור אחורה או לבטל את הקישור, אם הם לא רוצים לקשר את החשבון.
תהליך כניסה ברור. מוודאים שלמשתמשים יש שיטה ברורה להיכנס לחשבון Google שלהם, כמו שדות לשם המשתמש ולסיסמה או כניסה באמצעות חשבון Google.
אפשרות לבטל את הקישור. מציעים למשתמשים מנגנון לביטול הקישור, כמו כתובת URL להגדרות החשבון שלהם בפלטפורמה שלכם. אפשרות אחרת היא לכלול קישור לחשבון Google שבו המשתמשים יכולים לנהל את החשבון המקושר שלהם. אם משתמש מבטל את הקישור לשילוב שלכם, צריך להשתמש ב-
agentUsers.deleteכדי להודיע ל-Google על השינוי.אפשרות לשנות את חשבון המשתמש. תציע שיטה למשתמשים להחליף בין החשבונות שלהם. האפשרות הזו שימושית במיוחד אם למשתמשים יש בדרך כלל כמה חשבונות.
- אם משתמש צריך לסגור את מסך ההסכמה כדי לעבור בין חשבונות, צריך לשלוח שגיאה שניתן לתקן ל-Google כדי שהמשתמש יוכל להיכנס לחשבון הרצוי באמצעות קישור OAuth.
הוסיפו את הלוגו שלכם. להציג את הלוגו של החברה במסך הסכמה. משתמשים בהנחיות הסגנון כדי למקם את הלוגו. אם רוצים להציג גם את הלוגו של Google, אפשר לעיין במאמר בנושא לוגו וסימנים מסחריים.
הרשאה באמצעות קוד
הטמעה של שרת OAuth 2.0 של תהליך קוד ההרשאה מורכבת משתי נקודות קצה, שהשירות שלכם מספק באמצעות HTTPS. נקודת הקצה הראשונה היא נקודת הקצה של ההרשאה, שאחראית למציאת הסכמה מהמשתמשים לגישה לנתונים או לקבלת הסכמה כזו. נקודת הקצה של ההרשאה מציגה למשתמשים שלא מחוברים כבר ממשק משתמש לכניסה, ומתעדת את ההסכמה לגישה המבוקשת. נקודת הקצה השנייה היא נקודת הקצה להחלפת טוקנים, שמשמשת לקבלת מחרוזות מוצפנות שנקראות טוקנים, שמאשרות למשתמש גישה לשירות שלכם.
כשנדרשת לאפליקציית Google קריאה לאחד מממשקי ה-API של השירות שלכם, Google משתמשת בנקודות הקצה האלה כדי לקבל מהמשתמשים שלכם הרשאה לקרוא לממשקי ה-API האלה בשמם.
תהליך הרשאה באמצעות קוד OAuth 2.0 שהופעל על ידי Google מתבצע באופן הבא:
- Google פותחת את נקודת הקצה של ההרשאה בדפדפן של המשתמש. אם התהליך התחיל במכשיר עם קול בלבד לפעולה, Google מעבירה את הביצוע לטלפון.
- המשתמש מתחבר לחשבון שלו, אם הוא לא מחובר כבר, ומעניק ל-Google הרשאה לגשת לנתונים שלו באמצעות ה-API שלכם, אם הוא עדיין לא העניק הרשאה כזו.
- השירות שלכם יוצר קוד הרשאה ומחזיר אותו ל-Google. כדי לעשות זאת, צריך להפנות את הדפדפן של המשתמש בחזרה אל Google עם קוד ההרשאה שמצורף לבקשה.
- Google שולחת את קוד ההרשאה לנקודת הקצה (endpoint) של המרת האסימון, שמאמתת את האותנטיות של הקוד ומחזירה אסימון גישה ואסימון רענון. אסימון הגישה הוא אסימון לטווח קצר שהשירות מקבל כפרטי כניסה לגישה לממשקי API. אסימון הרענון הוא אסימון לטווח ארוך ש-Google יכולה לאחסן ולהשתמש בו כדי לקבל אסימוני גישה חדשים כשהתוקף שלהם פג.
- אחרי שהמשתמש משלים את תהליך קישור החשבון, כל בקשה עוקבת שנשלחת מ-Google מכילה אסימון גישה.
טיפול בבקשות הרשאה
כשצריך לבצע קישור חשבונות באמצעות תהליך קוד ההרשאה של OAuth 2.0, Google שולחת את המשתמש לנקודת הקצה של ההרשאה עם בקשה שכוללת את הפרמטרים הבאים:
| פרמטרים של נקודת קצה להרשאה | |
|---|---|
client_id |
מזהה הלקוח שהקציתם ל-Google. |
redirect_uri |
כתובת ה-URL שאליה שולחים את התשובה לבקשה הזו. |
state |
ערך לניהול חשבונות שמועבר בחזרה ל-Google ללא שינוי ב-URI של ההפניה. |
scope |
אופציונלי: קבוצה של מחרוזות היקף שמופרדות ברווחים ומציינות את הנתונים ש-Google מבקשת הרשאה לגשת אליהם. |
response_type |
סוג הערך שיוחזר בתשובה. בתהליך הרשאה באמצעות קוד של OAuth 2.0, סוג התגובה הוא תמיד code.
|
לדוגמה, אם נקודת הקצה להרשאה זמינה בכתובת https://myservice.example.com/auth, בקשה יכולה להיראות כך:
GET https://myservice.example.com/auth?client_id=GOOGLE_CLIENT_ID&redirect_uri=REDIRECT_URI&state=STATE_STRING&scope=REQUESTED_SCOPES&response_type=code
כדי שנקודת הקצה של ההרשאה תטפל בבקשות כניסה, צריך לבצע את השלבים הבאים:
- מוודאים שהערך
client_idזהה למזהה הלקוח שהקציתם ל-Google, ושהערךredirect_uriזהה לכתובת ה-URL להפניה אוטומטית ש-Google סיפקה לשירות שלכם. הבדיקות האלה חשובות כדי למנוע מתן גישה לאפליקציות לקוח לא מכוונות או לא מוגדרות. אם אתם תומכים בכמה תהליכי OAuth 2.0, צריך גם לוודא שresponse_typeהואcode. - בודקים אם המשתמש מחובר לשירות שלכם. אם המשתמש לא מחובר, צריך להשלים את תהליך הכניסה או ההרשמה לשירות.
- יוצרים קוד הרשאה ש-Google יכולה להשתמש בו כדי לגשת ל-API שלכם. קוד ההרשאה יכול להיות כל ערך מחרוזת, אבל הוא חייב לייצג באופן ייחודי את המשתמש, את הלקוח שאליו האסימון משויך ואת זמן התפוגה של הקוד, ואי אפשר לנחש אותו. בדרך כלל מנפיקים קודי הרשאה שתוקפם פג אחרי כ-10 דקות.
- מוודאים שכתובת ה-URL שצוינה בפרמטר
redirect_uriהיא מהצורה הבאה:https://oauth-redirect.googleusercontent.com/r/YOUR_PROJECT_ID https://oauth-redirect-sandbox.googleusercontent.com/r/YOUR_PROJECT_ID
- מפנים מחדש את הדפדפן של המשתמש לכתובת ה-URL שצוינה בפרמטר
redirect_uri. כשמפנים מחדש, מוסיפים את קוד ההרשאה שנוצר ואת ערך המצב המקורי שלא שונה על ידי צירוף הפרמטריםcodeו-state. זו דוגמה לכתובת ה-URL שמתקבלת:https://oauth-redirect.googleusercontent.com/r/YOUR_PROJECT_ID?code=AUTHORIZATION_CODE&state=STATE_STRING
טיפול בבקשות להחלפת טוקנים
נקודת הקצה של החלפת הטוקנים בשירות שלכם אחראית לשני סוגים של החלפות טוקנים:
- המרת קודי הרשאה באסימוני גישה ובאסימוני רענון
- המרת אסימוני רענון לאסימוני גישה
בקשות להחלפת אסימונים כוללות את הפרמטרים הבאים:
| פרמטרים של נקודת קצה להחלפת טוקנים | |
|---|---|
client_id |
מחרוזת שמזהה את מקור הבקשה כ-Google. המחרוזת הזו צריכה להיות רשומה במערכת שלכם כמזהה הייחודי של Google. |
client_secret |
מחרוזת סודית שרשמתם ב-Google לשירות שלכם. |
grant_type |
סוג הטוקן שמוחלף. הערך הזה צריך להיות authorization_code או refresh_token. |
code |
אם grant_type=authorization_code, הפרמטר הזה הוא הקוד ש-Google קיבלה מנקודת הקצה של הכניסה או של החלפת הטוקן. |
redirect_uri |
כשמגדירים את הפרמטר הזה לערך grant_type=authorization_code, הוא מייצג את כתובת ה-URL שמשמשת בבקשת ההרשאה הראשונית. |
refresh_token |
אם הערך הוא grant_type=refresh_token, הפרמטר הזה הוא אסימון הרענון ש-Google קיבלה מנקודת הקצה (endpoint) של החלפת האסימונים. |
הגדרת האופן שבו Google שולחת את פרטי הכניסה לשרת
בהתאם להטמעה, שרת ההרשאות מצפה לקבל את פרטי הכניסה של הלקוח בגוף הבקשה או בכותרת הבקשה.
כברירת מחדל, Google שולחת את פרטי הכניסה בגוף הבקשה. אם שרת ההרשאה שלכם מחייב שפרטי הלקוח יופיעו בכותרת הבקשה, אתם צריכים להגדיר את השילוב של Cloud-to-cloud בהתאם:
ברשימת הפרויקטים, לוחצים על פתיחה לצד הפרויקט שרוצים לעבוד איתו.
בקטע Cloud-to-Cloud, בוחרים באפשרות Develop (פיתוח).
לצד השילוב, לוחצים על פתיחה.
גוללים למטה לקטע Permissions (optional) (הרשאות (אופציונלי)) ומסמנים את תיבת הסימון Have Google transmit Client ID and secret via HTTP basic auth header (העברת מזהה לקוח וסוד באמצעות כותרת אימות בסיסי של HTTP).
לוחצים על שמירה כדי לשמור את השינויים.
המרת קודי הרשאה באסימוני גישה ובאסימוני רענון
אחרי שהמשתמש נכנס ונקודת הקצה של ההרשאה מחזירה ל-Google קוד הרשאה לטווח קצר, Google שולחת בקשה לנקודת הקצה של החלפת הטוקנים כדי להחליף את קוד ההרשאה באסימון גישה ובאסימון רענון.
בבקשות האלה, הערך של grant_type הוא authorization_code, והערך של code הוא הערך של קוד ההרשאה שהענקתם ל-Google קודם לכן. בהמשך מופיעה דוגמה לבקשה להחלפת קוד הרשאה בטוקן גישה ובטוקן רענון:
POST /token HTTP/1.1
Host: oauth2.example.com
Content-Type: application/x-www-form-urlencoded

client_id=GOOGLE_CLIENT_ID&client_secret=GOOGLE_CLIENT_SECRET&grant_type=authorization_code&code=AUTHORIZATION_CODE&redirect_uri=REDIRECT_URI
כדי להחליף קודי הרשאה באסימון גישה ובאסימון רענון, נקודת הקצה להחלפת אסימונים מגיבה לבקשות של POST על ידי ביצוע השלבים הבאים:
- מוודאים שהערך של
client_idמזהה את מקור הבקשה כמקור מורשה, ושהערך שלclient_secretתואם לערך הצפוי. - מוודאים שקוד ההרשאה תקף ולא פג התוקף שלו, ושמזהה הלקוח שצוין בבקשה זהה למזהה הלקוח שמשויך לקוד ההרשאה.
- מוודאים שכתובת ה-URL שצוינה בפרמטר
redirect_uriזהה לערך שנעשה בו שימוש בבקשת ההרשאה הראשונית. - אם אי אפשר לאמת את כל הקריטריונים שלמעלה, צריך להחזיר שגיאת בקשה לא תקינה מסוג HTTP 400 עם
{"error": "invalid_grant"}כתוכן הבקשה. - אחרת, משתמשים במזהה המשתמש מקוד ההרשאה כדי ליצור טוקן רענון וטוקן גישה. האסימונים האלה יכולים להיות כל ערך מחרוזת, אבל הם חייבים לייצג באופן ייחודי את המשתמש ואת הלקוח שאליו האסימון משויך, ואי אפשר לנחש אותם. עבור אסימוני גישה, צריך גם לתעד את זמן התפוגה של האסימון, שהוא בדרך כלל שעה אחרי הנפקת האסימון. תוקף אסימוני הרענון לא פג.
- מחזירים את אובייקט ה-JSON הבא בגוף התגובה של HTTPS:
{
"token_type": "Bearer",
"access_token": "ACCESS_TOKEN",
"refresh_token": "REFRESH_TOKEN",
"expires_in": SECONDS_TO_EXPIRATION
}
Google שומרת את אסימון הגישה ואת אסימון הרענון של המשתמש, ומתעדת את תפוגת אסימון הגישה. כשתוקף אסימון הגישה פג, Google משתמשת באסימון הרענון כדי לקבל אסימון גישה חדש מנקודת הקצה של החלפת האסימונים.
המרת אסימוני רענון לאסימוני גישה
כשפג התוקף של אסימון גישה, Google שולחת בקשה לנקודת הקצה של החלפת האסימונים כדי להחליף אסימון רענון באסימון גישה חדש.
בבקשות האלה, הערך של grant_type הוא refresh_token, והערך של refresh_token הוא הערך של טוקן הרענון שנתתם ל-Google בעבר. דוגמה לבקשה להחלפת טוקן רענון בטוקן גישה:
POST /token HTTP/1.1
Host: oauth2.example.com
Content-Type: application/x-www-form-urlencoded

client_id=GOOGLE_CLIENT_ID&client_secret=GOOGLE_CLIENT_SECRET&grant_type=refresh_token&refresh_token=REFRESH_TOKEN
כדי להחליף אסימון רענון באסימון גישה, נקודת הקצה להחלפת אסימונים מגיבה לבקשות של POST על ידי ביצוע השלבים הבאים:
- מוודאים שהערך של
client_idמזהה את מקור הבקשה כ-Google, ושהערך שלclient_secretתואם לערך הצפוי. - צריך לוודא שאסימון הרענון תקף, ושמזהה הלקוח שצוין בבקשה זהה למזהה הלקוח שמשויך לאסימון הרענון.
- אם אי אפשר לאמת את כל הקריטריונים שלמעלה, צריך להחזיר שגיאת בקשה שגויה מסוג HTTP 400 עם
{"error": "invalid_grant"}כתוכן הבקשה. - אחרת, משתמשים במזהה המשתמש מאסימון הרענון כדי ליצור אסימון גישה. האסימונים האלה יכולים להיות כל ערך מחרוזת, אבל הם חייבים לייצג באופן ייחודי את המשתמש ואת הלקוח שאליהם האסימון משויך, ואי אפשר לנחש אותם. במקרה של אסימוני גישה, צריך לתעד גם את תאריך התפוגה של האסימון, בדרך כלל שעה אחרי הנפקת האסימון.
- מחזירים את אובייקט ה-JSON הבא בגוף התגובה של HTTPS:
{ "token_type": "Bearer", "access_token": "ACCESS_TOKEN", "expires_in": SECONDS_TO_EXPIRATION }
טיפול בבקשות למידע על משתמשים
נקודת הקצה של userinfo היא משאב מוגן ב-OAuth 2.0 שמחזיר תלונות לגבי המשתמש המקושר. ההטמעה והאירוח של נקודת הקצה של userinfo הם אופציונליים, חוץ מאשר בתרחישים הבאים לדוגמה:
- כניסה לחשבון המקושר באמצעות Google One Tap.
- מינוי פשוט וקל ב-AndroidTV.
אחרי שהאחזור של אסימון הגישה מנקודת הקצה של האסימון מתבצע, Google שולחת בקשה לנקודת הקצה (endpoint) של userinfo כדי לאחזר פרטי פרופיל בסיסיים של המשתמש המקושר.
| כותרות של בקשות של נקודות קצה של userinfo | |
|---|---|
Authorization header |
אסימון הגישה מסוג נושא. |
לדוגמה, אם נקודת הקצה של Userinfo זמינה
https://myservice.example.com/userinfo, בקשה עשויה להיראות כך:
GET /userinfo HTTP/1.1
Host: myservice.example.com
Authorization: Bearer ACCESS_TOKEN
כדי שנקודת הקצה של userinfo תטפל בבקשות, מבצעים את השלבים הבאים:
- מחלצים את אסימון הגישה מהכותרת Authorization ומחזירים מידע עבור המשתמש שמשויך לאסימון הגישה.
- אם אסימון הגישה לא חוקי, צריך להחזיר שגיאה מסוג HTTP 401 מאושר עם שימוש בכותרת התגובה
WWW-Authenticate. דוגמה לתגובה עם שגיאה של userinfo:HTTP/1.1 401 Unauthorized WWW-Authenticate: error="invalid_token", error_description="The Access Token expired"
אם אסימון הגישה תקין, מוחזר ותגובת HTTP 200 עם אובייקט ה-JSON הבא בגוף ה-HTTPS תגובה:
{ "sub": "USER_UUID", "email": "EMAIL_ADDRESS", "given_name": "FIRST_NAME", "family_name": "LAST_NAME", "name": "FULL_NAME", "picture": "PROFILE_PICTURE", }תגובה של נקודת הקצה של userinfo subמזהה ייחודי שמזהה את המשתמש במערכת שלכם. emailכתובת האימייל של המשתמש. given_nameאופציונלי: השם הפרטי של המשתמש. family_nameאופציונלי: שם המשפחה של המשתמש. nameאופציונלי: השם המלא של המשתמש. pictureאופציונלי: תמונת פרופיל של המשתמש.