
每個 Cloud-to-cloud 整合都必須包含使用者驗證機制。
驗證可讓您將使用者的 Google 帳戶連結至驗證系統中的使用者帳戶。這樣一來,當完成動作收到智慧住宅意圖時,您就能識別使用者。Google 智慧住宅僅支援使用授權碼流程的 OAuth。
本頁說明如何設定 OAuth 2.0 伺服器,使其與 Cloud-to-cloud 整合服務搭配運作。
透過 OAuth 連結 Google 帳戶
在授權碼流程中,您需要兩個端點:
授權端點,會向尚未登入的使用者顯示登入 UI。授權端點也會建立短期授權碼,記錄使用者對所要求存取權的同意聲明。
權杖交換端點,負責處理兩種類型的交換作業:
- 將授權碼換成長期更新權杖和短期存取權杖。使用者完成帳戶連結流程時,就會進行這項交換作業。
- 使用長期更新權杖交換短期存取權杖。 如果 Google 的存取權杖已過期,就需要新的權杖,此時就會進行這項交換作業。
設計指南
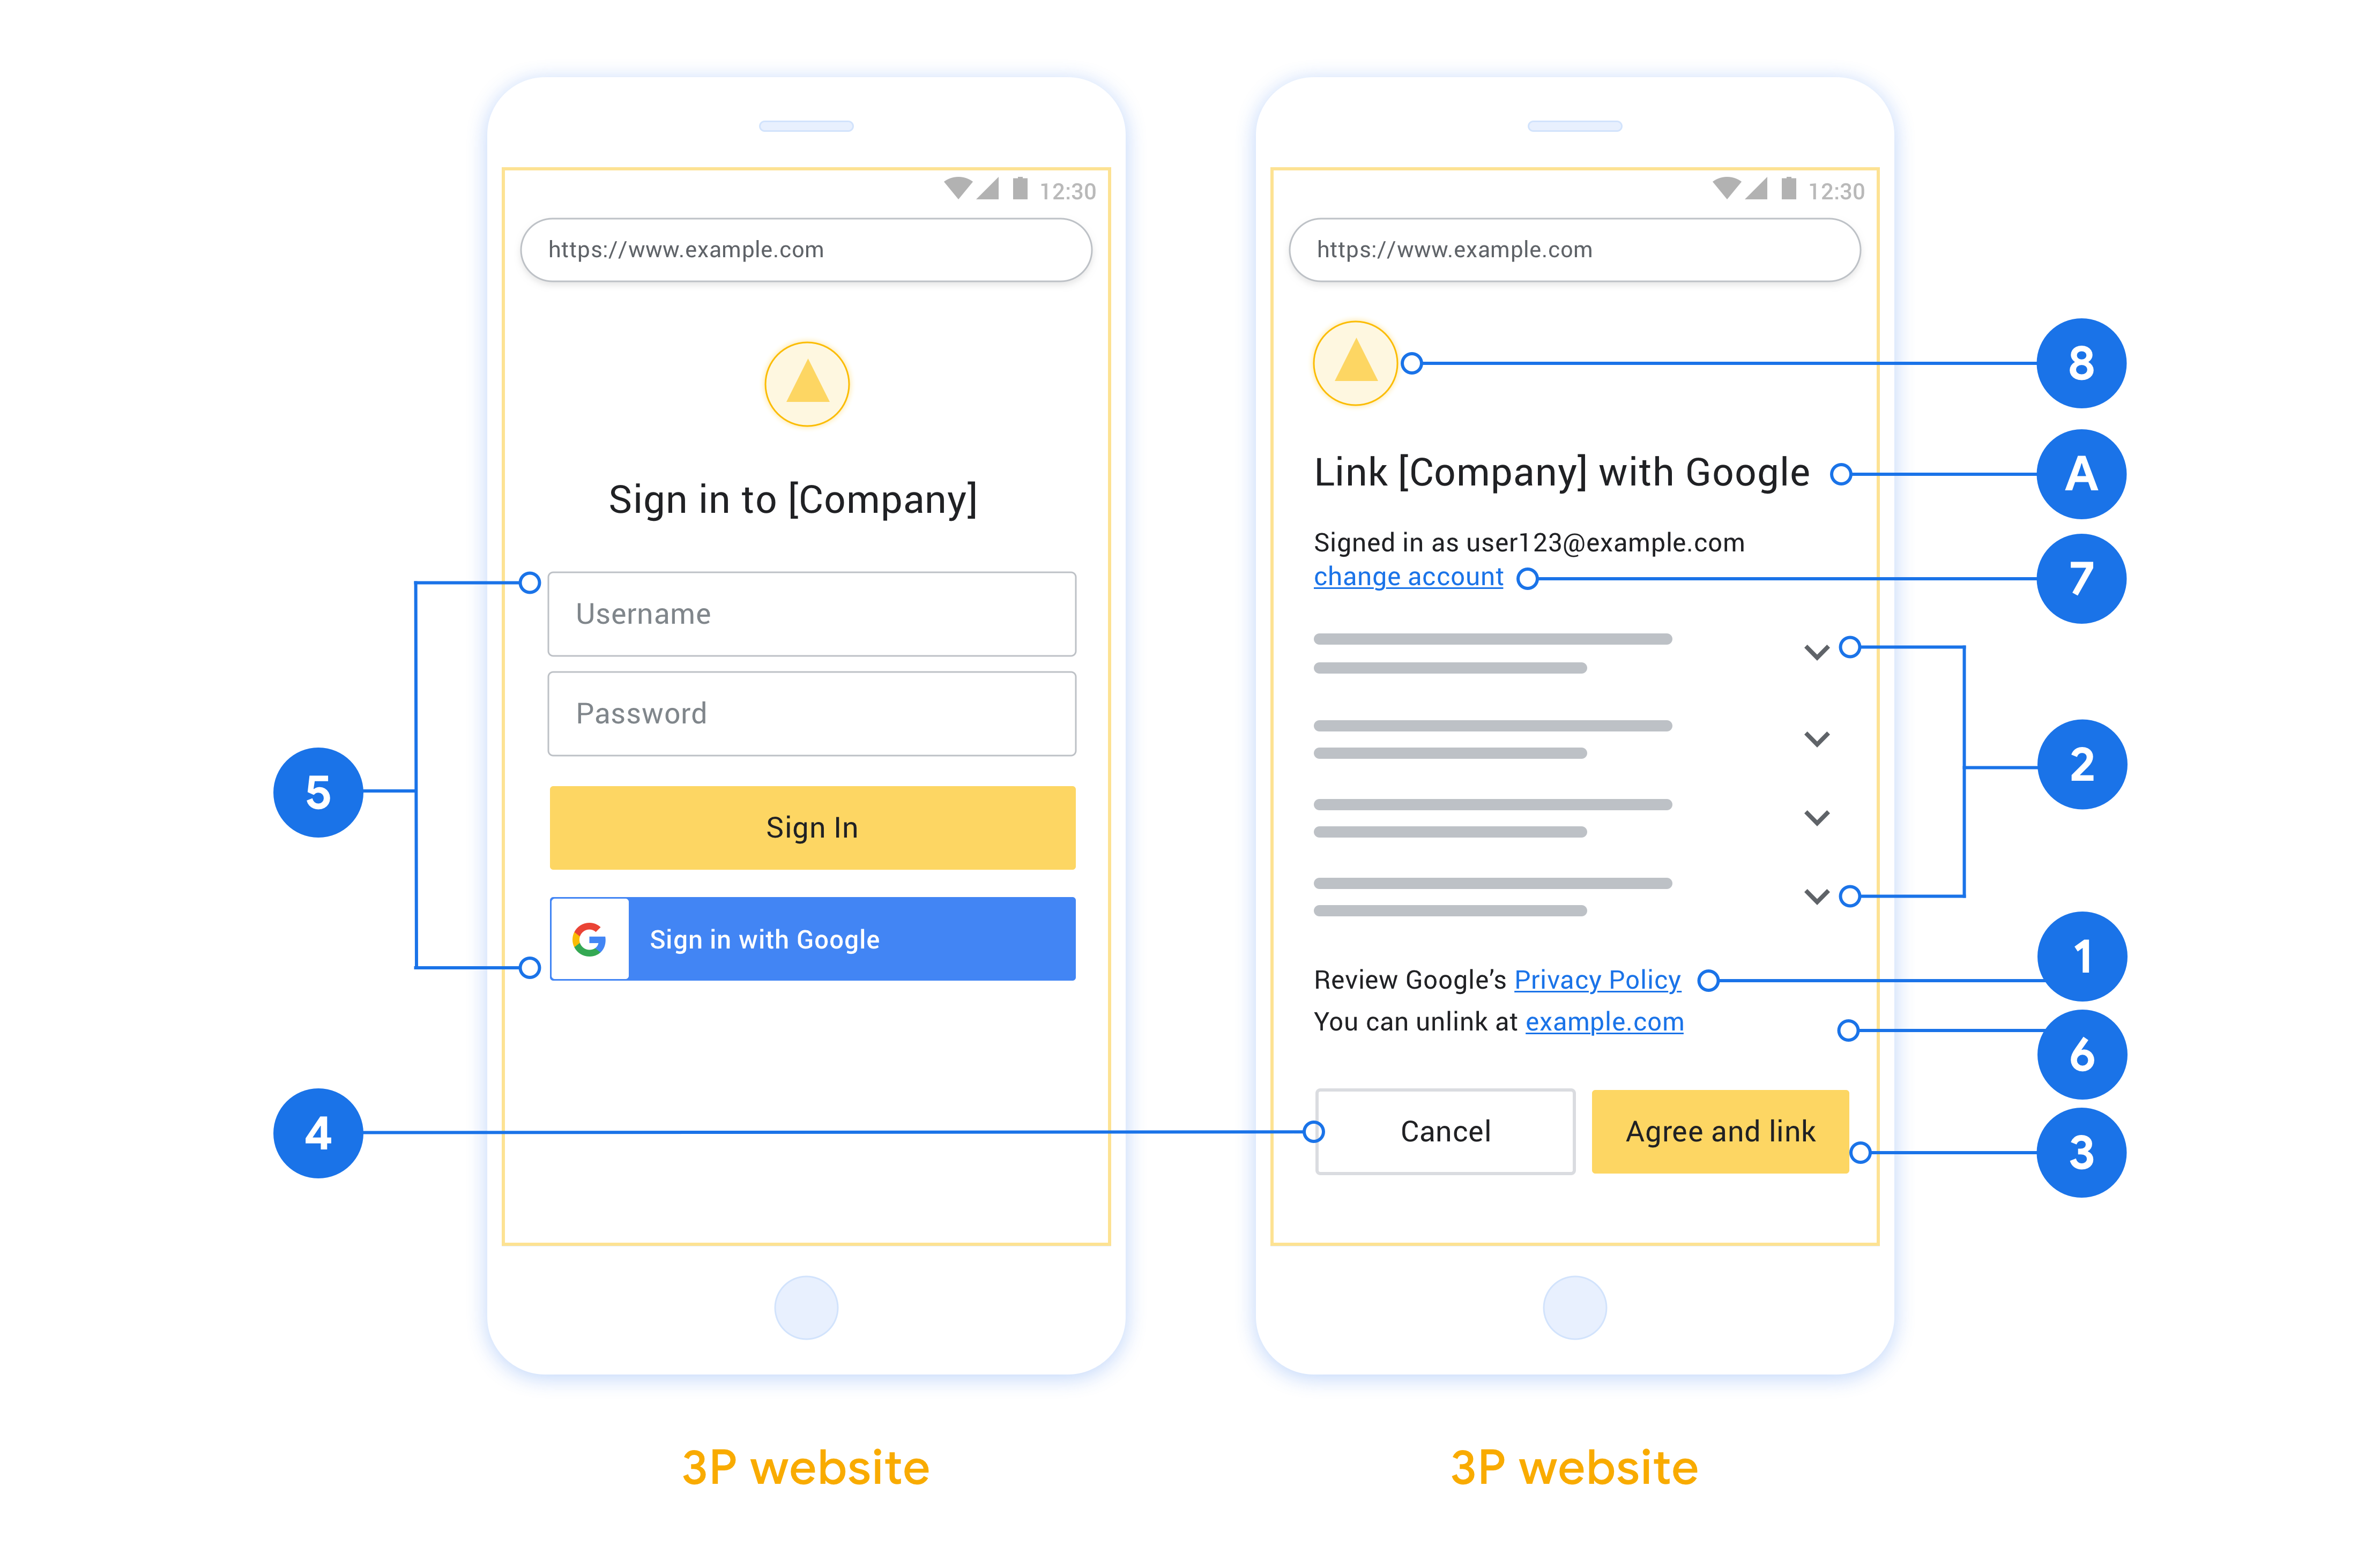
本節說明您為 OAuth 連結流程代管的使用者畫面設計規定和建議。Google 應用程式呼叫後,平台會向使用者顯示「登入 Google」頁面和帳戶連結同意畫面。使用者同意連結帳戶後,系統會將他們導向回 Google 應用程式。

需求條件
- 您必須告知使用者,他們的帳戶將連結至 Google,而非 Google Home 或 Google 助理等特定 Google 產品。
- 您必須提供 Google 授權聲明,例如「登入即表示授權 Google 控制您的裝置」。請參閱 Google Home 開發人員政策的「Google 裝置控制授權」一節。
- 您必須開啟網頁 OAuth 連結頁面,並確保使用者有清楚的 Google 帳戶登入方式,例如使用者名稱和密碼欄位。請勿使用 Google 登入 (GSI) 方法,讓使用者不必前往網頁 OAuth 連結頁面即可連結。此舉違反了 Google 政策。
- 您必須在 OAuth 連結頁面中加入至少一個下列項目,指出使用者要連結的整合服務:
- 公司標誌
- 公司名稱
- 整合作業名稱
- 應用程式圖示
建議
建議您採取下列做法:
顯示《Google 隱私權政策》。在同意畫面上加入《Google 隱私權政策》連結。
要分享的資料。請使用清楚簡潔的語言,向使用者說明 Google 需要哪些資料和原因,以及 Google 可能與您分享哪些使用或互動資料。
明確的行動號召。在同意聲明畫面中提供明確的行動號召,例如「同意並連結」。這是因為使用者必須瞭解連結帳戶時,需要與 Google 分享哪些資料。
可取消訂閱。如果使用者選擇不連結,請提供返回或取消的方式。
清楚的登入程序。確保使用者有明確的 Google 帳戶登入方式,例如使用者名稱和密碼欄位,或是「使用 Google 帳戶登入」。
可取消連結。提供解除連結的機制,例如平台帳戶設定的網址。或者,您也可以加入 Google 帳戶的連結,讓使用者管理已連結的帳戶。如果使用者取消連結整合服務,請使用
agentUsers.delete向 Google 通知這項變更。可變更使用者帳戶。建議使用者切換帳戶的方法。如果使用者通常有多個帳戶,這項功能就特別實用。
- 如果使用者必須關閉同意畫面才能切換帳戶,請將可復原的錯誤傳送給 Google,讓使用者透過 OAuth 連結登入所需帳戶。
加入您的標誌。在同意畫面上顯示公司標誌。 請按照樣式指南放置標誌。如要顯示 Google 標誌,請參閱「標誌和商標」一文。
授權碼流程
OAuth 2.0 伺服器實作的授權碼流程包含兩個端點,您的服務會透過 HTTPS 提供這些端點。第一個端點是授權端點,負責尋找或取得使用者同意聲明,允許存取資料。授權端點會向尚未登入的使用者顯示登入 UI,並記錄他們對所要求存取的同意聲明。第二個端點是權杖交換端點,用於取得加密字串 (稱為權杖),授權使用者存取您的服務。
當 Google 應用程式需要呼叫您服務的 API 時,Google 會一併使用這些端點,向使用者取得代表他們呼叫這些 API 的權限。
Google 啟動的 OAuth 2.0 授權碼流程工作階段會依下列流程進行:
- Google 會在使用者瀏覽器中開啟授權端點。如果使用者在僅支援語音的裝置上啟動動作流程,Google 會將執行作業轉移至手機。
- 使用者登入 (如果尚未登入),並授權 Google 透過您的 API 存取資料 (如果尚未授權)。
- 您的服務會建立授權碼,並傳回給 Google。如要這麼做,請將使用者的瀏覽器重新導向回 Google,並在要求中附加授權碼。
- Google 會將授權碼傳送至權杖交換端點,該端點會驗證授權碼的真實性,並傳回存取權杖和更新權杖。存取權杖是短期權杖,服務會接受這類權杖做為存取 API 的憑證。更新權杖是長期有效的權杖,Google 可以儲存並在存取權杖過期時使用,以取得新的存取權杖。
- 使用者完成帳戶連結流程後,Google 傳送的每個後續要求都會包含存取權杖。
處理授權要求
如要使用 OAuth 2.0 授權碼流程執行帳戶連結,Google 會將使用者傳送至您的授權端點,並在要求中加入下列參數:
| 授權端點參數 | |
|---|---|
client_id |
您指派給 Google 的用戶端 ID。 |
redirect_uri |
您用來傳送此要求回覆的網址。 |
state |
會傳回給 Google 的記帳值,且在重新導向 URI 中不會變更。 |
scope |
選填:以空格分隔的一組範圍字串,用於指定 Google 要求授權的資料。 |
response_type |
要在回應中傳回的值類型。如果是 OAuth 2.0 授權碼流程,回應類型一律為 code。
|
舉例來說,如果授權端點位於 https://myservice.example.com/auth,要求可能如下所示:
GET https://myservice.example.com/auth?client_id=GOOGLE_CLIENT_ID&redirect_uri=REDIRECT_URI&state=STATE_STRING&scope=REQUESTED_SCOPES&response_type=code
如要讓授權端點處理登入要求,請按照下列步驟操作:
- 確認
client_id與您指派給 Google 的用戶端 ID 相符,且redirect_uri與 Google 為您的服務提供的重新導向網址相符。這些檢查作業非常重要,可避免將存取權授予非預期或設定錯誤的用戶端應用程式。如果您支援多個 OAuth 2.0 流程,也請確認response_type為code。 - 確認使用者是否已登入您的服務。如果使用者未登入,請完成服務的登入或註冊流程。
- 產生授權碼,供 Google 用來存取您的 API。授權碼可以是任何字串值,但必須能代表使用者、權杖所屬的用戶端,以及代碼的到期時間,且不得可供猜測。您通常會發出授權碼,該授權碼會在約 10 分鐘後失效。
- 確認
redirect_uri參數指定的網址具有下列格式:https://oauth-redirect.googleusercontent.com/r/YOUR_PROJECT_ID https://oauth-redirect-sandbox.googleusercontent.com/r/YOUR_PROJECT_ID
- 將使用者的瀏覽器重新導向至
redirect_uri參數指定的網址。重新導向時,請附上您剛產生的授權碼和原始未修改的狀態值,方法是附加code和state參數。以下是最終網址的範例:https://oauth-redirect.googleusercontent.com/r/YOUR_PROJECT_ID?code=AUTHORIZATION_CODE&state=STATE_STRING
處理權杖交換要求
服務的權杖交換端點負責兩種權杖交換:
- 以授權碼換取存取權杖和更新權杖
- 以更新權杖換取存取權杖
權杖交換要求包含下列參數:
| 權杖交換端點參數 | |
|---|---|
client_id |
這個字串可將要求來源識別為 Google。這個字串必須在系統中註冊為 Google 的專屬 ID。 |
client_secret |
你向 Google 註冊的服務專用密鑰。 |
grant_type |
要交換的權杖類型。可以是 authorization_code 或 refresh_token。 |
code |
如果是 grant_type=authorization_code,這個參數就是 Google 從登入或權杖交換端點收到的代碼。 |
redirect_uri |
如果是 grant_type=authorization_code,這個參數就是初始授權要求中使用的網址。 |
refresh_token |
如果 grant_type=refresh_token,這個參數就是 Google 從權杖交換端點收到的更新權杖。 |
設定 Google 將憑證傳送至伺服器的方式
視實作方式而定,授權伺服器會預期在要求主體或要求標頭中收到用戶端憑證。
根據預設,Google 會在要求主體中傳送憑證。如果授權伺服器要求用戶端憑證位於要求標頭中,您必須據此設定 Cloud-to-cloud 整合:
從專案清單中,在要處理的專案旁點選「開啟」。
在「Cloud-to-Cloud」下方,選取「Develop」。
按一下整合項目旁的「開啟」。
向下捲動至「權限 (選用)」部分,然後選取「讓 Google 透過 HTTP 基本驗證標頭傳輸用戶端 ID 和密鑰」核取方塊。
按一下「儲存」以儲存您的變更。
以授權碼換取存取權杖和更新權杖
使用者登入後,授權端點會將短期授權碼傳回給 Google,接著 Google 會向權杖交換端點傳送要求,將授權碼換成存取權杖和更新權杖。
對於這類要求,grant_type 的值為 authorization_code,而 code 的值則是您先前授予 Google 的授權碼值。以下是要求交換授權碼以取得存取權杖和更新權杖的範例:
POST /token HTTP/1.1
Host: oauth2.example.com
Content-Type: application/x-www-form-urlencoded

client_id=GOOGLE_CLIENT_ID&client_secret=GOOGLE_CLIENT_SECRET&grant_type=authorization_code&code=AUTHORIZATION_CODE&redirect_uri=REDIRECT_URI
如要將授權碼換成存取權杖和更新權杖,權杖交換端點會執行下列步驟,回應 POST 要求:
- 確認
client_id將要求來源識別為授權來源,且client_secret符合預期值。 - 確認授權碼有效且未過期,且要求中指定的用戶端 ID 與授權碼相關聯的用戶端 ID 相符。
- 確認
redirect_uri參數指定的網址與初始授權要求中使用的值相同。 - 如果無法驗證上述所有條件,請傳回 HTTP 400 Bad Request 錯誤,並以
{"error": "invalid_grant"}做為主體。 - 否則,請使用授權碼中的使用者 ID 產生更新權杖和存取權杖。這些權杖可以是任何字串值,但必須代表使用者和權杖所屬的用戶端,且不得為可猜測的值。如果是存取權杖,請一併記錄權杖的到期時間,通常是發放權杖後的一小時。更新權杖不會過期。
- 在 HTTPS 回應的主體中傳回下列 JSON 物件:
{
"token_type": "Bearer",
"access_token": "ACCESS_TOKEN",
"refresh_token": "REFRESH_TOKEN",
"expires_in": SECONDS_TO_EXPIRATION
}
Google 會儲存使用者的存取權杖和更新權杖,並記錄存取權杖的到期時間。存取權杖過期時,Google 會使用更新權杖,從權杖交換端點取得新的存取權杖。
以更新權杖換取存取權杖
存取權杖到期時,Google 會向權杖交換端點傳送要求,將更新權杖換成新的存取權杖。
對於這類要求,grant_type 的值為 refresh_token,而 refresh_token 的值則是您先前授予 Google 的更新權杖值。以下是要求以更新權杖換取存取權杖的範例:
POST /token HTTP/1.1
Host: oauth2.example.com
Content-Type: application/x-www-form-urlencoded

client_id=GOOGLE_CLIENT_ID&client_secret=GOOGLE_CLIENT_SECRET&grant_type=refresh_token&refresh_token=REFRESH_TOKEN
如要將更新權杖換成存取權杖,權杖交換端點會執行下列步驟,回應 POST 要求:
- 確認
client_id將要求來源識別為 Google,且client_secret與預期值相符。 - 確認更新權杖有效,且要求中指定的用戶端 ID 與更新權杖相關聯的用戶端 ID 相符。
- 如果無法驗證上述所有條件,請傳回 HTTP 400 Bad Request 錯誤,並將
{"error": "invalid_grant"}做為主體。 - 否則,請使用更新權杖中的使用者 ID 產生存取權杖。這些權杖可以是任何字串值,但必須代表使用者和權杖所屬的用戶端,且不得可供猜測。如果是存取權杖,請一併記錄權杖的到期時間,通常是在核發權杖後一小時。
- 在 HTTPS 回應主體中傳回下列 JSON 物件:
{
"token_type": "Bearer",
"access_token": "ACCESS_TOKEN",
"expires_in": SECONDS_TO_EXPIRATION
}
處理使用者資訊要求
userinfo 端點是 OAuth 2.0 受保護的資源,可傳回已連結使用者的聲明。除了下列用途外,不一定要實作並代管 userinfo 端點:
成功從權杖端點擷取存取權杖後,Google 會向您的使用者資訊端點傳送要求,以擷取已連結使用者的基本個人資料。
| userinfo 端點要求標頭 | |
|---|---|
Authorization header |
Bearer 類型的存取權杖。 |
舉例來說,如果您的 userinfo 端點位於
https://myservice.example.com/userinfo,要求可能如下所示:
GET /userinfo HTTP/1.1
Host: myservice.example.com
Authorization: Bearer ACCESS_TOKEN
為了讓 userinfo 端點處理要求,請按照下列步驟操作:
- 從授權標頭擷取存取權杖,然後為與存取權杖相關聯的使用者傳回資訊。
- 如果存取權杖無效,請使用
WWW-Authenticate回應標頭傳回 HTTP 401 Unauthorized 錯誤。以下是 userinfo 錯誤回應的範例:HTTP/1.1 401 Unauthorized WWW-Authenticate: error="invalid_token", error_description="The Access Token expired"
如果存取權杖有效,則傳回並傳回 HTTP 200 回應,且 HTTPS 內文含有下列 JSON 物件 回應:
{ "sub": "USER_UUID", "email": "EMAIL_ADDRESS", "given_name": "FIRST_NAME", "family_name": "LAST_NAME", "name": "FULL_NAME", "picture": "PROFILE_PICTURE", }userinfo 端點回應 sub用來在系統中識別使用者的專屬 ID。 email使用者的電子郵件地址。 given_name選填:使用者的名字。 family_name選填:使用者的姓氏。 name選填:使用者全名。 picture選用:使用者的個人資料相片。