
Cada integración de Cloud-to-cloud debe incluir un mecanismo para autenticar a los usuarios.
La autenticación te permite vincular las Cuentas de Google de tus usuarios con las cuentas de usuario en tu sistema de autenticación. Esto te permite identificar a tus usuarios cuando tu entrega recibe un intent de casa inteligente. La casa inteligente de Google solo admite OAuth con un flujo de código de autorización.
En esta página, se describe cómo configurar tu servidor de OAuth 2.0 para que funcione con tu integración de Cloud-to-cloud.
Vinculación de la Cuenta de Google con OAuth
En el flujo de código de autorización, necesitas dos extremos:
El extremo de autorización, que presenta la IU de acceso a los usuarios que aún no accedieron. El extremo de autorización también crea un código de autorización de corta duración para registrar el consentimiento de los usuarios sobre el acceso solicitado.
El extremo de intercambio de tokens, que es responsable de dos tipos de intercambios:
- Intercambia un código de autorización por un token de actualización de larga duración y un token de acceso de corta duración. Este intercambio se produce cuando el usuario sigue el flujo de vinculación de la cuenta.
- Intercambia un token de actualización de larga duración por un token de acceso de corta duración. Este intercambio ocurre cuando Google necesita un nuevo token de acceso porque el que tenía venció.
Lineamientos de diseño
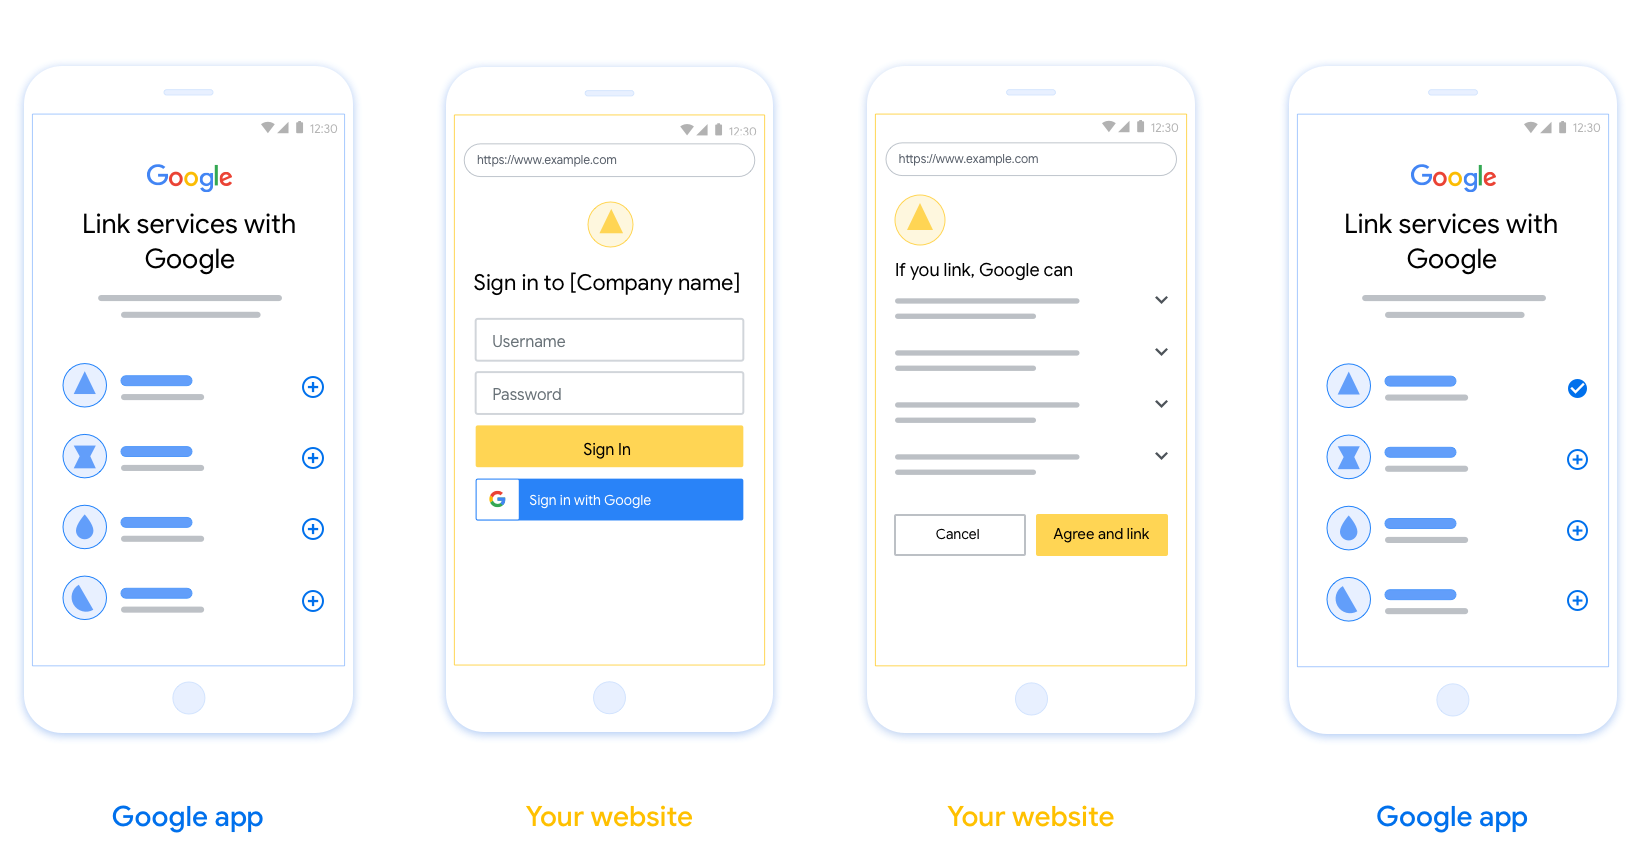
En esta sección, se describen los requisitos y las recomendaciones de diseño para la pantalla del usuario que alojas para los flujos de vinculación de OAuth. Después de que la app de Google la llame, tu plataforma mostrará al usuario una página de acceso a Google y una pantalla de consentimiento para la vinculación de cuentas. Se redirecciona al usuario a la app de Google después de que otorga su consentimiento para vincular las cuentas.
Requisitos
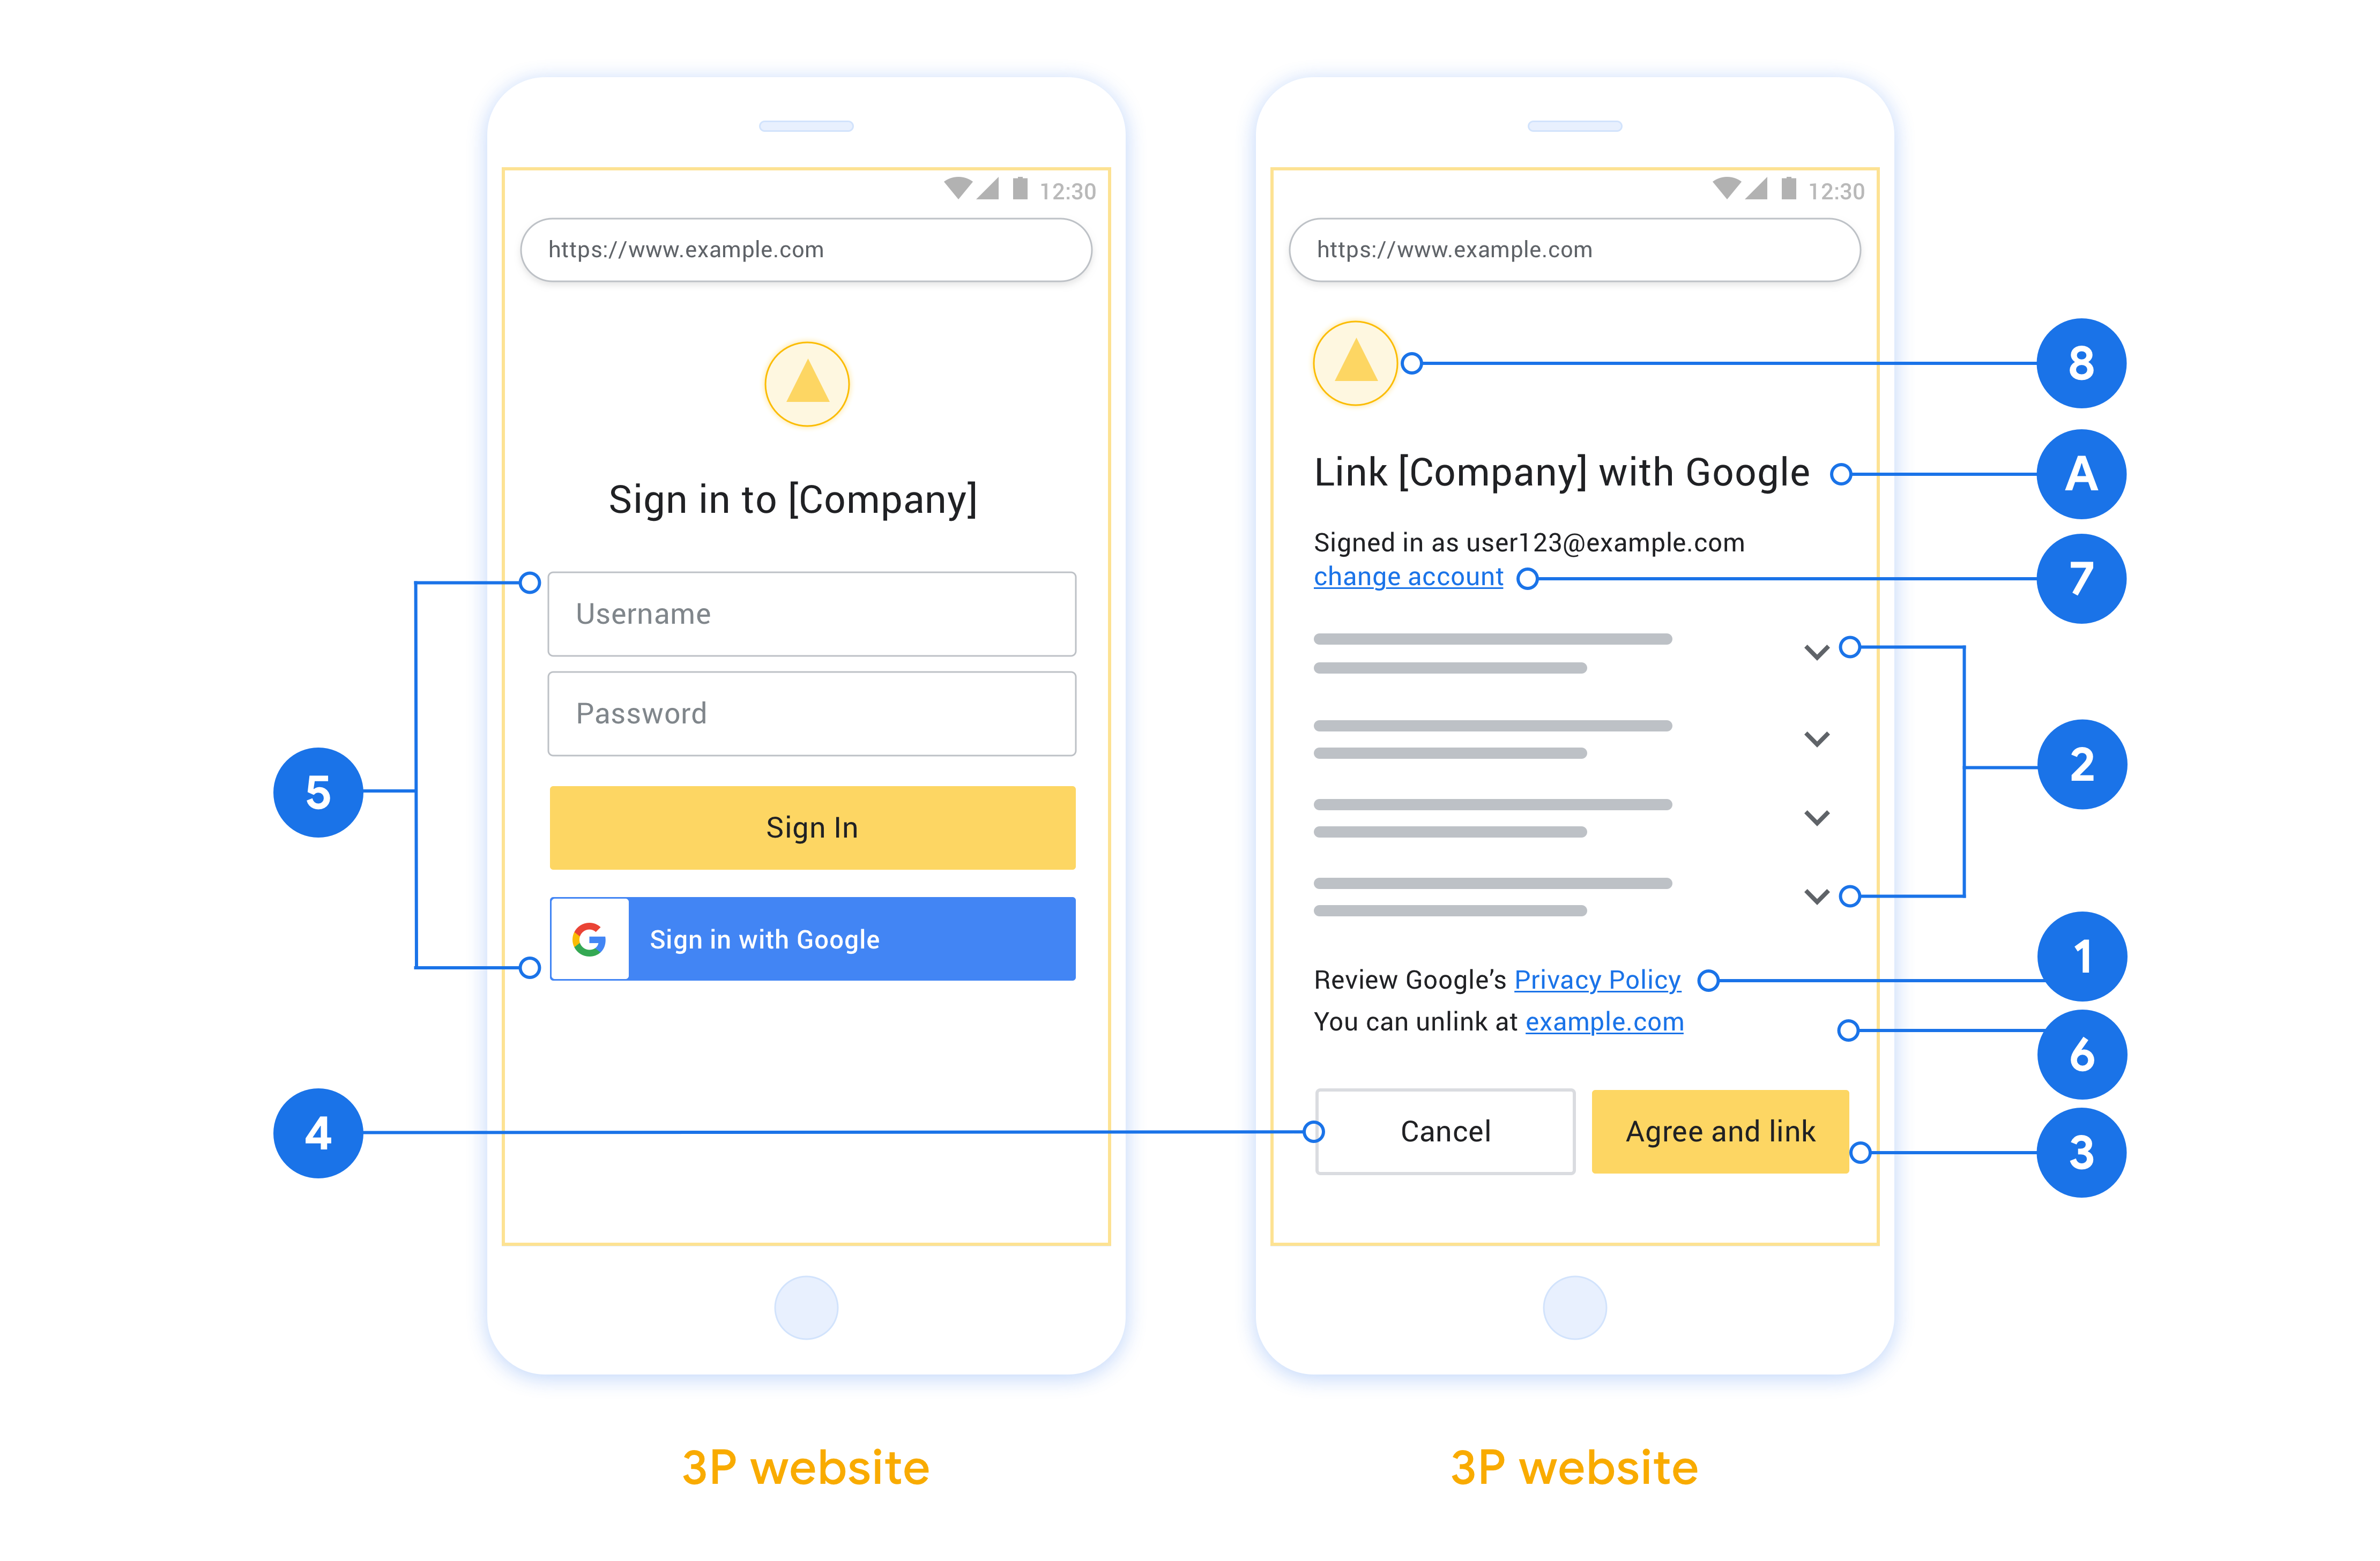
- Debes comunicar que la cuenta del usuario se vinculará a Google, no a un producto específico de Google, como Google Home o Asistente de Google.
- Debes tener una declaración de autorización de Google, como "Al acceder, autorizas a Google a controlar tus dispositivos". Consulta la sección Autorización de control de dispositivos de Google de las Políticas para desarrolladores de Google Home.
- Debes abrir la página de vinculación de OAuth web y asegurarte de que los usuarios tengan un método claro para acceder a su Cuenta de Google, como campos para su nombre de usuario y contraseña. No uses el método de Acceso con Google (GSI) que permite a los usuarios vincular sus cuentas sin que se los redireccione a la página de vinculación de OAuth web. Es un incumplimiento de la política de Google.
- Debes incluir al menos uno de los siguientes elementos en la página de vinculación de OAuth para indicar la integración a la que se vincula el usuario:
- Logotipo de la empresa
- Nombre de la empresa
- Nombre de la integración
- Ícono de la aplicación
Recomendaciones
Te recomendamos que hagas lo siguiente:
Mostrar la Política de Privacidad de Google Incluye un vínculo a la Política de Privacidad de Google en la pantalla de consentimiento.
Datos que se compartirán. Usa un lenguaje claro y conciso para indicarle al usuario qué datos suyos requiere Google y por qué.
Llamado a la acción claro. Incluye un llamado a la acción claro en la pantalla de consentimiento, como “Aceptar y vincular”. Esto se debe a que los usuarios deben comprender qué datos deben compartir con Google para vincular sus cuentas.
Capacidad de cancelar Proporciona una forma para que los usuarios vuelvan o cancelen la vinculación si deciden no vincular sus cuentas.
Proceso de acceso claro. Asegúrate de que los usuarios tengan un método claro para acceder a su Cuenta de Google, como campos para su nombre de usuario y contraseña, o Acceder con Google.
Capacidad de desvincular. Ofrece un mecanismo para que los usuarios desvinculen sus cuentas, como una URL a la configuración de la cuenta en tu plataforma. Como alternativa, puedes incluir un vínculo a la Cuenta de Google, en la que los usuarios pueden administrar su cuenta vinculada.
Capacidad de cambiar la cuenta de usuario Sugerir un método para que los usuarios cambien de cuenta Esto es especialmente beneficioso si los usuarios suelen tener varias cuentas.
- Si un usuario debe cerrar la pantalla de consentimiento para cambiar de cuenta, envía un error recuperable a Google para que pueda acceder a la cuenta deseada con la vinculación de OAuth.
Incluye tu logotipo. Muestra el logotipo de tu empresa en la pantalla de consentimiento. Usa tus lineamientos de estilo para colocar tu logotipo. Si también deseas mostrar el logotipo de Google, consulta Logotipos y marcas.
Flujo de código de autorización
Una implementación del servidor de OAuth 2.0 del flujo de código de autorización consta de dos extremos que tu servicio pone a disposición a través de HTTPS. El primer endpoint es el de autorización, que se encarga de encontrar o obtener el consentimiento de los usuarios para acceder a los datos. El extremo de autorización presenta una IU de acceso a los usuarios que aún no accedieron y registra el consentimiento para el acceso solicitado. El segundo extremo es el de intercambio de tokens, que se usa para obtener cadenas encriptadas, llamadas tokens, que autorizan a un usuario a acceder a tu servicio.
Cuando una aplicación de Google necesita llamar a una de las APIs de tu servicio, Google usa estos extremos en conjunto para obtener permiso de tus usuarios para llamar a estas APIs en su nombre.
Una sesión del flujo de código de autorización de OAuth 2.0 iniciada por Google tiene el siguiente flujo:
- Google abre tu extremo de autorización en el navegador del usuario. Si el flujo se inició en un dispositivo solo de voz para una acción, Google transfiere la ejecución a un teléfono.
- El usuario accede, si aún no lo hizo, y le otorga permiso a Google para acceder a sus datos con tu API, si aún no lo hizo.
- Tu servicio crea un código de autorización y se lo devuelve a Google. Para ello, redirecciona el navegador del usuario a Google con el código de autorización adjunto a la solicitud.
- Google envía el código de autorización a tu extremo de intercambio de tokens, que verifica la autenticidad del código y devuelve un token de acceso y un token de actualización. El token de acceso es un token de corta duración que tu servicio acepta como credenciales para acceder a las APIs. El token de actualización es un token de larga duración que Google puede almacenar y usar para adquirir tokens de acceso nuevos cuando estos vencen.
- Una vez que el usuario completa el flujo de vinculación de cuentas, cada solicitud posterior que se envía desde Google contiene un token de acceso.
Cómo controlar las solicitudes de autorización
Cuando necesites realizar la vinculación de cuentas con el flujo de código de autorización de OAuth 2.0, Google enviará al usuario a tu extremo de autorización con una solicitud que incluye los siguientes parámetros:
| Parámetros del extremo de autorización | |
|---|---|
client_id |
Es el ID de cliente que le asignaste a Google. |
redirect_uri |
Es la URL a la que envías la respuesta a esta solicitud. |
state |
Es un valor de contabilidad que se devuelve a Google sin cambios en el URI de redireccionamiento. |
scope |
Opcional: Es un conjunto de cadenas de alcance delimitadas por espacios que especifican los datos para los que Google solicita autorización. |
response_type |
Es el tipo de valor que se devolverá en la respuesta. Para el flujo de código de autorización de OAuth 2.0, el tipo de respuesta siempre es code.
|
Por ejemplo, si tu extremo de autorización está disponible en https://myservice.example.com/auth, una solicitud podría verse de la siguiente manera:
GET https://myservice.example.com/auth?client_id=GOOGLE_CLIENT_ID&redirect_uri=REDIRECT_URI&state=STATE_STRING&scope=REQUESTED_SCOPES&response_type=code
Para que tu extremo de autorización controle las solicitudes de acceso, sigue estos pasos:
- Verifica que
client_idcoincida con el ID de cliente que le asignaste a Google y queredirect_uricoincida con la URL de redireccionamiento que Google proporcionó para tu servicio. Estas verificaciones son importantes para evitar otorgar acceso a apps cliente no deseadas o mal configuradas. Si admites varios flujos de OAuth 2.0, también confirma queresponse_typeescode. - Verifica si el usuario accedió a tu servicio. Si el usuario no accedió a su cuenta, completa el flujo de acceso o registro de tu servicio.
- Genera un código de autorización para que Google lo use y acceda a tu API. El código de autorización puede ser cualquier valor de cadena, pero debe representar de forma única al usuario, al cliente para el que se genera el token y la hora de vencimiento del código, y no debe ser adivinable. Por lo general, emites códigos de autorización que vencen después de aproximadamente 10 minutos.
- Confirma que la URL especificada por el parámetro
redirect_uritenga el siguiente formato:https://oauth-redirect.googleusercontent.com/r/YOUR_PROJECT_ID https://oauth-redirect-sandbox.googleusercontent.com/r/YOUR_PROJECT_ID
- Redirecciona el navegador del usuario a la URL especificada por el parámetro
redirect_uri. Incluye el código de autorización que acabas de generar y el valor de estado original sin modificar cuando realices el redireccionamiento. Para ello, agrega los parámetroscodeystate. A continuación, se muestra un ejemplo de la URL resultante:https://oauth-redirect.googleusercontent.com/r/YOUR_PROJECT_ID?code=AUTHORIZATION_CODE&state=STATE_STRING
Cómo controlar las solicitudes de intercambio de tokens
El extremo de intercambio de tokens de tu servicio es responsable de dos tipos de intercambios de tokens:
- Intercambia códigos de autorización por tokens de acceso y tokens de actualización
- Intercambia tokens de actualización por tokens de acceso
Las solicitudes de intercambio de tokens incluyen los siguientes parámetros:
| Parámetros del extremo de intercambio de tokens | |
|---|---|
client_id |
Cadena que identifica el origen de la solicitud como Google. Esta cadena debe registrarse en tu sistema como el identificador único de Google. |
client_secret |
Es una cadena secreta que registraste en Google para tu servicio. |
grant_type |
Es el tipo de token que se intercambia. Puede ser authorization_code o refresh_token. |
code |
Cuando es grant_type=authorization_code, este parámetro es el código que Google recibió de tu extremo de acceso o intercambio de tokens. |
redirect_uri |
Cuando es grant_type=authorization_code, este parámetro es la URL que se usa en la solicitud de autorización inicial. |
refresh_token |
Cuando es grant_type=refresh_token, este parámetro es el token de actualización que Google recibió de tu extremo de intercambio de tokens. |
Configura cómo Google envía credenciales a tu servidor
Según su implementación, tu servidor de autorización espera recibir credenciales del cliente en el cuerpo o el encabezado de la solicitud.
De forma predeterminada, Google envía las credenciales en el cuerpo de la solicitud. Si tu servidor de autorización requiere que las credenciales del cliente estén en el encabezado de la solicitud, debes configurar tu integración de Cloud-to-cloud de la siguiente manera:
Ir a la consola para desarrolladores
En la lista de proyectos, haz clic en Abrir junto al proyecto con el que deseas trabajar.
En Cloud-to-Cloud, selecciona Develop.
Haz clic en Abrir junto a tu integración.
Desplázate hacia abajo hasta la sección Permisos (opcional) y selecciona la casilla de verificación Hacer que Google transmita el secreto y el ID de cliente a través del encabezado de autenticación básica HTTP.
Haz clic en Guardar para guardar los cambios.
Intercambia códigos de autorización por tokens de acceso y tokens de actualización
Después de que el usuario accede y tu extremo de autorización devuelve un código de autorización de corta duración a Google, Google envía una solicitud a tu extremo de intercambio de tokens para intercambiar el código de autorización por un token de acceso y un token de actualización.
Para estas solicitudes, el valor de grant_type es authorization_code, y el valor de code es el valor del código de autorización que otorgaste anteriormente a Google. A continuación, se muestra un ejemplo de una solicitud para intercambiar un código de autorización por un token de acceso y un token de actualización:
POST /token HTTP/1.1
Host: oauth2.example.com
Content-Type: application/x-www-form-urlencoded

client_id=GOOGLE_CLIENT_ID&client_secret=GOOGLE_CLIENT_SECRET&grant_type=authorization_code&code=AUTHORIZATION_CODE&redirect_uri=REDIRECT_URI
Para intercambiar códigos de autorización por un token de acceso y un token de actualización, tu extremo de intercambio de tokens responde a las solicitudes de POST ejecutando los siguientes pasos:
- Verifica que
client_ididentifique el origen de la solicitud como un origen autorizado y queclient_secretcoincida con el valor esperado. - Verifica que el código de autorización sea válido y no haya vencido, y que el ID de cliente especificado en la solicitud coincida con el ID de cliente asociado al código de autorización.
- Confirma que la URL especificada por el parámetro
redirect_urisea idéntica al valor que se usó en la solicitud de autorización inicial. - Si no puedes verificar todos los criterios anteriores, muestra un error HTTP 400 Bad Request con
{"error": "invalid_grant"}como cuerpo. - De lo contrario, usa el ID de usuario del código de autorización para generar un token de actualización y un token de acceso. Estos tokens pueden ser cualquier valor de cadena, pero deben representar de forma única al usuario y al cliente para el que se genera el token, y no deben ser adivinables. En el caso de los tokens de acceso, también registra la hora de vencimiento del token, que suele ser una hora después de que lo emites. Los tokens de actualización no vencen.
- Devuelve el siguiente objeto JSON en el cuerpo de la respuesta HTTPS:
{
"token_type": "Bearer",
"access_token": "ACCESS_TOKEN",
"refresh_token": "REFRESH_TOKEN",
"expires_in": SECONDS_TO_EXPIRATION
}
Google almacena el token de acceso y el token de actualización del usuario, y registra el vencimiento del token de acceso. Cuando vence el token de acceso, Google usa el token de actualización para obtener uno nuevo desde tu extremo de intercambio de tokens.
Intercambia tokens de actualización por tokens de acceso
Cuando vence un token de acceso, Google envía una solicitud a tu extremo de intercambio de tokens para intercambiar un token de actualización por un token de acceso nuevo.
Para estas solicitudes, el valor de grant_type es refresh_token, y el valor de refresh_token es el valor del token de actualización que otorgaste anteriormente a Google. A continuación, se muestra un ejemplo de una solicitud para intercambiar un token de actualización por un token de acceso:
POST /token HTTP/1.1
Host: oauth2.example.com
Content-Type: application/x-www-form-urlencoded

client_id=GOOGLE_CLIENT_ID&client_secret=GOOGLE_CLIENT_SECRET&grant_type=refresh_token&refresh_token=REFRESH_TOKEN
Para intercambiar un token de actualización por un token de acceso, tu extremo de intercambio de tokens responde a las solicitudes de POST ejecutando los siguientes pasos:
- Verifica que
client_ididentifique el origen de la solicitud como Google y queclient_secretcoincida con el valor esperado. - Verifica que el token de actualización sea válido y que el ID de cliente especificado en la solicitud coincida con el ID de cliente asociado al token de actualización.
- Si no puedes verificar todos los criterios anteriores, devuelve un error HTTP 400 Bad Request con
{"error": "invalid_grant"}como cuerpo. - De lo contrario, usa el ID de usuario del token de actualización para generar un token de acceso. Estos tokens pueden ser cualquier valor de cadena, pero deben representar de forma única al usuario y al cliente para el que se genera el token, y no deben ser adivinables. En el caso de los tokens de acceso, también registra la hora de vencimiento del token, que suele ser una hora después de que lo emites.
- Devuelve el siguiente objeto JSON en el cuerpo de la respuesta HTTPS:
{
"token_type": "Bearer",
"access_token": "ACCESS_TOKEN",
"expires_in": SECONDS_TO_EXPIRATION
}
Controla las solicitudes userinfo
El extremo userinfo es un recurso protegido de OAuth 2.0 que muestra reclamos sobre el usuario vinculado. La implementación y el alojamiento del extremo userinfo son opcionales, excepto en los siguientes casos de uso:
- Acceso a la cuenta vinculada con Google One Tap.
- Suscripción sin inconvenientes en Android TV.
Una vez que el token de acceso se recupera correctamente del extremo del token, Google envía una solicitud al extremo userinfo para recuperar la información básica de perfil del usuario vinculado.
| Encabezados de la solicitud del extremo userinfo | |
|---|---|
Authorization header |
El token de acceso del tipo portador. |
Por ejemplo, si el extremo userinfo está disponible en
https://myservice.example.com/userinfo, una solicitud podría verse de la siguiente manera:
GET /userinfo HTTP/1.1
Host: myservice.example.com
Authorization: Bearer ACCESS_TOKEN
Para que tu extremo userinfo controle las solicitudes, sigue estos pasos:
- Extrae el token de acceso del encabezado de autorización y muestra la información del usuario asociada con el token de acceso.
- Si el token de acceso no es válido, muestra un error HTTP 401 No autorizado con el encabezado de respuesta
WWW-Authenticate. A continuación, se muestra un ejemplo de una respuesta de error de userinfo:HTTP/1.1 401 Unauthorized WWW-Authenticate: error="invalid_token", error_description="The Access Token expired"
Si el token de acceso es válido, devuelve una respuesta HTTP 200 con el siguiente objeto JSON en el cuerpo del protocolo HTTPS respuesta:
{ "sub": "USER_UUID", "email": "EMAIL_ADDRESS", "given_name": "FIRST_NAME", "family_name": "LAST_NAME", "name": "FULL_NAME", "picture": "PROFILE_PICTURE", }respuesta del extremo userinfo subUn ID único que identifica al usuario en tu sistema. emailDirección de correo electrónico del usuario. given_nameOpcional: Es el nombre del usuario. family_nameOpcional: Apellido del usuario. nameOpcional: Es el nombre completo del usuario. pictureOpcional: Foto de perfil del usuario.