
Jede Cloud-to-cloud-Integration muss einen Mechanismus zur Authentifizierung von Nutzern enthalten.
Über die Authentifizierung kannst du die Google-Konten deiner Nutzer mit Nutzerkonten in deinem Authentifizierungssystem verknüpfen. So kannst du Nutzer identifizieren, wenn deine Auftragsausführung einen Smart-Home-Intent empfängt. Google Smart Home unterstützt nur OAuth mit einem Autorisierungscode-Ablauf.
Auf dieser Seite wird beschrieben, wie Sie Ihren OAuth 2.0-Server so einrichten, dass er mit Ihrer Cloud-to-cloud-Integration funktioniert.
Google-Kontoverknüpfung mit OAuth
Beim Autorisierungscode-Ablauf sind zwei Endpunkte erforderlich:
Der Autorisierungsendpunkt, über den die Anmeldeoberfläche für Nutzer angezeigt wird, die noch nicht angemeldet sind. Am Autorisierungsendpunkt wird auch ein kurzlebiger Autorisierungscode erstellt, um die Einwilligung der Nutzer für den angeforderten Zugriff aufzuzeichnen.
Der Tokenaustausch-Endpunkt, der für zwei Arten von Austauschvorgängen zuständig ist:
- Tauscht einen Autorisierungscode gegen ein langlebiges Aktualisierungstoken und ein kurzlebiges Zugriffstoken ein. Dieser Austausch findet statt, wenn der Nutzer den Ablauf zur Kontoverknüpfung durchläuft.
- Tauscht ein langlebiges Aktualisierungstoken gegen ein kurzlebiges Zugriffstoken ein. Dieser Austausch erfolgt, wenn Google ein neues Zugriffstoken benötigt, weil das vorhandene abgelaufen ist.
Gestaltungsrichtlinien
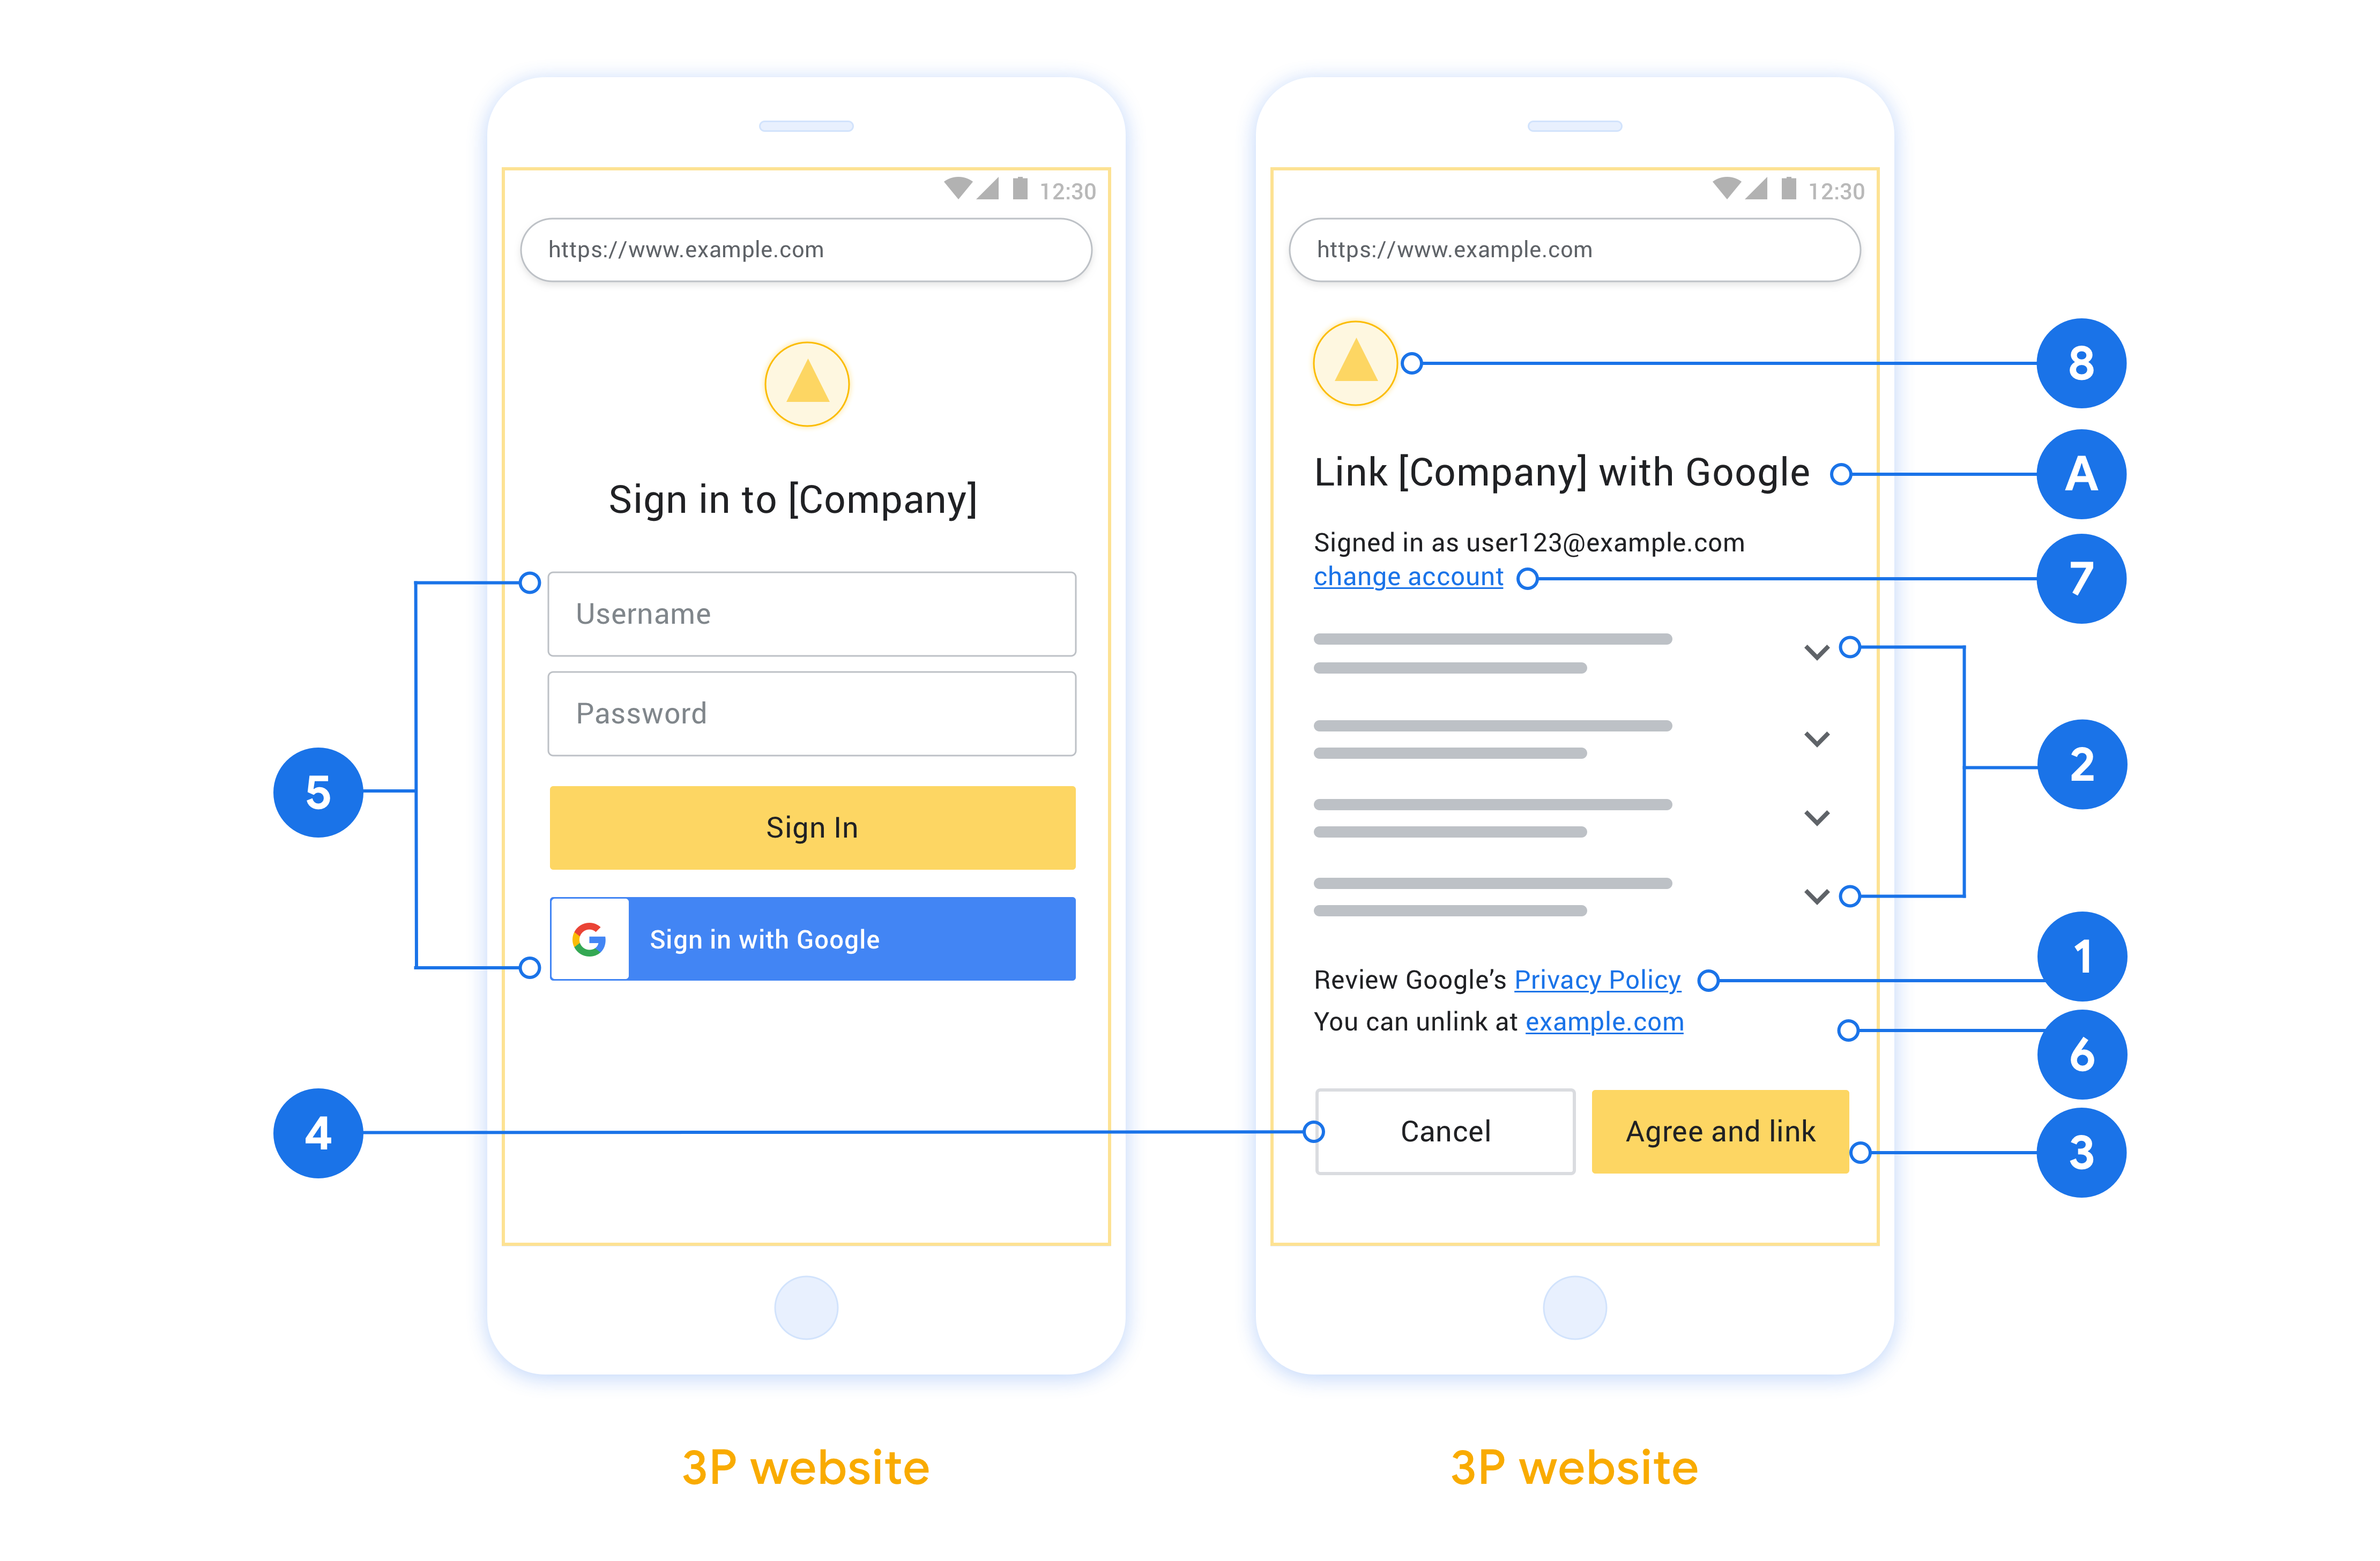
In diesem Abschnitt werden die Designanforderungen und ‑empfehlungen für den Nutzerbildschirm beschrieben, den Sie für OAuth-Verknüpfungsabläufe hosten. Nachdem die Funktion von der Google-App aufgerufen wurde, zeigt Ihre Plattform dem Nutzer eine Anmeldeseite für Google und einen Bildschirm für die Einwilligung zur Kontoverknüpfung an. Nachdem der Nutzer der Kontoverknüpfung zugestimmt hat, wird er zur Google-App zurückgeleitet.

Voraussetzungen
- Sie müssen dem Nutzer mitteilen, dass sein Konto mit Google verknüpft wird, nicht mit einem bestimmten Google-Produkt wie Google Home oder Google Assistant.
- Du musst über eine Google-Autorisierungserklärung verfügen, z. B. „Durch die Anmeldung autorisierst du Google, deine Geräte zu steuern.“ Weitere Informationen finden Sie im Abschnitt Autorisierung für die Gerätesteuerung durch Google der Google Home-Entwicklerrichtlinien.
- Sie müssen die Web-OAuth-Verknüpfungsseite öffnen und dafür sorgen, dass Nutzer sich auf einfache Weise in ihrem Google-Konto anmelden können, z. B. über Felder für ihren Nutzernamen und ihr Passwort. Verwenden Sie nicht die Google-Anmeldemethode (GSI), mit der Nutzer verknüpfen können, ohne zur Web-OAuth-Verknüpfungsseite weitergeleitet zu werden. Es stellt einen Verstoß gegen die Google-Richtlinien dar.
- Sie müssen mindestens eines der folgenden Elemente auf der OAuth-Verknüpfungsseite angeben, um die Integration anzugeben, mit der der Nutzer eine Verknüpfung herstellt:
- Firmenlogo
- Name des Unternehmens
- Name der Integration
- App-Symbol
Empfehlungen
Wir empfehlen Folgendes:
Datenschutzerklärung von Google anzeigen Fügen Sie auf dem Zustimmungsbildschirm einen Link zur Datenschutzerklärung von Google ein.
Zu teilende Daten: Verwenden Sie eine klare und prägnante Sprache, um dem Nutzer mitzuteilen, welche seiner Daten Google benötigt und warum.
Klarer Call-to-Action: Geben Sie auf dem Einwilligungsbildschirm einen klaren Call-to-Action an, z. B. „Zustimmen und verknüpfen“. Nutzer müssen wissen, welche Daten sie mit Google teilen müssen, um ihre Konten zu verknüpfen.
Möglichkeit zur Kündigung Bieten Sie Nutzern die Möglichkeit, zurückzugehen oder abzubrechen, wenn sie keine Verknüpfung herstellen möchten.
Übersichtlicher Anmeldevorgang: Sorgen Sie dafür, dass Nutzer sich auf einfache Weise in ihrem Google-Konto anmelden können, z. B. über Felder für ihren Nutzernamen und ihr Passwort oder über Mit Google anmelden.
Verknüpfung aufheben: Bieten Sie Nutzern eine Möglichkeit, die Verknüpfung aufzuheben, z. B. eine URL zu ihren Kontoeinstellungen auf Ihrer Plattform. Alternativ können Sie einen Link zu Google-Konto einfügen, über den Nutzer ihr verknüpftes Konto verwalten können.
Nutzerkonto ändern: Schlagen Sie Nutzern eine Methode vor, mit der sie ihr(e) Konto(s) wechseln können. Das ist besonders dann von Vorteil, wenn Nutzer mehrere Konten haben.
- Wenn ein Nutzer den Zustimmungsbildschirm schließen muss, um das Konto zu wechseln, senden Sie einen behebaren Fehler an Google, damit sich der Nutzer mit OAuth-Verknüpfung im gewünschten Konto anmelden kann.
Fügen Sie Ihr Logo ein. Ihr Unternehmenslogo auf dem Zustimmungsbildschirm anzeigen Platzieren Sie Ihr Logo gemäß Ihren Style-Richtlinien. Wenn Sie auch das Google-Logo anzeigen möchten, lesen Sie den Abschnitt Logos und Marken.
Autorisierungscode-Ablauf
An OAuth 2.0 server implementation of the authorization code flow consists of two endpoints, which your service makes available by HTTPS. The first endpoint is the authorization endpoint, which is responsible for finding or obtaining consent from users for data access. The authorization endpoint presents a sign-in UI to your users that aren't already signed in and records consent to the requested access. The second endpoint is the token exchange endpoint, which is used to obtain encrypted strings, called tokens, that authorize a user to access your service.
When a Google application needs to call one of your service's APIs, Google uses these endpoints together to get permission from your users to call these APIs on their behalf.
An OAuth 2.0 authorization code flow session initiated by Google has the following flow:
- Google opens your authorization endpoint in the user's browser. If the flow started on a voice-only device for an Action, Google transfers the execution to a phone.
- The user signs in, if not signed in already, and grants Google permission to access their data with your API, if they haven't already granted permission.
- Your service creates an authorization code and returns it to Google. To do so, redirect the user's browser back to Google with the authorization code attached to the request.
- Google sends the authorization code to your token exchange endpoint, which verifies the authenticity of the code and returns an access token and a refresh token. The access token is a short-lived token that your service accepts as credentials to access APIs. The refresh token is a long-lived token that Google can store and use to acquire new access tokens when they expire.
- After the user has completed the account linking flow, every subsequent request sent from Google contains an access token.
Handle authorization requests
When you need to perform account linking using the OAuth 2.0 authorization code flow, Google sends the user to your authorization endpoint with a request that includes the following parameters:
| Authorization endpoint parameters | |
|---|---|
client_id |
The Client ID you assigned to Google. |
redirect_uri |
The URL to which you send the response to this request. |
state |
A bookkeeping value that is passed back to Google unchanged in the redirect URI. |
scope |
Optional: A space-delimited set of scope strings that specify the data Google is requesting authorization for. |
response_type |
The type of value to return in the response. For the OAuth 2.0
authorization code flow, the response type is always code.
|
For example, if your authorization endpoint is available at
https://myservice.example.com/auth, a request might look like the following:
GET https://myservice.example.com/auth?client_id=GOOGLE_CLIENT_ID&redirect_uri=REDIRECT_URI&state=STATE_STRING&scope=REQUESTED_SCOPES&response_type=code
For your authorization endpoint to handle sign-in requests, do the following steps:
- Verify that the
client_idmatches the Client ID you assigned to Google, and that theredirect_urimatches the redirect URL provided by Google for your service. These checks are important to prevent granting access to unintended or misconfigured client apps. If you support multiple OAuth 2.0 flows, also confirm that theresponse_typeiscode. - Check if the user is signed in to your service. If the user isn't signed in, complete your service's sign-in or sign-up flow.
- Generate an authorization code for Google to use to access your API. The authorization code can be any string value, but it must uniquely represent the user, the client the token is for, and the code's expiration time, and it must not be guessable. You typically issue authorization codes that expire after approximately 10 minutes.
- Confirm that the URL specified by the
redirect_uriparameter has the following form:https://oauth-redirect.googleusercontent.com/r/YOUR_PROJECT_ID https://oauth-redirect-sandbox.googleusercontent.com/r/YOUR_PROJECT_ID
- Redirect the user's browser to the URL specified by the
redirect_uriparameter. Include the authorization code you just generated and the original, unmodified state value when you redirect by appending thecodeandstateparameters. The following is an example of the resulting URL:https://oauth-redirect.googleusercontent.com/r/YOUR_PROJECT_ID?code=AUTHORIZATION_CODE&state=STATE_STRING
Handle token exchange requests
Your service's token exchange endpoint is responsible for two kinds of token exchanges:
- Exchange authorization codes for access tokens and refresh tokens
- Exchange refresh tokens for access tokens
Token exchange requests include the following parameters:
| Token exchange endpoint parameters | |
|---|---|
client_id |
A string that identifies the request origin as Google. This string must be registered within your system as Google's unique identifier. |
client_secret |
A secret string that you registered with Google for your service. |
grant_type |
The type of token being exchanged. It's either
authorization_code or refresh_token. |
code |
When grant_type=authorization_code, this parameter is the
code Google received from either your sign-in or token exchange
endpoint. |
redirect_uri |
When grant_type=authorization_code, this parameter is the
URL used in the initial authorization request. |
refresh_token |
When grant_type=refresh_token, this parameter is the
refresh token Google received from your token exchange endpoint. |
Configure how Google sends credentials to your server
Depending on its implementation, your authorization server expects to receive client credentials either in the request body, or in the request header.
By default, Google sends the credentials in the request body. If your authorization server requires the client credentials to be in the request header, you must configure your Cloud-to-cloud integration accordingly:
From the list of projects, click Open next to the project you want to work with.
Under Cloud-to-Cloud, select Develop.
Click Open next your integration.
Scroll down to the Permissions (optional) section and select the Have Google transmit Client ID and secret via HTTP basic auth header checkbox.
Click Save to save your changes.
Exchange authorization codes for access tokens and refresh tokens
After the user signs in and your authorization endpoint returns a short-lived authorization code to Google, Google sends a request to your token exchange endpoint to exchange the authorization code for an access token and a refresh token.
For these requests, the value of grant_type is authorization_code, and the
value of code is the value of the authorization code you previously granted
to Google. The following is an example of a request to exchange an
authorization code for an access token and a refresh token:
POST /token HTTP/1.1
Host: oauth2.example.com
Content-Type: application/x-www-form-urlencoded

client_id=GOOGLE_CLIENT_ID&client_secret=GOOGLE_CLIENT_SECRET&grant_type=authorization_code&code=AUTHORIZATION_CODE&redirect_uri=REDIRECT_URI
To exchange authorization codes for an access token and a refresh token, your
token exchange endpoint responds to POST requests by executing the following
steps:
- Verify that the
client_ididentifies the request origin as an authorized origin, and that theclient_secretmatches the expected value. - Verify that the authorization code is valid and not expired, and that the client ID specified in the request matches the client ID associated with the authorization code.
- Confirm that the URL specified by the
redirect_uriparameter is identical to the value used in the initial authorization request. - If you can't verify all of the above criteria, return an HTTP
400 Bad Request error with
{"error": "invalid_grant"}as the body. - Otherwise, use the user ID from the authorization code to generate a refresh token and an access token. These tokens can be any string value, but they must uniquely represent the user and the client the token is for, and they must not be guessable. For access tokens, also record the expiration time of the token, which is typically an hour after you issue the token. Refresh tokens don't expire.
- Return the following JSON object in the body of the HTTPS response:
{
"token_type": "Bearer",
"access_token": "ACCESS_TOKEN",
"refresh_token": "REFRESH_TOKEN",
"expires_in": SECONDS_TO_EXPIRATION
}
Google stores the access token and the refresh token for the user and records the expiration of the access token. When the access token expires, Google uses the refresh token to get a new access token from your token exchange endpoint.
Exchange refresh tokens for access tokens
When an access token expires, Google sends a request to your token exchange endpoint to exchange a refresh token for a new access token.
For these requests, the value of grant_type is refresh_token, and the value
of refresh_token is the value of the refresh token you previously granted to
Google. The following is an example of a request to exchange a refresh token
for an access token:
POST /token HTTP/1.1
Host: oauth2.example.com
Content-Type: application/x-www-form-urlencoded

client_id=GOOGLE_CLIENT_ID&client_secret=GOOGLE_CLIENT_SECRET&grant_type=refresh_token&refresh_token=REFRESH_TOKEN
To exchange a refresh token for an access token, your token exchange endpoint
responds to POST requests by executing the following steps:
- Verify that the
client_ididentifies the request origin as Google, and that theclient_secretmatches the expected value. - Verify that the refresh token is valid, and that the client ID specified in the request matches the client ID associated with the refresh token.
- If you can't verify all of the above criteria, return an HTTP 400
Bad Request error with
{"error": "invalid_grant"}as the body. - Otherwise, use the user ID from the refresh token to generate an access token. These tokens can be any string value, but they must uniquely represent the user and the client the token is for, and they must not be guessable. For access tokens, also record the expiration time of the token, typically an hour after you issue the token.
- Return the following JSON object in the body of the HTTPS
response:
{
"token_type": "Bearer",
"access_token": "ACCESS_TOKEN",
"expires_in": SECONDS_TO_EXPIRATION
}
userinfo-Anfragen verarbeiten
Der userinfo-Endpunkt ist eine geschützte OAuth 2.0-Ressource, die Ansprüche über den verknüpften Nutzer zurückgibt. Die Implementierung und das Hosten des userinfo-Endpunkts sind mit Ausnahme der folgenden Anwendungsfälle optional:
- Anmeldung in einem verknüpften Konto über Google One Tap.
- Reibungsloses Abo auf Android TV
Nachdem das Zugriffstoken erfolgreich von Ihrem Tokenendpunkt abgerufen wurde, sendet Google eine Anfrage an Ihren userinfo-Endpunkt, um grundlegende Profilinformationen über den verknüpften Nutzer abzurufen.
| Anfrageheader für userinfo-Endpunkt | |
|---|---|
Authorization header |
Das Zugriffstoken vom Typ „Bearer“. |
Wenn Ihr userinfo-Endpunkt beispielsweise unter
https://myservice.example.com/userinfo, kann eine Anfrage so aussehen:
GET /userinfo HTTP/1.1
Host: myservice.example.com
Authorization: Bearer ACCESS_TOKEN
Führen Sie die folgenden Schritte aus, damit der userinfo-Endpunkt Anfragen verarbeiten kann:
- Extrahieren Sie das Zugriffstoken aus dem Autorisierungs-Header und geben Sie Informationen für den Nutzer zurück, der mit dem Zugriffstoken verknüpft ist.
- Wenn das Zugriffstoken ungültig ist, gib den Fehler „HTTP 401 Unauthorized“ mit dem Antwortheader
WWW-Authenticatezurück. Hier ist ein Beispiel für eine Userinfo-Fehlerantwort:HTTP/1.1 401 Unauthorized WWW-Authenticate: error="invalid_token", error_description="The Access Token expired"
Wenn das Zugriffstoken gültig ist, geben Sie eine HTTP 200-Antwort mit dem folgenden JSON-Objekt im Text des HTTPS-Objekts zurück. Antwort:
{ "sub": "USER_UUID", "email": "EMAIL_ADDRESS", "given_name": "FIRST_NAME", "family_name": "LAST_NAME", "name": "FULL_NAME", "picture": "PROFILE_PICTURE", }Userinfo-Endpunktantwort subEine eindeutige ID, die den Nutzer in Ihrem System identifiziert. emailE-Mail-Adresse des Nutzers given_nameOptional:Vorname des Nutzers. family_nameOptional:Nachname des Nutzers. nameOptional:Vollständiger Name des Nutzers. pictureOptional:Profilbild des Nutzers.