
يجب أن يتضمّن كل تكامل Cloud-to-cloud آلية لمصادقة المستخدمين.
تسمح لك المصادقة بربط حسابات Google الخاصة بالمستخدمين بحسابات المستخدمين في نظام المصادقة. يتيح لك ذلك تحديد المستخدمين عندما يتلقّى نظام تنفيذ الطلبات غرضًا متعلقًا بالمنزل المزوّد بأجهزة ذكية. لا يتيح نظام المنزل الذكي من Google سوى OAuth مع مسار رمز التفويض.
تصف هذه الصفحة كيفية إعداد خادم OAuth 2.0 لكي يعمل مع التكامل Cloud-to-cloud الخاص بك.
ربط حساب Google باستخدام OAuth
في مسار رمز التفويض، تحتاج إلى نقطتَي نهاية:
نقطة نهاية التفويض التي تعرض واجهة مستخدم تسجيل الدخول للمستخدمين الذين لم يسجّلوا الدخول بعد تنشئ نقطة نهاية التفويض أيضًا رمز تفويض قصير الأمد لتسجيل موافقة المستخدمين على الوصول المطلوب.
نقطة نهاية تبادل الرموز المميزة، وهي مسؤولة عن نوعَين من عمليات التبادل:
- يستبدل رمز التفويض برمز مميز طويل الأمد لإعادة التحميل ورمز دخول قصير الأمد. تحدث عملية التبادل هذه عندما يمرّ المستخدم بمسار ربط الحساب.
- يستبدل الرمز المميز لإعادة التحميل طويل الأمد برمز دخول قصير الأمد. تحدث عملية التبادل هذه عندما تحتاج Google إلى رمز دخول مميز جديد لأنّ الرمز الذي كان لديها قد انتهت صلاحيته.
إرشادات التصميم
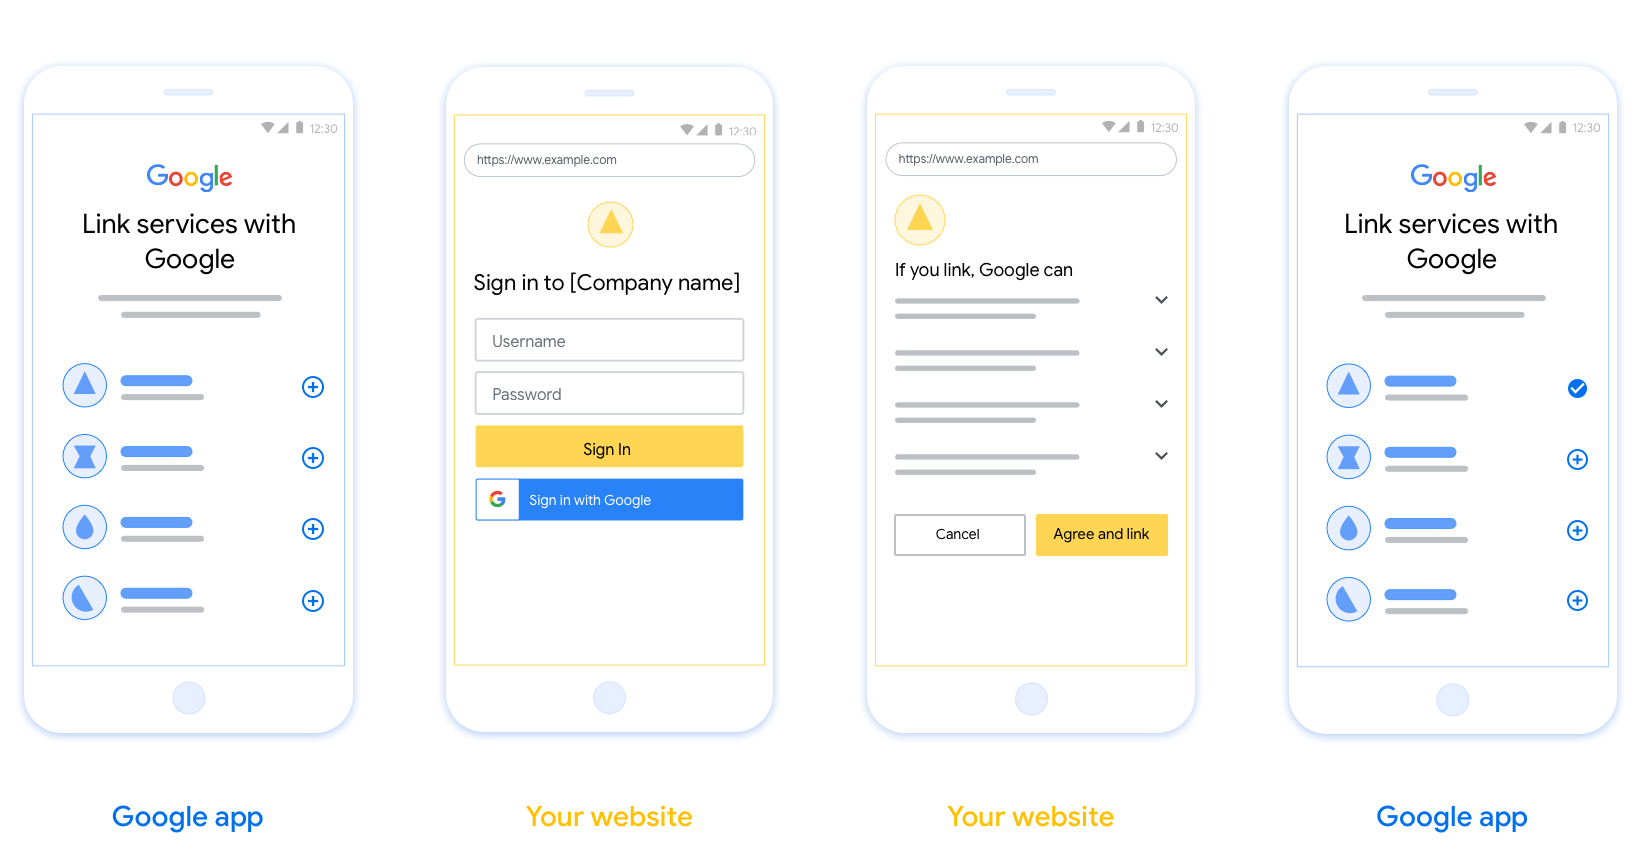
يوضّح هذا القسم متطلبات التصميم واقتراحات بشأن شاشة المستخدم التي تستضيفها لعمليات ربط حسابات OAuth. بعد أن يطلب تطبيق Google ذلك، تعرض منصتك للمستخدم صفحة تسجيل الدخول إلى Google وشاشة الموافقة على ربط الحساب. يتم توجيه المستخدم مرة أخرى إلى تطبيق Google بعد منح موافقته على ربط الحسابات.
المتطلبات
- يجب توضيح أنّه سيتم ربط حساب المستخدم بحساب على Google، وليس بمنتج معيّن من منتجات Google، مثل Google Home أو "مساعد Google".
- يجب أن يتضمّن التطبيق بيان تفويض من Google، مثل "من خلال تسجيل الدخول، أنت تمنح Google الإذن بالتحكّم في أجهزتك". يُرجى الاطّلاع على قسم تفويض التحكّم في أجهزة Google ضمن سياسات المطوّرين في Google Home.
- يجب فتح صفحة ربط Web OAuth والتأكّد من توفّر طريقة واضحة للمستخدمين لتسجيل الدخول إلى حساب Google، مثل حقول اسم المستخدم وكلمة المرور. لا تستخدِم طريقة "تسجيل الدخول باستخدام حساب Google" (GSI) التي تتيح للمستخدمين الربط بدون الانتقال إلى صفحة ربط حسابات OAuth على الويب. ويشكّل ذلك انتهاكًا لسياسة Google.
- يجب تضمين عنصر واحد على الأقل من العناصر التالية في صفحة ربط حساب OAuth للإشارة إلى عملية الدمج التي يربط المستخدم حسابه بها:
- شعار الشركة
- اسم الشركة
- اسم عملية الدمج
- رمز التطبيق
الاقتراحات
ننصحك باتّخاذ الإجراءات التالية:
عرض سياسة خصوصية Google تضمين رابط يؤدي إلى سياسة خصوصية Google في شاشة طلب الموافقة
البيانات التي ستتم مشاركتها استخدِم لغة واضحة وموجزة لإخبار المستخدمين بالبيانات التي تطلبها Google منهم والغرض من ذلك، وببيانات الاستخدام أو التفاعل التي قد تشاركها Google معك.
عبارة واضحة تحثّ على اتّخاذ إجراء: يجب تضمين عبارة واضحة تحثّ على اتّخاذ إجراء في شاشة الموافقة، مثل "الموافقة والربط"، لأنّ المستخدمين بحاجة إلى فهم البيانات التي يُطلب منهم مشاركتها مع Google لربط حساباتهم.
إمكانية الإلغاء: توفير طريقة للمستخدمين للرجوع أو الإلغاء إذا اختاروا عدم الربط
عملية تسجيل دخول واضحة: تأكَّد من توفير طريقة واضحة للمستخدمين لتسجيل الدخول إلى حساباتهم على Google، مثل حقول اسم المستخدم وكلمة المرور أو تسجيل الدخول باستخدام حساب Google.
إمكانية إلغاء الربط: توفير آلية للمستخدمين لإلغاء الربط، مثل عنوان URL يؤدي إلى إعدادات حساباتهم على منصتك بدلاً من ذلك، يمكنك تضمين رابط يؤدي إلى حساب Google حيث يمكن للمستخدمين إدارة حساباتهم المرتبطة. إذا ألغى المستخدم ربط حسابه بعملية الدمج، استخدِم
agentUsers.deleteلإبلاغ Google بالتغيير.إمكانية تغيير حساب المستخدم اقترِح طريقة تتيح للمستخدمين التبديل بين حساباتهم. ويكون ذلك مفيدًا بشكل خاص إذا كان المستخدمون يميلون إلى امتلاك حسابات متعدّدة.
- إذا كان على المستخدم إغلاق شاشة طلب الموافقة للتبديل بين الحسابات، أرسِل خطأ قابلاً للاسترداد إلى Google ليتمكّن المستخدم من تسجيل الدخول إلى الحساب المطلوب باستخدام ربط الحسابات عبر OAuth.
تضمين شعارك: عرض شعار شركتك على شاشة طلب الموافقة استخدِم إرشادات الأسلوب لتحديد موضع شعارك. إذا كنت تريد عرض شعار Google أيضًا، يُرجى الاطّلاع على الشعارات والعلامات التجارية.

مسار رمز التفويض
يتألف تنفيذ خادم OAuth 2.0 لمسار رمز التفويض من نقطتَي نهاية، يتيحهما خادمك من خلال بروتوكول HTTPS. نقطة النهاية الأولى هي نقطة نهاية التفويض، وهي مسؤولة عن العثور على موافقة المستخدمين على الوصول إلى البيانات أو الحصول عليها. تعرض نقطة نهاية التفويض واجهة مستخدم لتسجيل الدخول للمستخدمين الذين لم يسبق لهم تسجيل الدخول، وتسجّل الموافقة على الوصول المطلوب. نقطة النهاية الثانية هي نقطة نهاية تبادل الرموز المميّزة، وتُستخدَم للحصول على سلاسل مشفّرة، تُعرف باسم الرموز المميّزة، التي تمنح المستخدم إذن الوصول إلى خدمتك.
عندما يحتاج أحد تطبيقات Google إلى طلب إحدى واجهات برمجة التطبيقات في خدمتك، تستخدِم Google نقطتَي النهاية هاتَين معًا للحصول على إذن من المستخدمين لطلب واجهات برمجة التطبيقات هذه نيابةً عنهم.
تتّبع جلسة مسار رمز تفويض OAuth 2.0 التي بدأتها Google المسار التالي:
- تفتح Google نقطة نهاية التفويض في متصفّح المستخدم. إذا بدأ المسار على جهاز صوتي فقط لإجراء، تنقل Google التنفيذ إلى هاتف.
- يسجّل المستخدم الدخول، إذا لم يكن قد سجّله من قبل، ويمنح Google إذن الوصول إلى بياناته باستخدام واجهة برمجة التطبيقات، إذا لم يكن قد منح الإذن من قبل.
- تنشئ خدمتك رمز تفويض وتعرضه على Google. لإجراء ذلك، أعِد توجيه متصفّح المستخدم إلى Google مع إرفاق رمز التفويض بالطلب.
- ترسل Google رمز التفويض إلى نقطة نهاية تبادل الرموز المميّزة، التي تتحقّق من صحة الرمز وتعرض رمز دخول والرمز المميز لإعادة التحميل. رمز الدخول هو رمز قصير الأجل تقبله خدمتك كبيانات اعتماد للوصول إلى واجهات برمجة التطبيقات. الرمز المميز لإعادة التحميل هو رمز طويل الأجل يمكن لـ Google تخزينه واستخدامه للحصول على رموز دخول جديدة عند انتهاء صلاحيتها.
- بعد أن يكمل المستخدم مسار ربط الحساب، يحتوي كل طلب لاحق يتم إرساله من Google على رمز دخول.
التعامل مع طلبات التفويض
عندما تحتاج إلى إجراء ربط الحساب باستخدام مسار رمز تفويض OAuth 2.0، ترسل Google المستخدم إلى نقطة نهاية التفويض مع طلب يتضمّن المَعلمات التالية:
| مَعلمات نقطة نهاية التفويض | |
|---|---|
client_id |
معرّف العميل الذي خصّصته لـ Google. |
redirect_uri |
عنوان URL الذي ترسل إليه الردّ على هذا الطلب. |
state |
قيمة تنظيمية يتم إرجاعها إلى Google بدون تغيير في الـ URI لإعادة التوجيه. |
scope |
اختياري: مجموعة من سلاسل النطاق مفصولة بمسافات تحدّد البيانات التي تطلب Google إذن الوصول إليها. |
response_type |
نوع القيمة التي سيتم عرضها في الردّ. بالنسبة إلى مسار رمز تفويض OAuth 2.0
يكون نوع الردّ دائمًا code.
|
على سبيل المثال، إذا كانت نقطة نهاية التفويض متاحة على https://myservice.example.com/auth، قد يبدو الطلب على النحو التالي:
GET https://myservice.example.com/auth?client_id=GOOGLE_CLIENT_ID&redirect_uri=REDIRECT_URI&state=STATE_STRING&scope=REQUESTED_SCOPES&response_type=code
لكي تتمكّن نقطة نهاية التفويض من التعامل مع طلبات تسجيل الدخول، اتّبِع الخطوات التالية:
- تأكَّد من أنّ
client_idيطابق معرّف العميل الذي خصّصته لـ Google، وأنّredirect_uriيطابق عنوان URL لإعادة التوجيه الذي قدّمته Google لخدمتك. من المهم إجراء عمليات التحقّق هذه لمنع منح إذن الوصول إلى تطبيقات العميل غير المقصودة أو التي تم إعدادها بشكل غير صحيح. إذا كنت تتيح مسارات OAuth 2.0 متعددة ، تأكَّد أيضًا من أنّresponse_typeهوcode. - تحقَّق مما إذا كان المستخدم قد سجّل الدخول إلى خدمتك. إذا لم يكن المستخدم قد سجّل الدخول، أكمل مسار تسجيل الدخول أو الاشتراك في خدمتك.
- أنشئ رمز تفويض لتستخدمه Google للوصول إلى واجهة برمجة التطبيقات. يمكن أن يكون رمز التفويض أي قيمة سلسلة، ولكن يجب أن يمثّل المستخدم والعميل الذي تم إنشاء الرمز المميّز له ووقت انتهاء صلاحية الرمز بشكل فريد، ويجب ألا يكون من السهل تخمينه. عادةً ما تصدر رموز تفويض تنتهي صلاحيتها بعد 10 دقائق تقريبًا.
- تأكَّد من أنّ عنوان URL الذي تحدّده المَعلمة
redirect_uriيتّخذ الشكل التالي:https://oauth-redirect.googleusercontent.com/r/YOUR_PROJECT_ID https://oauth-redirect-sandbox.googleusercontent.com/r/YOUR_PROJECT_ID
- أعِد توجيه متصفّح المستخدم إلى عنوان URL الذي تحدّده المَعلمة
redirect_uri. أدرِج رمز التفويض الذي أنشأته للتو وقيمة الحالة الأصلية غير المعدَّلة عند إعادة التوجيه من خلال إلحاق المَعلمتَينcodeوstate. في ما يلي مثال على عنوان URL الناتج:https://oauth-redirect.googleusercontent.com/r/YOUR_PROJECT_ID?code=AUTHORIZATION_CODE&state=STATE_STRING
التعامل مع طلبات تبادل الرموز المميّزة
نقطة نهاية تبادل الرموز المميّزة في خدمتك مسؤولة عن نوعَين من عمليات تبادل الرموز المميّزة:
- تبادل رموز التفويض برموز الدخول ورموز إعادة التحميل
- تبادل رموز إعادة التحميل برموز الدخول
تتضمّن طلبات تبادل الرموز المميّزة المَعلمات التالية:
| مَعلمات نقطة نهاية تبادل الرموز المميّزة | |
|---|---|
client_id |
سلسلة تحدّد مصدر الطلب على أنّه Google. يجب تسجيل هذه السلسلة ضمن نظامك كمعرّف فريد لـ Google. |
client_secret |
سلسلة سرية سجّلتها لدى Google لخدمتك. |
grant_type |
نوع الرمز المميّز الذي يتم تبادله. يمكن أن يكون
authorization_code أو refresh_token. |
code |
عندما تكون grant_type=authorization_code، تكون هذه المَعلمة هي
الرمز الذي تلقّته Google من نقطة نهاية تسجيل الدخول أو نقطة نهاية تبادل الرموز المميّزة. |
redirect_uri |
عندما تكون grant_type=authorization_code، تكون هذه المَعلمة هي
عنوان URL المستخدَم في طلب التفويض الأولي. |
refresh_token |
عندما تكون grant_type=refresh_token، تكون هذه المَعلمة هي الرمز المميز لإعادة التحميل الذي تلقّته Google من نقطة نهاية تبادل الرموز المميّزة. |
ضبط كيفية إرسال Google بيانات الاعتماد إلى الخادم
استنادًا إلى تنفيذ خادم التفويض، يتوقّع الخادم تلقّي بيانات اعتماد العميل إما في نص الطلب أو في عنوان الطلب.
ترسل Google بيانات الاعتماد في نص الطلب تلقائيًا. إذا كان خادم التفويض يتطلب أن تكون بيانات اعتماد العميل في عنوان الطلب، عليك ضبط عملية التكامل من السحابة الإلكترونية إلى السحابة الإلكترونية وفقًا لذلك:Cloud-to-cloud
من قائمة المشاريع، انقر على فتح بجانب المشروع الذي تريد استخدامه.
ضمن من السحابة الإلكترونية إلى السحابة الإلكترونية ، انقر على تطوير.
انقر على فتح بجانب عملية التكامل.
مرِّر للأسفل إلى قسم الأذونات (اختياري) وضَع علامة في مربّع الاختيار Have Google transmit Client ID and secret via HTTP basic auth header (اطلب من Google إرسال معرّف العميل والرمز السري من خلال عنوان المصادقة الأساسية لبروتوكول HTTP).
انقر على حفظ لحفظ التغييرات.
تبادل رموز التفويض برموز الدخول ورموز إعادة التحميل
بعد أن يسجّل المستخدم الدخول وتعرض نقطة نهاية التفويض رمز تفويض قصير الأجل على Google، ترسل Google طلبًا إلى نقطة نهاية تبادل الرموز المميّزة لتبادل رمز التفويض برمز دخول ورمز إعادة تحميل.
بالنسبة إلى هذه الطلبات، تكون قيمة grant_type هي authorization_code، و
قيمة code هي قيمة رمز التفويض الذي منحته سابقًا
لـ Google. في ما يلي مثال على طلب تبادل رمز تفويض برمز دخول والرمز المميز لإعادة التحميل:
POST /token HTTP/1.1
Host: oauth2.example.com
Content-Type: application/x-www-form-urlencoded

client_id=GOOGLE_CLIENT_ID&client_secret=GOOGLE_CLIENT_SECRET&grant_type=authorization_code&code=AUTHORIZATION_CODE&redirect_uri=REDIRECT_URI
لتبادل رموز التفويض برمز دخول ورمز مميز لإعادة التحميل، تستجيب نقطة نهاية تبادل الرموز المميّزة لطلبات POST من خلال تنفيذ الخطوات التالية:
- تأكَّد من أنّ
client_idيحدّد مصدر الطلب على أنّه مصدر مأذون، وأنّclient_secretيطابق القيمة المتوقّعة. - تأكَّد من أنّ رمز التفويض صالح ولم تنتهِ صلاحيته، وأنّ معرّف العميل المحدّد في الطلب يطابق معرّف العميل المرتبط برمز التفويض.
- تأكَّد من أنّ عنوان URL الذي تحدّده المَعلمة
redirect_uriمطابق للقيمة المستخدَمة في طلب التفويض الأولي. - إذا تعذّر عليك التحقّق من جميع المعايير أعلاه، أعرض خطأ HTTP
400 Bad Request مع
{"error": "invalid_grant"}كنص أساسي. - بخلاف ذلك، استخدِم رقم تعريف المستخدم من رمز التفويض لإنشاء رمز إعادة تحميل ورمز دخول. يمكن أن تكون هذه الرموز المميّزة أي قيمة سلسلة، ولكنها يجب أن تمثّل المستخدم والعميل الذي تم إنشاء الرمز المميّز له بشكل فريد، ويجب ألا يكون من السهل تخمينها. بالنسبة إلى رموز الدخول، سجِّل أيضًا وقت انتهاء صلاحية الرمز، والذي يكون عادةً بعد ساعة من إصدار الرمز. لا تنتهي صلاحية رموز إعادة التحميل.
- أعرض عنصر JSON التالي في نص استجابة HTTPS:
{
"token_type": "Bearer",
"access_token": "ACCESS_TOKEN",
"refresh_token": "REFRESH_TOKEN",
"expires_in": SECONDS_TO_EXPIRATION
}
تخزّن Google رمز الدخول والرمز المميز لإعادة التحميل للمستخدم وتسجّل انتهاء صلاحية رمز الدخول. عند انتهاء صلاحية رمز الدخول، تستخدِم Google الرمز المميز لإعادة التحميل للحصول على رمز دخول جديد من نقطة نهاية تبادل الرموز المميّزة.
تبادل رموز إعادة التحميل برموز الدخول
عند انتهاء صلاحية رمز الدخول، ترسل Google طلبًا إلى نقطة نهاية تبادل الرموز المميّزة لتبادل الرمز المميز لإعادة التحميل برمز دخول جديد.
بالنسبة إلى هذه الطلبات، تكون قيمة grant_type هي refresh_token، وقيمة refresh_token هي قيمة الرمز المميز لإعادة التحميل الذي منحته سابقًا لـ Google. في ما يلي مثال على طلب تبادل الرمز المميز لإعادة التحميل برمز دخول:
POST /token HTTP/1.1
Host: oauth2.example.com
Content-Type: application/x-www-form-urlencoded

client_id=GOOGLE_CLIENT_ID&client_secret=GOOGLE_CLIENT_SECRET&grant_type=refresh_token&refresh_token=REFRESH_TOKEN
لتبادل الرمز المميز لإعادة التحميل برمز دخول، تستجيب نقطة نهاية تبادل الرموز المميّزة لطلبات POST من خلال تنفيذ الخطوات التالية:
- تأكَّد من أنّ
client_idيحدّد مصدر الطلب على أنّه Google، وأنّclient_secretيطابق القيمة المتوقّعة. - تحقَّق من أنّ الرمز المميز لإعادة التحميل صالح، وأنّ معرّف العميل المحدّد في الطلب يطابق معرّف العميل المرتبط بالرمز المميز لإعادة التحميل.
- إذا تعذّر عليك التحقّق من جميع المعايير أعلاه، أعرض خطأ HTTP 400
Bad Request مع
{"error": "invalid_grant"}كنص أساسي. - بخلاف ذلك، استخدِم رقم تعريف المستخدم من الرمز المميز لإعادة التحميل لإنشاء رمز دخول. يمكن أن تكون هذه الرموز المميّزة أي قيمة سلسلة، ولكن يجب أن تمثّل المستخدم والعميل الذي تم إنشاء الرمز المميّز له بشكل فريد ، ويجب ألا يكون من السهل تخمينها. بالنسبة إلى رموز الدخول، سجِّل أيضًا وقت انتهاء صلاحية الرمز، والذي يكون عادةً بعد ساعة من إصدار الرمز.
- أعرض عنصر JSON التالي في نص استجابة HTTPS:
{
"token_type": "Bearer",
"access_token": "ACCESS_TOKEN",
"expires_in": SECONDS_TO_EXPIRATION
}
التعامل مع طلبات معلومات المستخدم
نقطة نهاية userinfo هي مورد OAuth 2.0 محمي يعرض مطالبات بشأن المستخدم المرتبط. يُعد تنفيذ نقطة نهاية userinfo واستضافتها اختياريًا، باستثناء حالات الاستخدام التالية:
- تسجيل الدخول إلى حساب مرتبط باستخدام Google One Tap.
- اشتراك سلس على AndroidTV.
بعد استرداد رمز الدخول بنجاح من نقطة نهاية الرمز المميّز، ترسل Google طلبًا إلى نقطة نهاية معلومات المستخدم لاسترداد معلومات الملف الشخصي الأساسية عن المستخدم المرتبط.
| عناوين طلبات نقطة نهاية userinfo | |
|---|---|
Authorization header |
رمز الدخول من النوع "الحامل". |
على سبيل المثال، إذا كانت نقطة نهاية userinfo متاحة على
https://myservice.example.com/userinfo، قد يظهر الطلب على النحو التالي:
GET /userinfo HTTP/1.1
Host: myservice.example.com
Authorization: Bearer ACCESS_TOKEN
لتتمكّن نقطة نهاية معلومات المستخدم من معالجة الطلبات، عليك اتّباع الخطوات التالية:
- يمكنك استخراج رمز الدخول من عنوان التفويض ومعلومات الإرجاع للمستخدم المرتبط برمز الدخول.
- إذا كان رمز الدخول غير صالح، يمكنك عرض الخطأ HTTP 401 "غير مصرح به" مع استخدام عنوان الاستجابة
WWW-Authenticate. في ما يلي مثال على استجابة خطأ في معلومات المستخدم:HTTP/1.1 401 Unauthorized WWW-Authenticate: error="invalid_token", error_description="The Access Token expired"
إذا كان رمز الدخول صالحًا، يتم عرض الاستجابة HTTP 200 مع كائن JSON التالي في نص HTTPS. الرد:
{ "sub": "USER_UUID", "email": "EMAIL_ADDRESS", "given_name": "FIRST_NAME", "family_name": "LAST_NAME", "name": "FULL_NAME", "picture": "PROFILE_PICTURE", }استجابة نقطة نهاية لمعلومات المستخدم subمعرّف فريد يعرّف المستخدِم في نظامك. emailعنوان البريد الإلكتروني للمستخدم. given_nameاختياري: الاسم الأول للمستخدم. family_nameاختياري: اسم العائلة للمستخدم. nameاختياري: اسم المستخدم الكامل. pictureاختياري: صورة الملف الشخصي للمستخدم.