App Flip for Android

Once you have an OAuth 2.0 implementation, you can optionally configure OAuth-based App Flip, which allows your Android users to more quickly link their accounts in your authentication system to their Google accounts. The following sections describe how to design and implement App Flip for your smart home Action.

Design guidelines

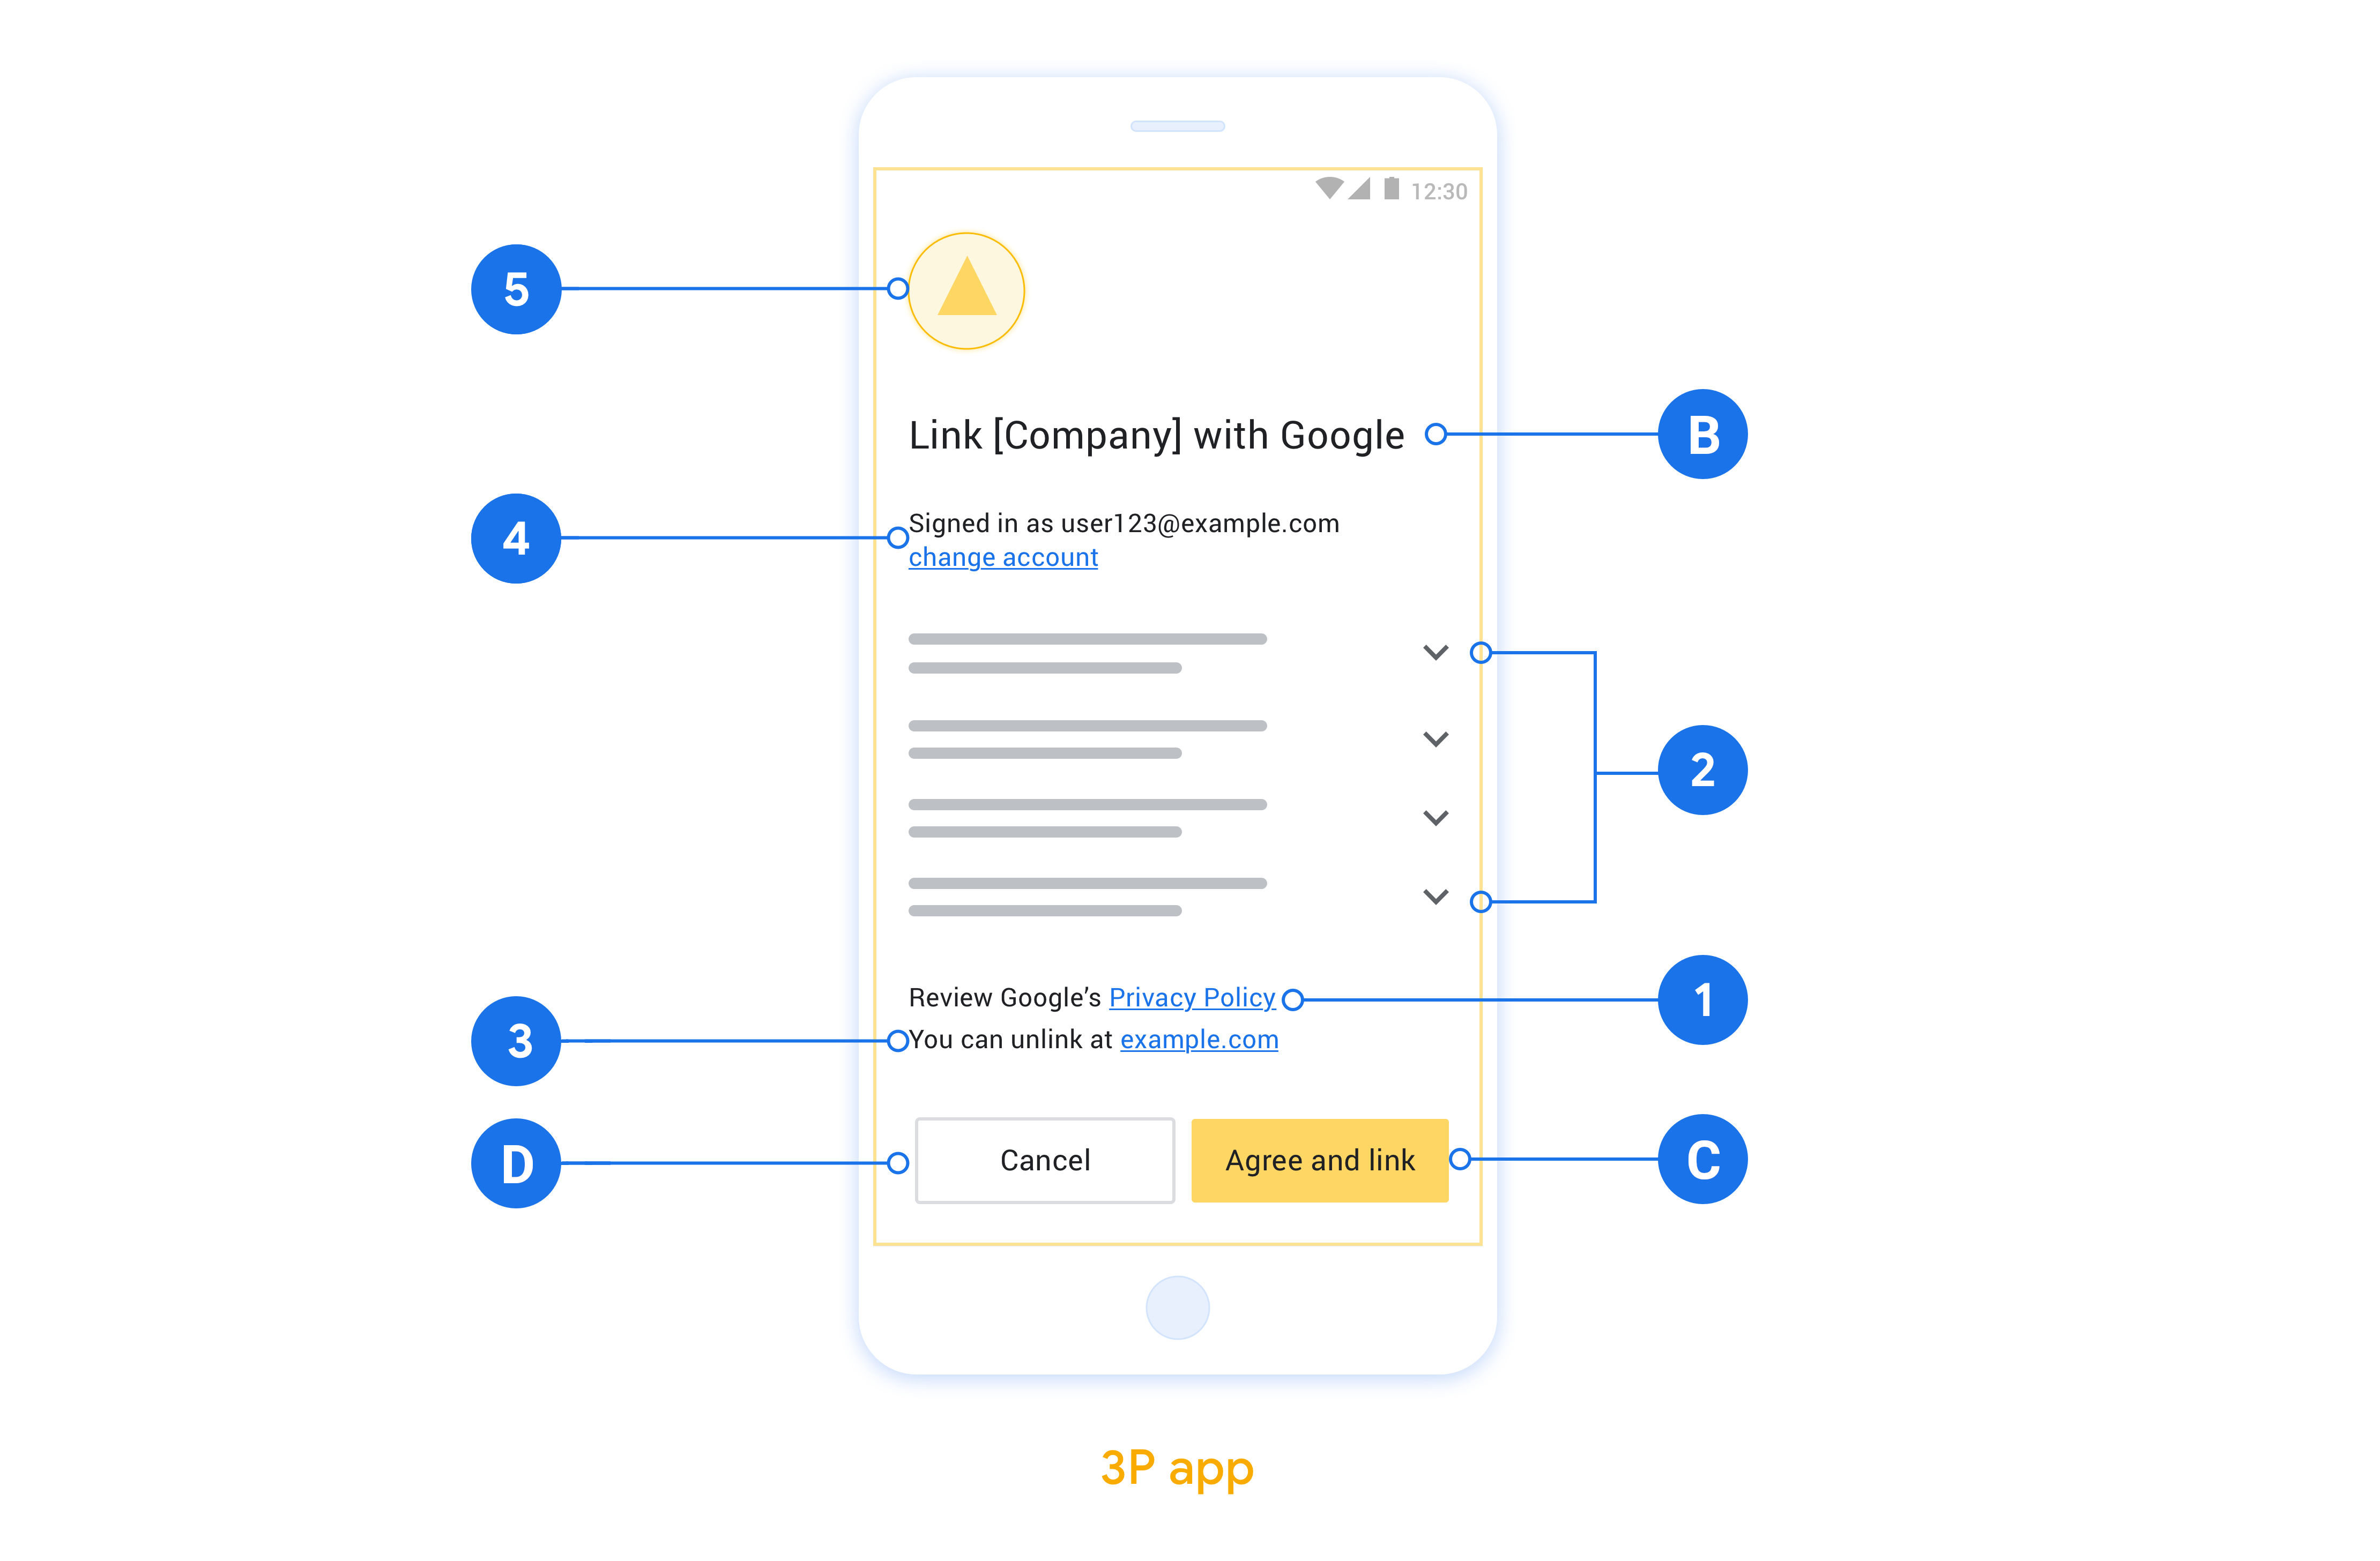
This section describes the design requirements and recommendations for the App Flip account linking consent screen. After Google calls your app, your app displays the consent screen to the user.

Requirements

  1. You must communicate that the user's account is being linked to Google, not to a specific Google product, such as Google Home or Google Assistant.

Recommendations

We recommend that you do the following:

  1. Display Google's Privacy Policy. Include a link to Google's Privacy Policy on the consent screen.

  2. Data to be shared. Use clear and concise language to tell the user what data of theirs Google requires and why.

  3. Clear call-to-action. State a clear call-to-action on your consent screen, such as "Agree and link." This is because users need to understand what data they're required to share with Google to link their accounts.

  4. Ability to cancel. Provide a way for users to go back or cancel, if they choose not to link.

  5. Ability to unlink. Offer a mechanism for users to unlink, such as a URL to their account settings on your platform. Alternatively, you can include a link to Google Account where users can manage their linked account.

  6. Ability to change user account. Suggest a method for users to switch their account(s). This is especially beneficial if users tend to have multiple accounts.

    • If a user must close the consent screen to switch accounts, send a recoverable error to Google so the user can sign in to the desired account with OAuth linking and the implicit flow.
  7. Include your logo. Display your company logo on the consent screen. Use your style guidelines to place your logo. If you wish to also display Google's logo, see Logos and trademarks.

This figure shows an example consent screen with call-outs to the
            individual requirements and recommendations to be followed when
            you design a user consent screen.
Figure 1: Account linking consent screen design guidelines.

Set up for OAuth-based App Flip

The following sections describe the prerequisites for OAuth-based App Flip and how to configure your App Flip project in the Actions console.

Create a smart home Action and set up an OAuth 2.0 server

Before you can configure App Flip, you need to do the following:

Configure App Flip in the Actions console

The following section describes how to configure App Flip in the Actions console.

  1. Fill out all the fields under OAuth Client information. (If App Flip isn't supported, regular OAuth is used as a fallback.)
  2. Under Use your app for account linking (optional), check Enable for Android.
  3. Fill out the following fields:
    • Application ID. The Application ID is a unique ID that you set for your app.
    • App signature. Android apps must be ‘signed’ with a public-key certificate before they can be installed. For information about obtaining your app signature, see Authenticating Your Client.
    • Authorization intent. In this field, enter a string that specifies your intent action.
  4. If you want to optionally configure your client, add scopes and click Add scope under Configure your client (optional).
  5. Click Save.

Implement App Flip in your Android apps

To implement App Flip, you need to modify the user authorization code in your app to accept a deep link from Google.

OAuth-based App Flip linking (App Flip) inserts your Android app into the Google Account Linking flow. A traditional account linking flow requires the user to enter their credentials in the browser. The use of App Flip defers user sign-in to your Android app, which allows you to leverage existing authorizations. If the user is signed in to your app, they don't need to re-enter their credentials to link their account. A minimal amount of code changes are required to implement App Flip on your Android app.

In this document, you learn how to modify your Android app to support App Flip.

Try the sample

The App Flip linking sample app demonstrates an App Flip-compatible account linking integration on Android. You can use this app to verify how to respond to an incoming App Flip intent from Google mobile apps.

The sample app is preconfigured to integrate with the App Flip Test Tool for Android, which you can use to verify your Android app's integration with App Flip before you configure account linking with Google. This app simulates the intent triggered by Google mobile apps when App Flip is enabled.

How it works

The following steps are required to carry out an App Flip integration:

  1. The Google app checks if your app is installed on the device using its package name.
  2. The Google app uses a package signature check to validate that the installed app is the correct app.
  3. The Google app builds an intent to start a designated activity in your app. This intent includes additional data required for linking. It also checks to see if your app supports App Flip by resolving this intent through the Android framework.
  4. Your app validates that the request is coming from the Google app. To do so, your app checks the package signature and the provided client ID.
  5. Your app requests an authorization code from your OAuth 2.0 server. At the end of this flow, it returns either an authorization code or an error to the Google app.
  6. The Google app retrieves the result and continues with account linking. If an authorization code is provided, the token exchange happens server-to-server, the same way it does in the browser-based OAuth linking flow.

Modify your Android app to support App Flip

To support App Flip, make the following code changes to your Android app:

  1. Add an <intent-filter> to your AndroidManifest.xml file with an action string that matches the value you entered in the App Flip Intent field.

    <activity android:name="AuthActivity">
      <!-- Handle the app flip intent -->
      <intent-filter>
        <action android:name="INTENT_ACTION_FROM_CONSOLE"/>
        <category android:name="android.intent.category.DEFAULT"/>
      </intent-filter>
    </activity>
    
  2. Validate the calling app's signature.

    private fun verifyFingerprint(
            expectedPackage: String,
            expectedFingerprint: String,
            algorithm: String
    ): Boolean {
    
        callingActivity?.packageName?.let {
            if (expectedPackage == it) {
                val packageInfo =
                    packageManager.getPackageInfo(it, PackageManager.GET_SIGNATURES)
                val signatures = packageInfo.signatures
                val input = ByteArrayInputStream(signatures[0].toByteArray())
    
                val certificateFactory = CertificateFactory.getInstance("X509")
                val certificate =
                    certificateFactory.generateCertificate(input) as X509Certificate
                val md = MessageDigest.getInstance(algorithm)
                val publicKey = md.digest(certificate.encoded)
                val fingerprint = publicKey.joinToString(":") { "%02X".format(it) }
    
                return (expectedFingerprint == fingerprint)
            }
        }
        return false
    }
    
  3. Extract the client ID from the intent parameters and verify that the client ID matches the expected value.

    private const val EXPECTED_CLIENT = "<client-id-from-actions-console>"
    private const val EXPECTED_PACKAGE = "<google-app-package-name>"
    private const val EXPECTED_FINGERPRINT = "<google-app-signature>"
    private const val ALGORITHM = "SHA-256"
    ...
    
    override fun onCreate(savedInstanceState: Bundle?) {
        super.onCreate(savedInstanceState)
    
        val clientId = intent.getStringExtra("CLIENT_ID")
    
        if (clientId == EXPECTED_CLIENT &&
            verifyFingerprint(EXPECTED_PACKAGE, EXPECTED_FINGERPRINT, ALGORITHM)) {
    
            // ...authorize the user...
        }
    }
    
  4. Upon successful authorization, return the resulting authorization code back to Google.

    // Successful result
    val data = Intent().apply {
        putExtra("AUTHORIZATION_CODE", authCode)
    }
    setResult(Activity.RESULT_OK, data)
    finish()
    
  5. If an error occurred, return an error result instead.

    // Error result
    val error = Intent().apply {
        putExtra("ERROR_TYPE", 1)
        putExtra("ERROR_CODE", 1)
        putExtra("ERROR_DESCRIPTION", "Invalid Request")
    }
    setResult(-2, error)
    finish()
    

Content of the launch intent

The Android intent that launches your app includes the following fields:

  • CLIENT_ID (String): Google client_id registered under your app.
  • SCOPE (String[]): A list of scopes requested.
  • REDIRECT_URI (String): The redirect URL.

Content of the response data

The data returned to the Google app is set in your app by calling setResult(). This data includes the following:

  • AUTHORIZATION_CODE (String): The authorization code value.
  • resultCode (int): Communicates the success or failure of the process and takes one of the following values:
    • Activity.RESULT_OK: Indicates success; an authorization code is returned.
    • Activity.RESULT_CANCELLED: Signals that the user has cancelled the process. In this case, the Google app will attempt account linking using your authorization URL.
    • -2: Indicates that an error has occurred. Different types of errors are described below.
  • ERROR_TYPE (int): The type of error, which takes one of the following values:
    • 1: Recoverable error: The Google app will attempt account linking using the authorization URL.
    • 2: Unrecoverable error: The Google app aborts account linking.
    • 3: Invalid or missing request parameters.
  • ERROR_CODE (int): An integer representing the nature of the error. To see what each error code means, refer to the table of error codes.
  • ERROR_DESCRIPTION (String, optional): Human-readable status message describing the error.

A value for the AUTHORIZATION_CODE is expected when resultCode == Activity.RESULT_OK. In all other cases, the value for AUTHORIZATION_CODE needs to be empty. If resultCode == -2, then the ERROR_TYPE value is expected to be populated.

Table of error codes

The table below shows the different error codes and whether each is a recoverable or unrecoverable error:

Error code Meaning Recoverable Unrecoverable
1 INVALID_REQUEST
2 NO_INTERNET_CONNECTION
3 OFFLINE_MODE_ACTIVE
4 CONNECTION_TIMEOUT
5 INTERNAL_ERROR
6 AUTHENTICATION_SERVICE_UNAVAILABLE
8 CLIENT_VERIFICATION_FAILED
9 INVALID_CLIENT
10 INVALID_APP_ID
11 INVALID_REQUEST
12 AUTHENTICATION_SERVICE_UNKNOWN_ERROR
13 AUTHENTICATION_DENIED_BY_USER
14 CANCELLED_BY_USER
15 FAILURE_OTHER
16 USER_AUTHENTICATION_FAILED

For all error codes, you must return the error result via setResult to ensure the appropriate fallback is triggered.

Test App Flip on your device

Now that you've created an Action and configured App Flip on the console and in your app, you can test App Flip on your mobile device. You can use the Google Assistant app or the Google Home app to test App Flip.

To test App Flip from the Assistant app, follow these steps:

  1. Go to the Actions console and select your project.
  2. Click Test in the top navigation.
  3. Trigger the account linking flow from the Assistant app:
    1. Open the Google Assistant app.
    2. Click Settings.
    3. On the Assistant tab, click Home Control.
    4. Click Add(+).
    5. Select your Action from the list of providers. It will be prefixed with “[test]” in the list. When you select your [test] Action from the list, it should open your app.
    6. Verify that your app was launched and begin testing your authorization flow.

To test App Flip from the Home app, follow these steps:

  1. Go to the Actions console and select your project.
  2. Click Test in the top navigation.
  3. Trigger the account linking flow from the Home app:
    1. Open the Google Home app.
    2. Click the + button.
    3. Click Set up device.
    4. Click Have something already set up?
    5. Select your smart home Action from the list of providers. It will be prefixed with “[test]” in the list. When you select your [test] Action from the list, it should open your app.
    6. Verify that your app was launched and begin testing your authorization flow.