OAuth 2.0 구현이 완료되면 선택적으로 OAuth 기반 App Flip를 구성할 수 있습니다. 이를 통해 Android 사용자는 인증 시스템의 계정을 Google 계정에 더 빠르게 연결할 수 있습니다. 다음 섹션에서는 Cloud-to-cloud 통합을 위해 App Flip을 설계하고 구현하는 방법을 설명합니다.
디자인 가이드라인
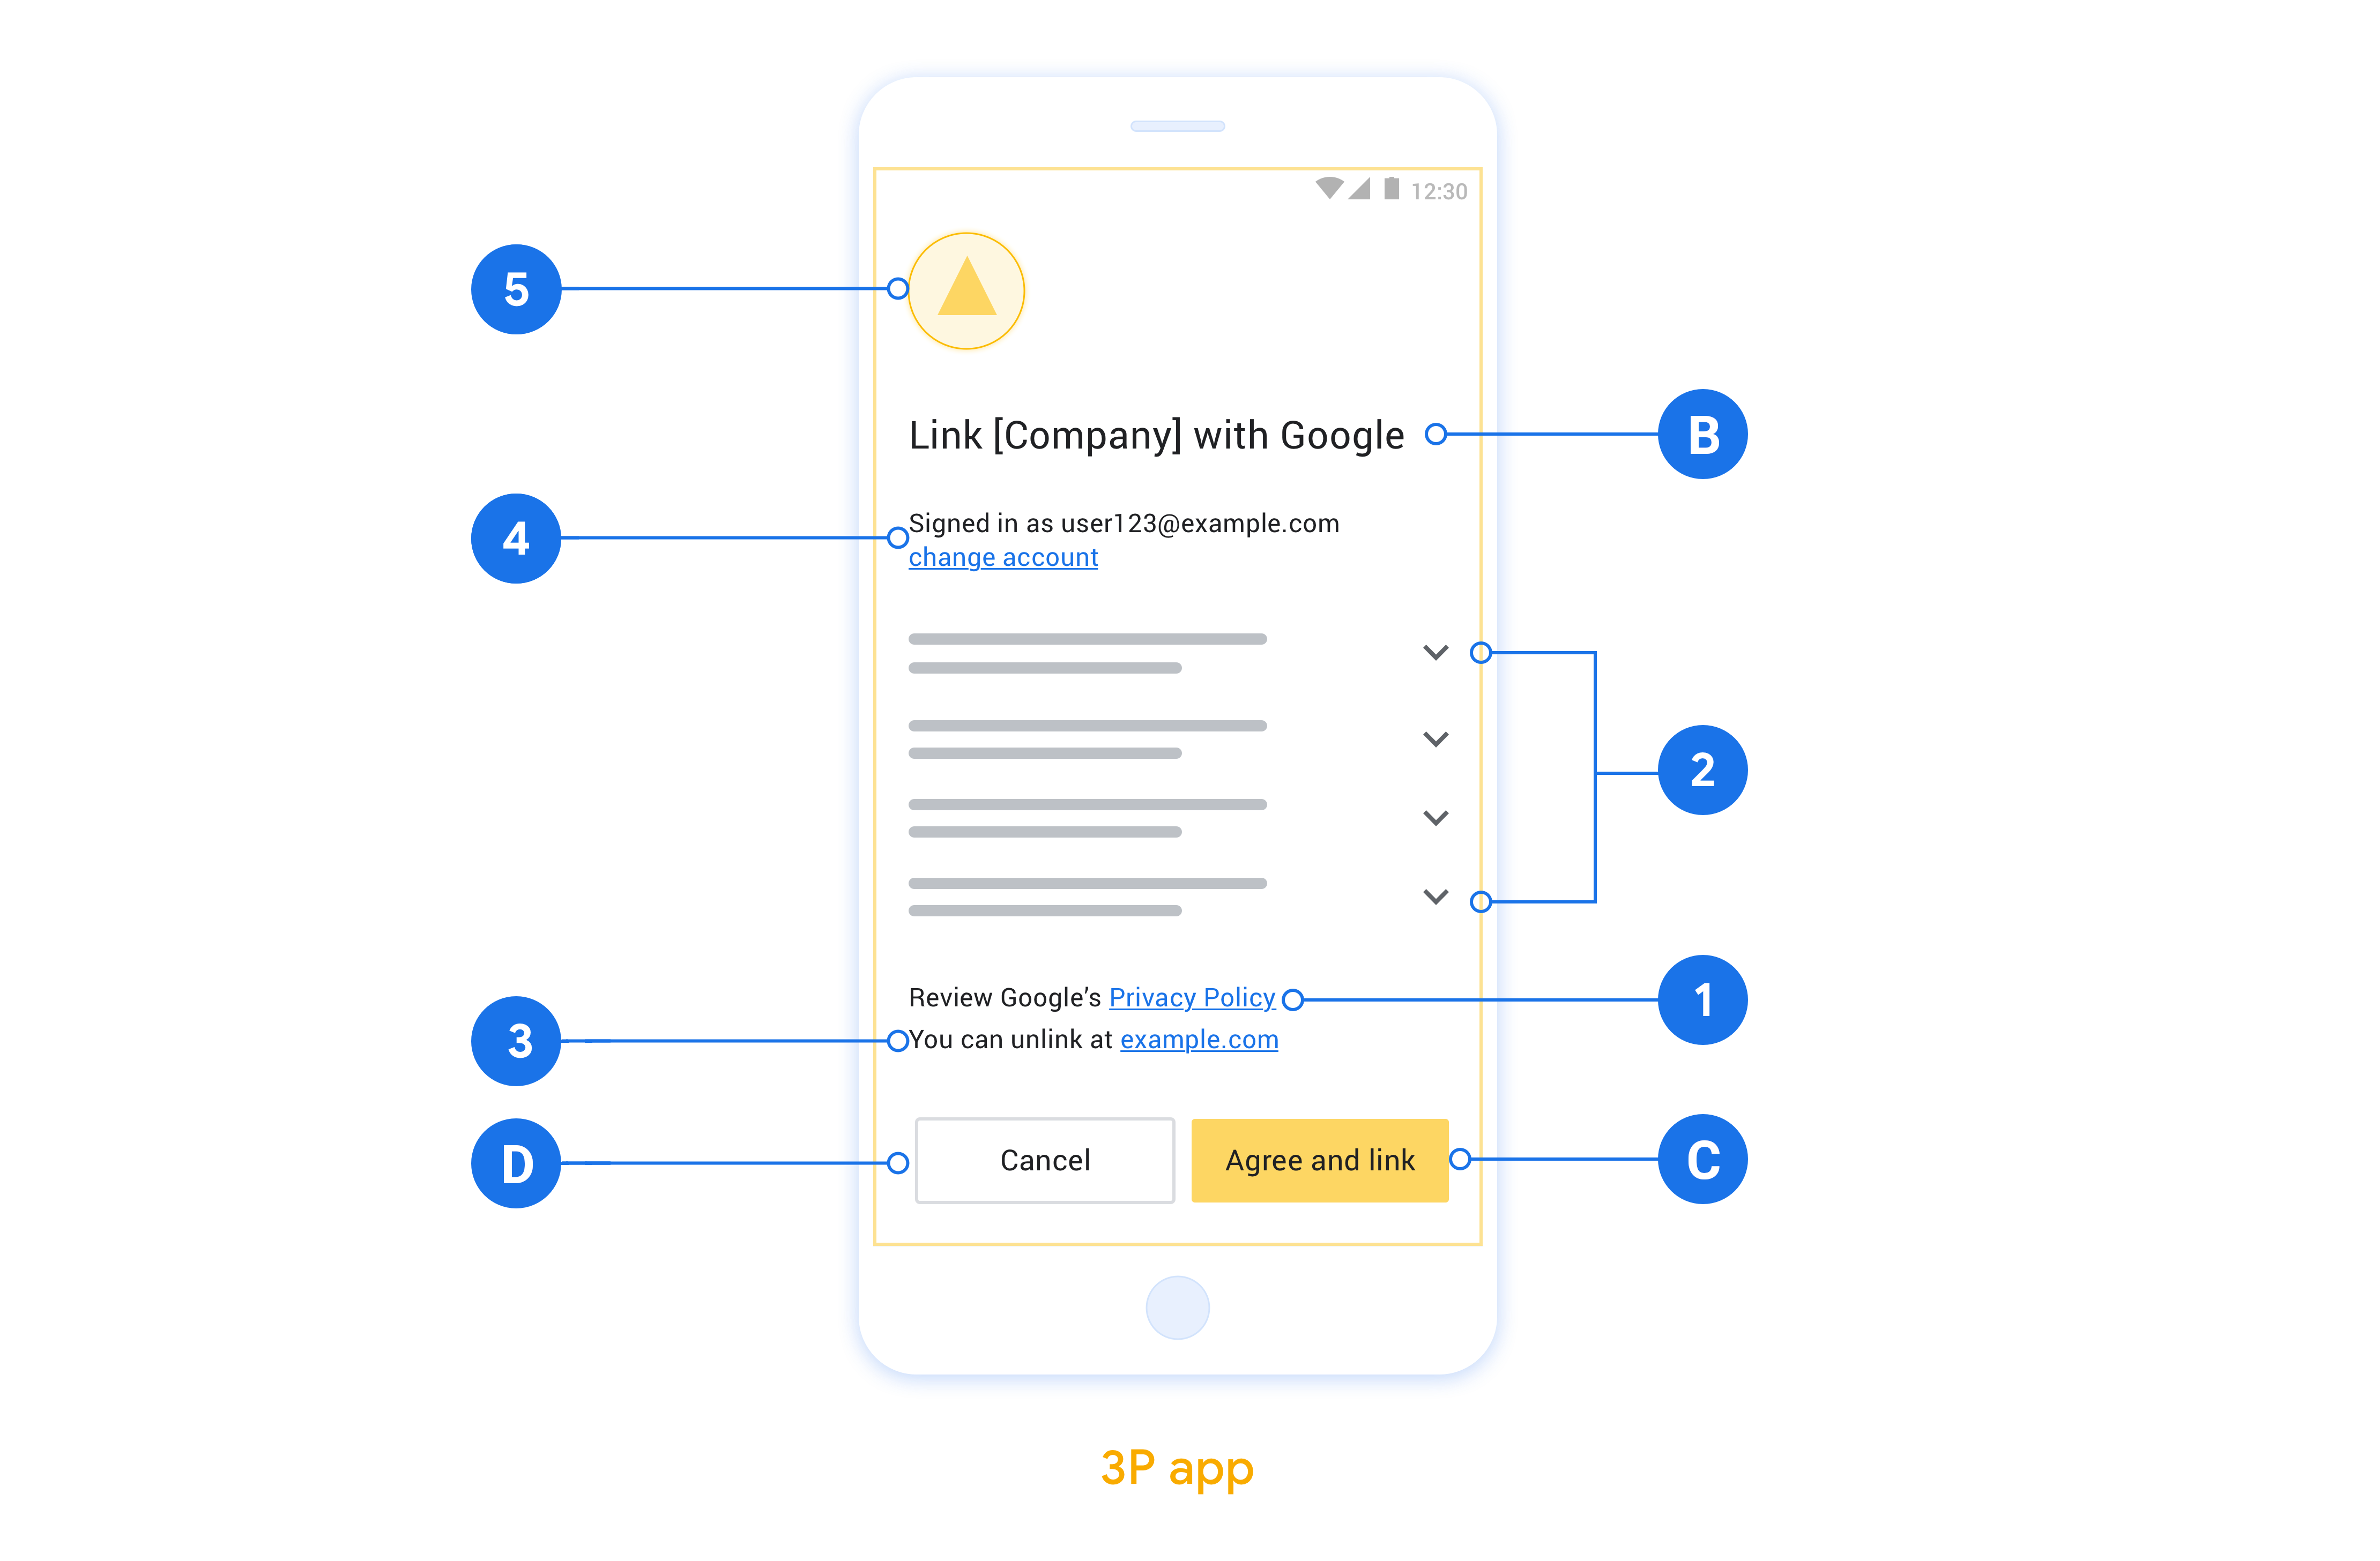
이 섹션에서는 앱 전환 계정 연결 동의 화면의 설계 요구사항과 권장사항을 설명합니다. Google이 앱을 호출하면 앱이 사용자에게 동의 화면을 표시합니다.
요구사항
- '연결되면 Google에서 기기를 제어할 수 있습니다'와 같은 Google 승인 문구가 있어야 합니다.
- 사용자의 계정이 Google Home 또는 Google 어시스턴트와 같은 특정 Google 제품이 아닌 Google에 연결된다고 알려야 합니다.
- 동의 화면에 명확한 클릭 유도 문구를 명시하고 연결 작업에는 '동의 및 연결'이라는 문구를 사용해야 합니다. 이는 사용자가 계정을 연결하기 위해 Google과 공유해야 하는 데이터를 이해해야 하기 때문입니다.
- 사용자가 연결하지 않기로 선택한 경우 뒤로 돌아가거나 취소할 수 있는 방법을 제공해야 합니다. 취소 작업에는 '취소'라는 문구를 사용합니다.
- '동의 및 연결'을 클릭한 후 연결 성공을 표시하고 사용자를 Google Home 앱으로 자동으로 리디렉션해야 합니다. 이제 사용자는 Google Home 앱에서 연결된 기기를 작업과 함께 확인할 수 있습니다. '취소'를 클릭한 후 사용자를 Google Home 앱으로 다시 리디렉션해야 합니다.
권장사항
다음을 수행하는 것이 좋습니다.
Google 개인정보처리방침을 표시합니다. 동의 화면에 Google 개인정보처리방침으로 연결되는 링크를 포함합니다.
공유할 데이터 명확하고 간결한 언어를 사용하여 Google에 필요한 사용자 데이터와 그 이유를 사용자에게 설명합니다.
연결 해제 기능. 사용자가 연결을 해제할 수 있는 메커니즘(예: 플랫폼의 계정 설정 URL)을 제공합니다. 또는 사용자가 연결된 계정을 관리할 수 있는 Google 계정 링크를 포함할 수 있습니다.
사용자 계정을 변경할 수 있습니다. 사용자가 계정을 전환할 수 있는 방법을 제안합니다. 이는 사용자가 계정을 여러 개 보유하는 경향이 있는 경우 특히 유용합니다.
- 사용자가 계정을 전환하기 위해 동의 화면을 닫아야 하는 경우 사용자가 OAuth 연결 및 암시적 흐름으로 원하는 계정에 로그인할 수 있도록 복구 가능한 오류를 Google에 전송하세요.
로고를 포함합니다. 동의 화면에 회사 로고를 표시합니다. 스타일 가이드라인에 따라 로고를 배치합니다. Google 로고도 표시하려면 로고 및 상표를 참고하세요.

OAuth 기반 App Flip 설정
다음 섹션에서는 OAuth 기반 앱 플립의 기본 요건과 Google Home 개발자 콘솔에서 앱 플립 프로젝트를 구성하는 방법을 설명합니다.
클라우드 간 통합을 만들고 OAuth 2.0 서버 설정
App Flip를 구성하려면 다음을 수행해야 합니다.
- OAuth 2.0 서버를 설정합니다. OAuth 서버 설정에 관한 자세한 내용은 OAuth 2.0 서버 구현을 참고하세요.
- 클라우드 간 통합 만들기 통합을 만들려면 클라우드 간 통합 만들기의 안내를 따르세요.
개발자 콘솔에서 앱 플립 구성
다음 섹션에서는 개발자 콘솔에서 앱 플립을 구성하는 방법을 설명합니다.
- OAuth 클라이언트 정보 아래의 모든 입력란을 작성합니다. (App Flip가 지원되지 않으면 일반 OAuth가 대체로 사용됩니다.)
- 계정 연결에 앱 사용(선택사항)에서 iOS 사용 설정을 선택합니다.
- 범용 링크 필드를 작성합니다. 범용 링크에 관한 자세한 내용은 앱과 웹사이트가 내 콘텐츠에 연결하도록 허용을 참고하세요.
- 선택적으로 클라이언트를 구성하려면 범위를 추가하고 클라이언트 구성 (선택사항)에서 범위 추가를 클릭합니다.
- 저장을 클릭합니다.
이제 다음 섹션으로 이동하여 iOS 또는 Android 앱에 App Flip를 구현할 수 있습니다.
네이티브 앱에 App Flip 구현
App Flip를 구현하려면 Google의 딥 링크를 수락하도록 앱의 사용자 승인 코드를 수정해야 합니다.
기기에서 App Flip 테스트
이제 클라우드 간 통합을 만들고 콘솔과 앱에서 앱 전환을 구성했으므로 모바일 기기에서 앱 전환을 테스트할 수 있습니다. Google Home 앱을 사용하여 앱 플립을 테스트할 수 있습니다.
Google Home 앱에서 App Flip를 테스트하려면 다음 단계를 따르세요.
- Developer Console로 이동하여 프로젝트를 선택합니다.
- 클라우드 간 > 테스트로 이동합니다.
- Home 앱에서 계정 연결 흐름을 트리거합니다.
- Google Home app (GHA)을 엽니다.
- 화면의 + 버튼을 클릭합니다.
- 기기 설정을 클릭합니다.
- 이미 설정된 기기가 있나요?를 클릭합니다.
- 공급업체 목록에서 클라우드 간 통합을 선택합니다. 목록에 '[test]'라는 접두사가 붙습니다. 목록에서 [테스트] 통합을 선택하면 앱이 열립니다.
- 앱이 실행되었는지 확인하고 승인 흐름 테스트를 시작합니다.
