OAuth 2.0을 구현하면 OAuth 기반 구성을 선택적으로 구성할 수 있습니다.App Flip , which allows your Android users to more quickly link their accounts in your authentication system to their Google accounts. The following sections describe how to design and implement App Flip for your smart home Action.
디자인 가이드라인
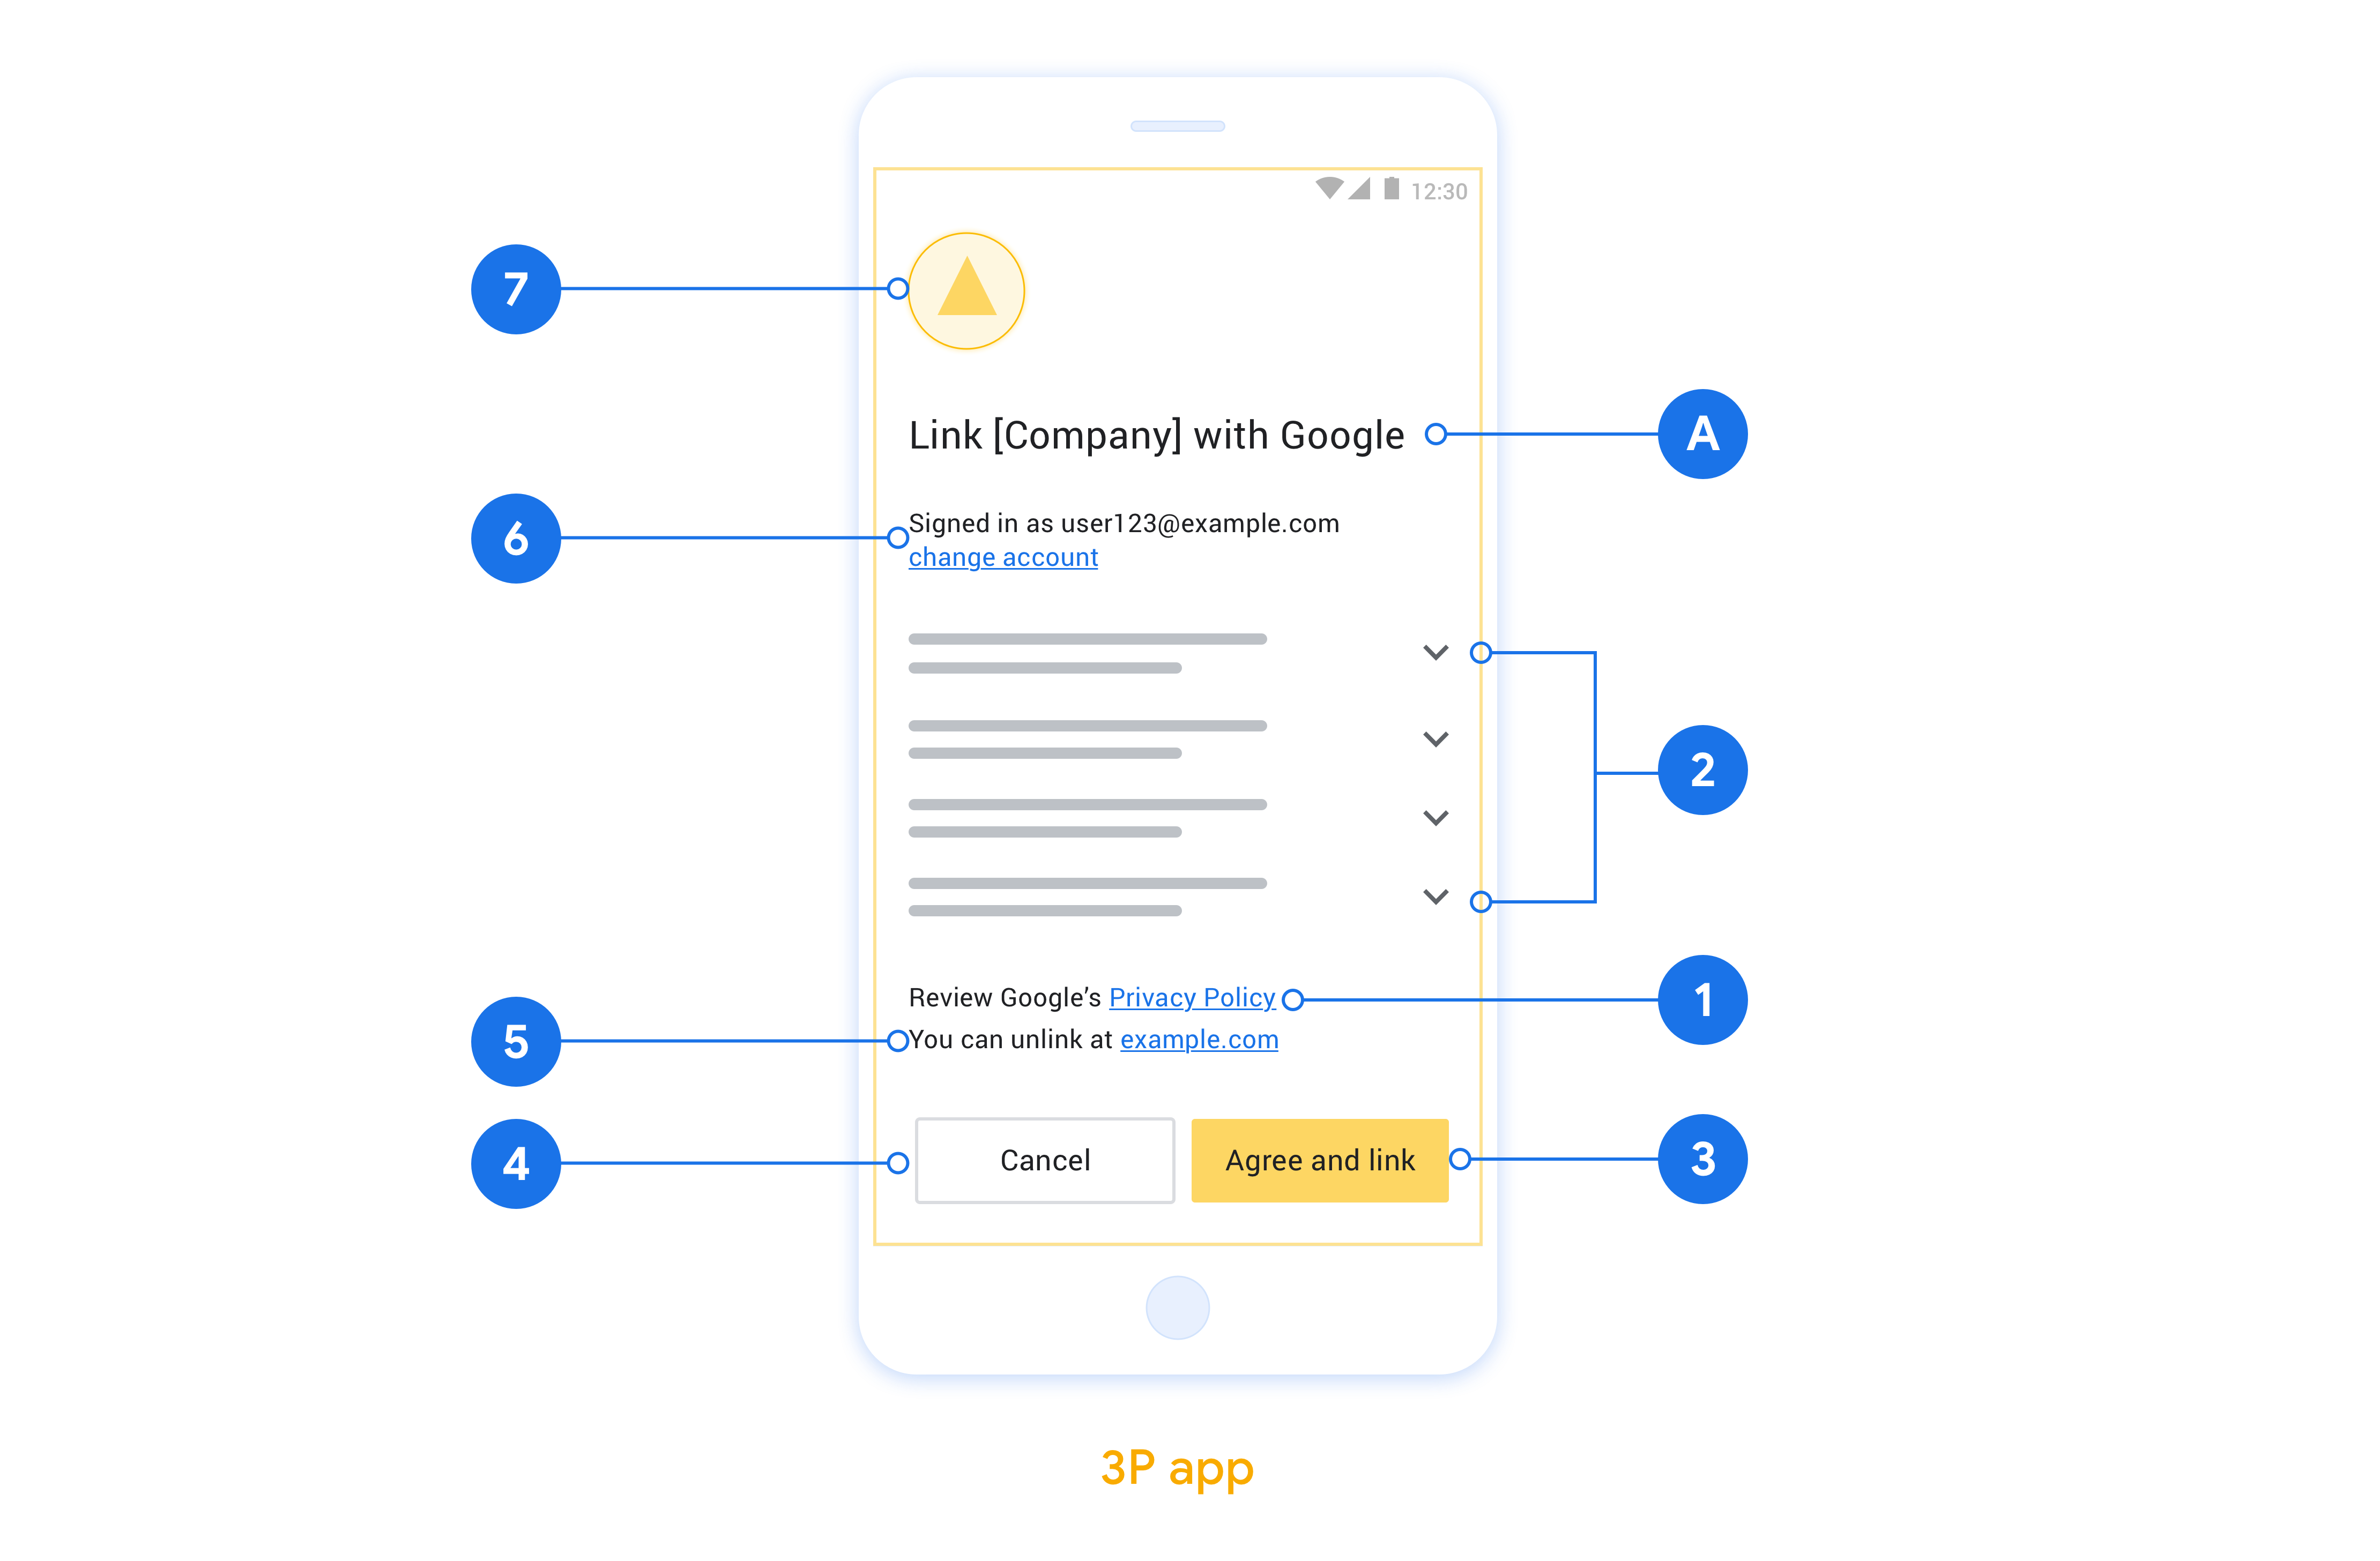
이 섹션에서는 앱 플립 계정 연결 동의 화면의 설계 요구사항 및 권장사항을 설명합니다. Google에서 앱을 호출하면 앱에서 사용자에게 동의 화면을 표시합니다.
요구사양
- 사용자의 계정이 Google Home이나 Google 어시스턴트와 같은 특정 Google 제품이 아니라 Google에 연결되어 있음을 알려야 합니다.
권장사항
다음을 수행하는 것이 좋습니다.
Google의 개인정보처리방침을 표시합니다. 동의 화면에 Google 개인정보처리방침 링크를 포함합니다.
공유할 데이터. 명확하고 간결한 표현을 사용하여 Google에 필요한 데이터와 그 이유를 사용자에게 알립니다.
명확한 클릭 유도 문구. 동의 화면에 '동의 및 링크'와 같은 명확한 클릭 유도 문구를 표시합니다. 사용자가 계정을 연결하기 위해 Google과 공유해야 하는 데이터를 파악해야 하기 때문입니다.
취소 기능. 사용자가 연결하지 않기로 결정한 경우 뒤로 돌아가거나 취소할 수 있는 방법을 제공합니다.
연결 해제 기능 사용자가 연결을 해제할 수 있는 메커니즘(예: 플랫폼의 계정 설정 URL)을 제공합니다. 또는 사용자가 연결된 계정을 관리할 수 있는 Google 계정 링크를 포함할 수 있습니다.
사용자 계정 변경 기능. 사용자가 계정을 전환할 수 있는 방법을 제안합니다. 이 방법은 사용자가 여러 계정을 사용하는 경향이 있는 경우에 특히 유용합니다.
- 사용자가 계정을 전환하기 위해 동의 화면을 닫아야 하는 경우, 사용자가 OAuth 연결 및 암시적 흐름을 사용하여 원하는 계정에 로그인할 수 있도록 복구 가능한 오류를 Google에 전송합니다.
로고를 포함합니다. 동의 화면에 회사 로고를 표시합니다. 스타일 가이드라인을 사용해 로고를 배치합니다. Google 로고도 표시하려면 로고 및 상표를 참조하세요.

OAuth 기반 앱 플립 설정
다음 섹션에서는 OAuth 기반 앱 플립의 기본 요건과 작업 콘솔에서 앱 플립 프로젝트를 구성하는 방법을 설명합니다.
스마트 홈 작업 만들기 및 OAuth 2.0 서버 설정하기
앱 플립을 구성하기 전에 다음을 실행해야 합니다.
- OAuth 2.0 서버를 설정합니다. OAuth 서버 설정에 관한 자세한 내용은 OAuth 2.0 서버 구현을 참고하세요.
- 작업을 만듭니다. 작업을 만들려면 작업 프로젝트 만들기의 안내를 따르세요.
Actions 콘솔에서 앱 플립 구성
다음 섹션에서는 Actions 콘솔에서 App Flip을 구성하는 방법을 설명합니다.
- OAuth 클라이언트 정보 아래의 모든 입력란을 작성합니다. 앱 플립이 지원되지 않으면 일반 OAuth가 대체로 사용됩니다.
- 계정 연결에 앱 사용 (선택사항)에서 Android에서 사용 설정을 선택합니다.
- 다음 입력란을 작성합니다.
- 애플리케이션 ID. 애플리케이션 ID는 앱에 설정하는 고유한 ID입니다.
- 앱 서명. Android 앱을 설치하려면 먼저 공개 키 인증서로 '서명'해야 합니다. 앱 서명 가져오기에 대한 자세한 내용은 클라이언트 인증을 참조하세요.
- 승인 인텐트. 이 필드에 인텐트 작업을 지정하는 문자열을 입력합니다.
- 원하는 경우 클라이언트를 구성하려면 범위를 추가하고 클라이언트 구성 (선택사항)에서 범위 추가를 클릭합니다.
- 저장을 클릭합니다.
Android 앱에서 App Flip 구현
앱 플립을 구현하려면 Google의 딥 링크를 허용하도록 앱의 사용자 승인 코드를 수정해야 합니다.
OAuth-based App Flip linking (App Flip) inserts your Android app into the Google Account Linking flow. A traditional account linking flow requires the user to enter their credentials in the browser. The use of App Flip defers user sign-in to your Android app, which allows you to leverage existing authorizations. If the user is signed in to your app, they don't need to re-enter their credentials to link their account. A minimal amount of code changes are required to implement App Flip on your Android app.
In this document, you learn how to modify your Android app to support App Flip.
Try the sample
The App Flip linking sample app demonstrates an App Flip-compatible account linking integration on Android. You can use this app to verify how to respond to an incoming App Flip intent from Google mobile apps.
The sample app is preconfigured to integrate with the App Flip Test Tool for Android, which you can use to verify your Android app's integration with App Flip before you configure account linking with Google. This app simulates the intent triggered by Google mobile apps when App Flip is enabled.
How it works
The following steps are required to carry out an App Flip integration:
- The Google app checks if your app is installed on the device using its package name.
- The Google app uses a package signature check to validate that the installed app is the correct app.
- The Google app builds an intent to start a designated activity in your app. This intent includes additional data required for linking. It also checks to see if your app supports App Flip by resolving this intent through the Android framework.
- Your app validates that the request is coming from the Google app. To do so, your app checks the package signature and the provided client ID.
- Your app requests an authorization code from your OAuth 2.0 server. At the end of this flow, it returns either an authorization code or an error to the Google app.
- The Google app retrieves the result and continues with account linking. If an authorization code is provided, the token exchange happens server-to-server, the same way it does in the browser-based OAuth linking flow.
Modify your Android app to support App Flip
To support App Flip, make the following code changes to your Android app:
Add an
<intent-filter>
to yourAndroidManifest.xml
file with an action string that matches the value you entered in the App Flip Intent field.<activity android:name="AuthActivity"> <!-- Handle the app flip intent --> <intent-filter> <action android:name="INTENT_ACTION_FROM_CONSOLE"/> <category android:name="android.intent.category.DEFAULT"/> </intent-filter> </activity>
Validate the calling app's signature.
private fun verifyFingerprint( expectedPackage: String, expectedFingerprint: String, algorithm: String ): Boolean { callingActivity?.packageName?.let { if (expectedPackage == it) { val packageInfo = packageManager.getPackageInfo(it, PackageManager.GET_SIGNATURES) val signatures = packageInfo.signatures val input = ByteArrayInputStream(signatures[0].toByteArray()) val certificateFactory = CertificateFactory.getInstance("X509") val certificate = certificateFactory.generateCertificate(input) as X509Certificate val md = MessageDigest.getInstance(algorithm) val publicKey = md.digest(certificate.encoded) val fingerprint = publicKey.joinToString(":") { "%02X".format(it) } return (expectedFingerprint == fingerprint) } } return false }
Extract the client ID from the intent parameters and verify that the client ID matches the expected value.
private const val EXPECTED_CLIENT = "<client-id-from-actions-console>" private const val EXPECTED_PACKAGE = "<google-app-package-name>" private const val EXPECTED_FINGERPRINT = "<google-app-signature>" private const val ALGORITHM = "SHA-256" ... override fun onCreate(savedInstanceState: Bundle?) { super.onCreate(savedInstanceState) val clientId = intent.getStringExtra("CLIENT_ID") if (clientId == EXPECTED_CLIENT && verifyFingerprint(EXPECTED_PACKAGE, EXPECTED_FINGERPRINT, ALGORITHM)) { // ...authorize the user... } }
Upon successful authorization, return the resulting authorization code back to Google.
// Successful result val data = Intent().apply { putExtra("AUTHORIZATION_CODE", authCode) } setResult(Activity.RESULT_OK, data) finish()
If an error occurred, return an error result instead.
// Error result val error = Intent().apply { putExtra("ERROR_TYPE", 1) putExtra("ERROR_CODE", 1) putExtra("ERROR_DESCRIPTION", "Invalid Request") } setResult(-2, error) finish()
Content of the launch intent
The Android intent that launches your app includes the following fields:
CLIENT_ID
(String
): Googleclient_id
registered under your app.SCOPE
(String[]
): A list of scopes requested.REDIRECT_URI
(String
): The redirect URL.
Content of the response data
The data returned to the Google app is set in your app by calling setResult()
.
This data includes the following:
AUTHORIZATION_CODE
(String
): The authorization code value.resultCode
(int
): Communicates the success or failure of the process and takes one of the following values:Activity.RESULT_OK
: Indicates success; an authorization code is returned.Activity.RESULT_CANCELLED
: Signals that the user has cancelled the process. In this case, the Google app will attempt account linking using your authorization URL.-2
: Indicates that an error has occurred. Different types of errors are described below.
ERROR_TYPE
(int
): The type of error, which takes one of the following values:1
: Recoverable error: The Google app will attempt account linking using the authorization URL.2
: Unrecoverable error: The Google app aborts account linking.3
: Invalid or missing request parameters.
ERROR_CODE
(int
): An integer representing the nature of the error. To see what each error code means, refer to the table of error codes.ERROR_DESCRIPTION
(String
, optional): Human-readable status message describing the error.
A value for the AUTHORIZATION_CODE
is expected when
resultCode == Activity.RESULT_OK
. In all other cases, the value for
AUTHORIZATION_CODE
needs to be empty. If resultCode == -2
, then the
ERROR_TYPE
value is expected to be populated.
Table of error codes
The table below shows the different error codes and whether each is a recoverable or unrecoverable error:
Error code | Meaning | Recoverable | Unrecoverable |
---|---|---|---|
1 |
INVALID_REQUEST |
✔ | |
2 |
NO_INTERNET_CONNECTION |
✔ | |
3 |
OFFLINE_MODE_ACTIVE |
✔ | |
4 |
CONNECTION_TIMEOUT |
✔ | |
5 |
INTERNAL_ERROR |
✔ | |
6 |
AUTHENTICATION_SERVICE_UNAVAILABLE |
✔ | |
8 |
CLIENT_VERIFICATION_FAILED |
✔ | |
9 |
INVALID_CLIENT |
✔ | |
10 |
INVALID_APP_ID |
✔ | |
11 |
INVALID_REQUEST |
✔ | |
12 |
AUTHENTICATION_SERVICE_UNKNOWN_ERROR |
✔ | |
13 |
AUTHENTICATION_DENIED_BY_USER |
✔ | |
14 |
CANCELLED_BY_USER |
✔ | |
15 |
FAILURE_OTHER |
✔ | |
16 |
USER_AUTHENTICATION_FAILED |
✔ |
For all error codes, you must return the error result via setResult
to
ensure the appropriate fallback is triggered.
기기에서 앱 플립 테스트
이제 작업을 만들고 콘솔과 앱에서 앱 플립을 구성했으므로 휴대기기에서 앱 플립을 테스트할 수 있습니다. Google 어시스턴트 앱 또는 Google Home 앱을 사용하여 앱 플립을 테스트할 수 있습니다.
어시스턴트 앱에서 앱 플립을 테스트하려면 다음 단계를 따르세요.
- Actions 콘솔로 이동하여 프로젝트를 선택합니다.
- 상단 탐색 메뉴에서 테스트를 클릭합니다.
- 어시스턴트 앱에서 계정 연결 흐름을 트리거합니다.
- Google 어시스턴트 앱을 엽니다.
- 설정을 클릭합니다.
- 어시스턴트 탭에서 홈 컨트롤을 클릭합니다.
- Add(+)를 클릭합니다.
- 제공업체 목록에서 작업을 선택합니다. 앞에 '[test]'라는 접두사가 붙습니다. 목록에서 [테스트] 작업을 선택하면 앱이 열립니다.
- 앱이 실행되었는지 확인하고 승인 흐름을 테스트합니다.
Home 앱에서 앱 플립을 테스트하려면 다음 단계를 따르세요.
- Actions 콘솔로 이동하여 프로젝트를 선택합니다.
- 상단 탐색 메뉴에서 테스트를 클릭합니다.
- Home 앱에서 계정 연결 흐름을 트리거합니다.
- Google Home 앱을 엽니다.
- 화면의 + 버튼을 클릭합니다.
- 기기 설정을 클릭합니다.
- 이미 설정된 기기가 있나요?를 클릭합니다.
- 제공업체 목록에서 스마트 홈 작업을 선택합니다. 앞에 '[test]'라는 접두사가 붙습니다. 목록에서 [테스트] 작업을 선택하면 앱이 열립니다.
- 앱이 실행되었는지 확인하고 승인 흐름을 테스트합니다.