
การผสานรวมแบบ Cloud-to-cloud ทุกรายการต้องมีกลไกในการ ตรวจสอบสิทธิ์ผู้ใช้
การตรวจสอบสิทธิ์ช่วยให้คุณลิงก์บัญชี Google ของผู้ใช้ กับบัญชีผู้ใช้ในระบบการตรวจสอบสิทธิ์ได้ ซึ่งจะช่วยให้คุณระบุผู้ใช้ได้เมื่อ Fulfillment ได้รับ Intent ของสมาร์ทโฮม สมาร์ทโฮมของ Google รองรับเฉพาะ OAuth ที่มี ขั้นตอนรหัสการให้สิทธิ์
หน้านี้อธิบายวิธีตั้งค่าเซิร์ฟเวอร์ OAuth 2.0 เพื่อให้ทำงานร่วมกับ การผสานรวมCloud-to-cloudของคุณได้
การลิงก์บัญชี Google กับ OAuth
In the authorization code flow, you need two endpoints:
The authorization endpoint, which presents the sign-in UI to your users that aren't already signed in. The authorization endpoint also creates a short-lived authorization code to record users' consent to the requested access.
The token exchange endpoint, which is responsible for two types of exchanges:
- Exchanges an authorization code for a long-lived refresh token and a short-lived access token. This exchange happens when the user goes through the account linking flow.
- Exchanges a long-lived refresh token for a short-lived access token. This exchange happens when Google needs a new access token because the one it had expired.
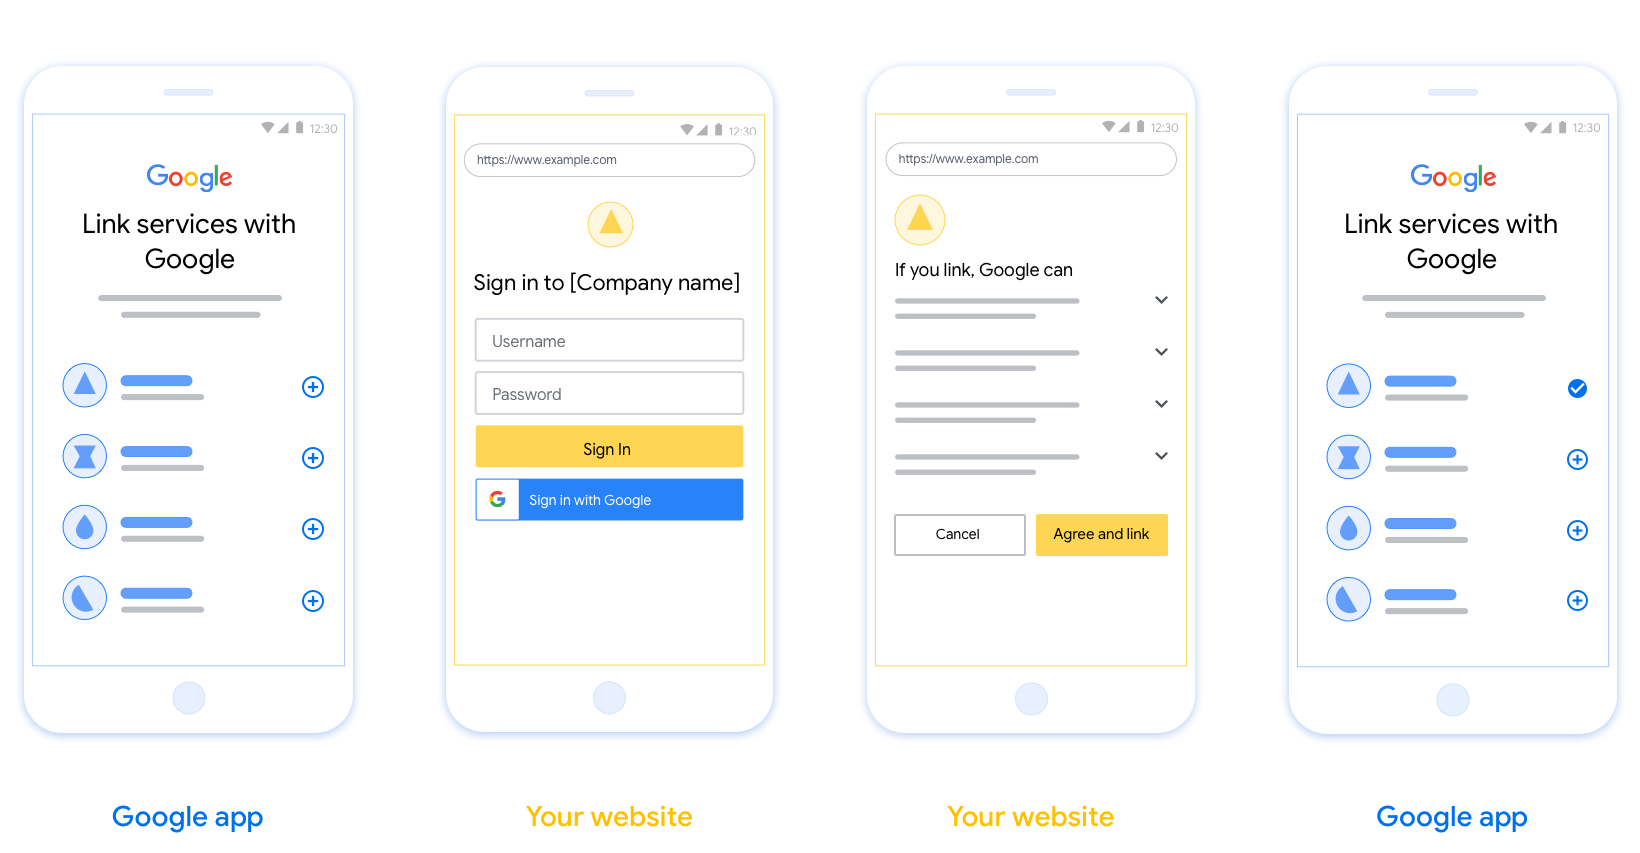
Design guidelines
This section describes the design requirements and recommendations for the user screen that you host for OAuth linking flows. After it's called by Google's app, your platform displays a sign in to Google page and account linking consent screen to the user. The user is directed back to Google's app after giving their consent to link accounts.
Requirements
- You must communicate that the user’s account will be linked to Google, not a specific Google product like Google Home or Google Assistant.
- You must have a Google authorization statement such as "By signing in, you are authorizing Google to control your devices." See the Google Device Control Authorization section of the Google Home Developer Policies.
- You must open the Web OAuth linking page and ensure users have a clear method for signing in to their Google Account, such as fields for their username and password. Don't use the Google Sign-In (GSI) method that enables users to link without being taken to the Web OAuth Linking page. It is a violation of Google policy.
- You must include at least one of the following items in the OAuth linking
page to indicate the integration to which the user is linking:
- Company logo
- Company name
- Integration name
- App icon
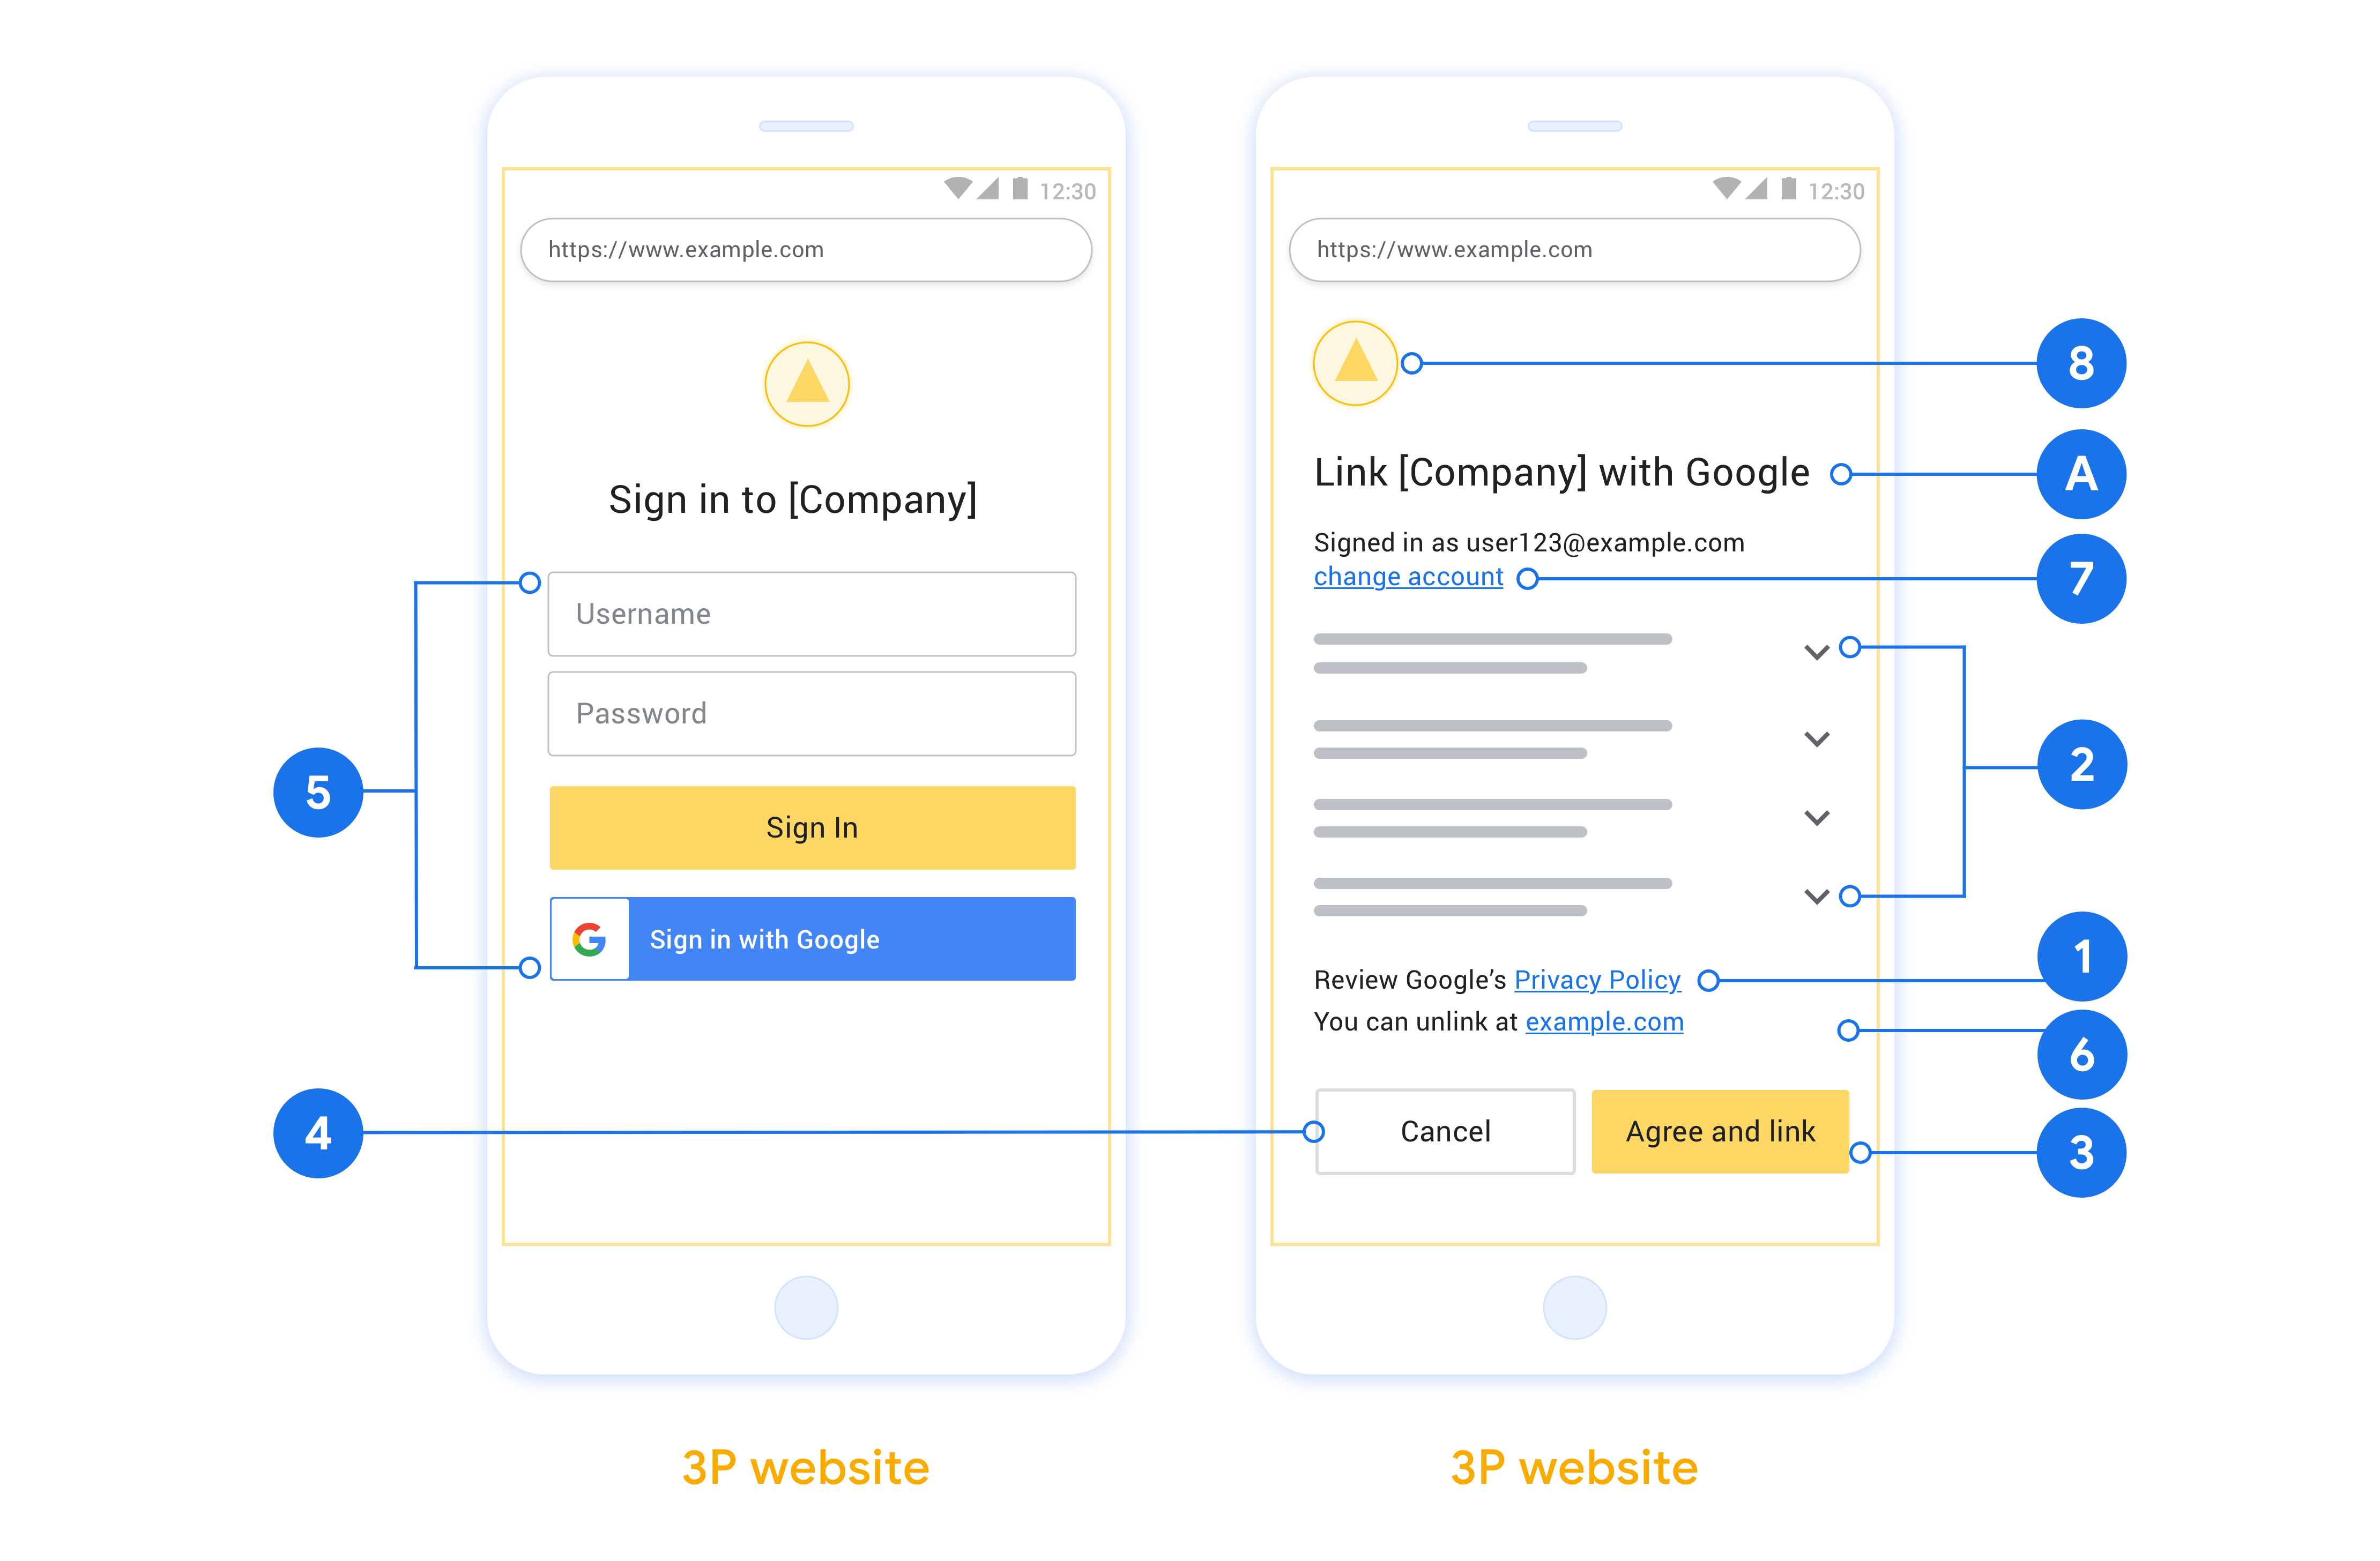
Recommendations
We recommend that you do the following:
Display Google's Privacy Policy. Include a link to Google’s Privacy Policy on the consent screen.
Data to be shared. Use clear and concise language to tell the user what data of theirs Google requires and why, and what usage or interaction data may be shared with you by Google.
Clear call-to-action. State a clear call-to-action on your consent screen, such as “Agree and link.” This is because users need to understand what data they're required to share with Google to link their accounts.
Ability to cancel. Provide a way for users to go back or cancel, if they choose not to link.
Clear sign-in process. Ensure that users have a clear method for signing in to their Google Account, such as fields for their username and password or Sign in with Google.
Ability to unlink. Offer a mechanism for users to unlink, such as a URL to their account settings on your platform. Alternatively, you can include a link to Google Account where users can manage their linked account. If a user unlinks from your integration, use
agentUsers.deleteto notify Google of the change.Ability to change user account. Suggest a method for users to switch their account(s). This is especially beneficial if users tend to have multiple accounts.
- If a user must close the consent screen to switch accounts, send a recoverable error to Google so the user can sign in to the desired account with OAuth linking.
Include your logo. Display your company logo on the consent screen. Use your style guidelines to place your logo. If you wish to also display Google's logo, see Logos and trademarks.
ขั้นตอนรหัสการให้สิทธิ์
การใช้งานเซิร์ฟเวอร์ OAuth 2.0 ของขั้นตอน รหัสการให้สิทธิ์ประกอบด้วยปลายทาง 2 แห่ง ซึ่งบริการของคุณจะทำให้พร้อมใช้งานผ่าน HTTPS ปลายทางแรกคือปลายทางการให้สิทธิ์ ซึ่งมีหน้าที่ค้นหาหรือขอความยินยอมจากผู้ใช้ในการเข้าถึงข้อมูล ปลายทางการให้สิทธิ์จะแสดง UI การลงชื่อเข้าใช้แก่ผู้ใช้ที่ยังไม่ได้ลงชื่อเข้าใช้ และบันทึกความยินยอมในการเข้าถึงที่ขอ ปลายทางที่ 2 คือปลายทางการแลกเปลี่ยนโทเค็น ซึ่งใช้เพื่อรับสตริงที่เข้ารหัสที่เรียกว่าโทเค็น ซึ่งอนุญาตให้ผู้ใช้เข้าถึงบริการของคุณ
เมื่อแอปพลิเคชันของ Google ต้องเรียก API ของบริการ Google จะใช้ปลายทางเหล่านี้ร่วมกันเพื่อขอสิทธิ์จากผู้ใช้ในการเรียก API เหล่านี้ในนามของผู้ใช้
เซสชันขั้นตอนรหัสการให้สิทธิ์ OAuth 2.0 ที่ Google เริ่มต้นจะมีขั้นตอนดังนี้
- Google จะเปิดปลายทางการให้สิทธิ์ในเบราว์เซอร์ของผู้ใช้ หากขั้นตอนเริ่มต้นในอุปกรณ์ที่ใช้เสียงเท่านั้นสำหรับ Action Google จะโอนการดำเนินการไปยังโทรศัพท์
- ผู้ใช้ลงชื่อเข้าใช้ (หากยังไม่ได้ลงชื่อเข้าใช้) และให้สิทธิ์ Google ในการเข้าถึงข้อมูลของผู้ใช้ด้วย API ของคุณ หากยังไม่ได้ให้สิทธิ์
- บริการของคุณจะสร้าง รหัสการให้สิทธิ์และส่งกลับไปยัง Google โดยเปลี่ยนเส้นทางเบราว์เซอร์ของผู้ใช้กลับไปที่ Google พร้อมแนบรหัสการให้สิทธิ์กับคำขอ
- Google จะส่งรหัสการให้สิทธิ์ไปยังปลายทางการแลกเปลี่ยนโทเค็น ซึ่งจะตรวจสอบความถูกต้องของรหัสและส่งกลับ โทเค็นเพื่อการเข้าถึงและ โทเค็นการรีเฟรช โทเค็นเพื่อการเข้าถึงเป็นโทเค็นที่มีอายุสั้น ซึ่งบริการของคุณยอมรับเป็นข้อมูลเข้าสู่ระบบเพื่อเข้าถึง API โทเค็นการรีเฟรชเป็นโทเค็นที่มีอายุยาวนาน ซึ่ง Google สามารถจัดเก็บและใช้เพื่อรับโทเค็นเพื่อการเข้าถึงใหม่เมื่อโทเค็นเดิมหมดอายุ
- หลังจากที่ผู้ใช้ทำตามขั้นตอนการลิงก์บัญชีเสร็จสมบูรณ์แล้ว คำขอที่ส่งจาก Google ในครั้งต่อๆ ไปจะมีโทเค็นเพื่อการเข้าถึง
จัดการคำขอการให้สิทธิ์
เมื่อคุณต้องทำการลิงก์บัญชีโดยใช้ขั้นตอนรหัสการให้สิทธิ์ OAuth 2.0 Google จะส่งผู้ใช้ไปยังปลายทางการให้สิทธิ์พร้อมคำขอที่มีพารามิเตอร์ต่อไปนี้
| พารามิเตอร์ปลายทางการให้สิทธิ์ | |
|---|---|
client_id |
รหัสไคลเอ็นต์ที่คุณกำหนดให้กับ Google |
redirect_uri |
URL ที่คุณส่งการตอบกลับคำขอนี้ |
state |
ค่าการบันทึกที่ส่งกลับไปยัง Google โดยไม่มีการเปลี่ยนแปลงใน URI การเปลี่ยนเส้นทาง |
scope |
ไม่บังคับ: ชุดสตริงขอบเขตที่คั่นด้วยช่องว่าง ซึ่งระบุ ข้อมูลที่ Google กำลังขอการให้สิทธิ์ |
response_type |
ประเภทของค่าที่จะแสดงผลในการตอบกลับ สำหรับขั้นตอนรหัสการให้สิทธิ์ OAuth 2.0
ประเภทการตอบกลับจะเป็น code เสมอ
|
ตัวอย่างเช่น หากปลายทางการให้สิทธิ์ของคุณพร้อมใช้งานที่ https://myservice.example.com/auth คำขออาจมีลักษณะดังนี้
GET https://myservice.example.com/auth?client_id=GOOGLE_CLIENT_ID&redirect_uri=REDIRECT_URI&state=STATE_STRING&scope=REQUESTED_SCOPES&response_type=code
หากต้องการให้ปลายทางการให้สิทธิ์จัดการคำขอลงชื่อเข้าใช้ ให้ทำตามขั้นตอนต่อไปนี้
- ตรวจสอบว่า
client_idตรงกับรหัสไคลเอ็นต์ที่คุณกำหนดให้กับ Google และredirect_uriตรงกับ URL การเปลี่ยนเส้นทางที่ Google ให้ไว้สำหรับบริการของคุณ การตรวจสอบเหล่านี้มีความสำคัญในการป้องกันไม่ให้สิทธิ์เข้าถึงแก่แอปไคลเอ็นต์ที่ไม่ต้องการหรือกำหนดค่าไม่ถูกต้อง หากคุณรองรับขั้นตอน OAuth 2.0 หลายขั้นตอน ให้ยืนยันด้วยว่าresponse_typeคือcode - ตรวจสอบว่าผู้ใช้ลงชื่อเข้าใช้บริการของคุณหรือไม่ หากผู้ใช้ไม่ได้ลงชื่อเข้าใช้ ให้ทำตามขั้นตอนการลงชื่อเข้าใช้หรือลงชื่อสมัครใช้ของบริการให้เสร็จสมบูรณ์
- สร้างรหัสการให้สิทธิ์เพื่อให้ Google ใช้เข้าถึง API ของคุณ รหัสการให้สิทธิ์สามารถเป็นค่าสตริงใดก็ได้ แต่ต้องแสดงถึงผู้ใช้ ไคลเอ็นต์ที่โทเค็นมีไว้ให้ และเวลาหมดอายุของรหัสอย่างไม่ซ้ำกัน และต้องคาดเดาไม่ได้ โดยปกติแล้วคุณจะออกรหัสการให้สิทธิ์ที่หมดอายุหลังจากผ่านไปประมาณ 10 นาที
- ยืนยันว่า URL ที่ระบุโดยพารามิเตอร์
redirect_uriมีรูปแบบดังนี้https://oauth-redirect.googleusercontent.com/r/YOUR_PROJECT_ID https://oauth-redirect-sandbox.googleusercontent.com/r/YOUR_PROJECT_ID
- เปลี่ยนเส้นทางเบราว์เซอร์ของผู้ใช้ไปยัง URL ที่ระบุโดยพารามิเตอร์
redirect_uriรวมรหัสการให้สิทธิ์ที่คุณ เพิ่งสร้างและค่าสถานะเดิมที่ไม่ได้แก้ไขเมื่อเปลี่ยนเส้นทาง โดยการต่อท้ายพารามิเตอร์codeและstateตัวอย่าง URL ที่ได้มีดังนี้https://oauth-redirect.googleusercontent.com/r/YOUR_PROJECT_ID?code=AUTHORIZATION_CODE&state=STATE_STRING
จัดการคำขอแลกเปลี่ยนโทเค็น
ปลายทางการแลกเปลี่ยนโทเค็นของบริการมีหน้าที่รับผิดชอบการแลกเปลี่ยนโทเค็น 2 ประเภท ได้แก่
- แลกรหัสการให้สิทธิ์เป็นโทเค็นเพื่อการเข้าถึงและโทเค็นการรีเฟรช
- แลกโทเค็นการรีเฟรชเป็นโทเค็นเพื่อการเข้าถึง
คำขอแลกเปลี่ยนโทเค็นมีพารามิเตอร์ต่อไปนี้
| พารามิเตอร์ปลายทางการแลกเปลี่ยนโทเค็น | |
|---|---|
client_id |
สตริงที่ระบุแหล่งที่มาของคำขอเป็น Google คุณต้องลงทะเบียนสตริงนี้ ภายในระบบเป็นตัวระบุที่ไม่ซ้ำกันของ Google |
client_secret |
สตริงลับที่คุณลงทะเบียนกับ Google สำหรับบริการของคุณ |
grant_type |
ประเภทของโทเค็นที่จะแลกเปลี่ยน ซึ่งอาจเป็น
authorization_code หรือ refresh_token |
code |
เมื่อ grant_type=authorization_code พารามิเตอร์นี้คือรหัสที่ Google ได้รับจากปลายทางการลงชื่อเข้าใช้หรือปลายทางการแลกเปลี่ยนโทเค็น |
redirect_uri |
เมื่อ grant_type=authorization_code พารามิเตอร์นี้คือ
URL ที่ใช้ในคำขอการให้สิทธิ์เริ่มต้น |
refresh_token |
เมื่อ grant_type=refresh_token พารามิเตอร์นี้คือโทเค็นการรีเฟรชที่ Google ได้รับจากปลายทางการแลกเปลี่ยนโทเค็น |
กำหนดค่าวิธีที่ Google ส่งข้อมูลเข้าสู่ระบบไปยังเซิร์ฟเวอร์
เซิร์ฟเวอร์การให้สิทธิ์คาดว่าจะได้รับข้อมูลเข้าสู่ระบบไคลเอ็นต์ในเนื้อหาของคำขอหรือในส่วนหัวของคำขอ ทั้งนี้ขึ้นอยู่กับการใช้งาน
โดยค่าเริ่มต้น Google จะส่งข้อมูลเข้าสู่ระบบในเนื้อหาของคำขอ หากเซิร์ฟเวอร์การให้สิทธิ์กำหนดให้ข้อมูลเข้าสู่ระบบไคลเอ็นต์อยู่ในส่วนหัวของคำขอ คุณต้องกำหนดค่าการผสานรวม Cloud-to-cloud ตามนั้น
จากรายการโปรเจ็กต์ ให้คลิกเปิด ข้างโปรเจ็กต์ที่ต้องการใช้
ในส่วน Cloud-to-Cloud ให้เลือกพัฒนา
คลิกเปิด ข้างการผสานรวม
เลื่อนลงไปที่ส่วนสิทธิ์ (ไม่บังคับ) แล้วเลือกช่องทำเครื่องหมายให้ Google ส่งรหัสไคลเอ็นต์และรหัสลับผ่านส่วนหัวการตรวจสอบสิทธิ์พื้นฐานของ HTTP
คลิกบันทึก เพื่อบันทึกการเปลี่ยนแปลง
แลกรหัสการให้สิทธิ์เป็นโทเค็นเพื่อการเข้าถึงและโทเค็นการรีเฟรช
หลังจากที่ผู้ใช้ลงชื่อเข้าใช้และปลายทางการให้สิทธิ์ส่งรหัสการให้สิทธิ์ที่มีอายุสั้นไปยัง Google แล้ว Google จะส่งคำขอไปยังปลายทางการแลกเปลี่ยนโทเค็นเพื่อแลกรหัสการให้สิทธิ์เป็นโทเค็นเพื่อการเข้าถึงและโทเค็นการรีเฟรช
สำหรับคำขอเหล่านี้ ค่าของ grant_type คือ authorization_code และ
ค่าของ code คือค่าของรหัสการให้สิทธิ์ที่คุณให้ไว้กับ Google ก่อนหน้านี้ ตัวอย่างคำขอแลกรหัสการให้สิทธิ์เป็นโทเค็นเพื่อการเข้าถึงและโทเค็นการรีเฟรชมีดังนี้
POST /token HTTP/1.1
Host: oauth2.example.com
Content-Type: application/x-www-form-urlencoded

client_id=GOOGLE_CLIENT_ID&client_secret=GOOGLE_CLIENT_SECRET&grant_type=authorization_code&code=AUTHORIZATION_CODE&redirect_uri=REDIRECT_URI
หากต้องการแลกรหัสการให้สิทธิ์เป็นโทเค็นเพื่อการเข้าถึงและโทเค็นการรีเฟรช ปลายทางการแลกเปลี่ยนโทเค็นจะตอบสนองต่อคำขอ POST โดยทำตามขั้นตอนต่อไปนี้
- ตรวจสอบว่า
client_idระบุแหล่งที่มาของคำขอเป็นแหล่งที่มาที่ได้รับอนุญาต และclient_secretตรงกับค่าที่คาดไว้ - ตรวจสอบว่ารหัสการให้สิทธิ์ถูกต้องและยังไม่หมดอายุ และรหัสไคลเอ็นต์ที่ระบุในคำขอตรงกับรหัสไคลเอ็นต์ที่เชื่อมโยงกับรหัสการให้สิทธิ์
- ยืนยันว่า URL ที่ระบุโดยพารามิเตอร์
redirect_uriเหมือนกับค่าที่ใช้ในคำขอการให้สิทธิ์เริ่มต้น - หากคุณยืนยันเกณฑ์ทั้งหมดข้างต้นไม่ได้ ให้แสดงข้อผิดพลาด HTTP
400 Bad Request โดยมี
{"error": "invalid_grant"}เป็นเนื้อหา - หากยืนยันได้ ให้ใช้รหัสผู้ใช้จากรหัสการให้สิทธิ์เพื่อสร้างโทเค็นการรีเฟรชและโทเค็นเพื่อการเข้าถึง โทเค็นเหล่านี้สามารถเป็นค่าสตริงใดก็ได้ แต่ต้อง แสดงถึงผู้ใช้และไคลเอ็นต์ที่โทเค็นมีไว้ให้ และต้อง คาดเดาไม่ได้ สำหรับโทเค็นเพื่อการเข้าถึง ให้บันทึกเวลาหมดอายุของโทเค็นด้วย ซึ่งโดยปกติแล้วจะผ่านไป 1 ชั่วโมงหลังจากที่คุณออกโทเค็น โทเค็นการรีเฟรชไม่มีวันหมดอายุ
- แสดงออบเจ็กต์ JSON ต่อไปนี้ในเนื้อหาของการตอบกลับ HTTPS
{
"token_type": "Bearer",
"access_token": "ACCESS_TOKEN",
"refresh_token": "REFRESH_TOKEN",
"expires_in": SECONDS_TO_EXPIRATION
}
Google จะจัดเก็บโทเค็นเพื่อการเข้าถึงและโทเค็นการรีเฟรชของผู้ใช้ และบันทึกการหมดอายุของโทเค็นเพื่อการเข้าถึง เมื่อโทเค็นเพื่อการเข้าถึงหมดอายุ Google จะใช้โทเค็นการรีเฟรชเพื่อรับโทเค็นเพื่อการเข้าถึงใหม่จากปลายทางการแลกเปลี่ยนโทเค็น
แลกโทเค็นการรีเฟรชเป็นโทเค็นเพื่อการเข้าถึง
เมื่อโทเค็นเพื่อการเข้าถึงหมดอายุ Google จะส่งคำขอไปยังปลายทางการแลกเปลี่ยนโทเค็นเพื่อแลกโทเค็นการรีเฟรชเป็นโทเค็นเพื่อการเข้าถึงใหม่
สำหรับคำขอเหล่านี้ ค่าของ grant_type คือ refresh_token และค่าของ refresh_token คือค่าของโทเค็นการรีเฟรชที่คุณให้ไว้กับ Google ก่อนหน้านี้ ตัวอย่างคำขอแลกโทเค็นการรีเฟรชเป็นโทเค็นเพื่อการเข้าถึงมีดังนี้
POST /token HTTP/1.1
Host: oauth2.example.com
Content-Type: application/x-www-form-urlencoded

client_id=GOOGLE_CLIENT_ID&client_secret=GOOGLE_CLIENT_SECRET&grant_type=refresh_token&refresh_token=REFRESH_TOKEN
หากต้องการแลกโทเค็นการรีเฟรชเป็นโทเค็นเพื่อการเข้าถึง ปลายทางการแลกเปลี่ยนโทเค็นจะตอบสนองต่อคำขอ POST โดยทำตามขั้นตอนต่อไปนี้
- ตรวจสอบว่า
client_idระบุแหล่งที่มาของคำขอเป็น Google และclient_secretตรงกับค่าที่คาดไว้ - ตรวจสอบว่าโทเค็นการรีเฟรชถูกต้อง และรหัสไคลเอ็นต์ที่ระบุในคำขอตรงกับรหัสไคลเอ็นต์ที่เชื่อมโยงกับโทเค็นการรีเฟรช
- หากคุณยืนยันเกณฑ์ทั้งหมดข้างต้นไม่ได้ ให้แสดงข้อผิดพลาด HTTP 400
Bad Request โดยมี
{"error": "invalid_grant"}เป็นเนื้อหา - หากยืนยันได้ ให้ใช้รหัสผู้ใช้จากโทเค็นการรีเฟรชเพื่อสร้างโทเค็นเพื่อการเข้าถึง โทเค็นเหล่านี้สามารถเป็นค่าสตริงใดก็ได้ แต่ต้องแสดงถึงผู้ใช้และไคลเอ็นต์ที่โทเค็นมีไว้ให้ และต้องคาดเดาไม่ได้ สำหรับโทเค็นเพื่อการเข้าถึง ให้บันทึกเวลาหมดอายุของโทเค็นด้วย ซึ่งโดยปกติแล้วจะผ่านไป 1 ชั่วโมงหลังจากที่คุณออกโทเค็น
- แสดงออบเจ็กต์ JSON ต่อไปนี้ในเนื้อหาของการตอบกลับ HTTPS
{
"token_type": "Bearer",
"access_token": "ACCESS_TOKEN",
"expires_in": SECONDS_TO_EXPIRATION
}
Handle userinfo requests
The userinfo endpoint is an OAuth 2.0 protected resource that return claims about the linked user. Implementing and hosting the userinfo endpoint is optional, except for the following use cases:
- Linked Account Sign-In with Google One Tap.
- Frictionless subscription on AndroidTV.
After the access token has been successfully retrieved from your token endpoint, Google sends a request to your userinfo endpoint to retrieve basic profile information about the linked user.
| userinfo endpoint request headers | |
|---|---|
Authorization header |
The access token of type Bearer. |
For example, if your userinfo endpoint is available at
https://myservice.example.com/userinfo, a request might look like the following:
GET /userinfo HTTP/1.1
Host: myservice.example.com
Authorization: Bearer ACCESS_TOKEN
For your userinfo endpoint to handle requests, do the following steps:
- Extract access token from the Authorization header and return information for the user associated with the access token.
- If the access token is invalid, return an HTTP 401 Unauthorized error with using the
WWW-AuthenticateResponse Header. Below is an example of a userinfo error response:HTTP/1.1 401 Unauthorized WWW-Authenticate: error="invalid_token", error_description="The Access Token expired"
If the access token is valid, return and HTTP 200 response with the following JSON object in the body of the HTTPS response:
{ "sub": "USER_UUID", "email": "EMAIL_ADDRESS", "given_name": "FIRST_NAME", "family_name": "LAST_NAME", "name": "FULL_NAME", "picture": "PROFILE_PICTURE", }userinfo endpoint response subA unique ID that identifies the user in your system. emailEmail address of the user. given_nameOptional: First name of the user. family_nameOptional: Last name of the user. nameOptional: Full name of the user. pictureOptional: Profile picture of the user.