Building
Verify your phone is compatible
All Android O (8.1, API level 27) and later devices are compatible with Matter. Follow the steps below to check if your phone has the necessary modules.
Set up Android Debug Bridge
Android Debug Bridge (adb) should be set up prior to troubleshooting.
To set it up:
- Install "adb" on your computer.
- Turn on Developer Options and USB Debugging on your Android phone.
Verify your Google Play Services (GPS) Matter modules
To check if you have the Google Play services Matter modules, do the following:
- Set up Android Debug Bridge.
- Use a USB cable to connect your Android phone to your computer.
- Run this command in a terminal to verify that the necessary
Matter modules are installed:
adb shell dumpsys activity provider com.google.android.gms.chimera.container.GmsModuleProvider | grep "com.google.android.gms.home"com.google.android.gms.home [v222110900]
- Run this command in a terminal to verify that the necessary
Thread modules are installed:
adb shell dumpsys activity provider com.google.android.gms.chimera.container.GmsModuleProvider | grep "com.google.android.gms.threadnetwork"com.google.android.gms.threadnetwork [v222106301]
If the modules are not listed, it means that either:
- You have an outdated Android version. Make sure it's Android O (8.1) or above.
- The Matter modules have not been downloaded yet. Wait at least 24 hours for them to download. Ensure your device is powered on and charging during this time, so the download isn't delayed. If you haven't received the modules within 24 hours, you can try a factory data reset of the device to force the modules to download.
Verify the VID/PID of your device
If you want to start developing your integration with Google, you must create a project and an integration on the Google Home Console.

The VID/PID value your device is beaconing should match the VID/PID entered into your Google Home Developer Console project.
- VIDs
0xFFF1—0xFFF4are reserved for testing. They may be used for basic commissioning and control tests, but they can't be used during the following phases of development:
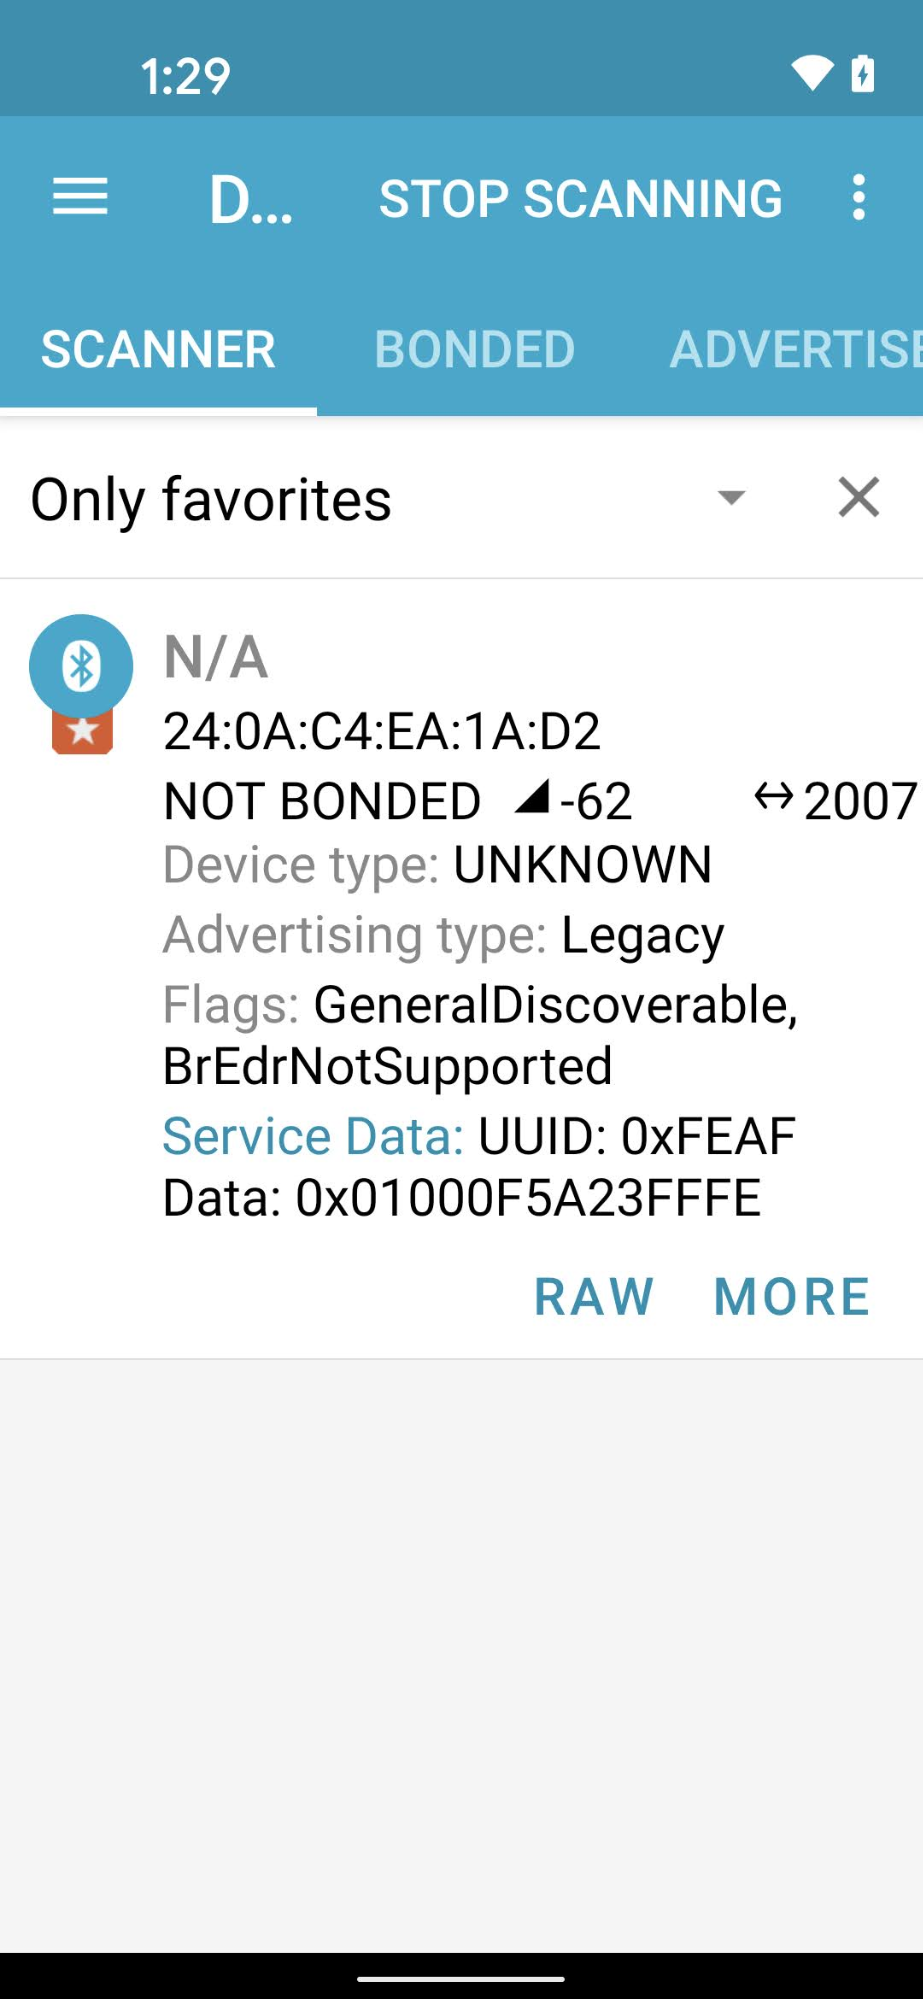
Using a Bluetooth engineering app such as nRF Connect for Mobile, you can see the VID/PID of the beaconing device in the Service Data field.
In this screenshot from the Android version of nRF Connect,
you'll see the VID/PID is listed as 5A23FFFE starting at the fourth byte of
the Service Data field. This indicates a VID of 5A23 and a PID of FFFE —
both in little endian format.
The BLE app displays the values in little endian, but the VID/PID values you enter into your Developer Console project are in big endian.
Validate that the right values and format have been entered into your Actions Console project based on what the Bluetooth sniffer is showing.
For the values in the example screenshot, the VID and PID in the
Developer Console would be 235A and FEFF, respectively.
Verify your device was built using a compatible Matter SDK branch
Google Matter hubs are compatible with
Matter 1.0 and have been tested with builds that used
commits from the stable branch v1.0-branch. Check the Public release
notes for the specific commits recommended for use with
each new hub release.
Pairing
Verify the credentials for your device
When you use your own Alliance-assigned VID, ensure that you have the correct credentials on the device:
- Certification Declaration (CD).
- Device Attestation Certificate (DAC) and its certificate chain.
For more information, see Create Matter device test certificates.
Verify your Matter-compatible Hub
Your Matter hub must be one of the hubs supported by Google. It must also be on a build compatible with Matter.
Some hubs are also Thread Border Routers and thus enable you to develop and test Thread devices. Other hubs only support Wi-Fi and Ethernet Matter devices, unless you have another border router in your network to enable Thread connectivity.
Your hub build may be verified by: Sliding finger down from top edge > Configuration Wheel > Device Information > Technical information > Chromecast firmware version
Commissioning fails with a "Could not contact Google" error message
Make sure you have created an integration with the correct VID/PID combination in the Developer Console. See Create a Matter integration for more information.
Commissioning fails with a "Can't reach device" error message
If you keep getting a "Can't reach device" error message when commissioning a Thread device, and have exhausted all the available debug options, you may want to clear the stored preferred Thread credentials on your Android phone for a clean setup via Settings > Apps > App Apps' > Google Play services > Storage & cache > Manage space > CLEAR ALL DATA.
Testing
Commissioned device does not appear in the Test Suite
If you've paired a device with a test Vendor ID (VID) and Product ID (PID), but it does not appear when you attempt to test the device with the Test Suite in Developer Console, this is likely caused by using the same test VID and PID combo across multiple integrations.
To troubleshoot, remove all test devices from Developer Console and pair the device you wish to test again.
To validate that you've paired the correct one, you can set the Manufacturer and
Model information (CHIP_DEVICE_CONFIG_DEVICE_* values) for the device to
unique values in your test firmware.
See Device information for more information.
If things still go wrong
If after following all the troubleshooting steps here your issue still isn't solved, no problem!
In the troubleshooting steps you have gathered important data about your device, console project, and environment. With that data in hand check the Support page, for how to best share your issue with the community and the Google Home support team.
