
Capturing Wi-Fi packets lets you see details and interactions that are otherwise masked before they reach software running on a device, making these captures an important tool for some types of bugs.
The main steps involved are:
- Find the right channel to sniff on.
- Capture the traffic.
- Share the capture and a hash of your WLAN password.
1. Determine the right channel and width
WLAN networks operate on:
- a channel, typically referred to with a number. 1-13 is for 2.4GHz channels, 36-200 for 5GHz channels
- with a specific width (either 20Mhz, 40Mhz, 80Mhz, 160MHz)
Each access point (for example router, mesh node) in your network typically has a unique 2.4GHz channel and a 5GHz channel and you need to find which one the device is connected to. There are several options:
Use your router's control panel
If you use Nest WiFi, skip this option – the info isn't exposed.
Most routers have a list of connected devices and which channel and width they are using.
- Find your router's IP address using this guide.
- Go to your router's address in your web browser, for example http://192.168.1.1.
- Sign in. Don't know your password? Look for a tag on your router, or use Router Passwords.
Look for a page named something like "clients" or "attached devices". For example a Netgear router page might look like the following, or for Eero devices.
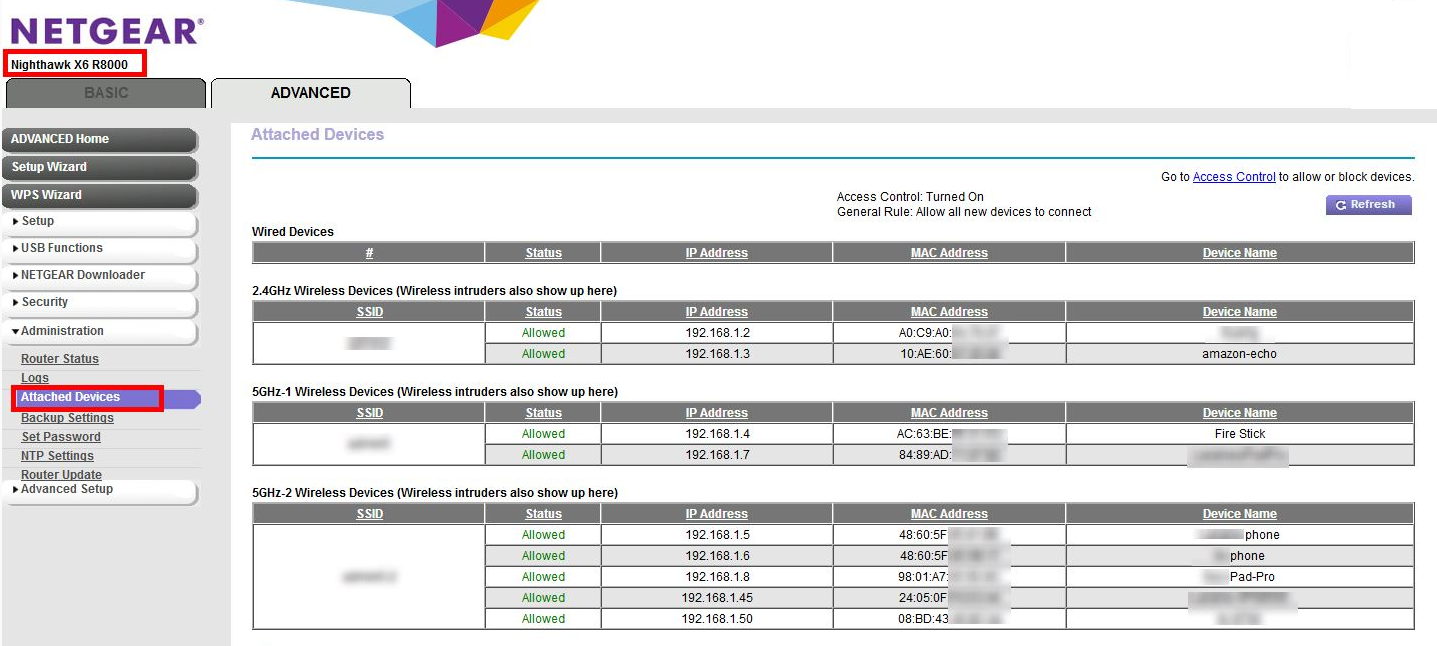
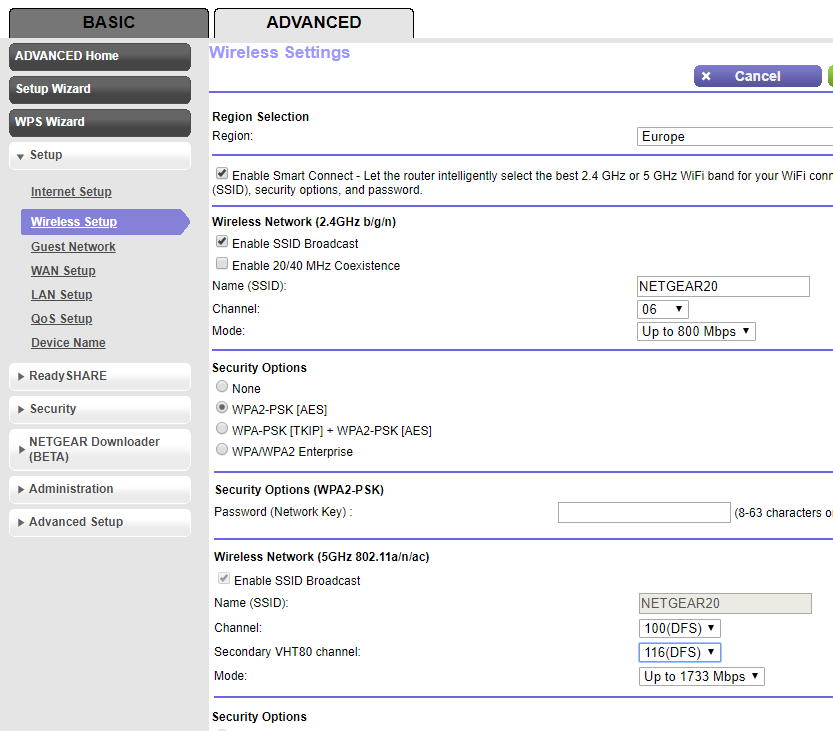
You may have to look elsewhere in the settings to map the info from step 4 to a particular channel and bandwidth. For example, a Netgear router:
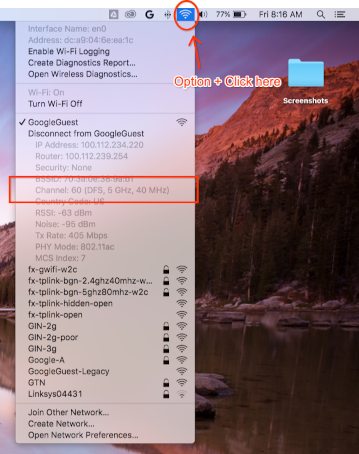
Use your Mac, if it is already connected to the same channel
Hold Option on your keyboard then click the WLAN icon at the top right corner in your Mac's status bar. You should see the regular WLAN menu with a few more options and information. Take a look at the unavailable menu items and look for the one that mentions Channel:
`Channel 60 (DFS, 5GHz, 40MHz)`
Can't find channel and width
If the other methods don't work, you can try:
List all the channels your APs are using (typically 2 for each AP or mesh point).
a. Recommended With an Android phone, you can use an app like Wifiman or Aruba Utilities.
a. On a Mac, you can use
/System/Library/PrivateFrameworks/Apple80211.framework/Resources/airport-sto list options.Perform a short (even 15 seconds is enough) capture on each of those channels, using the instructions below
Install Wireshark (for assistance, see Install Wireshark).
Open each of the captures using Wireshark, apply a display filter of
wlan.addr == YOUR_DEVICE'S_MAC, and see if any packets show up.
2. Start the capture
Important: Capturing the 4-way handshake
If security is turned on for Wi-Fi, you need to know the encryption keys to decrypt the captured packets. Encryption keys are derived from a 4-way handshake that occurs when the device connects to the network, and are unique to each connection between a device and the AP.
Because of this, you MUST capture the 4-way handshake to decrypt Wi-Fi payloads. If the device is already connected to the network when you start the capture, disconnect and reconnect the device (or reboot it) once the sniffing starts.
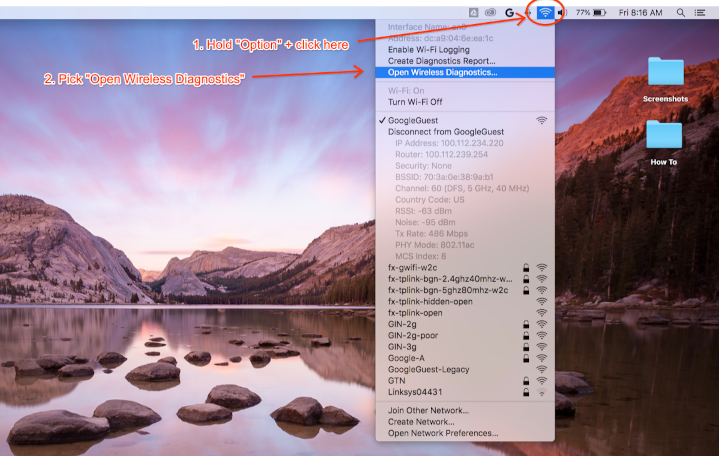
Capture on Mac
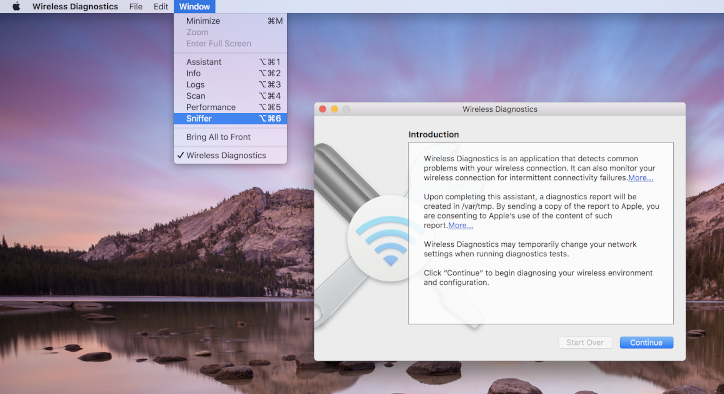
While holding the Option key on your keyboard, click the WLAN icon then select "Open Wireless Diagnostics…":
From the Wireless Diagnostics menu bar, select Window > Sniffer:
Set the channel and width to the values you retrieved earlier (Screenshot example is for Channel 60 and Width 40 MHz):
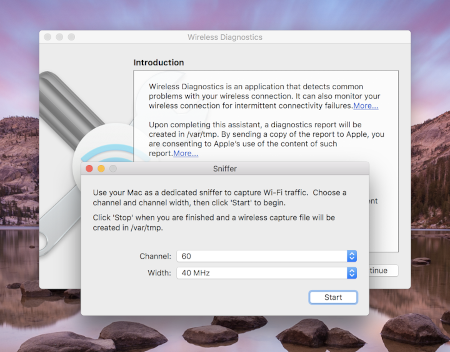
Press Start and enter your password. Now, try to reproduce the problem.
Ensure you capture the 4-way handshake from a connection as noted in
Capturing the 4-way handshake.
Once done, press Stop. A new *.pcap file can be found in /var/tmp which
contains all the traffic. An example filename is:
(null)_ch100_2018-11-06_10.52.01.pcap.
Capture on Linux
Turn off Wi-Fi. This can either be done by:
- Using the GUI (recommended)
- Using Network Manager CLI to tell it to stop managing the WLAN
interface:
sudo nmcli dev set <wlan-ifname> managed on - If using an alternate network manager, adjust accordingly.
Save this script. Replace
<wlan-ifname>with the name of your Wi-Fi interface. This doc assumes the script name to besetup-wifi-capture.#!/usr/bin/env bash sudo ifconfig <wlan-ifname> down sudo rfkill unblock wifi sudo iwconfig <wlan-ifname> mode monitor sudo ifconfig <wlan-ifname> up sudo iw dev <wlan-ifname> set channel $@Execute the preceding script and pass in the channel and highest bandwidth to sniff, for example channel 153 with 80MHz bandwidth:
./setup-wifi-capture chan 153 80 MHzOpen Wireshark, and you should now be able to capture packets on the wlan interface.
3. Share the capture
Use WPA PSK (Raw Key) Generator to generate a hash of your password. This lets you decrypt the capture without knowing your plain-text password.
You need to share the generated PSK as well so others can decrypt the capture.
Appendix
Install Wireshark
You can install Wireshark using apt install wireshark on Linux or download it online from the Wireshark website.
Set up Wireshark to decrypt traffic
This isn't necessary for sharing your capture files, only do this if you want to examine decrypted traffic yourself in Wireshark.
With WPA2 security on Wi-Fi, the WPA2-PSK isn't used directly for encryption and decryption of traffic. It's used in a 4-way handshake, which you need to capture to decrypt packets. However, if all you're trying to capture are issues with connecting to Wi-Fi or drops in connectivity, which can be gleaned from Wi-Fi management frames, you don't need to capture the 4-way handshake. In either case, it doesn't hurt to capture it anyway.
Open Wireshark and open the Preferences page (Wireshark menu > Preferences or **Cmd + , **).
Find "IEEE 802.11" section in "Protocols" category and ensure "Enable decryption" is checked:
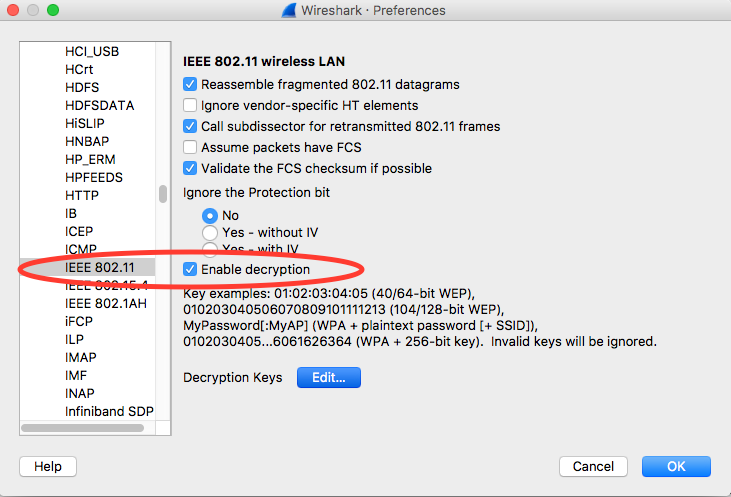
Click the Edit button next to the Decryption Keys label.
Click the '+' button in the bottom-left corner and select the "wpa-pwd" option.
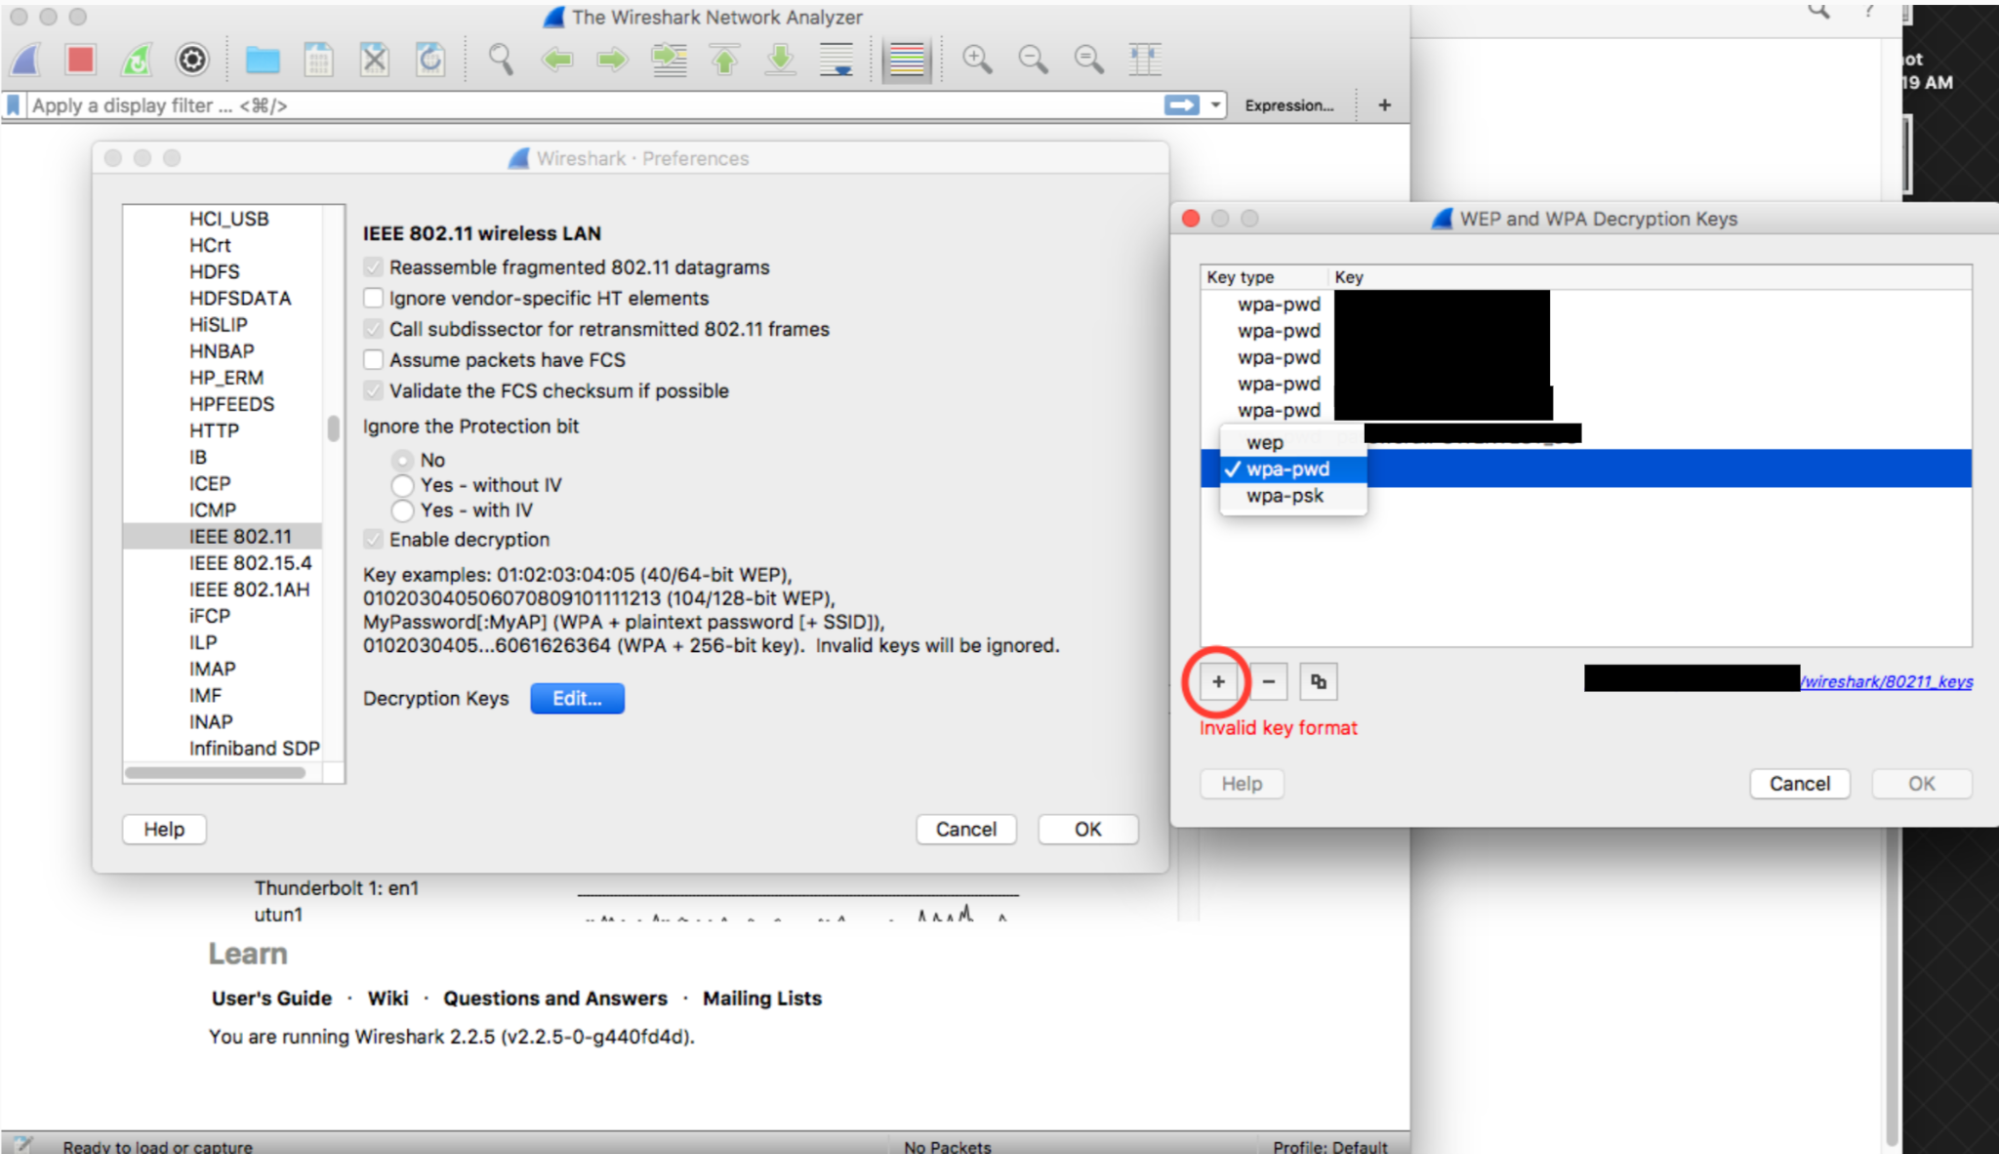
Click the key column of newly created row (right next to the wpa-pwd string), type in your WPA2 PSK and SSID in the format of
<password>:<ssid>. For example, if your network name wasMyHomeNetworkand your WPA2 PSK wasmyp4ssword, type inmyp4ssword:MyHomeNetwork.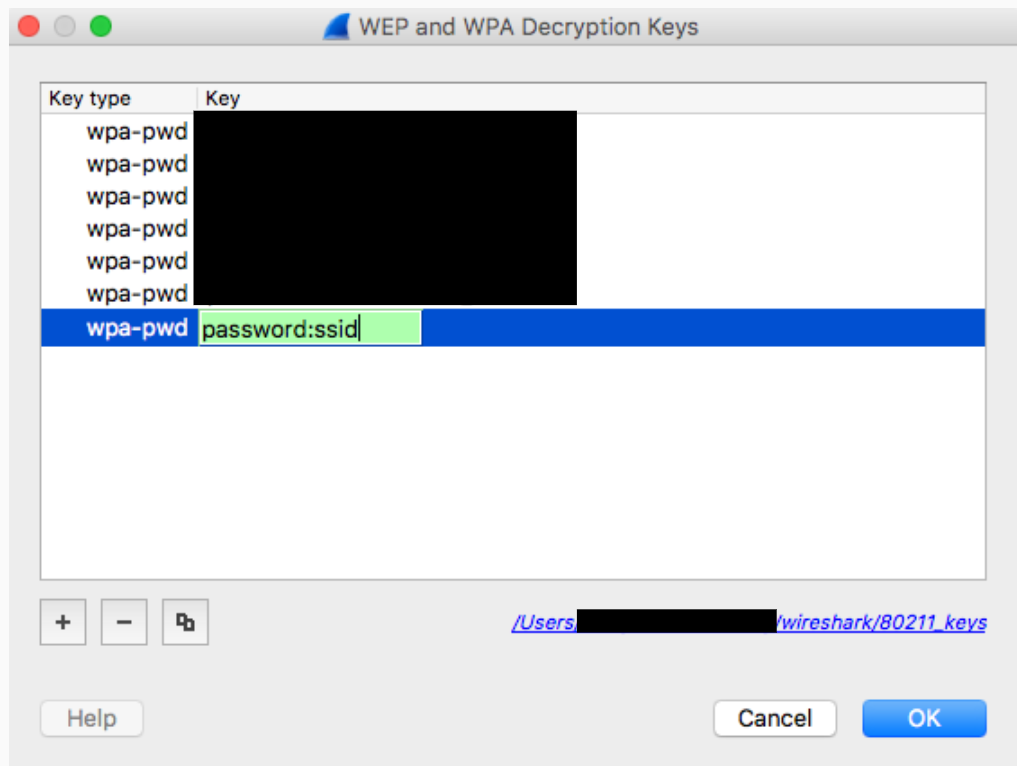
Click OK to confirm
For further information, see Wireshark's official guide (with screenshots) at How to Decrypt 802.11.
If using tshark, pass the following arguments:
tshark -o wlan.enable_decryption:TRUE -o 'uat:80211_keys:"wpa-pwd","<psk>:<ssid>"'
Colorize Wireshark 802.11 Data
There is a handy 802.11 color profile located on metageek.com: Wireshark Configuration Profile.