
1. Before you begin
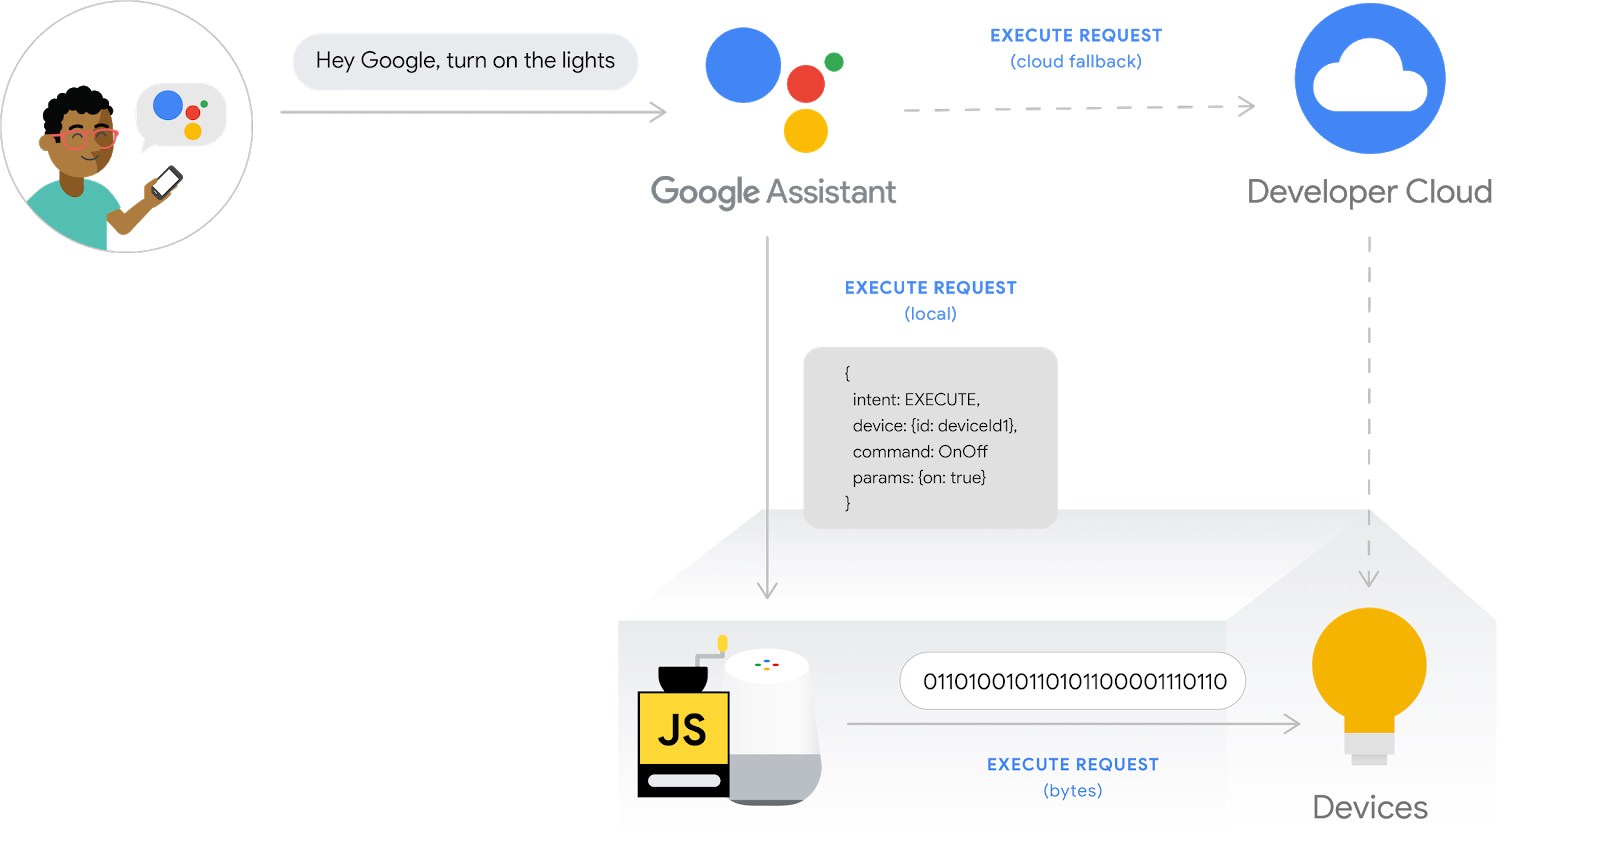
Smart home integrations allow the Google Assistant to control connected devices in users' homes. To build a Cloud-to-cloud integration, you need to provide a cloud webhook endpoint capable of handling smart home intents. For instance, when a user says, "Hey Google, turn on the lights," the Assistant sends the command to your cloud fulfillment to update the state of the device.
The Local Home SDK enhances your smart home integration by adding a local path to route smart home intents directly to a Google Home device, which enhances reliability and reduces latency in processing users' commands. It allows you to write and deploy a local fulfillment app in TypeScript or JavaScript that identifies devices and executes commands on any Google Home smart speaker or Google Nest smart display. Your app then communicates directly with users' existing smart devices over the local area network by using existing standard protocols to fulfill commands.
Debugging Cloud-to-cloud integrations is a critical step to build your integrations with production quality, yet it is challenging and time-consuming without informative, easy-to-use troubleshooting and testing tools. To facilitate debugging Cloud-to-cloud integrations, Google Cloud Platform (GCP) Metrics and Logging and Test Suite for smart home are available to help you identify and resolve issues of your integrations.
Prerequisites
- Create a Cloud-to-cloud integration developer guide
- Run the Enable local fulfillment for Cloud-to-cloud integrations codelab
What you'll build
In this codelab, you'll build a local fulfillment for Cloud-to-cloud integrations and connect it to the Assistant, then debug the Local Home app by Test suite for smart home & Google Cloud Platform (GCP) Metrics and Logging.
What you'll learn
- How to use GCP Metrics and Logging to identify and resolve production issues.
- How to use the Test Suite to identify functional and API issues.
- How to use Chrome Dev Tools while developing your Local Home app.
What you'll need
- The latest version of Google Chrome
- An iOS or Android device with the Google Home app
- A Google Home smart speaker or Google Nest smart display
- Node.js version 24 or later
- A Google Account
- A Google Cloud billing account
2. Run the washer app
Get the source code
Click the following link to download the sample for this codelab on your development machine:
...or you can clone the GitHub repository from the command line:
$ git clone https://github.com/google-home/smarthome-debug-local.git
About the project
The starter app contains similar subdirectories and cloud functions as the Enable local fulfillment for Cloud-to-cloud integrations codelab. But instead of app-start, we have app-faulty here. We will start with a local home app that works but not that well.
Connect to Firebase
We will be using the same project that you have created in Enable local fulfillment for Cloud-to-cloud integrations codelab, but we will deploy the files downloaded in this codelab.
Navigate to the app-faulty directory, then set up the Firebase CLI with your integration project created in the Enable local fulfillment for Cloud-to-cloud integrations codelab:
$ cd app-faulty
$ firebase use <project-id>
Deploy to Firebase
Navigate to the app-faulty/functions folder and install all the necessary dependencies using npm:
$ cd functions
$ npm install
Note: If you see the message below, you can ignore and proceed. The warning is due to some older dependencies and you can find more details here.
found 5 high severity vulnerabilities
  run `npm audit fix` to fix them, or `npm audit` for details
Navigate to the app-faulty/local/ directory and run the following commands to download the TypeScript compiler and compile the app:
$ cd ../local
$ npm install
$ npm run build
This compiles the index.ts (TypeScript) source and places the following contents into the app-faulty/public/local-home/ directory:
bundle.js—Compiled JavaScript output containing the local app and dependencies.index.html—Local hosting page used to serve the app for on-device testing.
Now that you have installed the dependencies and configured your project, you are ready to run the app for the first time.
$ firebase deploy
This is the console output you should see:
...

✔ Deploy complete!

Project Console: https://console.firebase.google.com/project/<project-id>/overview
Hosting URL: https://<projectcd -id>.web.app
This command deploys a web app, along with several Cloud Functions for Firebase.
Update HomeGraph
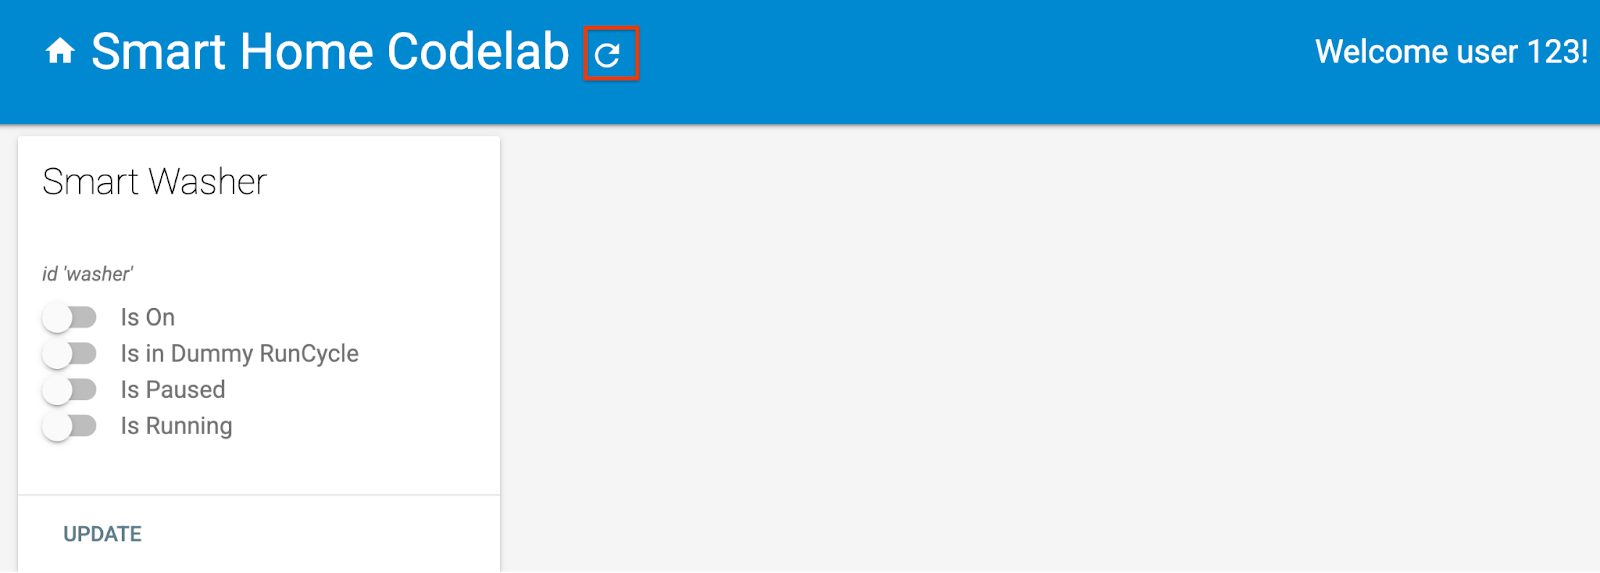
Open the Hosting URL in your browser (https://<project-id>.web.app) to view the web app. On the web UI, click the Refresh button to update HomeGraph with the latest device metadata from the faulty washer app using Request Sync.
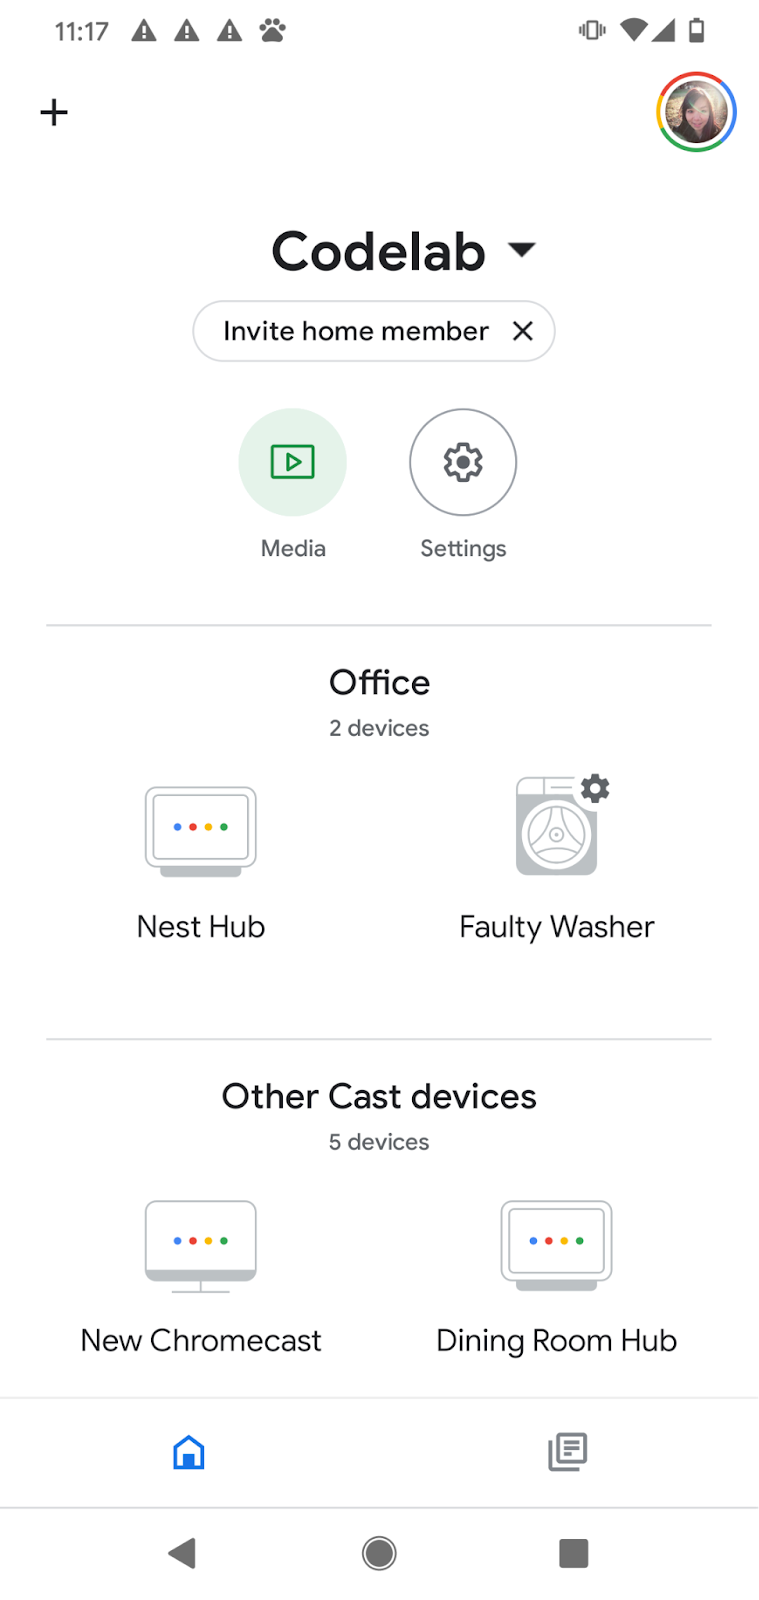
Open the Google Home app and verify that you can see your washer device with a new name "Faulty Washer". Remember to assign the device to a room that has a Nest device in it.
3. Start the smart washer
If you have run the Enable local fulfillment for Cloud-to-cloud integrations codelab, you should have started the virtual smart washer already. If it's stopped, remember to restart the virtual device.
Start the device
Navigate to the virtual-device/ directory and run the device script, passing the configuration parameters as arguments:
$ cd ../../virtual-device
$ npm install
$ npm start -- \
  --deviceId=deviceid123 --projectId=<project-id> \
  --discoveryPortOut=3311 --discoveryPacket=HelloLocalHomeSDK
Verify that the device script runs with the expected parameters:
(...): UDP Server listening on 3311
(...): Device listening on port 3388
(...): Report State successful
4. Test the Local Home App
Send commands to your device through voice commands to the Google Home device, such as:
"Hey Google, turn on my washer."
"Hey Google, start my washer."
"Hey Google, force local."
"Hey Google, stop my washer."
You will notice Google Assistant responds with "Sorry, it looks like the Faulty Washer isn't available right now" when you try to control the washer after "force local".
This means that the device is not reachable through a local path. It worked before issuing "Hey Google, force local" because we will fall back to using the cloud path when the device is not reachable through a local path. However, after "force local", the option of falling back to the cloud path is disabled.
To find out what the problem is, let's make use of the tools that we have: Google Cloud Platform (GCP) Metrics and Logging and Chrome Developer Tools.
5. Debug the Local Home app
In the following section, you will use the tools provided by Google to find out why the device is not reachable through the local path. You can use Google Chrome Developer Tools to connect to the Google Home device, view the console logs, and debug the Local Home app. You can also send custom logs to Cloud Logging so that you can be aware of the top errors that your users are finding in your Local Home app.
Connect Chrome Developer Tools
To connect the debugger to your local fulfillment app, follow these steps:
- Make sure that you linked your Google Home device to a user with permission to access the Developer Console project.
- Reboot your Google Home device, which enables it to get the URL of your HTML as well as the scan configuration that you put in the Developer Console.
- Launch Chrome on your development machine.
- Open a new Chrome tab and enter
chrome://inspectin the address field to launch the inspector.
You should see a list of devices on the page and your app URL should appear under the name of your Google Home device.

Launch the inspector
Click Inspect under your app URL to launch Chrome Developer Tools. Select the Console tab and verify that you can see the content of IDENTIFY intent printed by your TypeScript app.
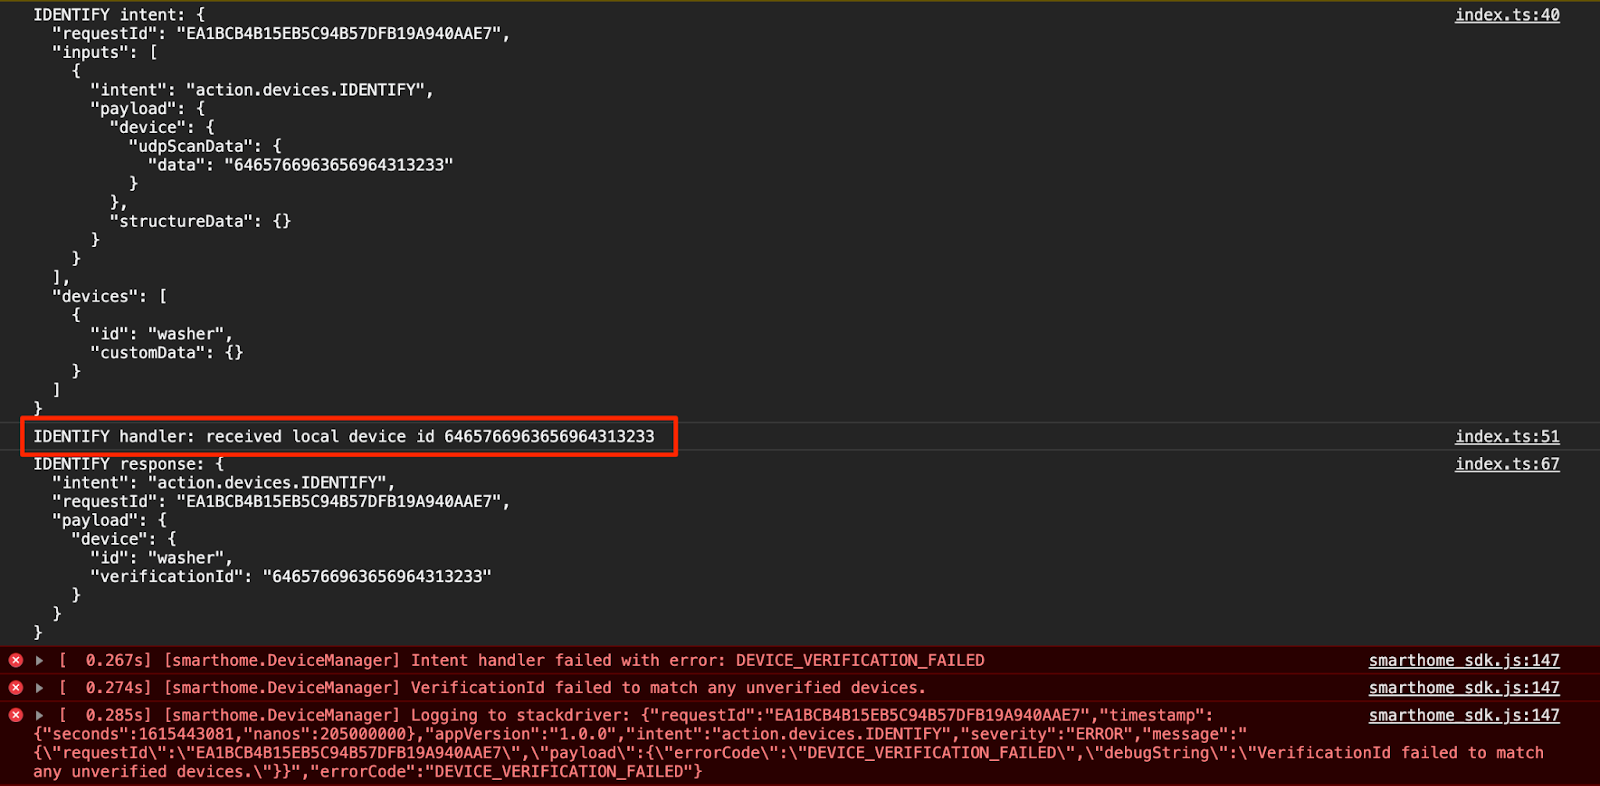
This output means the IDENTIFY handler was triggered successfully, but the verificationId returned in the IdentifyResponse does not match any of the devices in your HomeGraph. Let's add some custom logs to find out why.
Add custom logs
Although there is an DEVICE_VERIFICATION_FAILED error printed by the Local Home SDK, it doesn't help much in finding the root cause. Let's add some custom logs to make sure we are reading and processing the scan data correctly, and note that, if we reject the promise with an error, the error message is actually sent to Cloud Logging as well.
local/index.ts
identifyHandler(request: IntentFlow.IdentifyRequest):
    Promise<IntentFlow.IdentifyResponse> {
  console.log("IDENTIFY intent: " + JSON.stringify(request, null, 2));

  const scanData = request.inputs[0].payload.device.udpScanData;
  if (!scanData) {
    const err = new IntentFlow.HandlerError(request.requestId,
        'invalid_request', 'Invalid scan data');
    return Promise.reject(err);
  }

  // In this codelab, the scan data contains only local device id.
  // Is there something wrong here?
  const localDeviceId = Buffer.from(scanData.data);
  console.log(`IDENTIFY handler: received local device id
      ${localDeviceId}`);

  // Add custom logs
  if (!localDeviceId.toString().match(/^deviceid[0-9]{3}$/gi)) {
    const err = new IntentFlow.HandlerError(request.requestId,
        'invalid_device', 'Invalid device id from scan data ' +
        localDeviceId);
    return Promise.reject(err);
  }

  const response: IntentFlow.IdentifyResponse = {
    intent: Intents.IDENTIFY,
    requestId: request.requestId,
    payload: {
      device: {
        id: 'washer',
        verificationId: localDeviceId.toString(),
      }
    }
  };
  console.log("IDENTIFY response: " + JSON.stringify(response, null, 2));

  return Promise.resolve(response);
}
Also, change the local home app version, so that we can identify if we're using the correct version.
local/index.ts
const localHomeSdk = new App('1.0.1');
After adding the custom logs, you need to compile the app again and re-deploy to Firebase.
$ cd ../app-faulty/local
$ npm run build
$ firebase deploy --only hosting
Now, reboot your Google Home device so that it can load the updated local home app. You can see if the Google Home device is using the expected version by looking at the Console logs in the Chrome Developer Tools.

Access Cloud Logging
Let's look at how to use Cloud Logging to find your errors. To access Cloud Logging for your project:
- In the Cloud Platform console, go to the Projects page.
- Select your smart home project.
- Under Operations, select Logging > Logs Explorer.
Access to logging data is managed through Identity and Access Management (IAM) for users of your integrations project. For more details on roles and permissions for logging data, see Cloud Logging access control.
Use advanced filters
We know that errors are happening in the IDENTIFY intent, as the local path is not working because the local device fails to be identified. However, we want to know exactly what the issue is, so let's filter out the errors that happen in the IDENTIFY handler first.
Click the Show query toggle, it should turn into a Query builder box. Enter jsonPayload.intent="IDENTIFY" in the Query builder box and click the Run query button.
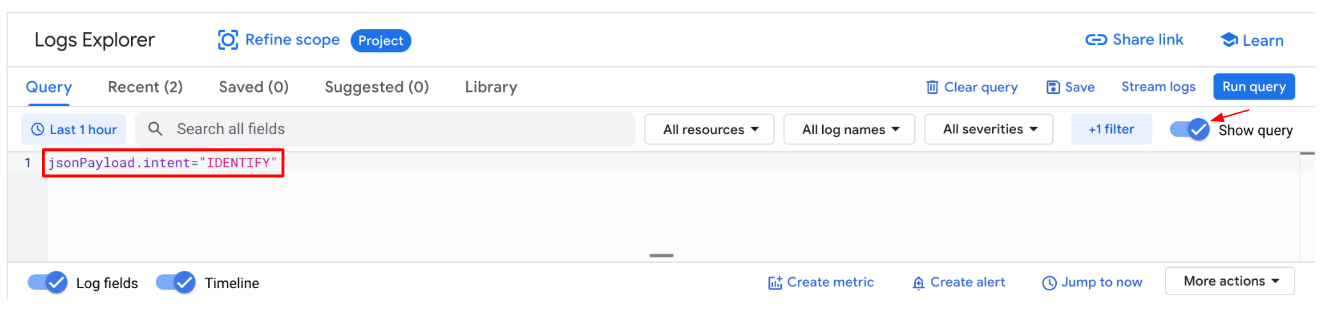
As a result, you get all the error logs that are thrown in the IDENTIFY handler. Next, expand the last error. You will find the errorCode and debugString that you just set when rejecting the promise in the IDENTIFY handler.
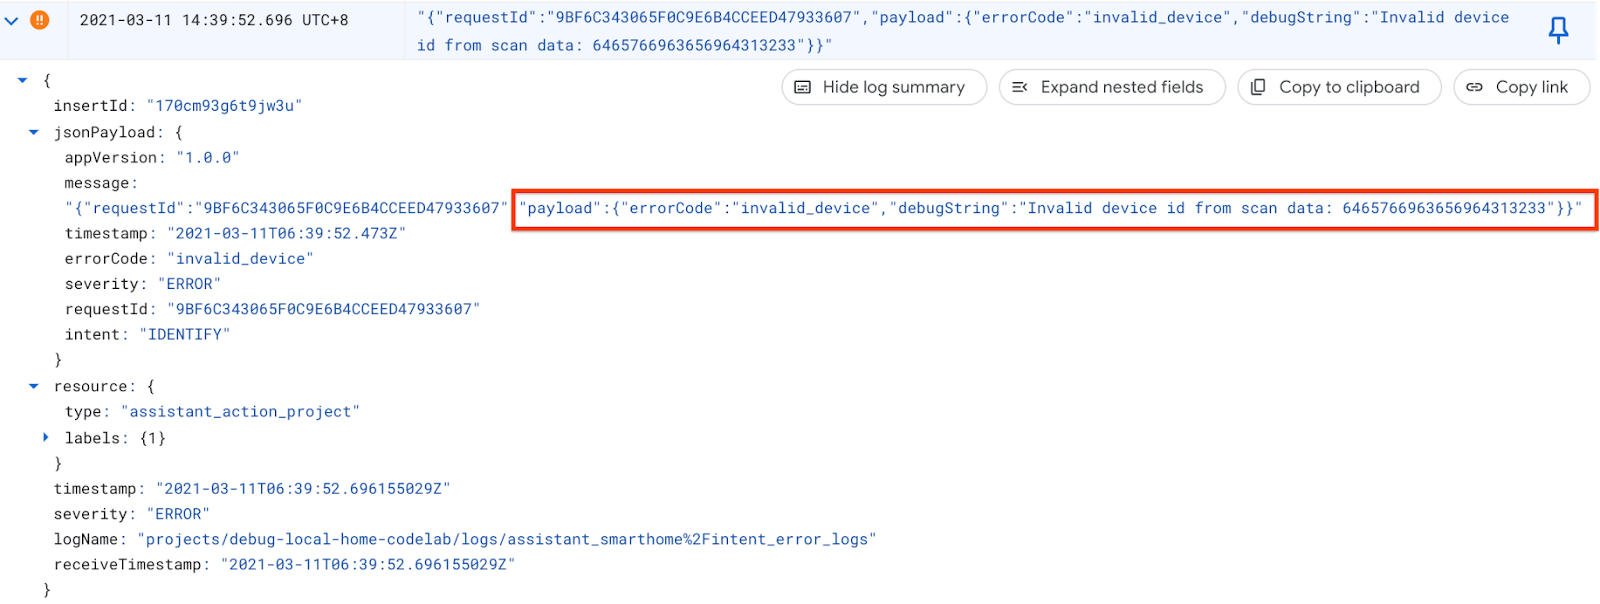
From the debugString, we can tell that the local device ID is not in the expected format. The Local Home app expects to get the local device ID as a string starting with deviceid followed by 3 digits, but the local device ID here is a hex string.
Fix the error
Going back to the source code where we parse the local device ID from the scan data, we notice that we didn't provide the encoding when converting the string into bytes. The scan data is received as a hex string, so pass hex as the character encoding when calling Buffer.from().
local/index.ts
identifyHandler(request: IntentFlow.IdentifyRequest):
    Promise<IntentFlow.IdentifyResponse> {
  console.log("IDENTIFY intent: " + JSON.stringify(request, null, 2));

  const scanData = request.inputs[0].payload.device.udpScanData;
  if (!scanData) {
    const err = new IntentFlow.HandlerError(request.requestId,
        'invalid_request', 'Invalid scan data');
    return Promise.reject(err);
  }

  // In this codelab, the scan data contains only local device id.
  const localDeviceId = Buffer.from(scanData.data, 'hex');
  console.log(`IDENTIFY handler: received local device id
      ${localDeviceId}`);

  if (!localDeviceId.toString().match(/^deviceid[0-9]{3}$/gi)) {
    const err = new IntentFlow.HandlerError(request.requestId,
      'invalid_device', 'Invalid device id from scan data ' +
      localDeviceId);
    return Promise.reject(err);
  }

  const response: IntentFlow.IdentifyResponse = {
    intent: Intents.IDENTIFY,
    requestId: request.requestId,
    payload: {
      device: {
        id: 'washer',
        verificationId: localDeviceId.toString(),
      }
    }
  };
  console.log("IDENTIFY response: " + JSON.stringify(response, null, 2));

  return Promise.resolve(response);
}
Also, change the local home app version, so that we can identify if we're using the correct version.
local/index.ts
const localHomeSdk = new App('1.0.2');
After fixing the error, compile the app and redeploy to Firebase. In app-faulty/local, run:
$ npm run build
$ firebase deploy --only hosting
Test your fix
After deployment, reboot your Google Home device so that it can load the updated local home app. Make sure the local home app version is 1.0.2, and this time, you should see no errors in the Chrome Developers Tools Console.

Now you can try to send commands to your device again.
"Hey Google, force local."
"Hey Google, stop my washer."
"Hey Google, turn on my washer."
...
"Hey Google, force default."
6. Run Test Suite for Smart Home
After verifying your device using the touch controls in the Google Home app or through voice commands, you can use the automated Test Suite for smart home to validate use cases based on the device types and traits associated with your integration. The Test Suite runs a series of tests to detect issues in your integration, and shows informative messages for failed test cases to expedite your debugging before diving into event logs.
Run Test Suite for smart home
Follow these instructions to test your Cloud-to-cloud integration by Test Suite:
- In your web browser, open the Test Suite for smart home.
- Sign in to Google using the button in the top-right corner. This allows the Test Suite to send the commands directly to Google Assistant.
- In the Project ID field, enter the project ID of your Cloud-to-cloud integration. And then click NEXT to proceed.
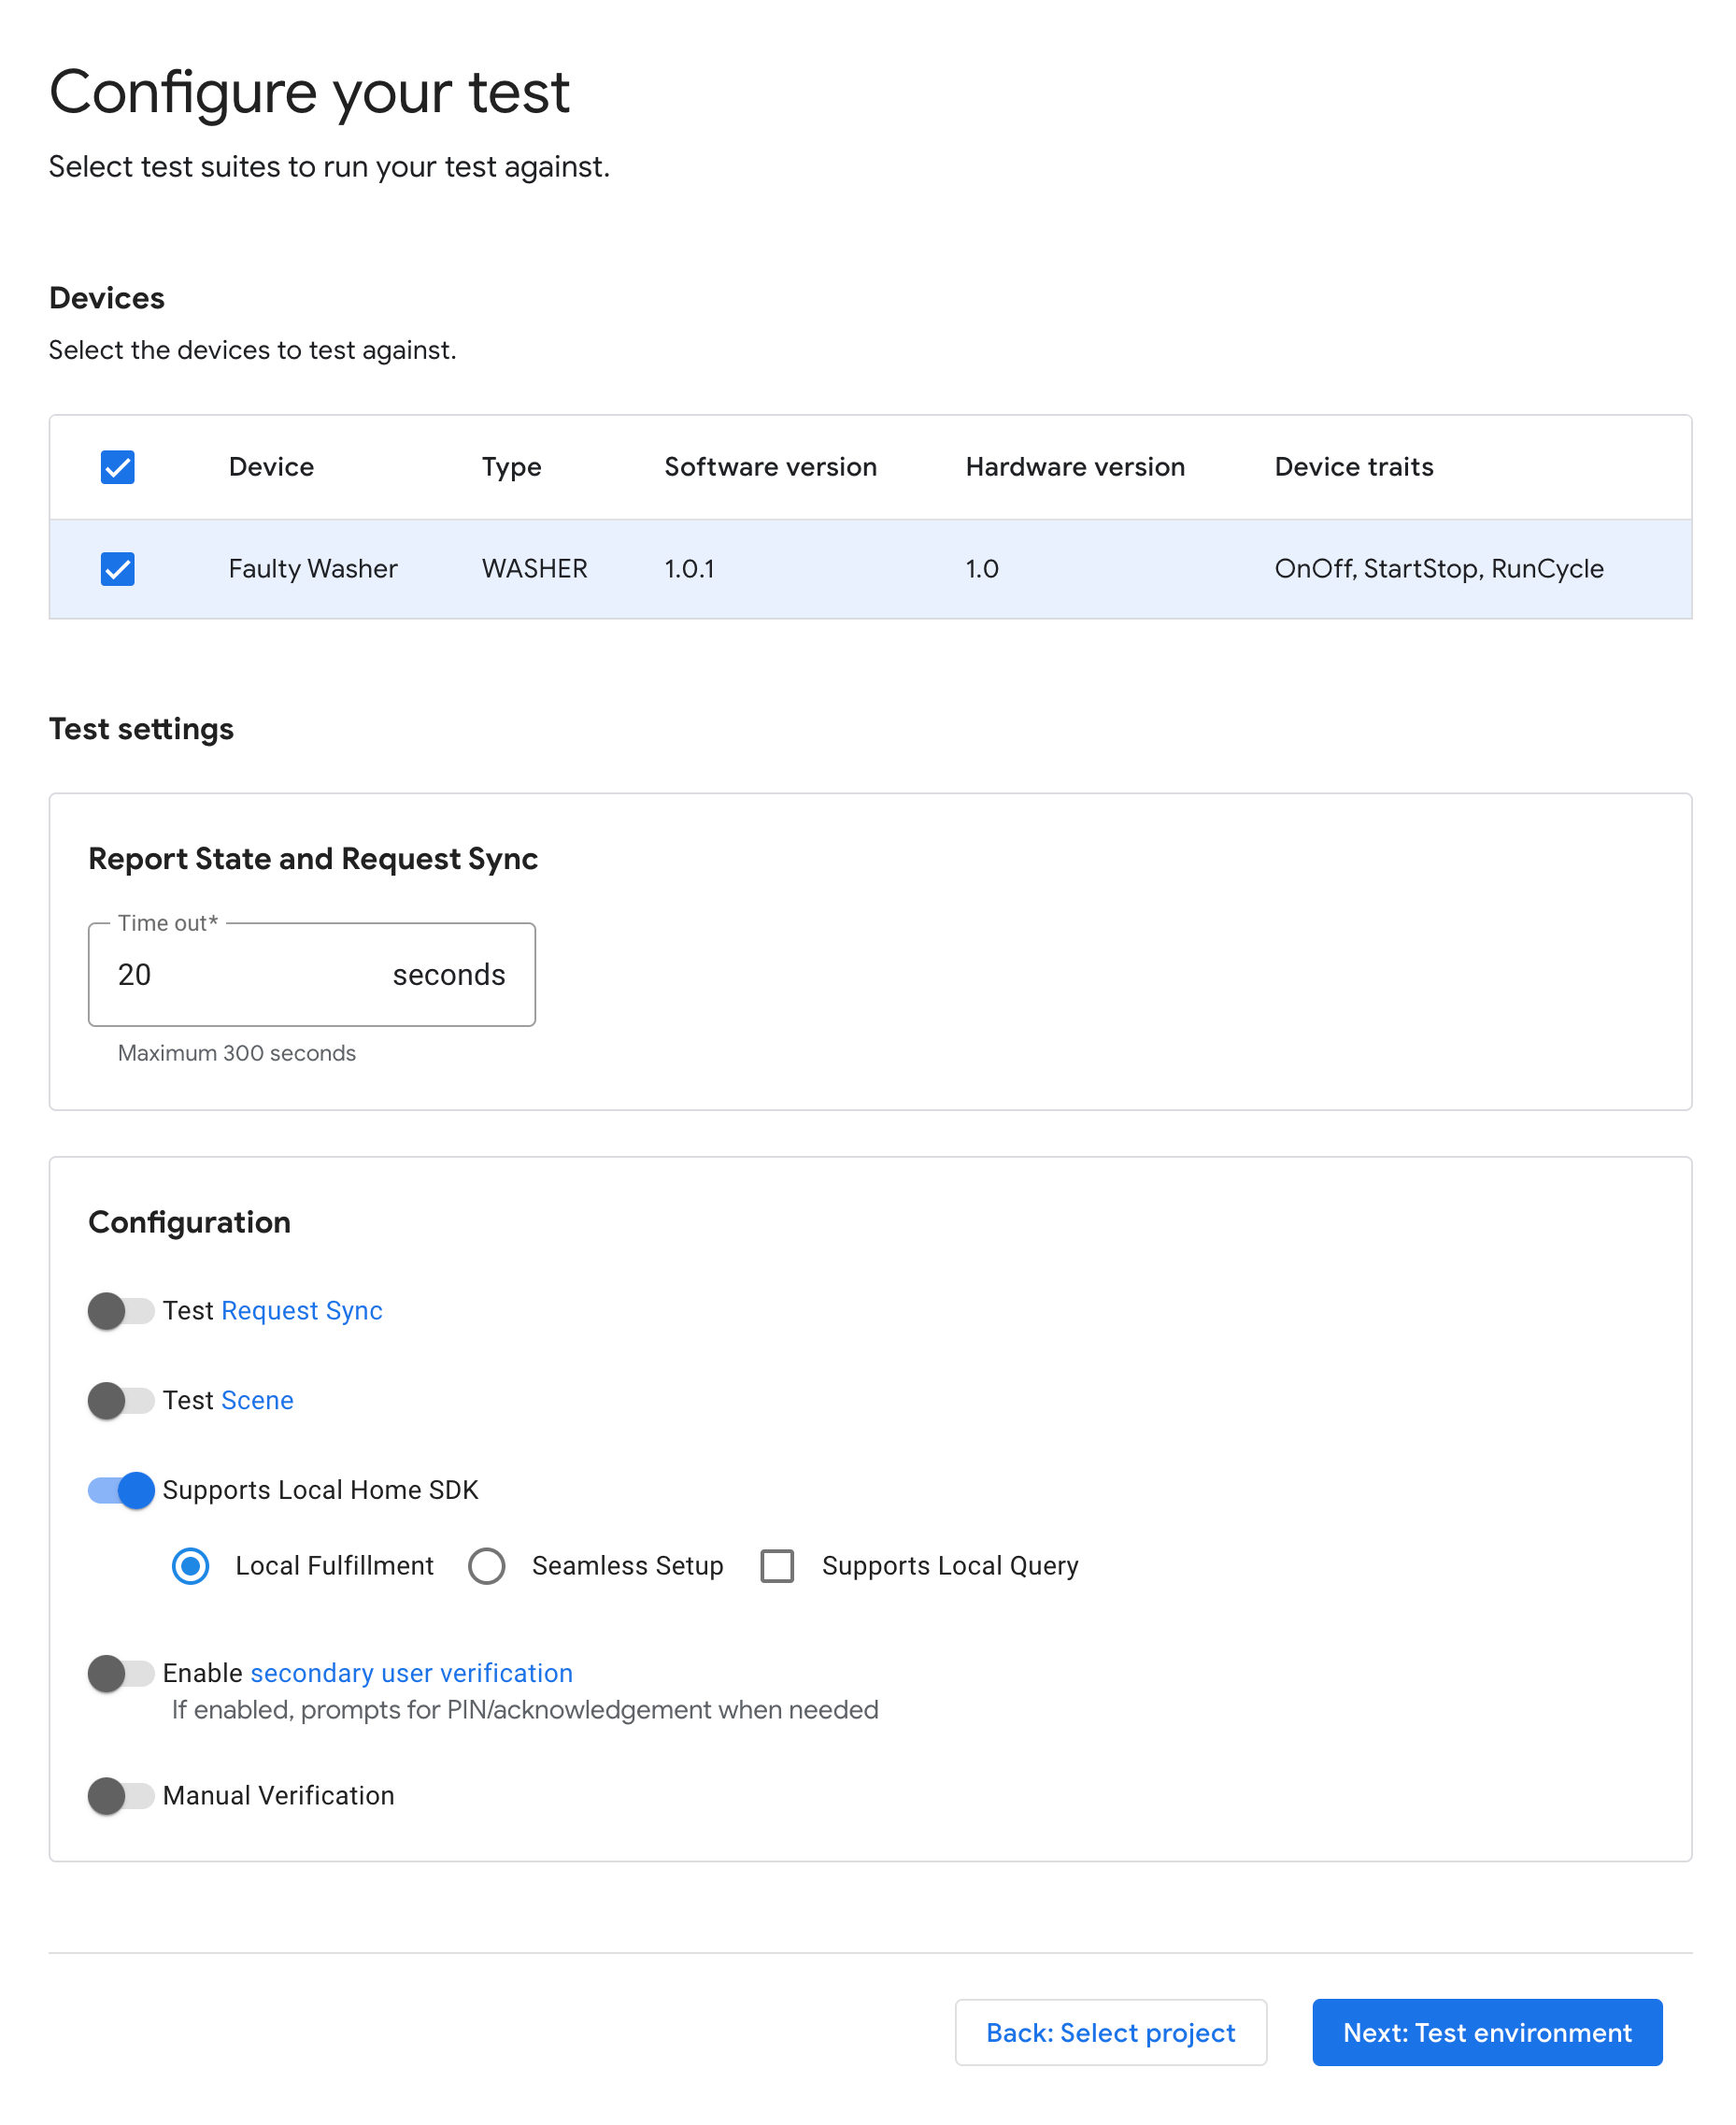
- In the Test Settings step, you should see your Faulty Washer in the Devices and Trais section.
- Disable the Test Request Sync option since the sample washer app has no UI to add / remove / rename the washer. In a production system, you must trigger Request Sync whenever the user adds / removes / renames devices.
- Leave the Local Home SDK option enabled since we're going to test both local and cloud paths.
- Click Next: Test environment to start running the test.
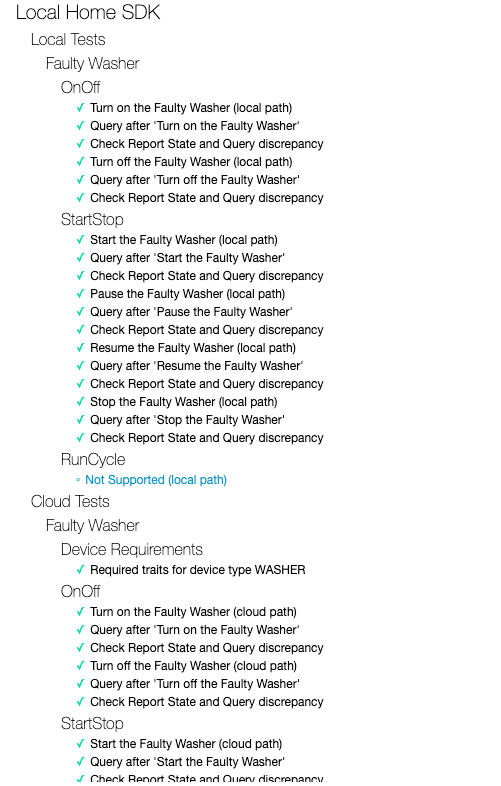
When the tests have completed, you'll notice that the Pause/Resume tests in the local path are failing while the Pause/Resume tests in the cloud path are passing.
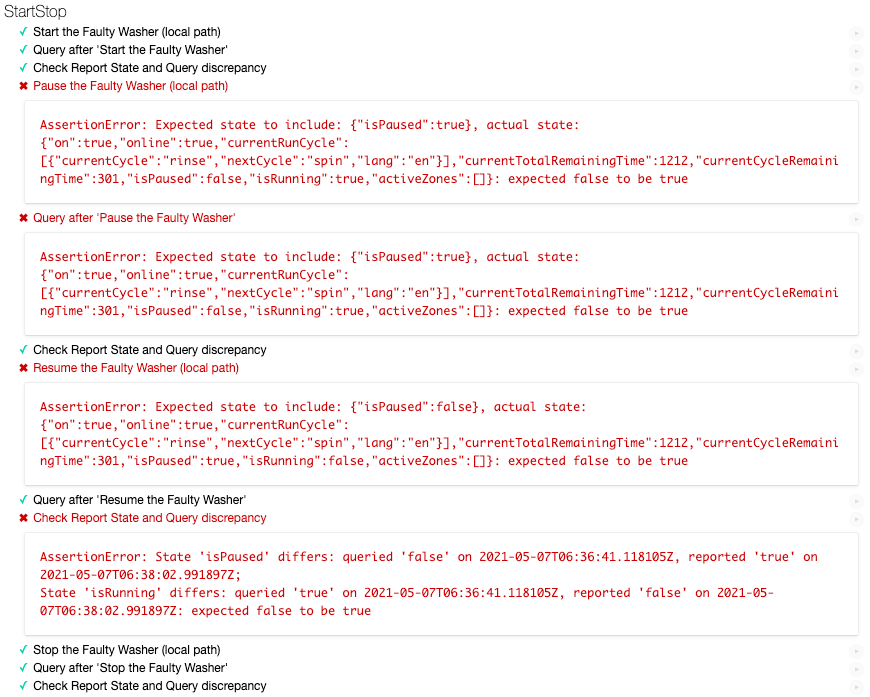
Analyze error message
Take a look closer at the error messages in the failed test cases. They tell you what is the expected state for that test and what was the actual state. In this case, for "Pause the Washer", the expected state is isPaused: true, but in the actual state we got isPaused: false. Similarly, for "Pause the Washer", the expected state is isPaused: true, but in the actual state we got isPaused: false.
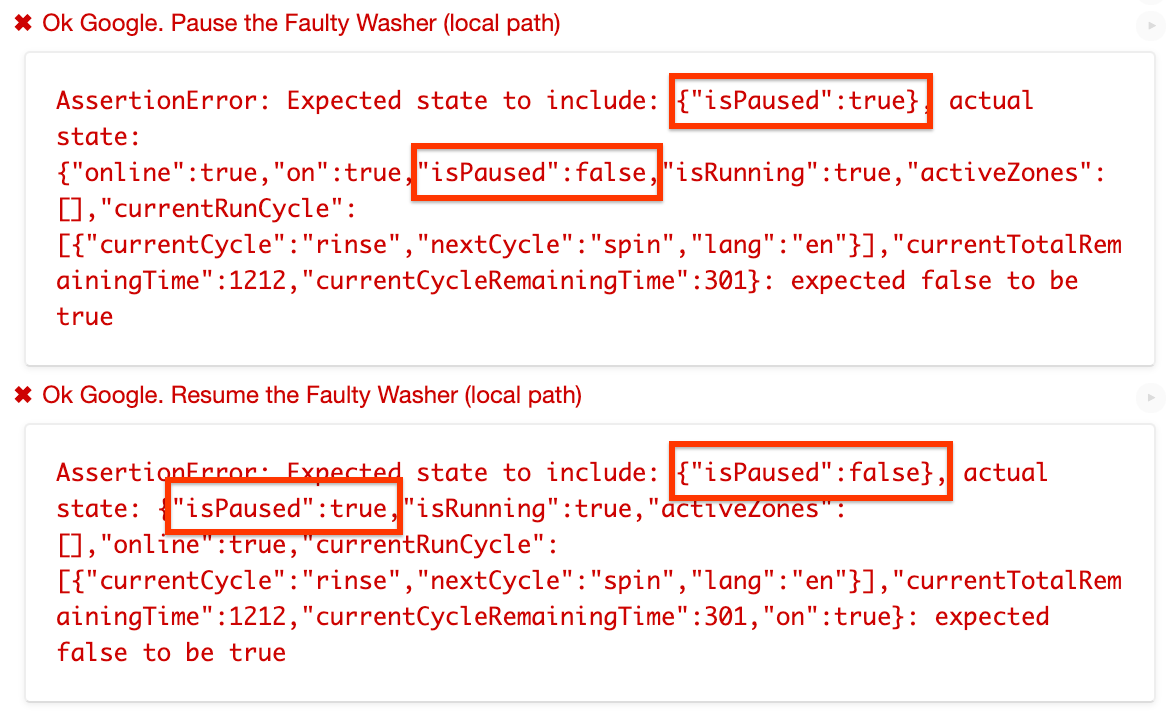
From the error messages, it looks like in the local path, we're setting the isPaused state inversely.
Identify and fix the error
Let's find the source code where the Local Home app sends the execution command to the device. getDataCommand() is the function called by the executeHandler() to set the payload in the execution command sent to the device.
local/index.ts
getDataForCommand(command: string, params: IWasherParams): unknown {
    switch (command) {
        case 'action.devices.commands.OnOff':
            return {
                on: params.on ? true : false
            };
        case 'action.devices.commands.StartStop':
            return {
                isRunning: params.start ? true : false
            };
        case 'action.devices.commands.PauseUnpause':
            return {
                // Is there something wrong here?
                isPaused: params.pause ? false : true
            };
        default:
            console.error('Unknown command', command);
            return {};
    }
}
We are indeed setting the isPause in the reverse state, it should be set to true when params.pause is true and false otherwise. So, let's fix that.
local/index.ts
getDataForCommand(command: string, params: IWasherParams): unknown {
    switch (command) {
        case 'action.devices.commands.OnOff':
            return {
                on: params.on ? true : false
            };
        case 'action.devices.commands.StartStop':
            return {
                isRunning: params.start ? true : false
            };
        case 'action.devices.commands.PauseUnpause':
            return {
                isPaused: params.pause ? true : false
            };
        default:
            console.error('Unknown command', command);
            return {};
    }
}
Change the local home app version, so that we can identify if we're using the correct version.
local/index.ts
const localHomeSdk = new App('1.0.3');
Remember to to compile the app again and re-deploy to Firebase. In app-faulty/local, run:
$ npm run build
$ firebase deploy --only hosting
Now, reboot your Google Home device so that it can load the updated local home app. Make sure the local home app version is 1.0.3.
Test your fix
Now, re-run the Test suite for smart home with the same configurations and you will find that all test cases have passed.
7. Congratulations
Congratulations! You successfully learned how to troubleshoot a Local Home app using the Test Suite for smart home & Cloud Logging.
Learn More
Here are some additional things you can try:
- Add more supported traits to your device and test with Test Suite.
- Add more custom logs in each of the intent handlers and view them in Cloud Logging.
- Create dashboards, set up alerts, and access metrics data programmatically to get helpful usage metrics about your integration.
You can also learn more about testing and submitting an integration for review, including the certification process to publish your integration to users.