1. Introduction
Matter is a connectivity protocol that brings exciting opportunities for the development of smart devices. In this codelab, you'll build your first Matter device. To learn about Matter, visit Google Home Developer Center: Matter or the Connectivity Standards Alliance website.
What you'll learn
- How to integrate a physical device with Matter.
- How to commission and control your Matter device with Google Home.
What you'll need
- A hub, which is any Google Nest device that supports Matter, such as the Nest Hub (2nd generation).
- Either an Espressif Systems ESP32-DevkitC or ESP32 M5STACK Matter evaluation board.
- A PC running Linux.
- Basic knowledge of Linux.
2. Set up your environment
Identify the serial device
The first step in setting up your development environment is to determine which serial port your device is connected to. This information will allow you to program and interact with your developer board.
- Connect the developer board to your computer using a USB cable.
- Look in the
/devfile system to find the developer board device. You can narrow your search by specifying your developer board's device prefix. Espressif's ESP32 uses/dev/ttyUSBx:user@host $ ls /dev/ttyUSB* /dev/ttyUSB0
Set up your hub
Set up your hub using the same Google Account you intend to use for this codelab.
Set up your development environment
Prerequisites
These instructions were tested on Debian Linux and should work on most Debian-based Linux distributions, including Ubuntu. If you're working with a different Linux distribution, the dependency setup procedure may vary from what follows.
Install dependencies
Run the following command to install required Linux package binaries that may not already be installed:
$ sudo apt-get install git gcc g++ pkg-config libssl-dev libdbus-1-dev \
libglib2.0-dev libavahi-client-dev ninja-build python3-venv python3-dev \
python3-pip unzip libgirepository1.0-dev libcairo2-dev libreadline-dev screen
Set up the SDK
To continue this codelab, you'll need the Espressif SDK (the Espressif IoT Development Framework or ‘ESP-IDF').
- Create a directory to contain the ESP-IDF:
$ mkdir ~/esp-idf_tools
- Clone the ESP-IDF from GitHub into this directory:
$ cd ~/esp-idf_tools
$ git clone -b v4.4.3 --recursive https://github.com/espressif/esp-idf.git
- Complete the toolchain installation:
$ cd ./esp-idf
$ ./install.sh
$ cd ~/
Set up the Matter SDK
- Clone the open source Matter repository:
$ git clone https://github.com/project-chip/connectedhomeip.git
$ cd ./connectedhomeip
$ git fetch origin v1.0-branch
$ git checkout FETCH_HEAD
- Fetch the repository submodules:
$ ./scripts/checkout_submodules.py --shallow --platform esp32
- Bootstrap the Matter development environment:
$ source ./scripts/bootstrap.sh
3. Google Home Developer Console
The Google Home Developer Console is the web application where you manage your Matter integrations with Google Home.
Any Matter device that has passed Connectivity Standards Alliance (Alliance) Matter certification works in the Google Home ecosystem. Devices under development that have not been certified can be commissioned in the Google Home ecosystem under certain conditions - see Pairing restrictions for more information.
Create a developer project
Begin by going to the Google Home Developer Console:
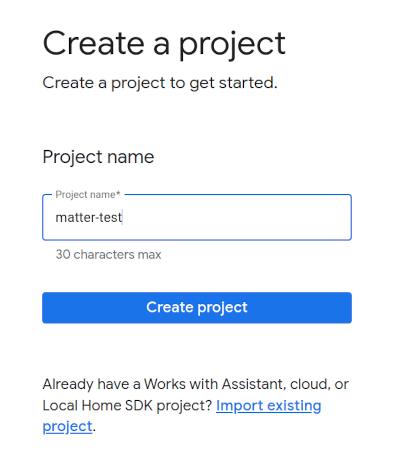
- Click Create project.
- Enter a unique project name and then click Create project.

- Click + Add integration, which takes you to the Matter resources screen, where you can view Matter development documentation and read about some tools.
- When you're ready to continue, click Next: Develop, which displays the Matter checklist page.
- Click Next: Setup
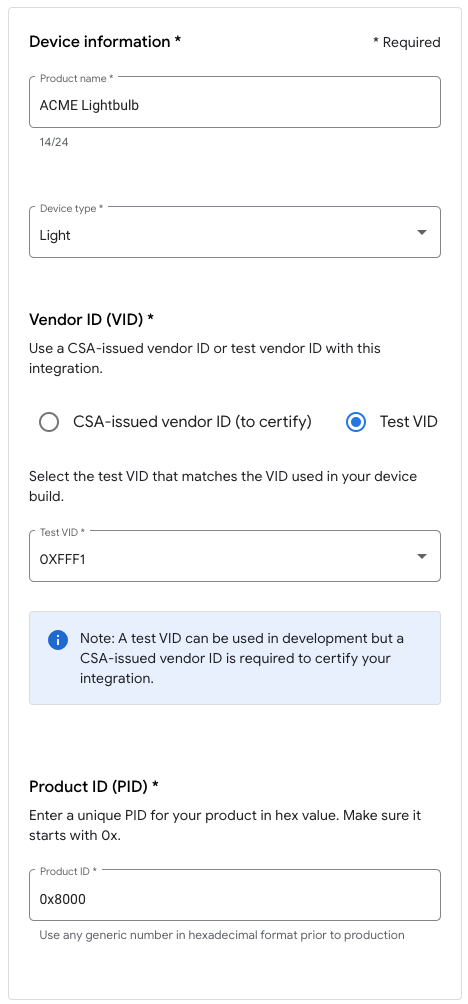
- On the Setup page, enter your Product name.
- Click Select device type and select the device type from the drop-down menu (in this case,
Light). - In Vendor ID (VID), select Test VID, and select 0xFFF1 from the Test VID drop-down menu. In Product ID (PID), enter 0x8000 and click Save & continue, and then click Save in the following page. Use these exact VID/PID values, later codelab steps depend on them.

- Now you'll see your integration under Matter integrations.
- Reboot your hub to ensure that it receives the most recent Matter integration project configuration. If you have to change the VID or PID later, you'll also need to reboot after saving the project for the change to take effect. See Restart Google Nest or Google Wifi devices for step-by-step reboot instructions.
4. Build the device
All the examples in Matter are placed in the examples folder in the Github repository. There are several samples available, but our focus on this codelab is on the lighting-app.
This example is a simple device that appears in Google Home as an On/Off Light, responding to On and Off commands. Making it control an actual electric light is beyond the scope of this codelab.
Configure the build
- Configure the Matter SDK and activate the Matter build environment:
$ cd ~/esp-idf_tools/esp-idf
$ source export.sh
$ cd ~/connectedhomeip
$ source ./scripts/activate.sh
- Enable Ccache, which accelerates the build process:
$ export IDF_CCACHE_ENABLE=1
- Move to the
lighting-appESP32 build directory and set the target architecture:$ cd ./examples/lighting-app/esp32 $ idf.py set-target esp32
- Run the configuration utility:
$ idf.py menuconfig
- Select
Demo -> Device Typeand setDevice TypetoESP32-DevKitC. - Press the left arrow key to return to the top level menu.
- Select
Component config --->. - Select
CHIP Device Layer --->. - Select
Device Identification Options --->. - Set
Vendor IDto your Alliance-assigned VID, or a test VID. - Set
Product IDto the PID you set on the Matter integration in the Google Home Developer Console. - Press S to Save.
- Press Return to accept the default path where the configuration will be saved.
- Press Return to dismiss the save confirmation dialog.
- Press Q to Quit out of the configuration utility.
- Run the configuration utility:
Run the build
Invoke the build script:
idf.py build
The build should complete with no errors.
Program the device
- Connect your developer board to your computer using a USB cable.
- Wipe out any previous firmware on the device (if you only have one developer board connected to your computer, you may leave off the
-p {device}option - the device should be detected automatically):idf.py -p {device} erase-flash - Copy your new application to the developer board with:
idf.py -p {device} flash
More information about the flashing options may be found at the Espressif esptool.py documentation page.
5. Connect to the device
- Open a terminal window.
- Make a note of what directory you're in, then connect to your new Matter device using GNU
screen:$ screen -L {device} 115200 - If you see a blank console, press the RESET button to start the device boot process.
6. Commission the device
Note: This step will only succeed if you have already set up your project in the Google Home Developer Console.
Nest Hub
A hub is required to commission your device on the Matter fabric. This is a Google Nest device, such as the Nest Hub (2nd generation), that supports Matter and which will serve as both a Border Router for Thread-enabled devices and as a local fulfillment path for routing Smart Home intents.
Refer to this list to see which hubs support Matter.
Before starting the commissioning process, check to make sure that:
- Your hub is paired with the same Google account you used to sign in on the Google Home Console.
- Your hub is on the same Wi-Fi network as the computer you are using to run your Virtual Matter Device.
- Your hub is in the same structure you are using on your Google Home App. (The "house" in the Google Home Graph represents your structure).
Pair the device
Follow the ESP32 pairing instructions to pair your device.
Note: If you're using an M5STACK, be aware that its screen will remain blank after being flashed, so you'll have to view the QR code using the URL that appears in the console. Or, you can type in the manual pairing code instead.
Example console output showing QR code URL:
I (1926) chip[DL]: Done driving station state, nothing else to do...
I (1936) chip[SVR]: SetupQRCode: [MT:X.XXXXXXXXXXXXXXXXX]
I (1936) chip[SVR]: Copy/paste the below URL in a browser to see the QR Code:
I (1946) chip[SVR]: https://project-chip.github.io/connectedhomeip/qrcode.html?data=MT%3XX.KXXXXXXXXXXXXXXXX
I (1956) chip[SVR]: Manual pairing code: [XXXXXXXXXXX]]
Troubleshooting
Commissioning fails
- Make sure you have created a project with the correct VID/PID combination in the Google Home Console.
- Make sure you entered the correct VID and PID in the build configuration.
- Make sure you selected the correct
Device Typein the build configuration.
For more troubleshooting tips, see the Matter Troubleshooting page.
7. Control the device
Once your Matter-compliant device is successfully commissioned and appears in the Google Home app as a light bulb, you may try controlling the device using Google Assistant, the Google Home app, or the Google Assistant Simulator in the Google Home Extension for VS Code.
Google Assistant
Use Google Assistant on your phone or hub to toggle the device state from voice commands, such as saying "Hey Google, toggle my lights".
See the Control smart home devices with voice commands section of Control smart home devices added to the Google Home app for more examples of commands.
Google Home app
You may tap the On and Off labels next to the bulb icon shown on the Google Home App.
See Control devices with the Google Home app for more information.
Google Assistant Simulator
In the Google Home Extension for VS Code, using the Google Assistant Simulator, you can issue utterances to your device using a chat-like interface.
8. Congratulations!
You've successfully created and commissioned your first Matter device. Awesome!
In this codelab you learned how to:
- Install a Matter development environment from requirements to a working state.
- Build and run a Matter device.
- Commission and control your device from Google Home.
To learn more about Matter, explore these references:
- The Matter Primer by Google Home, where you'll learn the important concepts and principles of the Matter protocol.
- The Matter Specification, Matter Device Library and Matter Application Cluster Library, published by the Connected Standard Alliance.
- The Matter GitHub repository.
