Matter virtual devices are useful for developing and testing Matter solutions, and can be commissioned using the Google Home app (GHA), and controlled using GHA and Google Assistant, just like physical Matter devices.
For app developers and others who need to test or emulate a virtual Matter device but lack the resources to build their own physical or virtual Matter device, Google offers the Matter Virtual Device (MVD). MVD is a lightweight standalone Linux or macOS desktop tool that simulates different types of virtual Matter devices and provides a graphical user interface to control and display the states of the virtual Matter device.
Unlike a physical Matter device, MVD does not rely on Bluetooth® Low Energy (BLE) or Thread® in order to join a Matter fabric. Instead, it uses the host Linux or macOS machine's existing Wi-Fi network connection for commissioning.
Compared to other tools
The MVD differs from the Virtual Device Controller (VDC) in that it is a self-contained solution, combining a virtual device with a UI for controlling it. In contrast, the VDC is used to control a separate virtual Matter device.
The MVD contains several different prebuilt virtual devices and includes an integrated UI to run and control them.
Supported devices
The MVD supports the following Matter device types:
| Matter Device Type | Application Cluster(s) | Home Ecosystem Type |
|---|---|---|
| Air Purifier |
0x0202 0x0006 0x0071 |
Air Purifier |
| Air Quality Sensor |
0x005b 0x0402 0x0405 0x040c 0x040d 0x042a 0x042d 0x042e |
Sensor |
| Basic Video Player |
0x0006 0x0506 0x0509 |
Television |
| Color Temperature Light |
0x0300 0x0008 0x0006 |
Light |
| Contact Sensor |
0x0045 |
Sensor |
| Dimmable Light |
0x0008 0x0006 |
Light |
| Dimmable Plug-in Unit |
0x0006 0x0008 |
Outlet |
| Dishwasher |
0x0006 0x0059 0x0056 0x0060 |
Dishwasher |
| Door Lock |
0x0101 |
Lock |
| Extended Color Light |
0x0300 0x0008 0x0006 |
Light |
| Fan |
0x0202 0x0006 |
Fan |
| Flow Sensor |
0x0404 |
Sensor |
| Generic Switch |
0x003b |
Switch |
| Humidity Sensor |
0x0405 |
Sensor |
| Laundry Washer |
0x0006 0x0051 0x0053 0x0056 0x0060 |
Washer |
| Light Sensor |
0x0400 |
Sensor |
| Occupancy Sensor |
0x0406 |
Sensor |
| On/Off Light |
0x0008 0x0006 |
Light |
| On/Off Light Switch |
0x0006 |
Switch |
| On/Off Plug-in Unit |
0x0008 0x0006 |
Outlet |
| Pressure Sensor |
0x0403 |
Sensor |
| Pump |
0x0006 0x0200 0x0402 0x0403 0x0404 |
Pump |
| Robot Vacuum Cleaner |
0x0054 0x0055 0x0061 |
Vacuum |
| Room Air Conditioner |
0x0006 0x0201 0x0202 |
Air Conditioner |
| Smoke CO Alarm |
0x005C |
Co Detector
Smoke Detector |
| Temperature Sensor |
0x0402 |
Sensor |
| Thermostat |
0x0201 |
Thermostat |
| Window Covering |
0x0102 |
Blinds |
Install MVD
MVD runs on 64-bit x86 processor machines running Debian
(13 Trixie or above), Ubuntu (20.04 Noble Numbat or above), or macOS.
Linux
Download the MVD Debian (.deb) package
Download the armored-ASCII signature (.asc) file
Then run dpkg to install the MVD
Debian (.deb) package:
sudo dpkg -i mvd_1.7.0_amd64.debmacOS
Download the MVD (macOS x86) dmg file
Download the MVD (ARM64 M1) dmg file
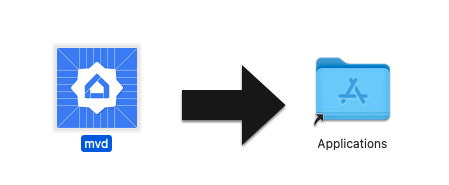
Then double-click the dmg file to open the installation
window.
To complete installation, select and drag the mvd icon to
the Applications folder:

Check port usage
The controller module in MVD uses TCP port 33000 to make RPC calls to the virtual device, so if this port is already in use by another process on your computer, be sure to free it up.
To see whether any process is using port 33000:
Linux
sudo fuser -v 33000/tcpmacOS
lsof -i:33000You can kill any process using TCP port 33000 with a single command:
Linux
sudo fuser -k 33000/tcpmacOS
lsof -ti:33000 | xargs killRun MVD
Linux
On Linux, run MVD from your applications folder or from the terminal:
mvdmacOS
On macOS, use Launchpad to open MVD or run MVD from the terminal:
cd /Applicationsopen mvd.app
Configure your device
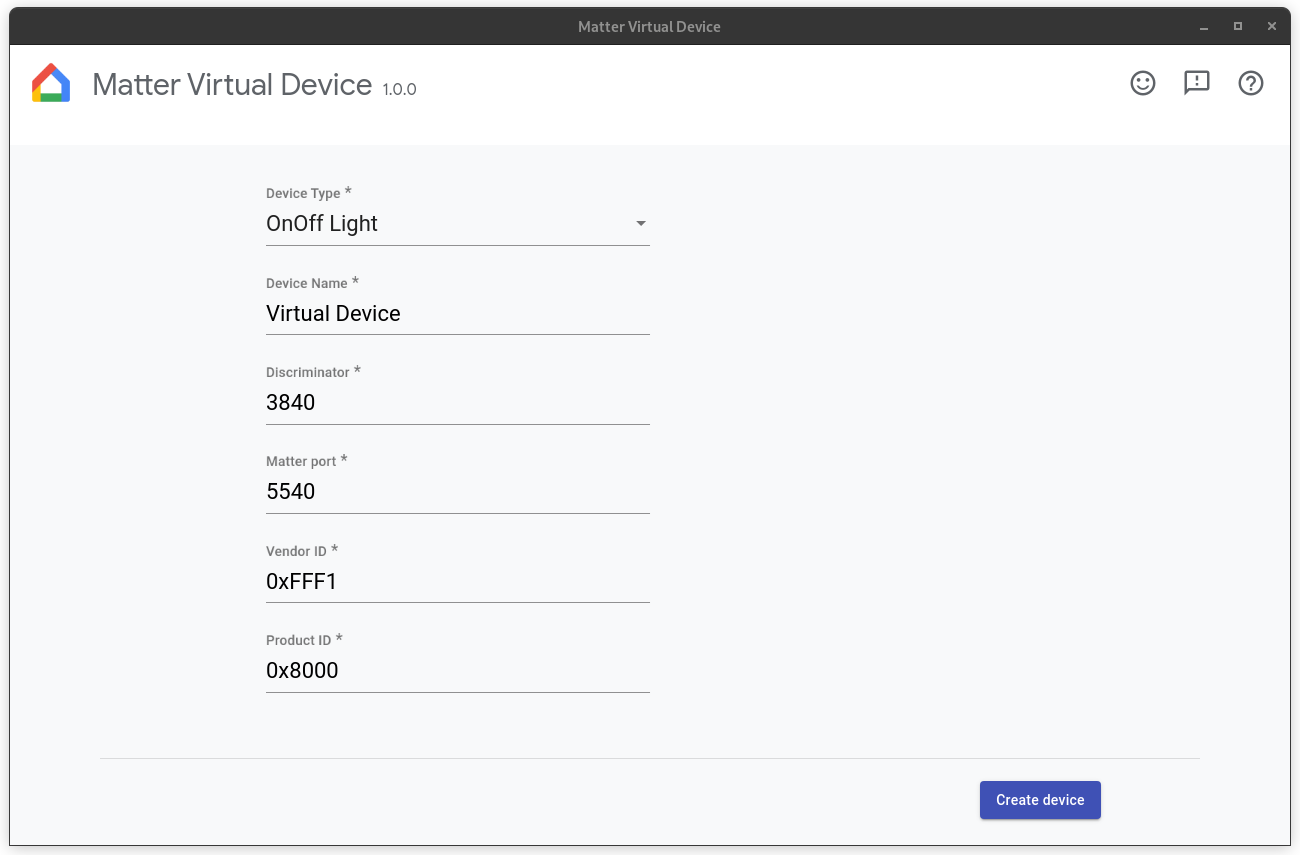
The main screen appears upon launch, and lets you configure a virtual device:
- Device Type: Select the device type (for example, Light, Switch, Sensor and so forth).
- Device Name: Give the device a user-friendly name.
- Discriminator: A 12-bit number used to discern between multiple
commissionable device advertisements. (Default:
3840). - Matter Port: A port for Matter commissioning and communication through IP networks. Matter uses TCP/UDP port 5540 by default, but you can configure the virtual device to use a different port, as long as no other service is using it.
- Vendor ID: Only test vendor ID
0xFFF1is supported. - Product ID: Only test product IDs
0x8000through0x801Fare supported.

Configure your firewall
Linux
If you have a firewall running in your computer, either shut it down, or allow incoming TCP/UDP connections on the Matter port.
To view the current active netfilter firewall rules, run:
sudo iptables -L -nIf you are using `ufw`, it can be disabled with:
sudo ufw disableAnd it can be re-enabled with:
sudo ufw enablemacOS
To configure or disable the firewall on macOS:
- Go to the Apple menu and choose System Settings.
- Click Network in the sidebar list.
- Click Firewall.
- Toggle the switch for Firewall to the Off position.
Run your device
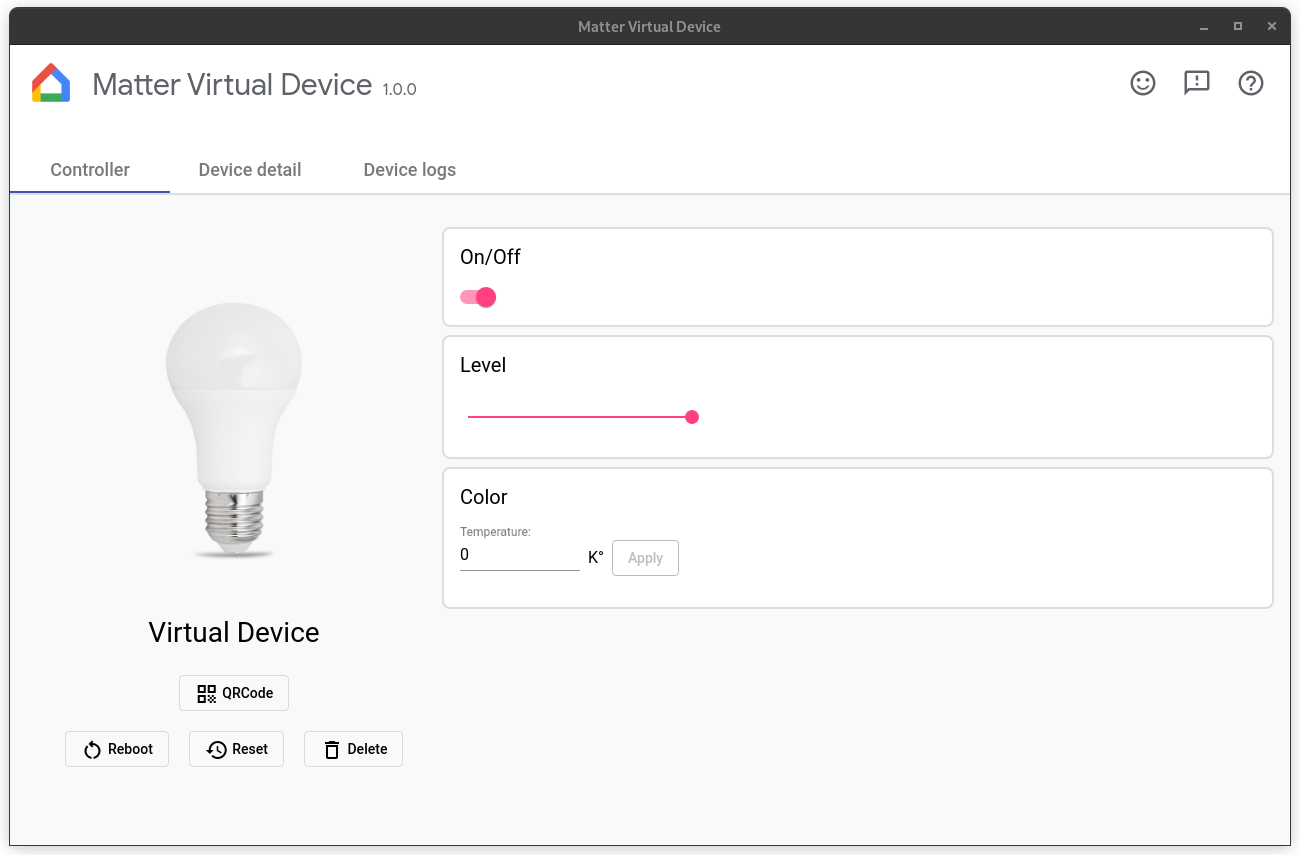
After the device is configured, click Create device. When the device is created, the Controller screen appears. Depending on the type of device you selected, you may see one or more of the following controls:
- On/Off: Common to the majority of devices.
- Level: For example, a light could have a level slider to adjust brightness.
- Color: For example, a color light could have this control.
- Occupancy: The Occupancy Sensor offers this control, to simulate the occupied or unoccupied state.
All virtual devices have the following controls:
- QRCode: Shows the QR code used for commissioning.
- Reboot: Restarts the virtual device. The device is disconnected from the network briefly.
- Reset: Factory-resets the current device and clears all state, including commissioning, current controls state, and so forth
- Delete: Destroys the device and returns to the Create device screen.

Manufacturer-specific traits
Manufacturer-specific (MS) traits are supported by the Home APIs for Android and provide additional functionality beyond the standard traits in Matter. To test a device with a MS trait, MVD lets you interact with the traits in the section called Custom Clusters (see image above).
Commission your device
The device is commissionable as soon as it is created.
There are a couple of prerequisites for commissioning the device:
You must have a project in Google Home Developer Console. This project must contain a Matter integration that has the same VID/PID combination as the one you used in setting up your virtual device. See the project creation guide for details.
You must have a Google Nest Hub that supports Matter
You must have an Android phone running Android 8.1 or later, with GHA installed.
The Android phone must be connected to the same Wi-Fi network as the hub.
The host machine must be connected to the Wi-Fi network.
To commission the device using the GHA, click QRCode to display the device's QR code, then follow the instructions in Pair a Matter device which explain how to onboard a Matter device using the GHA. You may also commission the device using the Google Home Sample App for Matter.
See our Matter Primer to learn how Matter Commissioning works.
Control the device
After you commission a virtual device, you can control the device using the Google Home App or Google Assistant by voice. You can either:
- Control the device through GHA or Assistant while monitoring state changes on the virtual device, or
- Control the device using the Sample App for Matter while monitoring state changes on the virtual device,or
- Control device state through MVD itself while monitoring state changes in GHA or Assistant.
Test with the device
To test with Assistant, we recommend using an utterance simulator such as Google Home Extension for VS Code or Google Home Plugin for Android Studio.
View device details
The Device detail screen shows detailed device information:
- Name: The friendly name given to the device.
- Device Type: The device type selected.
- Discriminator: The current device discriminator.
- Vendor ID: The current device vendor ID.
- Product ID: The current device product ID.
- RPC Port: The RPC port that device communicates with controllers (GUI).
- Matter Port: The port used by current device to communicate through IP network.
- Pass Code: The PIN used to commission the device through the network.
- Configuration Folder: The folder that virtual device stores configuration.
- Commission Information: Shows the fabric(s) that the device joined and the node ID of the device in the fabric.
View device logs
If you launched MVD from the terminal, log output appears
on stdout.
You can also view device logs on the Device logs tab.
Stop the device
To stop and destroy the device, click Delete.
Terminate the app
Closing the control window destroys the device and terminates the MVD application. If you launched from the terminal, you can also terminate the application by typing Ctrl-C in the terminal.
Get help
To get help with MVD, to report a bug, or to request a new feature, reach out to your Google support contact.
Clicking the help button in the upper-right corner of the window takes you to this page.
File a bug
If you feel you have found a defect in the MVD, you may file a bug by clicking the Issue button in the upper-right corner of the window.
Send feedback
To submit your thoughts on what you like about MVD or how we can improve your experience with the tool, complete our Feedback Form.
The form can be launched from the feedback button in the upper-right corner of the window, or by clicking the button below.
You can also provide feedback with the survey that pop-ups on the bottom when you're using MVD.
