
1. ก่อนเริ่มต้น
Google Home API มีชุดไลบรารีสำหรับนักพัฒนาแอป Android เพื่อเข้าถึงระบบนิเวศของ Google Home API ใหม่เหล่านี้ช่วยให้นักพัฒนาแอปสร้างแอปที่จัดสรรและควบคุมอุปกรณ์สมาร์ทโฮมได้อย่างราบรื่น
Google มีแอปตัวอย่าง Android สำหรับนักพัฒนาแอปที่ต้องการเข้าถึงตัวอย่างการทำงานโดยใช้ Google Home APIs Codelab นี้อิงตามสาขาของแอปตัวอย่างที่จะแนะนำวิธีใช้ API ของสิทธิ์ การจัดสรร อุปกรณ์ และโครงสร้าง
ข้อกำหนดเบื้องต้น
- ความรู้เกี่ยวกับระบบนิเวศของ Google Home (Cloud-to-Cloud และ Matter)
- เวิร์กสเตชันที่ติดตั้ง Android Studio (2024.3.1 Ladybug ขึ้นไป)
- โทรศัพท์ Android ที่เป็นไปตามข้อกำหนดของ Home API (ดูข้อกำหนดเบื้องต้น) โดยติดตั้งบริการ Google Play และแอป Google Home โปรแกรมจำลองจะใช้ไม่ได้ แอปตัวอย่างรองรับเฉพาะโทรศัพท์ Android จริงเท่านั้น
- Google Home Hub ที่รองรับซึ่งใช้ได้กับ Google Home API
- ไม่บังคับ - อุปกรณ์สมาร์ทโฮมที่ใช้ร่วมกับ Google Home API ได้
สิ่งที่คุณจะได้เรียนรู้
- วิธีสร้างแอป Android โดยใช้ Google Home API ตามแนวทางปฏิบัติแนะนำ
- วิธีใช้ Device และ Structure API เพื่อแสดงและควบคุมสมาร์ทโฮม
- วิธีใช้ Commissioning API เพื่อเพิ่มอุปกรณ์ลงในระบบนิเวศของ Google Home
ไม่บังคับ: ตั้งค่าบ้าน
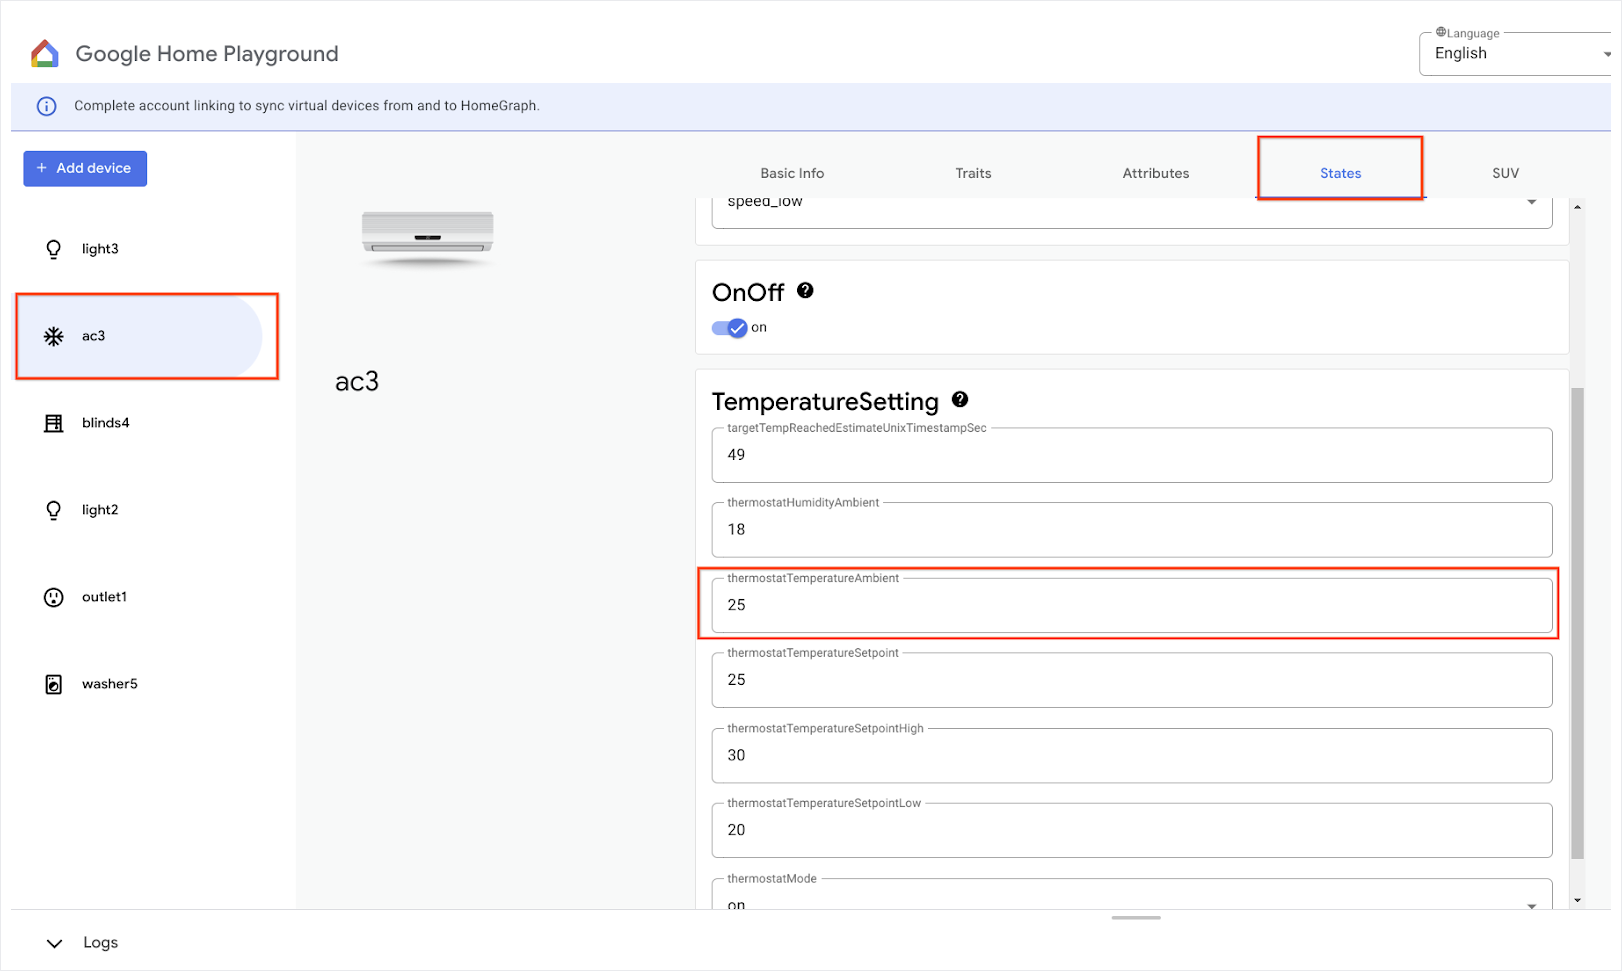
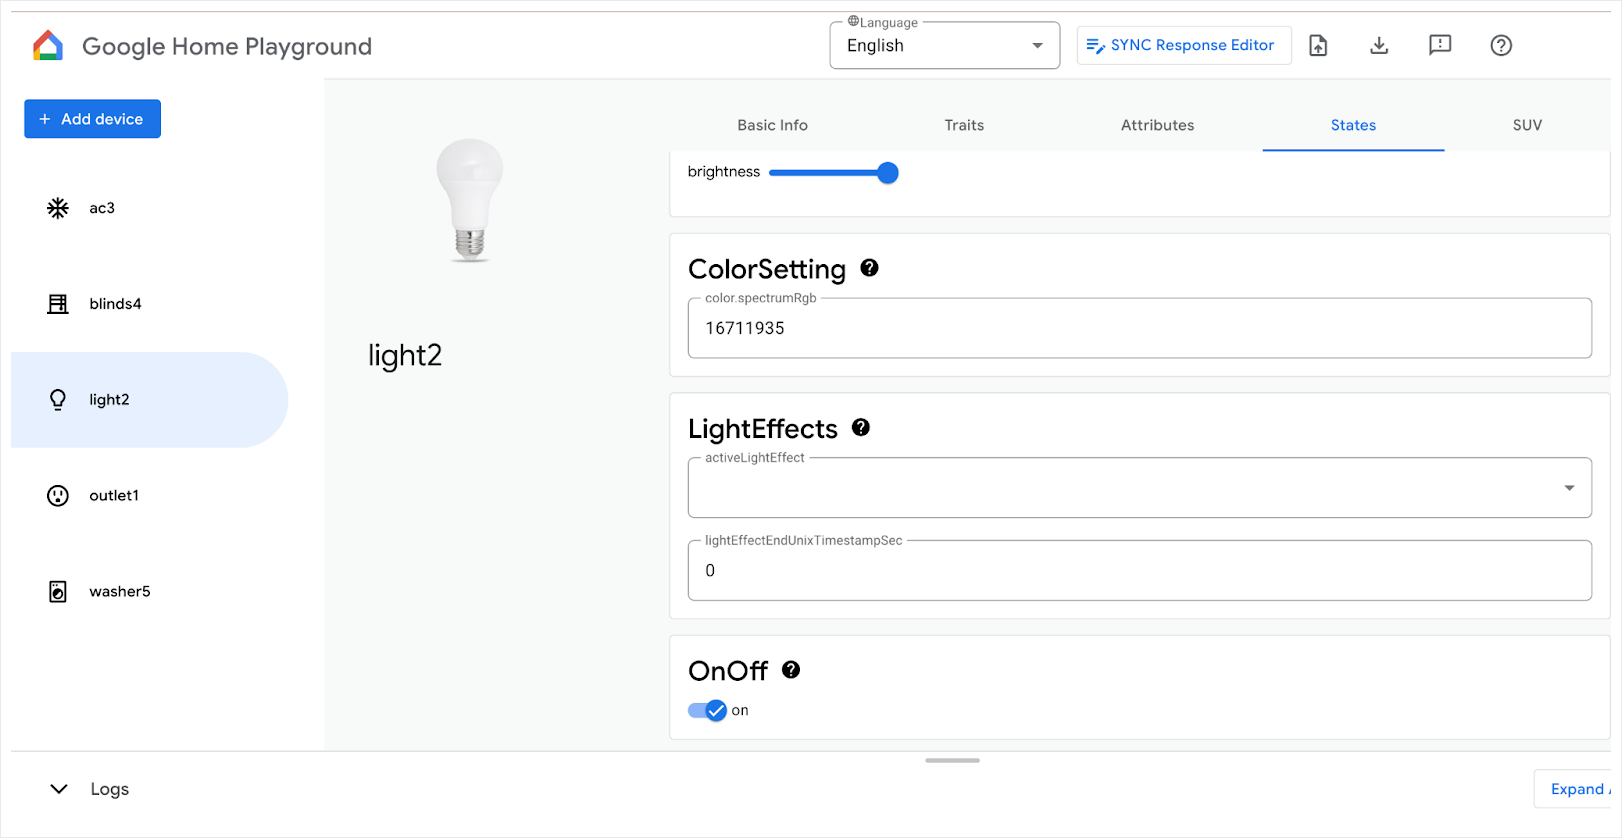
ก่อนใช้ Google Home API คุณจะต้องตั้งค่าบ้านในบัญชี Google โดยใช้แอป Google Home และเพิ่มอุปกรณ์ 2-3 เครื่อง ส่วนนี้จะอธิบายวิธีดำเนินการโดยใช้ Google Home Playground ซึ่งมีอุปกรณ์สมาร์ทโฮมเสมือน
เปิด home-playground.withgoogle.com ในเว็บเบราว์เซอร์ ลงชื่อเข้าใช้ด้วยบัญชี Google แล้วดูว่าอุปกรณ์จำลองต่อไปนี้ปรากฏขึ้นหรือไม่
- outlet1: ปลั๊กเปิด/ปิด
- light2: ไฟที่หรี่ได้
- light3: เปิด/ปิดไฟ
- ac3: เครื่องปรับอากาศ
- blinds4: Window Covering
- washer5: เครื่องซักผ้าอัจฉริยะ
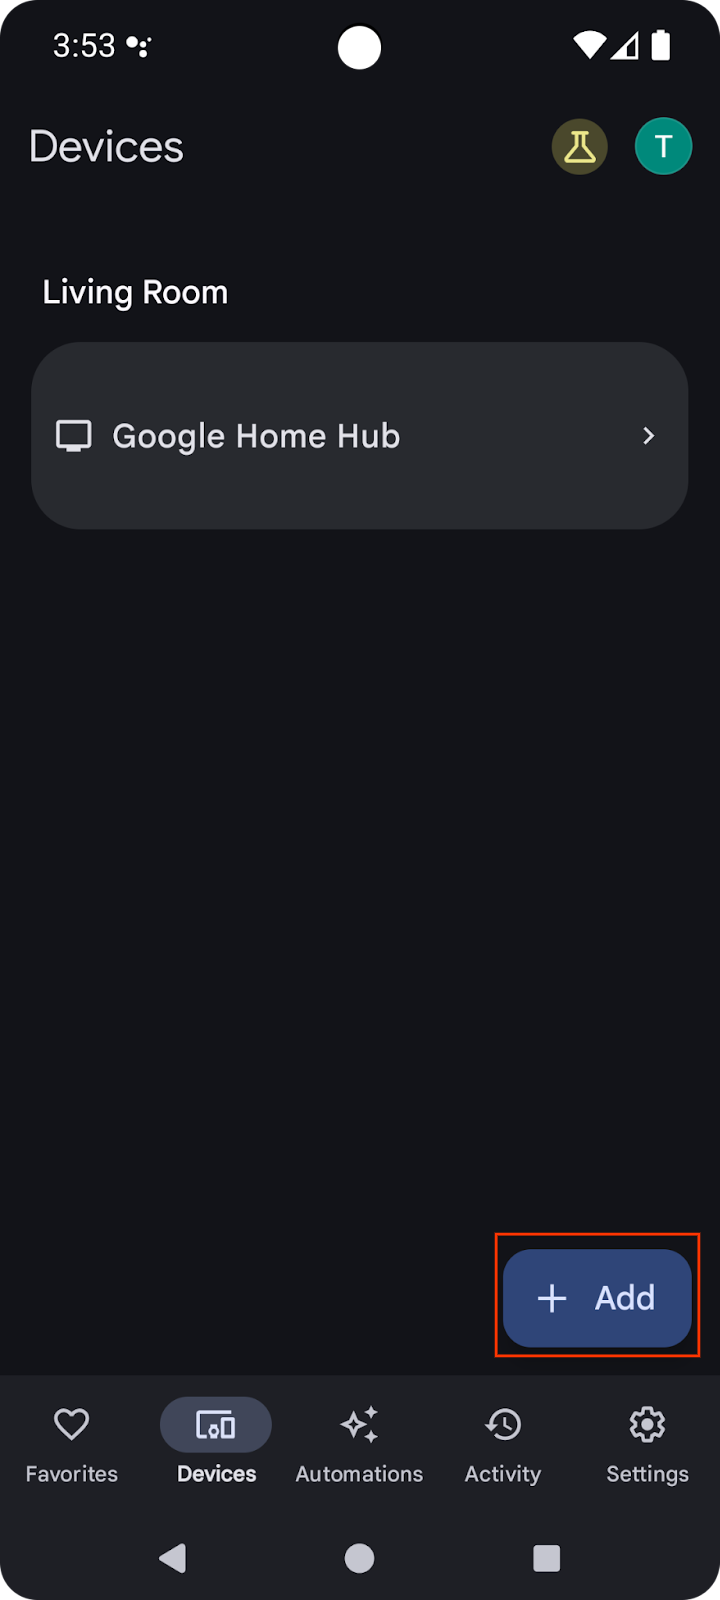
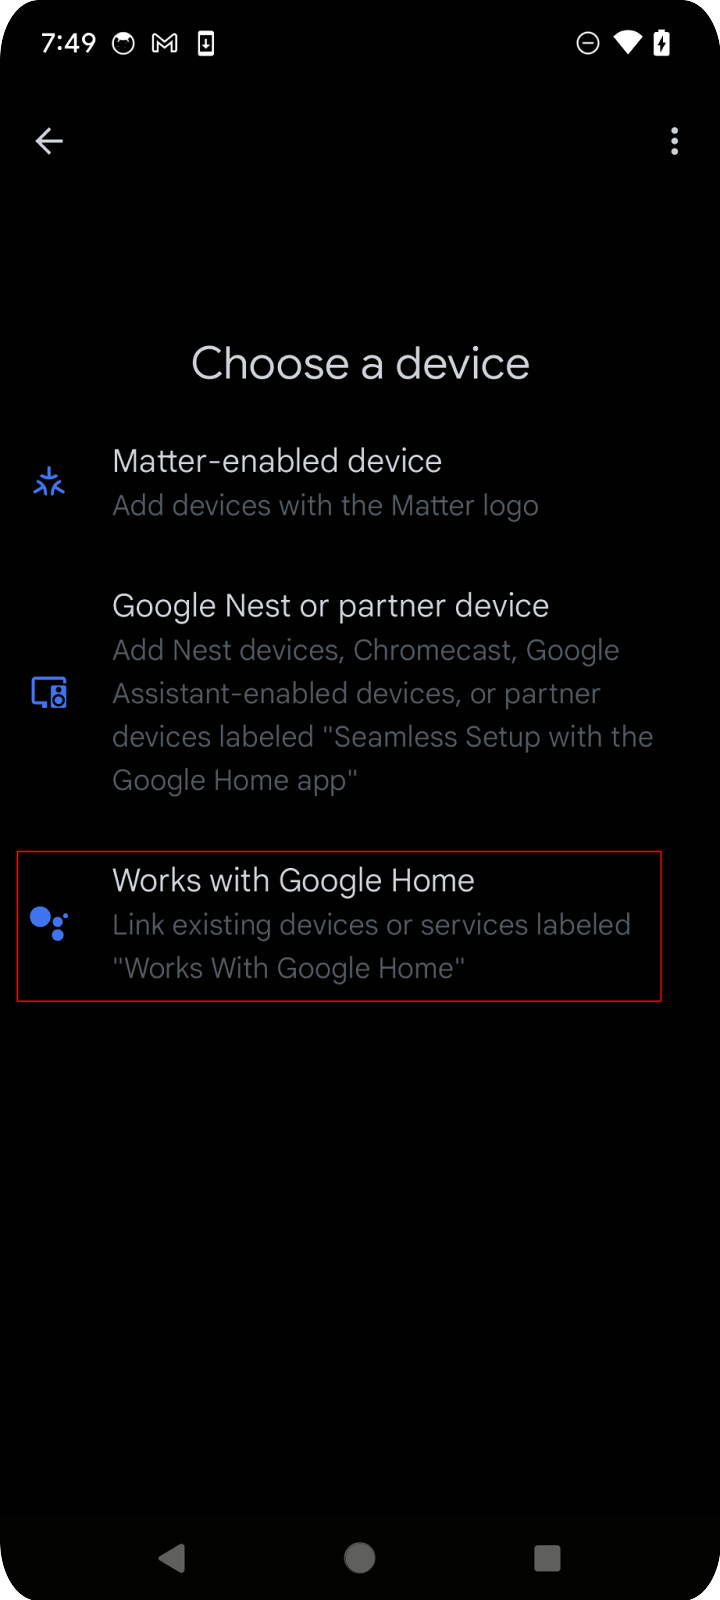
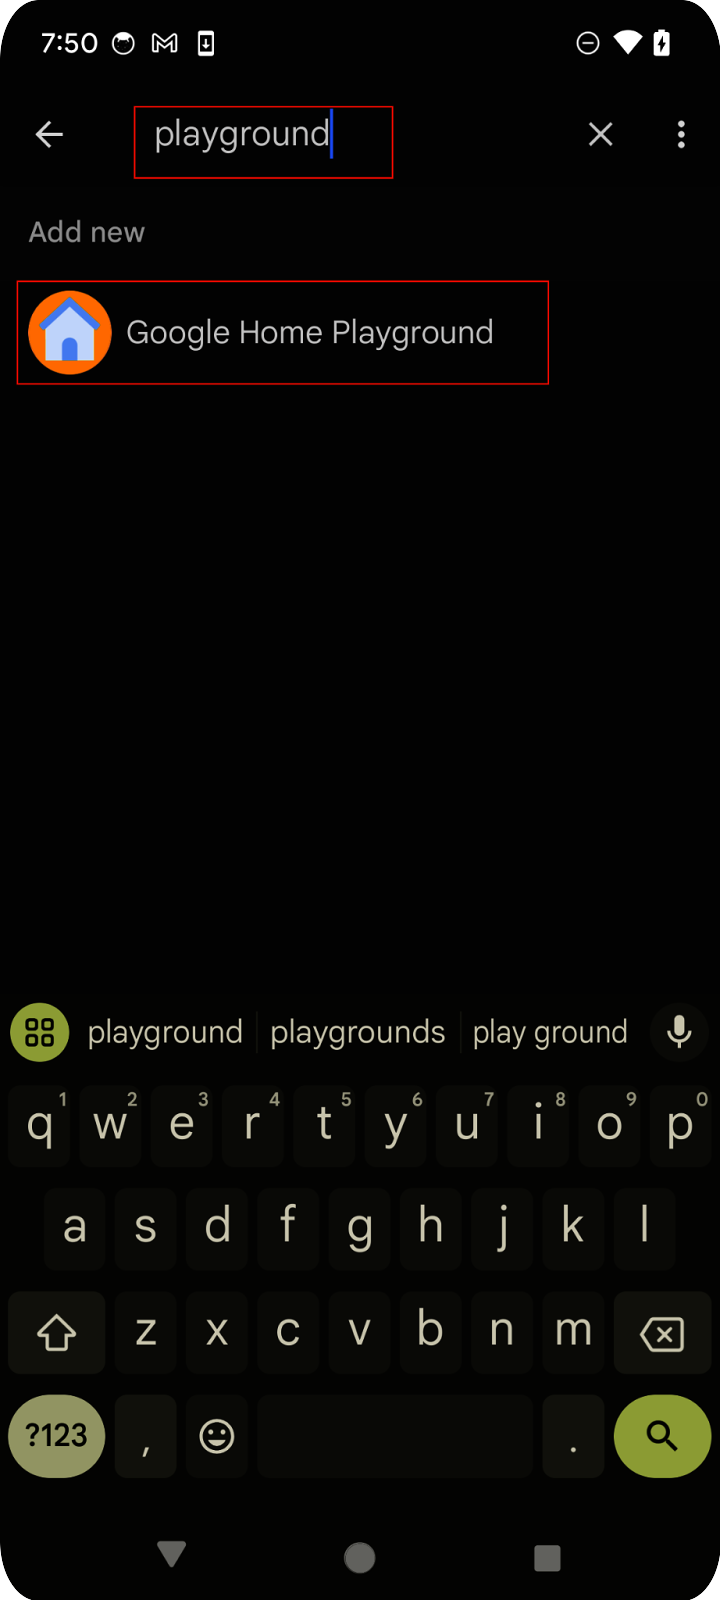
เปิดแอป Google Home ในอุปกรณ์เคลื่อนที่ แตะปุ่มเพิ่ม แล้วเลือกใช้ได้กับ Google Home ค้นหา "playground" ในรายการ จากนั้นเลือกโปรเจ็กต์ "Google Home Playground" แล้วแตะต่อไป
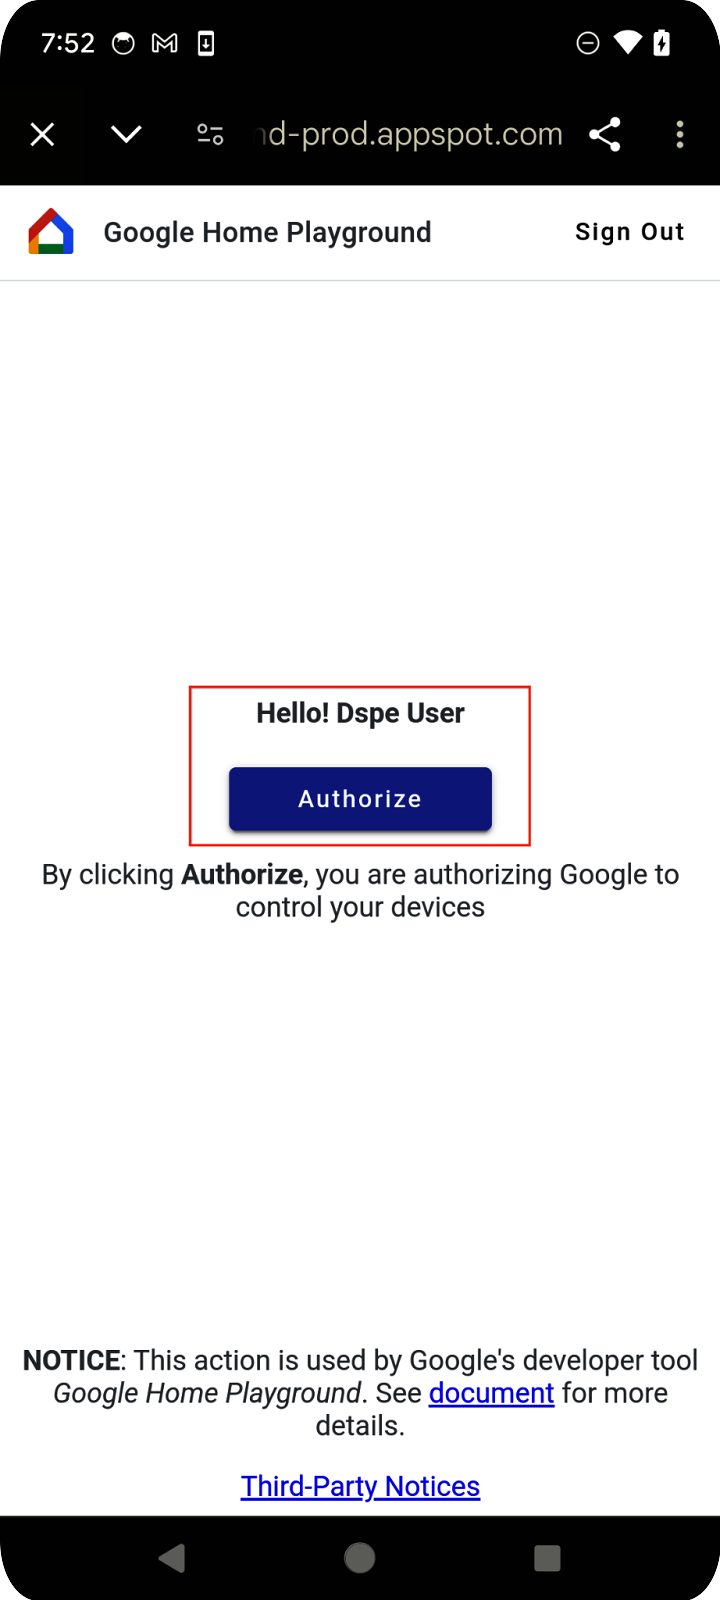
Google Home Playground จะแสดงหน้าการให้สิทธิ์บัญชี แตะให้สิทธิ์หรือลงชื่อเข้าใช้ด้วย Google คุณจะเห็นอุปกรณ์ทั้งหมดที่กำหนดค่าจากเว็บแอปในแอปบนอุปกรณ์เคลื่อนที่
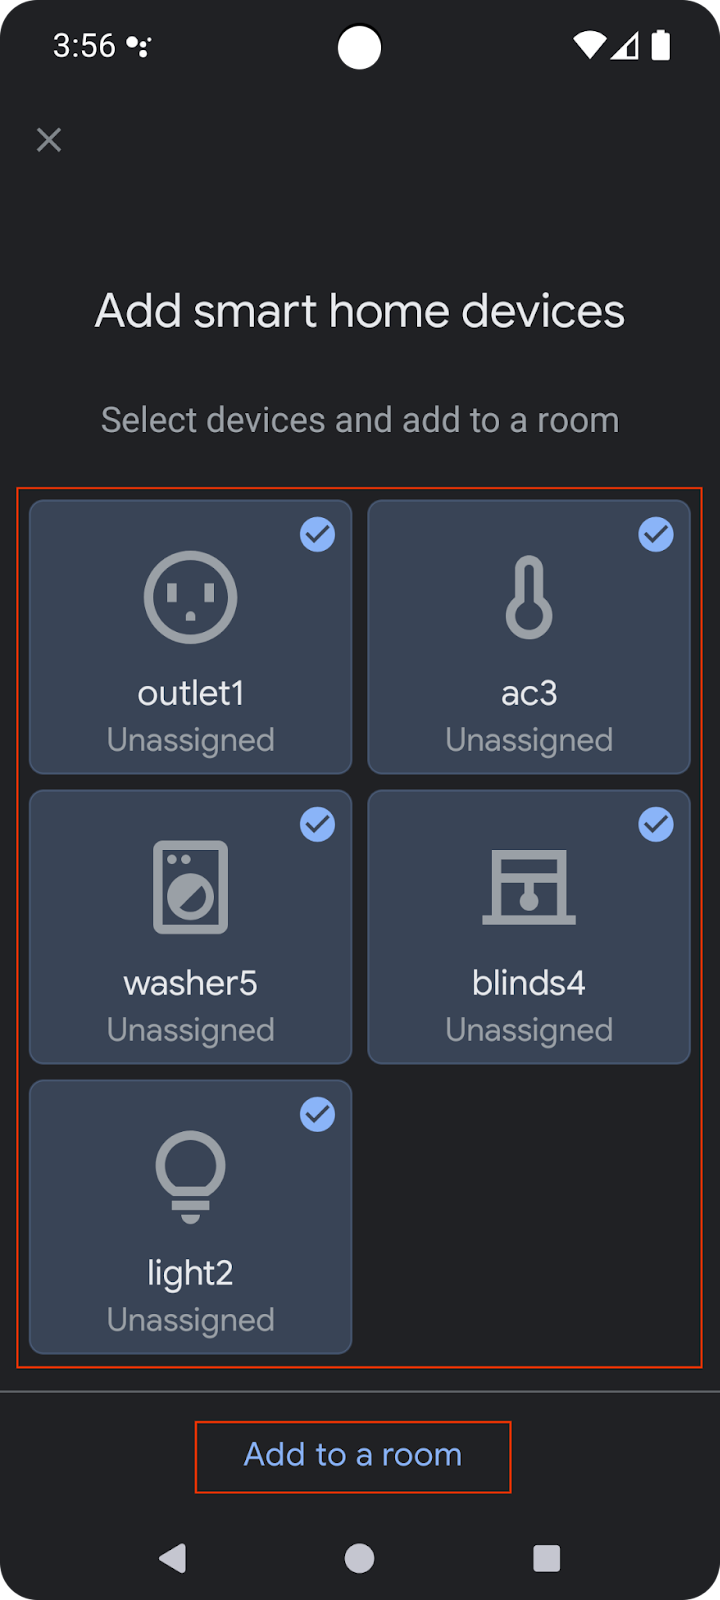
เลือกอุปกรณ์ทั้งหมดและทําตามกระบวนการตั้งค่าให้เสร็จสมบูรณ์ เมื่อกลับไปที่หน้าแรก คุณจะเห็นอุปกรณ์ทั้งหมดที่พร้อมใช้งาน
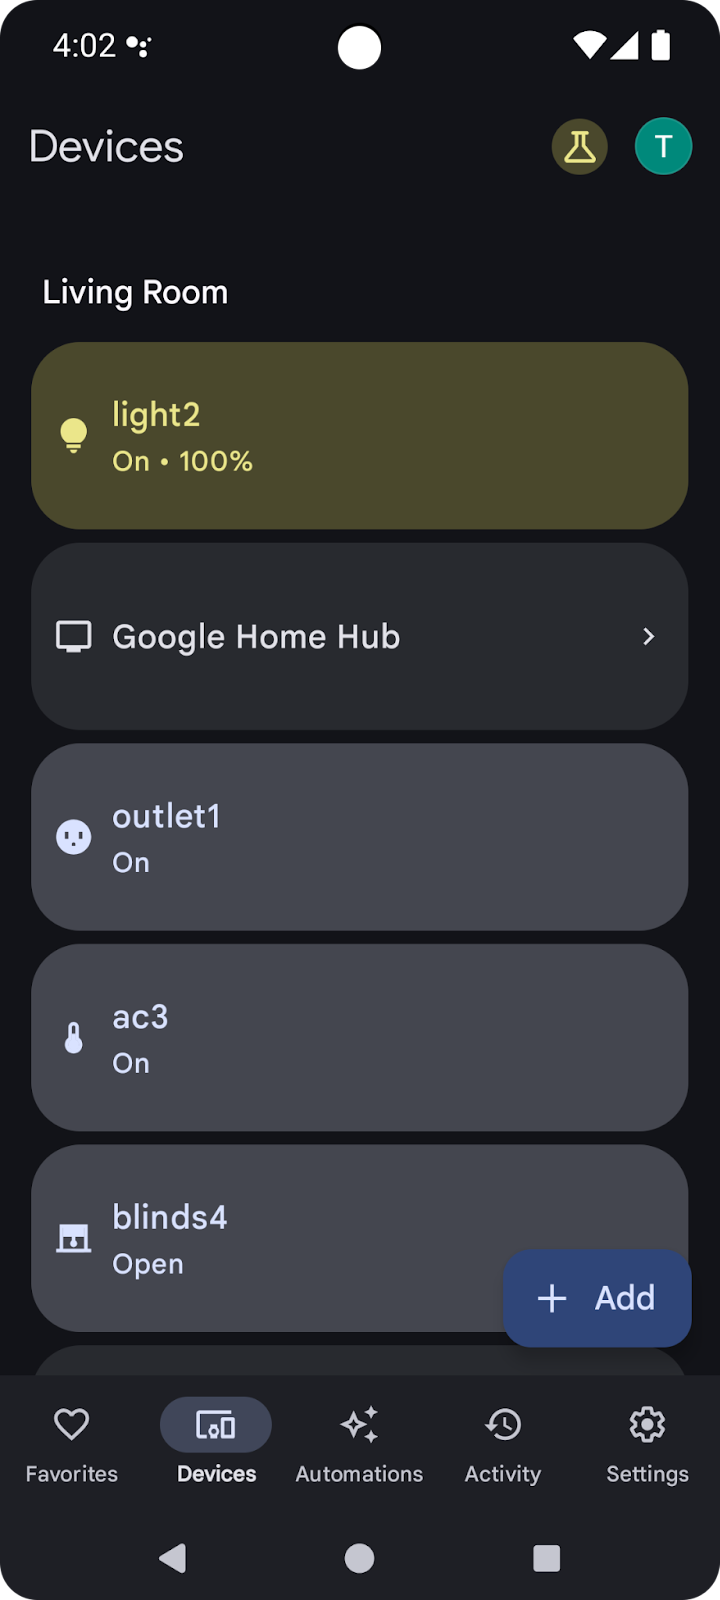
ตอนนี้อุปกรณ์ที่รองรับในรายการพร้อมให้ใช้งานกับ Google Home API แล้ว
2. สร้างโปรเจ็กต์
แผนภาพต่อไปนี้แสดงสถาปัตยกรรมของแอป Home APIs
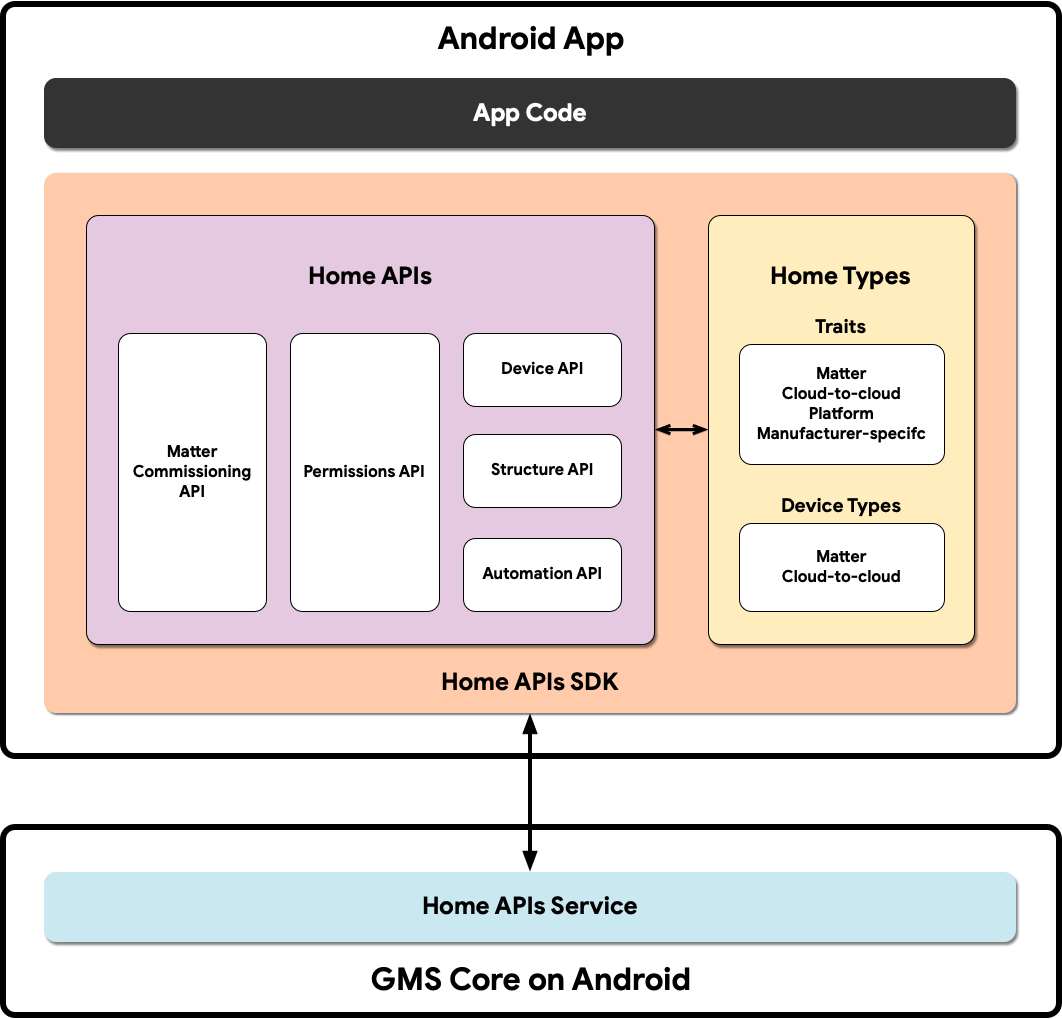
- โค้ดแอป: โค้ดหลักที่นักพัฒนาแอปใช้สร้างอินเทอร์เฟซผู้ใช้ของแอปและตรรกะสำหรับการโต้ตอบกับ SDK ของ Home API
- SDK ของ Home APIs: SDK ของ Home APIs ที่ Google จัดเตรียมให้จะทำงานร่วมกับบริการ Home APIs ใน GMSCore เพื่อควบคุมอุปกรณ์สมาร์ทโฮม นักพัฒนาแอปสร้างแอปที่ทำงานร่วมกับ Home API โดยการรวมแอปเข้ากับ Home API SDK
- GMSCore ใน Android: GMSCore หรือที่เรียกว่าบริการ Google Play เป็นแพลตฟอร์มของ Google ที่ให้บริการระบบหลัก ซึ่งจะเปิดใช้ฟังก์ชันหลักในอุปกรณ์ Android ที่ผ่านการรับรองทั้งหมด โมดูลบ้านของบริการ Google Play มีบริการที่โต้ตอบกับ Home API
ตั้งค่า Home SDK
ทำตามขั้นตอนที่ระบุไว้ในตั้งค่า SDK เพื่อรับ SDK เวอร์ชันล่าสุด
ดาวน์โหลดแอปตัวอย่าง
ซอร์สโค้ดสำหรับแอปตัวอย่างพร้อมให้บริการบน GitHub Codelab นี้ใช้ตัวอย่างจากสาขา codelab-branch-1 ของแอปตัวอย่าง
ไปที่ตำแหน่งที่ต้องการบันทึกโปรเจ็กต์ แล้วโคลนกิ่ง codelab-branch-1
$ git clone -b codelab-branch-1 https://github.com/google-home/google-home-api-sample-app-android.git
สร้างแอปตัวอย่าง
ทำตามขั้นตอนที่ 1-5 ในสร้างแอป
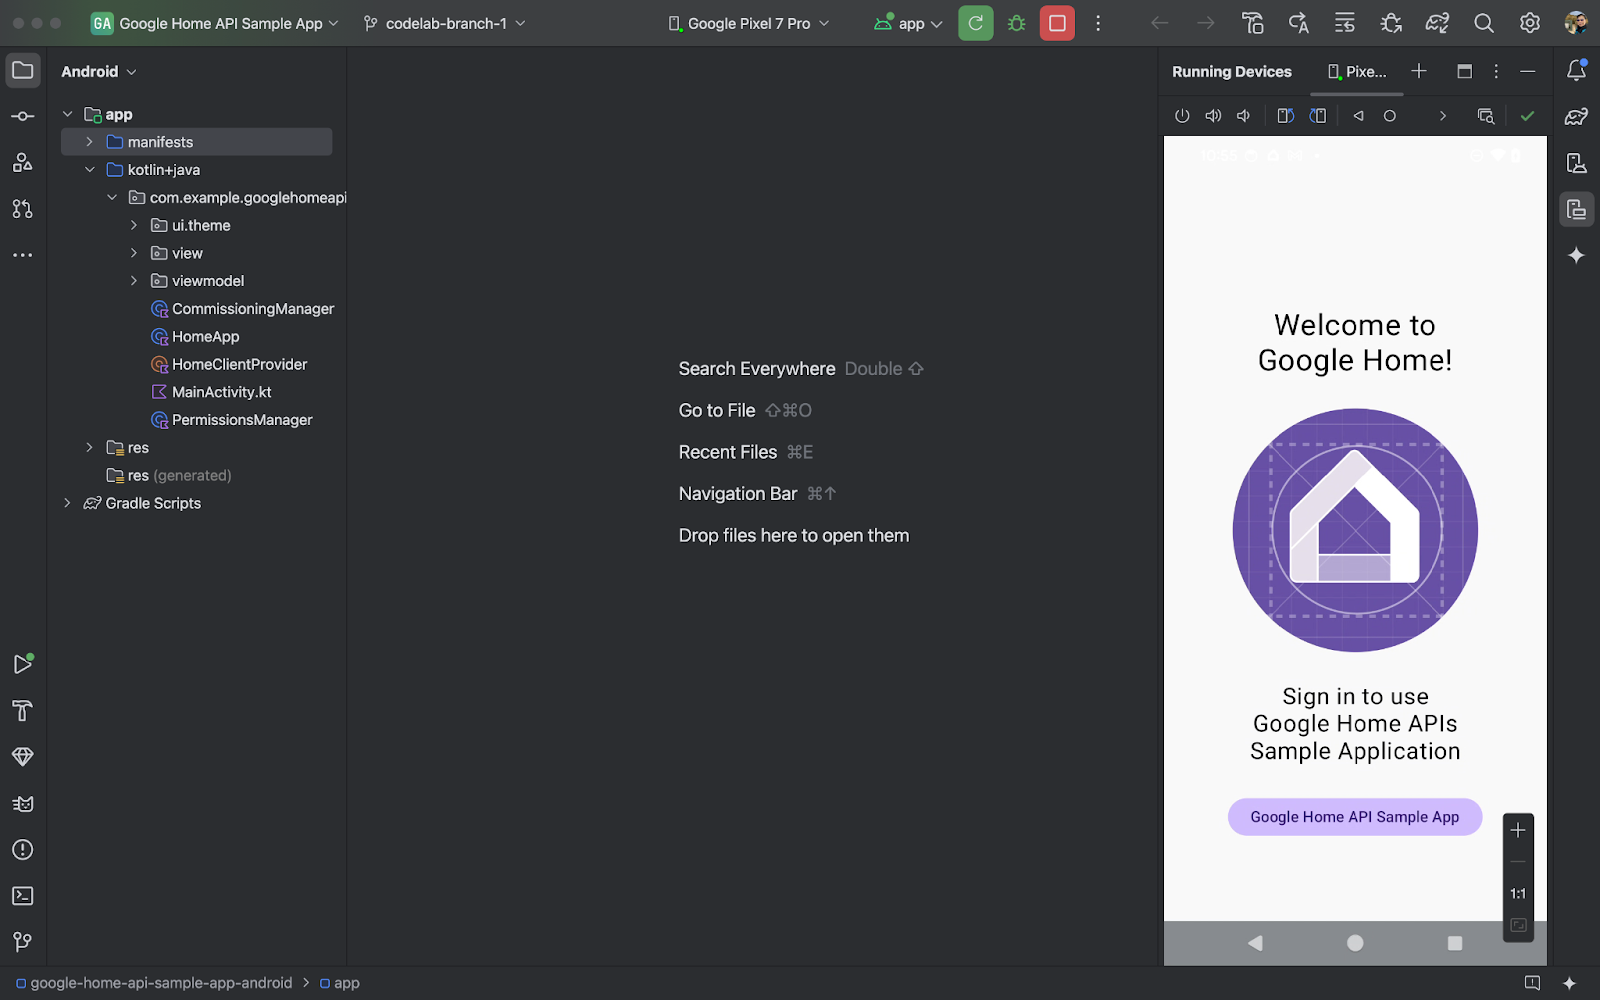
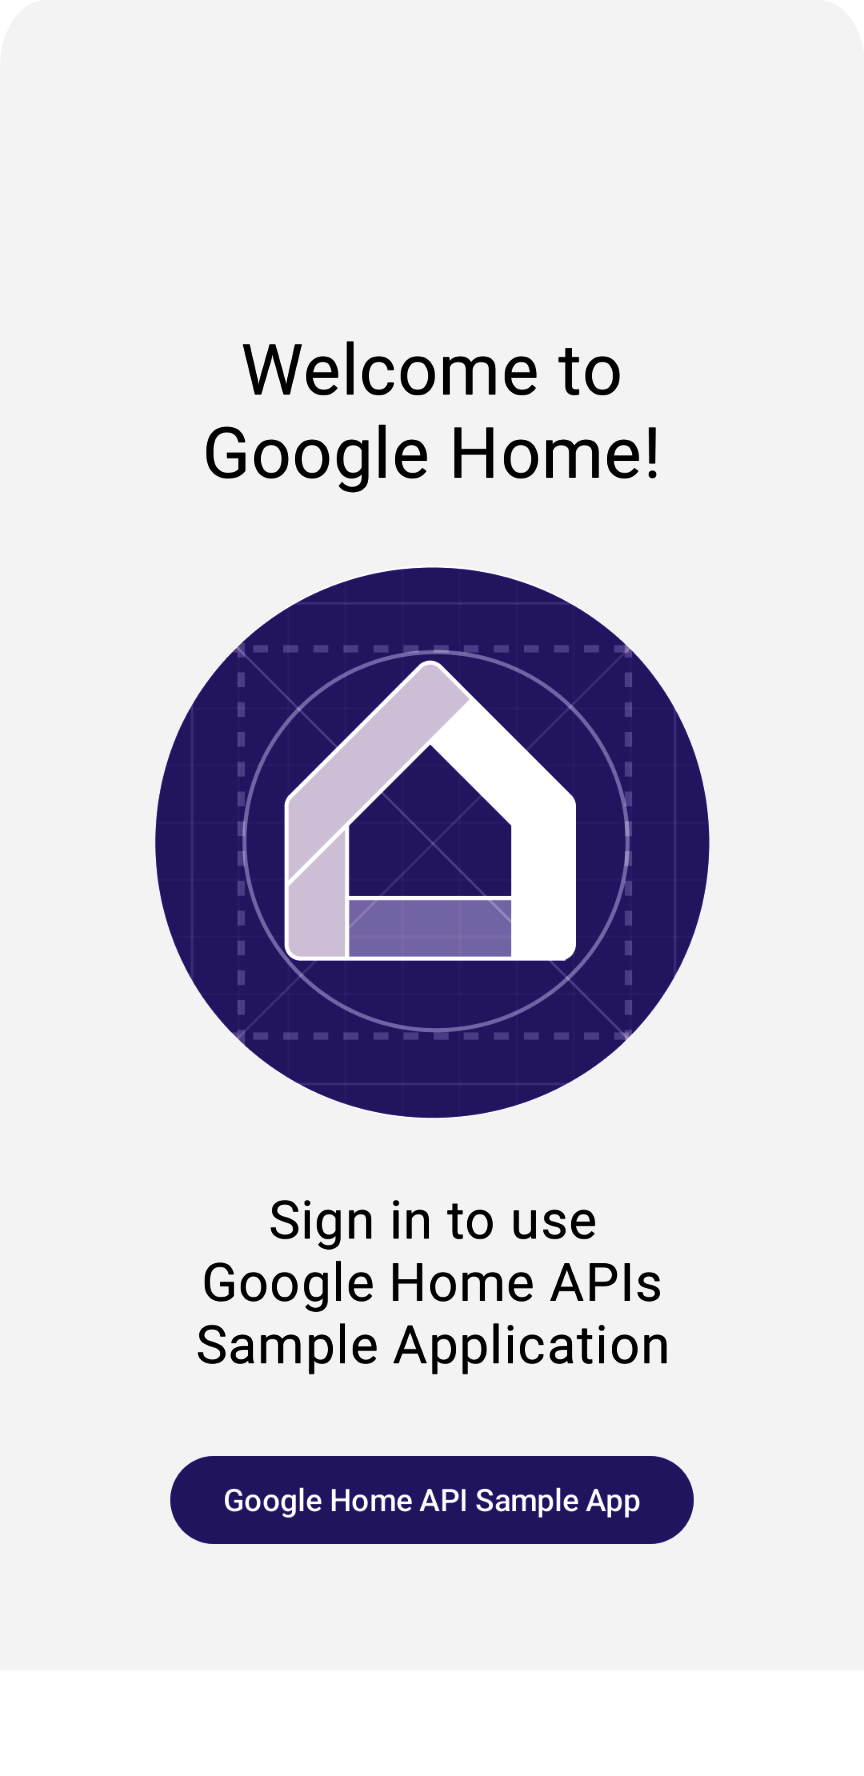
เมื่อแอปทำงานในโทรศัพท์ได้สำเร็จ คุณจะเห็นหน้าหลักของแอปตัวอย่าง แต่คุณจะลงชื่อเข้าใช้ไม่ได้จนกว่าจะตั้งค่าการตรวจสอบสิทธิ์ OAuth และใช้ส่วนที่ขาดหายไปโดยใช้ Permissions API
3. ตั้งค่าการตรวจสอบสิทธิ์
Home API ใช้ OAuth 2.0 เพื่อให้สิทธิ์เข้าถึงอุปกรณ์ในโครงสร้าง OAuth ช่วยให้ผู้ใช้ให้สิทธิ์แก่แอปหรือบริการได้โดยไม่ต้องเปิดเผยข้อมูลเข้าสู่ระบบ
ทำตามวิธีการในตั้งค่าความยินยอม OAuth เพื่อกำหนดค่าหน้าจอขอความยินยอม โปรดสร้างบัญชีทดสอบอย่างน้อย 1 บัญชี
จากนั้นทำตามวิธีการในตั้งค่าข้อมูลเข้าสู่ระบบ OAuth เพื่อสร้างข้อมูลเข้าสู่ระบบสำหรับแอป
4. การเริ่มต้นและการจัดการสิทธิ์
ในส่วนนี้ คุณจะได้เรียนรู้วิธีเริ่มต้น SDK และจัดการสิทธิ์ของผู้ใช้โดยการเติมส่วนที่ขาดหายไปโดยใช้ Permissions API
กำหนดประเภทและลักษณะที่รองรับ
เมื่อพัฒนาแอป คุณต้องระบุประเภทและลักษณะของอุปกรณ์ที่แอปจะรองรับอย่างชัดเจน ในแอปตัวอย่าง เราทำเช่นนี้โดยการกำหนดรายการแบบคงที่ในออบเจ็กต์คู่ใน HomeApp.kt ซึ่งจากนั้นจะอ้างอิงได้ทั่วทั้งแอปตามต้องการ
companion object {

  // List of supported device types by this app:
  val supportedTypes: List<DeviceTypeFactory<out DeviceType>> = listOf(
    OnOffLightDevice,
    DimmableLightDevice,

  // ...
  )
  // List of supported device traits by this app:
  val supportedTraits: List<TraitFactory<out Trait>> = listOf(
  OnOff,
  LevelControl,
  // ...
  )
}
ดูประเภทอุปกรณ์ที่รองรับและดัชนีลักษณะใน Android เพื่อดูประเภทอุปกรณ์และลักษณะทั้งหมดที่รองรับ
ยกเลิกการแสดงความคิดเห็นในขั้นตอนที่ 4.1.1 และ 4.1.2 ในไฟล์ต้นฉบับ HomeApp.kt เพื่อเปิดใช้ซอร์สโค้ดที่ขอสิทธิ์
companion object {
// List of supported device types by this app:
val supportedTypes: List<DeviceTypeFactory<out DeviceType>> = listOf(
// TODO: 4.1.1 - Non-registered device types will be unsupported
//             ContactSensorDevice,
//             ColorTemperatureLightDevice,
//             DimmableLightDevice,
//             ExtendedColorLightDevice,
//             GenericSwitchDevice,
//             GoogleDisplayDevice,
//             GoogleTVDevice,
//             OccupancySensorDevice,
//             OnOffLightDevice,
//             OnOffLightSwitchDevice,
//             OnOffPluginUnitDevice,
//             OnOffSensorDevice,
//             RootNodeDevice,
//             SpeakerDevice,
//             ThermostatDevice,
)
// List of supported device traits by this app:
val supportedTraits: List<TraitFactory<out Trait>> = listOf(
// TODO: 4.1.2 - Non-registered traits will be unsupported
//             AreaAttendanceState,
//             AreaPresenceState,
//             Assistant,
//             AssistantBroadcast,
//             AssistantFulfillment,
//             BasicInformation,
//             BooleanState,
//             OccupancySensing,
//             OnOff,
//             Notification,
//             LevelControl,
//             TemperatureControl,
//             TemperatureMeasurement,
//             Thermostat,
//             Time,
//             Volume,
        )
}
เริ่มต้นออบเจ็กต์ HomeClient
แอปทั้งหมดที่ใช้ Home API จะเริ่มต้นออบเจ็กต์ HomeClient ซึ่งเป็นอินเทอร์เฟซหลักในการโต้ตอบกับ API เราเตรียมออบเจ็กต์นี้ในตัวเริ่มต้นของคลาส HomeApp (HomeApp.kt)
// Registry to record device types and traits used in this app:
val registry = FactoryRegistry(
  types = supportedTypes,
  traits = supportedTraits
)
// Configuration options for the HomeClient:
val config = HomeConfig(
  coroutineContext = Dispatchers.IO,
  factoryRegistry = registry
)
// Initialize the HomeClient, which is the primary object to use all Home APIs:
homeClient = Home.getClient(context = context, homeConfig = config)
ก่อนอื่น เราจะสร้าง FactoryRegistry โดยใช้ประเภทและลักษณะที่รองรับซึ่งเราได้กำหนดไว้ก่อนหน้านี้ จากนั้นเราจะใช้รีจิสทรีนี้เพื่อเริ่มต้น HomeConfig ซึ่งมีการกำหนดค่าที่จำเป็นต่อการเรียกใช้ API จากนั้นเราจะใช้การเรียก Home.getClient(...) เพื่อรับอินสแตนซ์ HomeClient
การโต้ตอบกับ Home API ทั้งหมดจะผ่านออบเจ็กต์ HomeClient นี้
ใช้ Permissions API
การตรวจสอบสิทธิ์ผู้ใช้สำหรับ Home API จะดำเนินการผ่าน Permissions API PermissionsManager.kt ไฟล์ต้นฉบับของแอปตัวอย่างมีโค้ดสำหรับการตรวจสอบสิทธิ์ผู้ใช้ ยกเลิกการแสดงความคิดเห็นเนื้อหาของฟังก์ชัน checkPermissions(...) และ requestPermissions(...) เพื่อเปิดใช้สิทธิ์สำหรับแอปตัวอย่าง
การลงทะเบียน
homeClient.registerActivityResultCallerForPermissions(activity)
การเปิดตัว
try {
    val result: PermissionsResult
    result = homeClient.requestPermissions(forceLaunch = true)
    when (result.status) {
        PermissionsResultStatus.SUCCESS -> // Success Case
        PermissionsResultStatus.CANCELLED -> // User Cancelled
        PermissionsResultStatus.ERROR -> // Some Error
else -> // Unsupported Case
    }
}
catch (e: HomeException) { ... }
การตรวจสอบ
try {
    val state: PermissionsState
    state = homeClient.hasPermissions().first { state ->
        state != PermissionsState.PERMISSIONS_STATE_UNINITIALIZED
    }
    when (state) {
        PermissionsState.GRANTED -> // Signed In
        PermissionsState.NOT_GRANTED -> // Not Signed In
        PermissionsState.PERMISSIONS_STATE_UNAVAILABLE -> // ...
        PermissionsState.PERMISSIONS_STATE_UNINITIALIZED -> // ...
else -> // Unsupported case
    }
}
catch (e: HomeException) { ... }
การติดตาม
       homeClient.hasPermissions().collect( { state ->
// Track the changes on state
        } )
ยกเลิกการแสดงความคิดเห็นในขั้นตอนที่ 4.3.1 ใน PermissionsManager.kt เพื่อเปิดใช้โค้ดที่ขอสิทธิ์
fun requestPermissions() {
    scope.launch {
    try {
// TODO: 4.3.1 - Request the permissions from the Permissions API
//                 // Request permissions from the Permissions API and record the result:
//                 val result: PermissionsResult = client.requestPermissions(forceLaunch = true)
//                 // Adjust the sign-in status according to permission result:
//                 if (result.status == PermissionsResultStatus.SUCCESS)
//                     isSignedIn.emit(true)
//                 // Report the permission result:
//                 reportPermissionResult(result)
    }
    catch (e: HomeException) { MainActivity.showError(this, e.message.toString()) }
    }
}
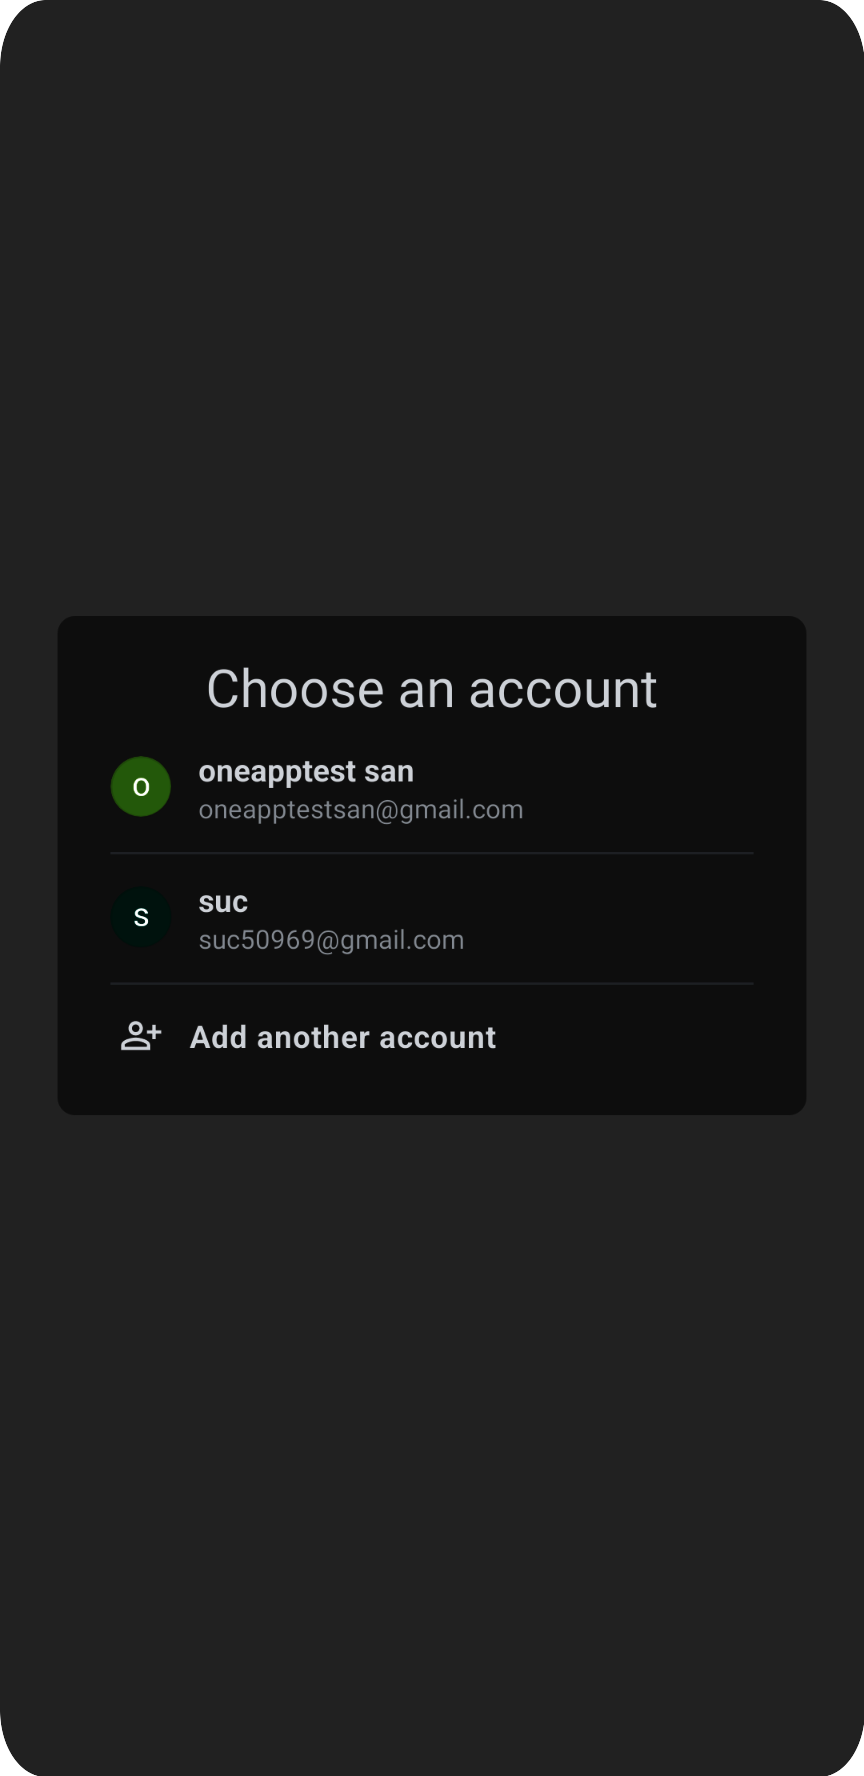
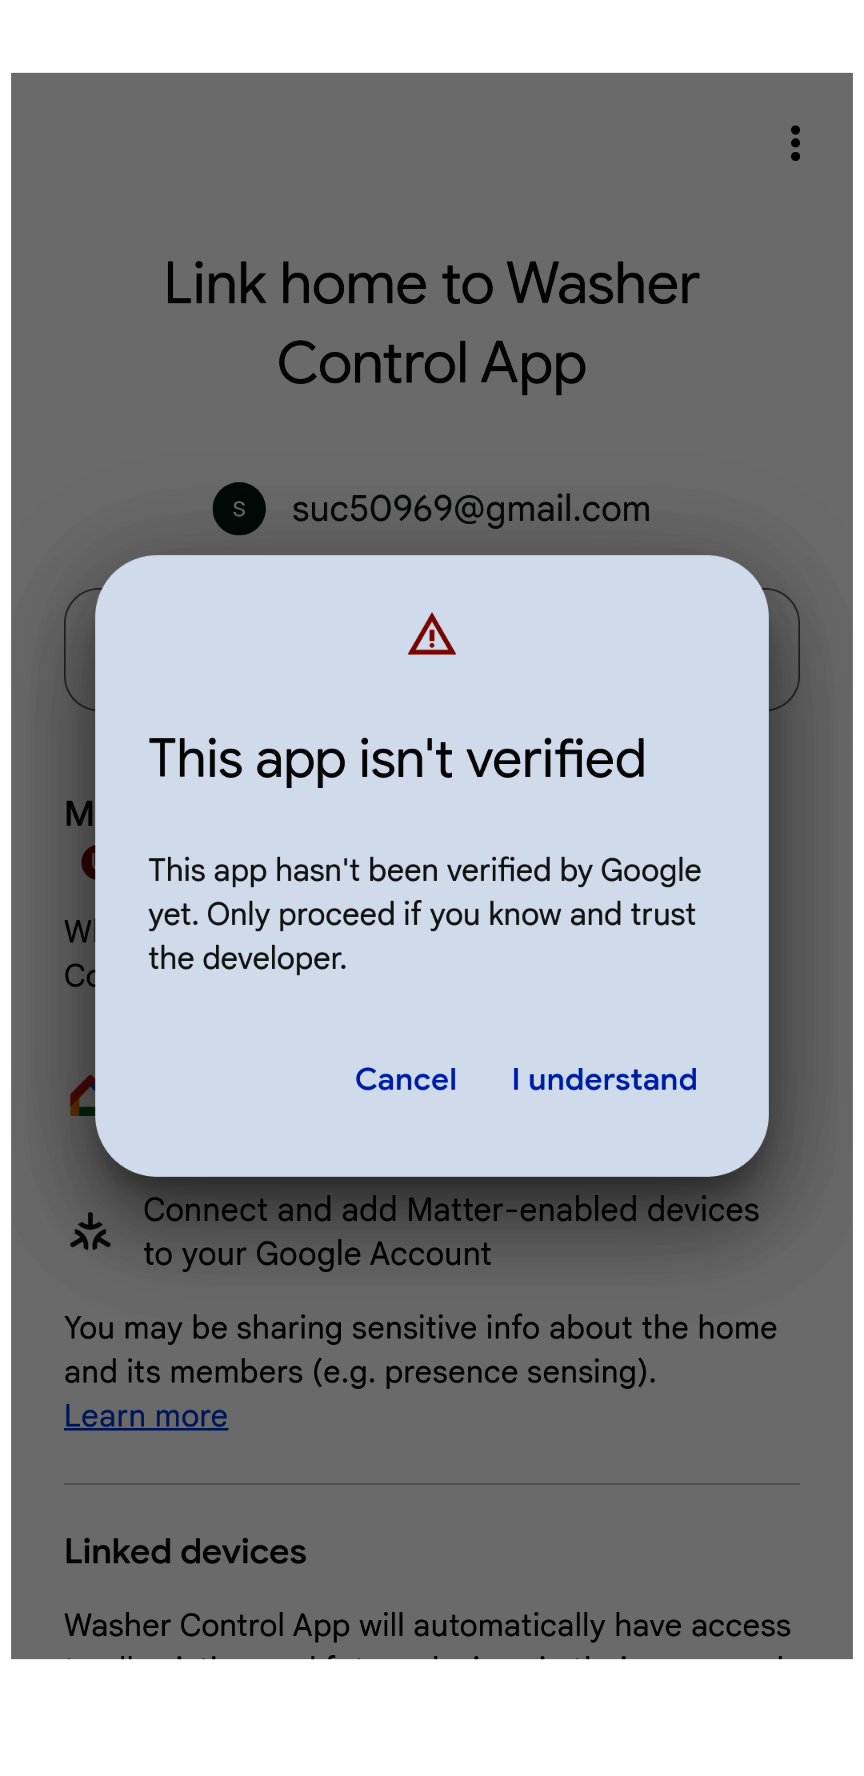
ตอนนี้ให้เรียกใช้แอปในโทรศัพท์โดยทำตามขั้นตอนและอนุญาตสิทธิ์ คุณควรเห็นขั้นตอนต่อไปนี้
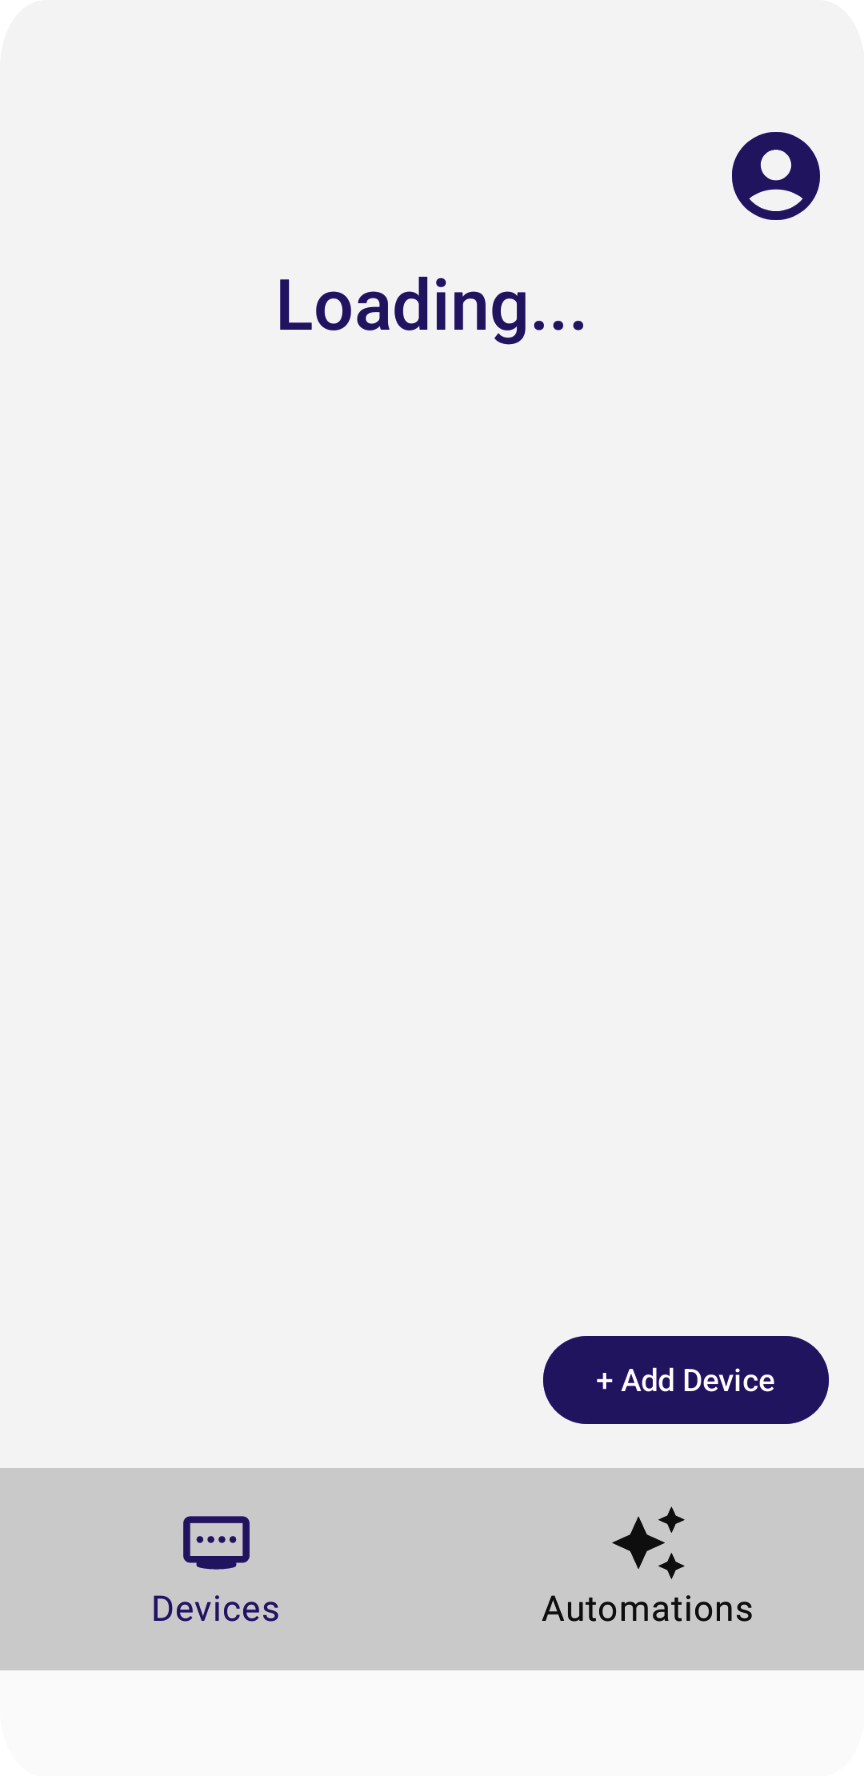
ข้อความ "กำลังโหลด" จะแสดงอยู่ตลอดเวลา เนื่องจากเรายังไม่ได้ใช้โค้ดที่อ่านโครงสร้างและอุปกรณ์ เราจะดำเนินการดังกล่าวในส่วนถัดไป
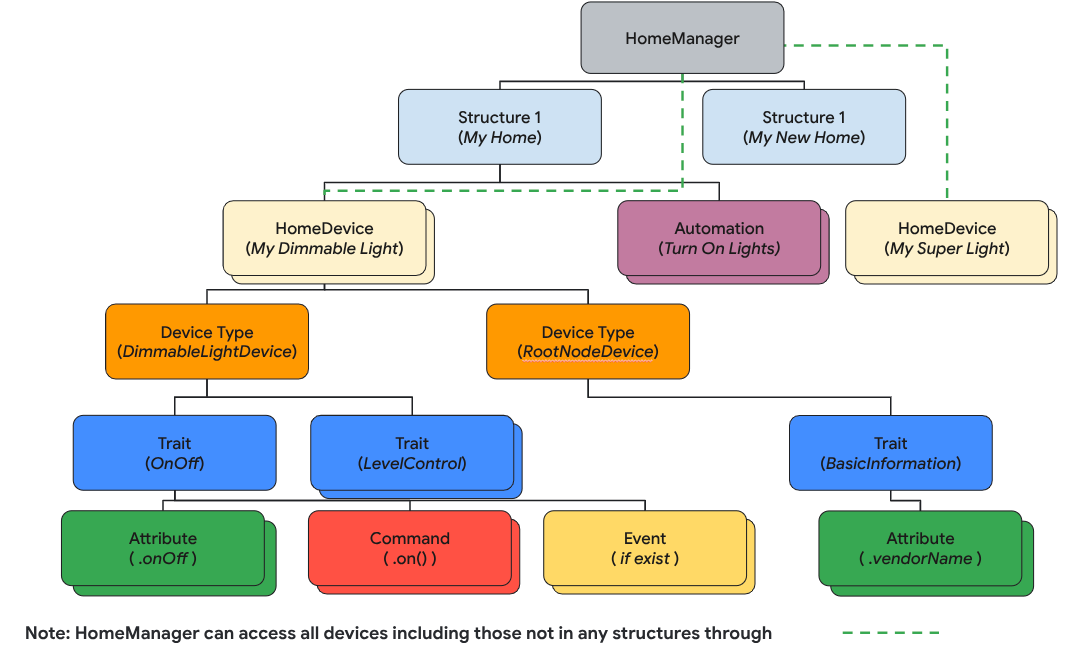
5. ทําความเข้าใจโมเดลข้อมูล
ใน Home API โมเดลข้อมูลประกอบด้วย
Structureแสดงถึงบ้านที่มีห้องและอุปกรณ์Roomเป็นส่วนหนึ่งของโครงสร้างและมีอุปกรณ์- คุณกำหนดอุปกรณ์ (กำหนดเป็น
HomeDevice) ให้กับโครงสร้าง (หรือบ้าน) หรือห้องในโครงสร้างได้ - อุปกรณ์ประกอบด้วย
DeviceTypeอินสแตนซ์อย่างน้อย 1 รายการ DeviceTypeประกอบด้วยอินสแตนซ์TraitTraitประกอบด้วยอินสแตนซ์Attribute(สำหรับการอ่าน/เขียน), อินสแตนซ์Command(สำหรับการควบคุมแอตทริบิวต์) และอินสแตนซ์Event(สำหรับการอ่านหรือการสมัครรับข้อมูลบันทึกการเปลี่ยนแปลงที่ผ่านมา)- อินสแตนซ์
Automationเป็นส่วนหนึ่งของโครงสร้าง และใช้ข้อมูลเมตาและอุปกรณ์ในบ้านเพื่อทำให้งานต่างๆ ในบ้านเป็นแบบอัตโนมัติ
ในส่วนนี้ คุณจะได้เรียนรู้วิธีพัฒนาซอร์สโค้ดเพื่อแสดงวิธีใช้ Structure API ในการแยกวิเคราะห์และแสดงโครงสร้างบ้าน ห้อง อุปกรณ์ และอื่นๆ
อ่านโครงสร้าง
การออกแบบ Home API อิงตาม Kotlin Flows เพื่อสตรีมออบเจ็กต์โมเดลข้อมูล (เช่น Structure, HomeDevice และอื่นๆ) นักพัฒนาแอปจะติดตาม Flow เพื่อรับออบเจ็กต์ทั้งหมดที่อยู่ในออบเจ็กต์ (เช่น Structure, Room และอื่นๆ)
หากต้องการดึงข้อมูลโครงสร้างทั้งหมด ให้เรียกใช้ฟังก์ชัน structures() ซึ่งจะแสดงผลโฟลว์ของโครงสร้าง จากนั้นเรียกใช้ฟังก์ชันรายการในโฟลว์เพื่อรับโครงสร้างทั้งหมดที่ผู้ใช้เป็นเจ้าของ
// Get the a snapshot of all structures from the current homeClient
val allStructures : Set<Structure> =
    homeClient.structures()   // HomeObjectsFlow<Structure>
    .list()                   // Set<Structure>
คำแนะนำเกี่ยวกับสถาปัตยกรรมแอปแนะนำอย่างยิ่งให้ใช้แนวทางการเขียนโปรแกรมแบบรีแอกทีฟที่ทันสมัยเพื่อปรับปรุงโฟลว์ข้อมูลและการจัดการสถานะของแอป
แอปตัวอย่างปฏิบัติตามรูปแบบการเขียนโค้ดแบบรีแอกทีฟดังนี้
- View Model (เช่น
StructureViewModelและDeviceViewModelในฐานะผู้ถือสถานะ) จะสมัครรับข้อมูลโฟลว์จาก Home APIs SDK เพื่อรับการเปลี่ยนแปลงค่าและรักษาสถานะล่าสุด - View (เช่น
StructureViewและDeviceView) จะติดตาม View Model เพื่อรับสถานะและแสดงผล UI เพื่อให้การเปลี่ยนแปลงเหล่านั้นปรากฏ - เมื่อผู้ใช้คลิกปุ่มในมุมมอง (เช่น ปุ่ม "เปิด" ของอุปกรณ์ไฟ) เหตุการณ์จะทริกเกอร์ฟังก์ชันของ ViewModel ซึ่งจะเรียกใช้ฟังก์ชัน Home API ที่ตอบสนอง (เช่น คำสั่ง
OnของลักษณะOnOff)
ในขั้นตอนที่ 5.1.1 ใน HomeAppViewModel.kt เราจะติดตามเหตุการณ์การเปลี่ยนแปลงโครงสร้างโดยการเรียกใช้ฟังก์ชัน collect() ยกเลิกการแสดงความคิดเห็นในส่วนที่ข้าม structureSet ที่แสดงผลโดยการตอบกลับของ Structures API และส่งใน StructureViewModel's StateFlow ซึ่งจะช่วยให้แอปตรวจสอบการเปลี่ยนแปลงสถานะของโครงสร้างได้
   private suspend fun subscribeToStructures() {
// TODO: 5.1.1 - Subscribe the structure data changes
// // Subscribe to structures returned by the Structures API:
// homeApp.homeClient.structures().collect { structureSet ->
//     val structureVMList: MutableList<StructureViewModel> = mutableListOf()
//     // Store structures in container ViewModels:
//     for (structure in structureSet) {
//         structureVMList.add(StructureViewModel(structure))
//     }
//     // Store the ViewModels:
//     structureVMs.emit(structureVMList)
//
//     // If a structure isn't selected yet, select the first structure from the list:
//     if (selectedStructureVM.value == null && structureVMList.isNotEmpty())
//         selectedStructureVM.emit(structureVMList.first())
//
// }
}
ใน DevicesView.kt แอปจะสมัครใช้บริการ StructureViewModel'sStateFlow, ซึ่งจะทริกเกอร์การจัดองค์ประกอบ UI ใหม่เมื่อโครงสร้างข้อมูลมีการเปลี่ยนแปลง ยกเลิกการแสดงความคิดเห็นในซอร์สโค้ดในขั้นตอนที่ 5.1.2 เพื่อแสดงรายการโครงสร้างเป็นเมนูแบบเลื่อนลง
   val structureVMs: List<StructureViewModel> = homeAppVM.structureVMs.collectAsState().value
...
DropdownMenu(expanded = expanded, onDismissRequest = { expanded = false }) {
// TODO: 5.1.2 - Show list of structures in DropdownMenu
//  for (structure in structureVMs) {
//      DropdownMenuItem(
//          text = { Text(structure.name) },
//          onClick = {
//              scope.launch { homeAppVM.selectedStructureVM.emit(structure) }
//              expanded = false
//          }
//      )
//  }
}
...
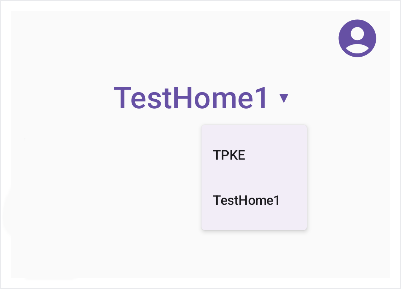
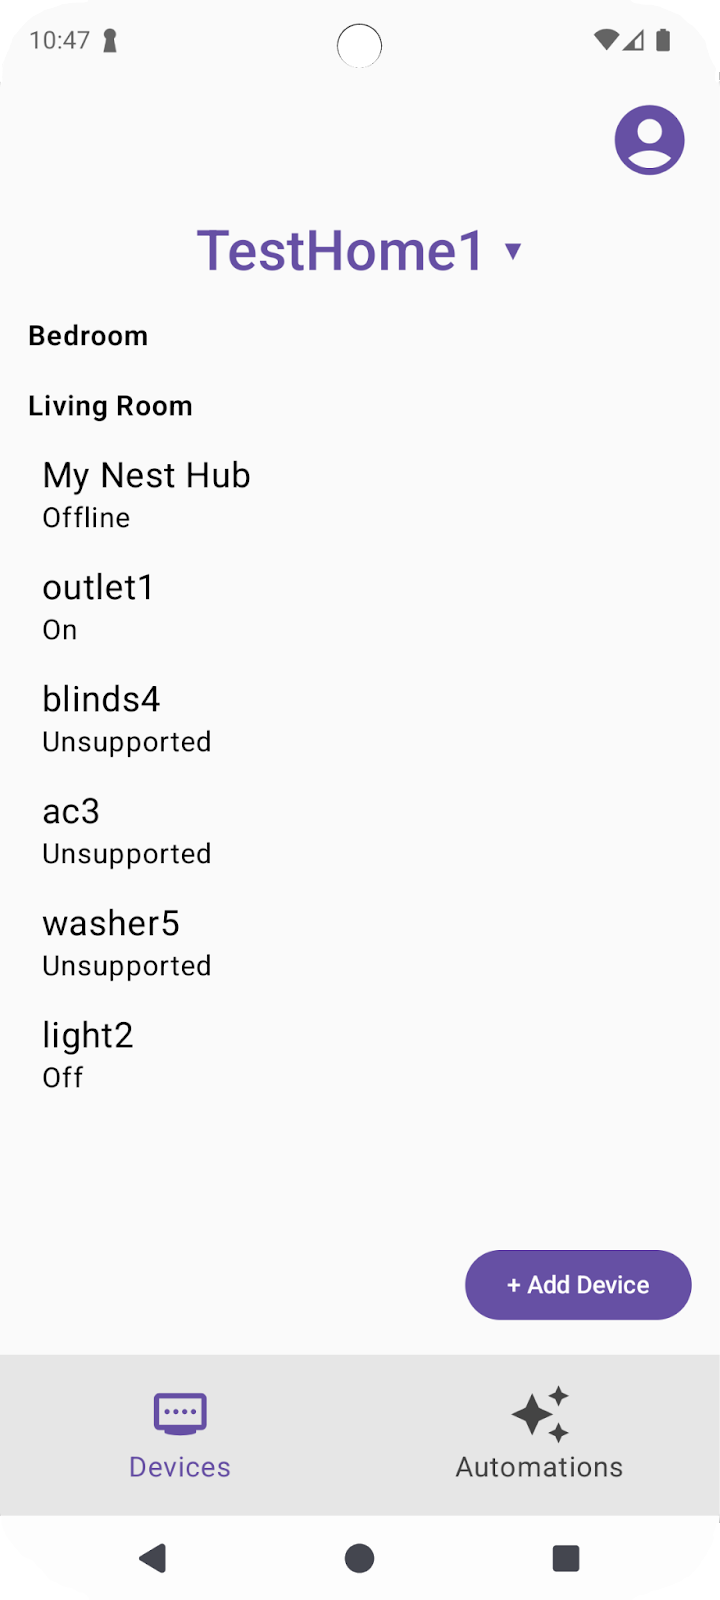
เรียกใช้แอปอีกครั้ง คุณควรเห็นเมนูเมื่อแตะลูกศร
แยกวิเคราะห์โครงสร้าง
ขั้นตอนถัดไปคือการสำรวจออบเจ็กต์บ้านในโครงสร้าง ดึงข้อมูลห้องจากโครงสร้าง
val rooms: Set<Room>
rooms = structure.rooms().list()
จากนั้นคุณจะไปยังห้องต่างๆ เพื่อดึงข้อมูลอุปกรณ์ได้โดยทำดังนี้
val devices: Set<HomeDevice>
devices = room.devices().list()
สำคัญ: ในรูปแบบข้อมูลของ Home API โครงสร้างอาจมีอุปกรณ์ที่ไม่ได้กำหนดให้กับห้อง ดังนั้นอย่าลืมบันทึกอุปกรณ์ที่ไม่มีห้องในแอปด้วย
val devicesWithoutRooms: MutableSet<HomeDevice> = mutableSetOf()

for (device in structure.devices().list())
if (device.roomId == null)
  devicesWithoutRooms.add(device)
อีกครั้งในโค้ดตัวอย่างที่มีอยู่ เราจะติดตามโฟลว์เพื่อรับรายการห้องและอุปกรณ์ล่าสุด ตรวจสอบโค้ดในขั้นตอนที่ 5.2.1 และ 5.2.2 ในStructureViewModel.ktไฟล์ต้นฉบับ และยกเลิกการแสดงความคิดเห็นเพื่อเปิดใช้การสมัครใช้บริการข้อมูลห้อง
val roomVMs : MutableStateFlow<List<RoomViewModel>>
val deviceVMs : MutableStateFlow<List<DeviceViewModel>>
val deviceVMsWithoutRooms : MutableStateFlow<List<DeviceViewModel>>
private suspend fun subscribeToRooms() {
// TODO: 5.2.1 - Subscribe the room data changes
//   // Subscribe to changes on rooms:
//   structure.rooms().collect { roomSet ->
//       val roomVMs = mutableListOf<RoomViewModel>()
//       // Store rooms in container ViewModels:
//       for (room in roomSet) {
//           roomVMs.add(RoomViewModel(room))
//       }
//       // Store the ViewModels:
//       this.roomVMs.emit(roomVMs)
//   }
}
private suspend fun subscribeToDevices() {
// TODO: 5.2.2 - Subscribe the device data changes in a structure
//   // Subscribe to changes on devices:
//   structure.devices().collect { deviceSet ->
//       val deviceVMs = mutableListOf<DeviceViewModel>()
//       val deviceWithoutRoomVMs = mutableListOf<DeviceViewModel>()
//       // Store devices in container ViewModels:
//       for (device in deviceSet) {
//           val deviceVM = DeviceViewModel(device)
//           deviceVMs.add(deviceVM)
//           // For any device that's not in a room, additionally keep track of a separate list:
//           if (device.roomId == null)
//               deviceWithoutRoomVMs.add(deviceVM)
//       }
//       // Store the ViewModels:
//       this.deviceVMs.emit(deviceVMs)
//       deviceVMsWithoutRooms.emit(deviceWithoutRoomVMs)
//   }
    }
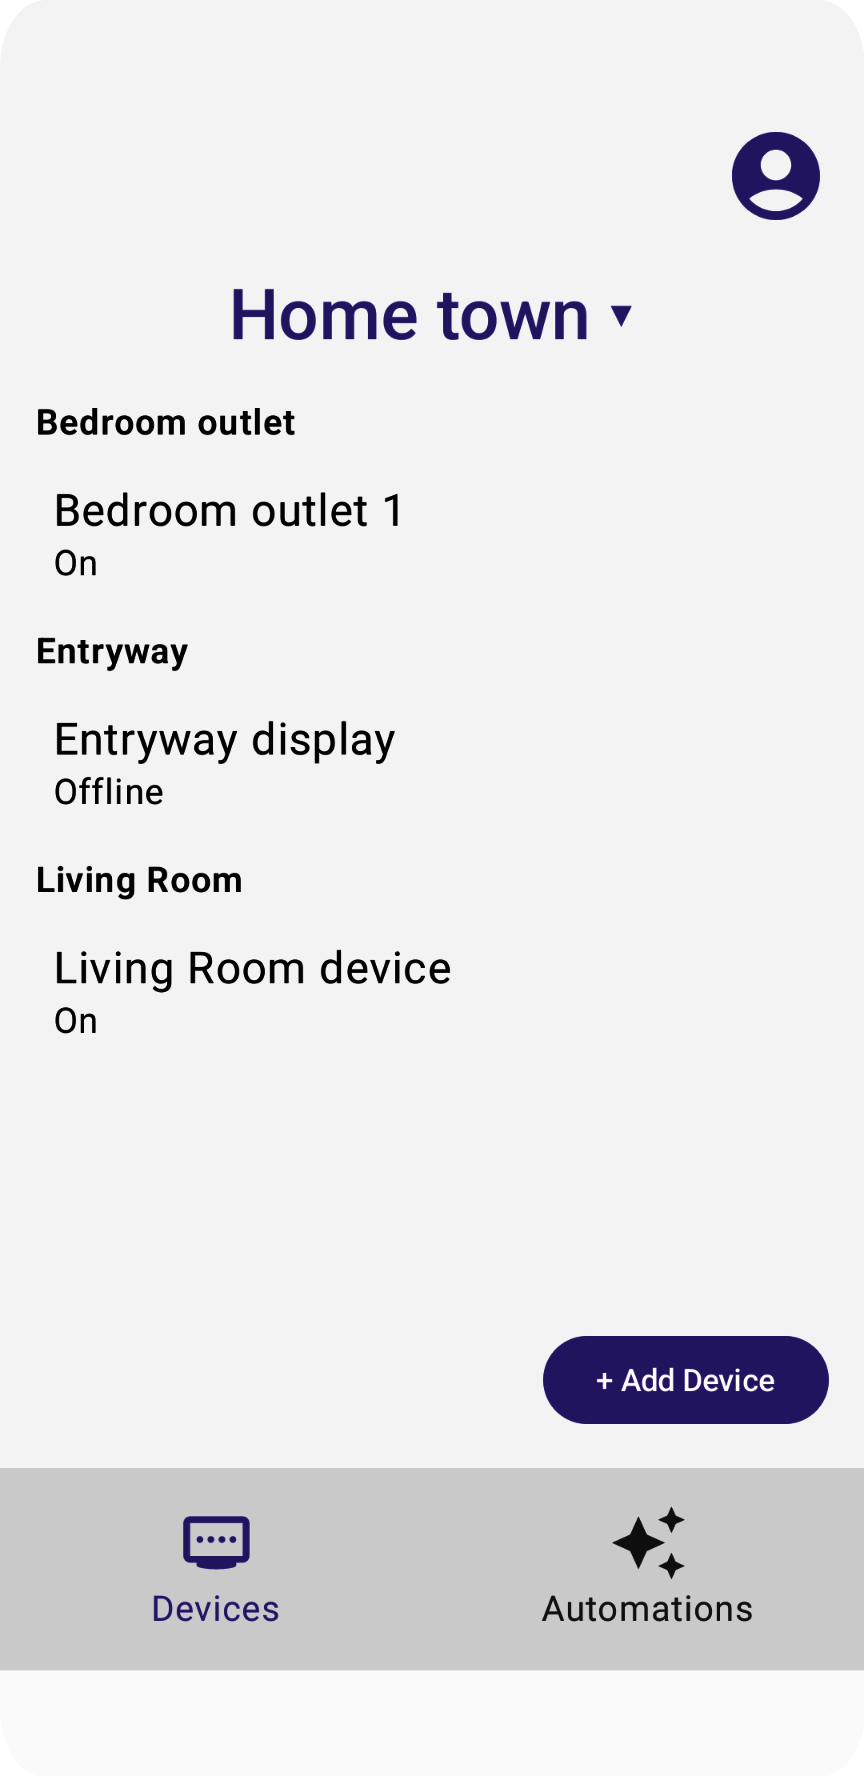
ยกเลิกการแสดงความคิดเห็นในขั้นตอนที่ 5.2.3 และ 5.2.4 ในDevicesView.ktไฟล์ต้นฉบับเพื่อแสดงรายการห้องเป็นเมนู
val selectedRoomVMs: List<RoomViewModel> =
selectedStructureVM.roomVMs.collectAsState().value
...
for (roomVM in selectedRoomVMs) {
// TODO: 5.2.3 - Render the list of rooms
//   RoomListItem(roomVM)
// TODO: 5.2.4 - Render the list of devices in a room
//   val deviceVMsInRoom: List<DeviceViewModel> = roomVM.deviceVMs.collectAsState().value
//
//   for (deviceVM in deviceVMsInRoom) {
//       DeviceListItem(deviceVM, homeAppVM)
//   }
}
เมื่อมีอุปกรณ์แล้ว เราจะมาดูวิธีใช้งานอุปกรณ์กัน
6. ทำงานกับอุปกรณ์
Home API ใช้ออบเจ็กต์ HomeDevice เพื่อบันทึกอุปกรณ์และความสามารถของอุปกรณ์ นักพัฒนาแอปสามารถติดตามแอตทริบิวต์ของอุปกรณ์และใช้แอตทริบิวต์เหล่านั้นเพื่อแสดงอุปกรณ์สมาร์ทโฮมในแอปของตนได้
อ่านสถานะอุปกรณ์
ออบเจ็กต์ HomeDevice จะแสดงชุดค่าคงที่ เช่น ชื่ออุปกรณ์หรือสถานะการเชื่อมต่อ ในฐานะนักพัฒนาแอป คุณสามารถดึงข้อมูลเหล่านี้ได้หลังจากได้รับอุปกรณ์จาก API
val id: String = device.id.id
val name: String = device.name
val connectivity: ConnectivityState =
    device.sourceConnectivity.connectivityState
หากต้องการรับความสามารถของอุปกรณ์ คุณต้องดึงข้อมูลประเภทและลักษณะจาก HomeDevice โดยคุณสามารถทำได้โดยสมัครใช้โฟลว์ประเภทอุปกรณ์ดังนี้ และเรียกข้อมูลลักษณะจากประเภทอุปกรณ์
device.types().collect { typeSet ->
var primaryType : DeviceType = UnknownDeviceType()
for (typeInSet in typeSet)
if (typeInSet.metadata.isPrimaryType)
                    primaryType = typeInSet
            val traits: List<Trait> = mutableListOf()
for (trait in primaryType.traits())
if (trait.factory in myTraits)
                    traits.add(trait)
for (trait in traits)
                parseTrait(trait, primaryType)
        }
อุปกรณ์แต่ละเครื่องจะมีชุด DeviceType ที่รองรับ (ความสามารถที่รวมไว้) ซึ่งคุณสามารถเรียกข้อมูลได้โดยใช้ device.types() อุปกรณ์ประเภทเหล่านี้มีลักษณะที่ดึงข้อมูลได้โดยใช้ type.traits() อุปกรณ์ทุกเครื่องจะทำเครื่องหมายประเภทใดประเภทหนึ่งเป็นประเภทหลัก (ซึ่งตรวจสอบได้โดยใช้ type.metadata.isPrimaryType) ที่คุณควรแสดงในแอป เราขอแนะนำให้คุณสำรวจประเภททั้งหมดที่แสดงและผสานรวมลักษณะทั้งหมดที่พร้อมใช้งานเพื่อให้ผู้ใช้ได้รับประสบการณ์การใช้งานที่สมบูรณ์
เมื่อดึงลักษณะแล้ว คุณจะแยกวิเคราะห์ลักษณะดังกล่าวได้โดยใช้ฟังก์ชันต่อไปนี้เพื่อตีความค่า
fun <T : Trait?> parseTrait(trait : T, type: DeviceType) {
    val status : String = when (trait) {
        is OnOff -> { if (trait.onOff) "On" else "Off" }
        is LevelControl -> { trait.currentLevel.toString() }
        is BooleanState -> {
            when (type.factory) {
                ContactSensorDevice -> {
if (trait.stateValue) "Closed"
else "Open"
                }
else -> ...
            }
        }
else -> ...
    }
}
โปรดทราบว่าลักษณะที่แสดงอาจแตกต่างกันไปตามประเภทอุปกรณ์ที่มีลักษณะดังกล่าว (ดู BooleanState ในตัวอย่างก่อนหน้า) ดังนั้นคุณจึงต้องทราบบริบทของอุปกรณ์แต่ละประเภทเพื่อทำความเข้าใจว่าลักษณะของอุปกรณ์เหล่านั้นแสดงถึงอะไร
ยกเลิกการแสดงความคิดเห็นในขั้นตอนที่ 6.1.1 และ 6.1.2 ในDeviceViewModel.ktไฟล์ต้นฉบับเพื่อดึงข้อมูลสถานะ
private suspend fun subscribeToType() {
// Subscribe to changes on device type, and the traits/attributes within:
device.types().collect { typeSet ->
// Container for the primary type for this device:
var primaryType : DeviceType = UnknownDeviceType()
...
// TODO: 6.1.1 - Determine the primary type for this device
//       // Among all the types returned for this device, find the primary one:
//       for (typeInSet in typeSet)
//           if (typeInSet.metadata.isPrimaryType)
//               primaryType = typeInSet
//
//       // Optional: For devices with a single type that did not define a primary:
//       if (primaryType is UnknownDeviceType && typeSet.size == 1)
//           primaryType = typeSet.first()
// Container for list of supported traits present on the primary device type:
val supportedTraits: List<Trait> = getSupportedTraits(primaryType.traits())
...
}
fun getSupportedTraits(traits: Set<Trait>) : List<Trait> {
           val supportedTraits: MutableList<Trait> = mutableListOf()
// TODO: 6.1.2 - Get only the supported traits for this device
//   for (trait in traits)
//       if (trait.factory in HomeApp.supportedTraits)
//           supportedTraits.add(trait)
return supportedTraits
}
ยกเลิกการแสดงความคิดเห็นในขั้นตอนที่ 6.1.3 ใน DeviceView.kt เพื่อแสดงผลลักษณะ OnOff รวมถึงชื่อและสถานะเป็น String ดังนี้
Box (Modifier.padding(horizontal = 24.dp, vertical = 8.dp)) {
when (trait) {
is OnOff -> {
// TODO: 6.1.3 - Render controls based on the trait type
// Column (Modifier.fillMaxWidth()) {
//     Text(trait.factory.toString(), fontSize = 20.sp)
//     Text(DeviceViewModel.getTraitStatus(trait, type), fontSize = 16.sp)
// }
...
}
is LevelControl -> {
      ...
  }
   is BooleanState -> {
      ...
  }
   is OccupancySensing -> {
      ...
  }
  ...
}
หากคุณเรียกใช้แอปตอนนี้ด้วยอุปกรณ์ประเภทที่รองรับ (เช่น อุปกรณ์หลอดไฟ) แอปควรแสดงสถานะล่าสุดของอุปกรณ์ทั้งหมด
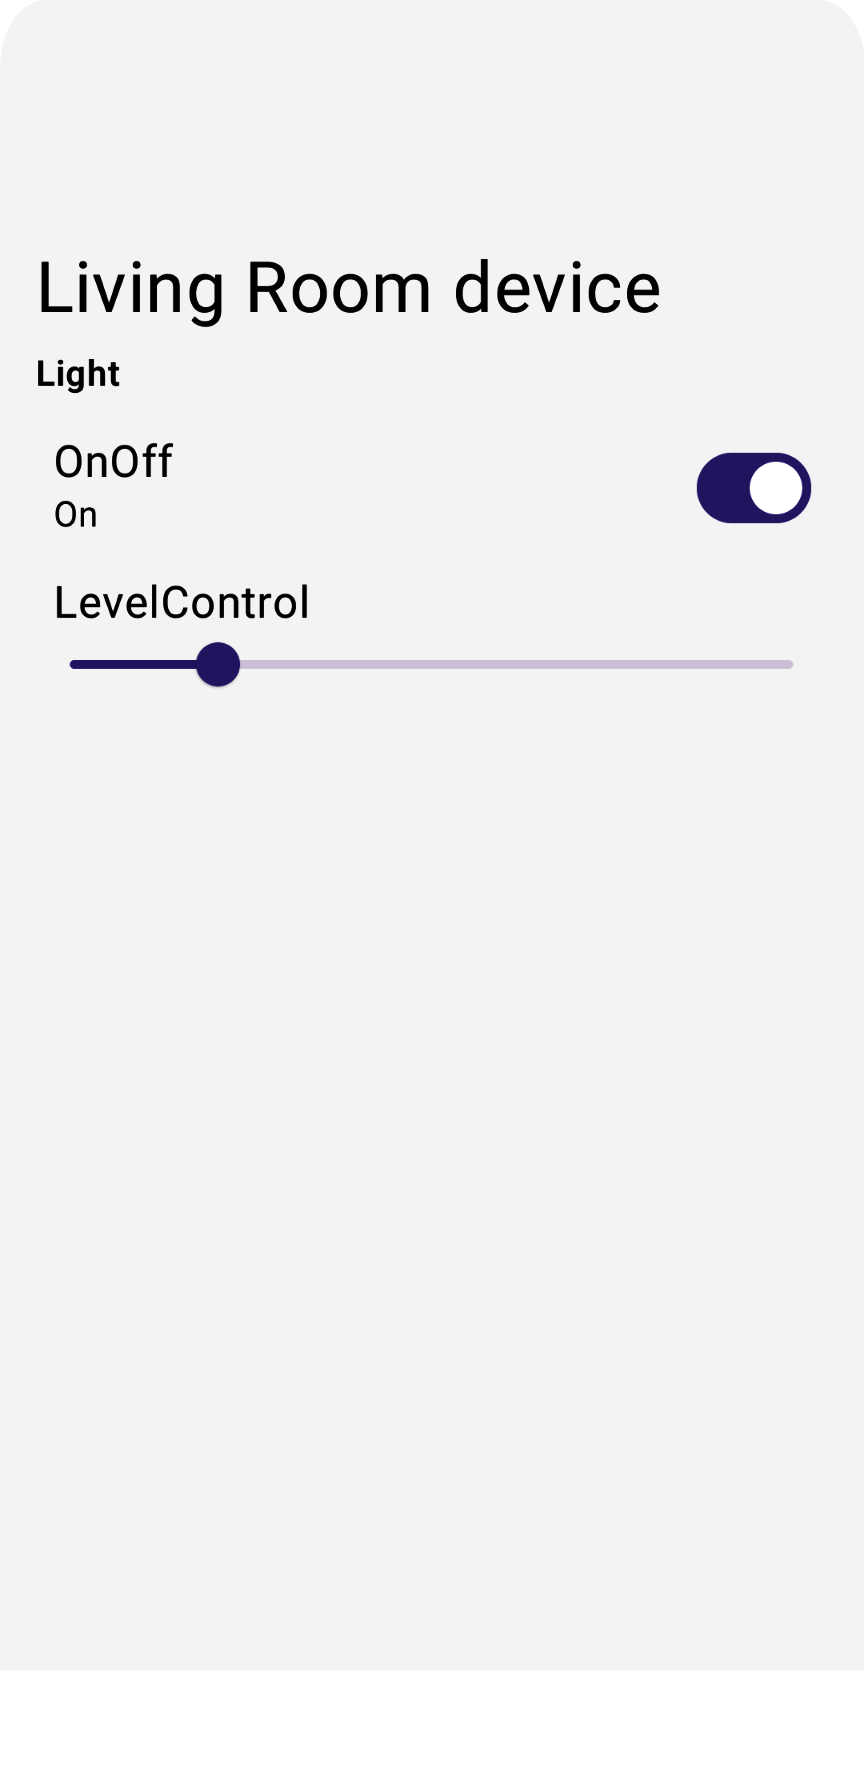
ใช้คำสั่งในอุปกรณ์
หากต้องการออกคำสั่งไปยังอุปกรณ์ Home API จะมีฟังก์ชันอำนวยความสะดวกในออบเจ็กต์ลักษณะ เช่น trait.on() หรือ trait.moveToLevel(...)
fun <T : Trait?> issueCommand(trait : T) {
     when (trait) {
         is OnOff -> {
// trait.on()
// trait.off()
   }
   is LevelControl -> {
// trait.moveToLevel(...)
// trait.moveToLevelWithOnOff(...)
        }
    }
}
เคล็ดลับ: เมื่อกำหนดประเภทลักษณะแล้ว ให้ใช้ฟีเจอร์เติมข้อความอัตโนมัติของ Android Studio เพื่อดูว่ามีการดำเนินการประเภทใดบ้างที่ใช้ได้สำหรับการโต้ตอบกับลักษณะ
ยกเลิกการแสดงความคิดเห็นในขั้นตอนที่ 6.2.1 ใน DeviceView.kt เพื่อเพิ่มการควบคุมการทำงานในแอป
Box (Modifier.padding(horizontal = 24.dp, vertical = 8.dp)) {
when (trait) {
is OnOff -> {
                ....
// TODO: 6.2.1 - Render controls based on the trait type
//   Switch (checked = (trait.onOff == true), modifier = Modifier.align(Alignment.CenterEnd),
//       onCheckedChange = { state ->
//           scope.launch { if (state) trait.on() else trait.off() }
//       },
//       enabled = isConnected
//   )
}
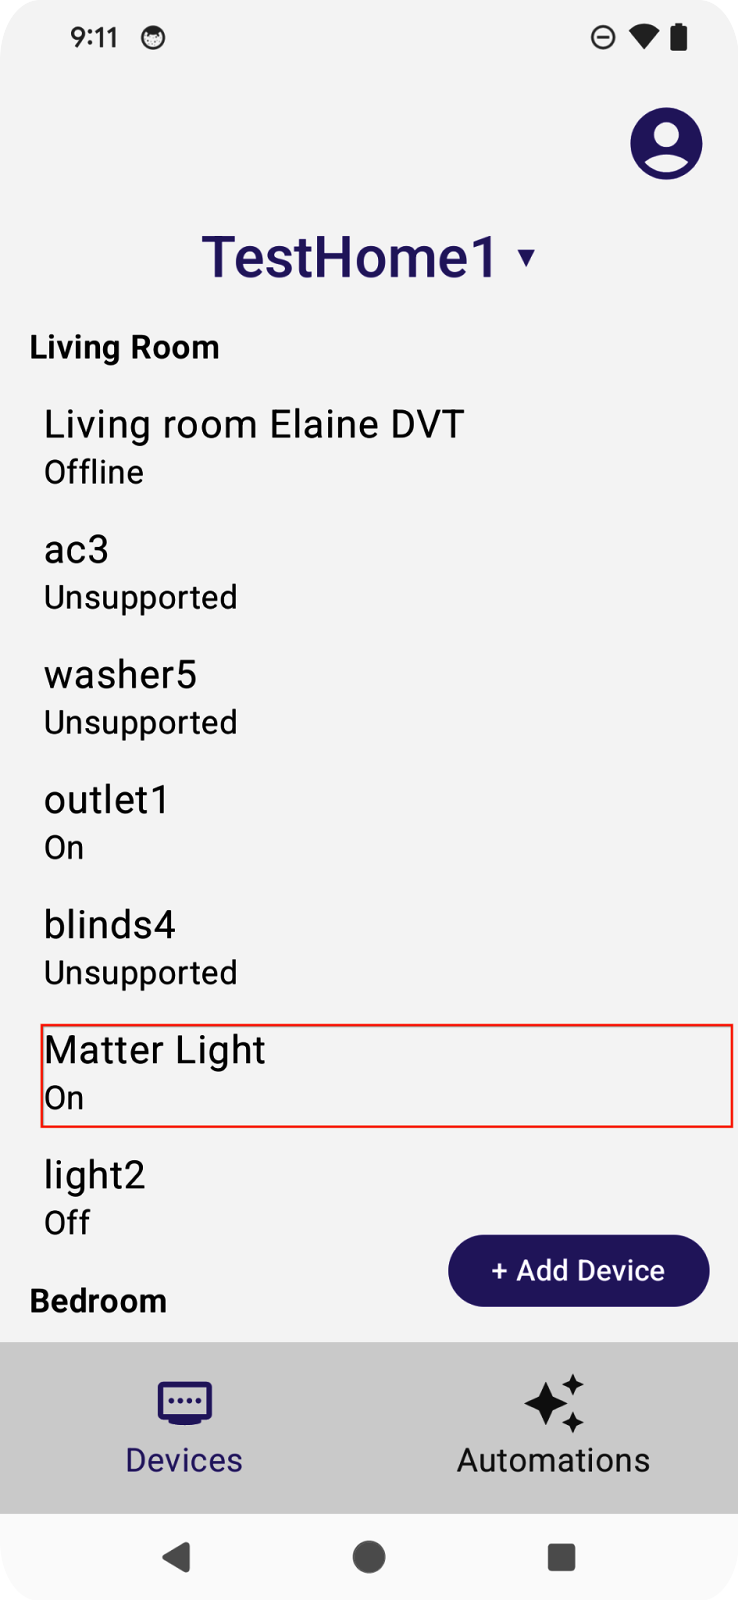
หากเรียกใช้แอปตอนนี้ แอปควรอนุญาตให้คุณควบคุมอุปกรณ์จริงในชีวิตประจำวันได้
หากแตะการควบคุมเปิด/ปิดบนหลอดไฟ อุปกรณ์ควรจะเปิดขึ้น
ดูข้อมูลเพิ่มเติมเกี่ยวกับวิธีควบคุมอุปกรณ์ได้ที่ควบคุมอุปกรณ์ใน Android
7. ตั้งค่าอุปกรณ์
Commissioning API ช่วยให้นักพัฒนาแอปเพิ่มอุปกรณ์ลงในระบบนิเวศของ Google Home และทำให้พร้อมใช้งานเพื่อควบคุมโดยใช้ Home API รองรับเฉพาะอุปกรณ์ Matter ในส่วนนี้ เราจะมาดูวิธีเปิดใช้การจัดสรรอุปกรณ์ในแอป
ก่อนเริ่มส่วนนี้ โปรดตรวจสอบว่าคุณมีคุณสมบัติตรงตามข้อกำหนดเบื้องต้นต่อไปนี้
- เราได้เพิ่ม Google Hub ที่รองรับ Matter ซึ่งอยู่ในเครือข่ายเดียวกับโทรศัพท์ Android ลงในแอป Google Home แล้ว
- คุณได้สร้างโปรเจ็กต์นักพัฒนาซอฟต์แวร์ใน Google Home Developer Console ด้วย VID
0xFFF1และ PID0x8000
หากคุณมีอุปกรณ์ Matter จริงที่มีคิวอาร์โค้ดสำหรับการจัดสรร คุณสามารถข้ามไปที่เปิดใช้ Commissioning API ได้เลย หรือจะไปยังส่วนถัดไปก็ได้ ซึ่งเราจะพูดถึงวิธีใช้แอปอุปกรณ์เสมือน Matter (MVD) เพื่อสร้างอุปกรณ์เสมือนที่สามารถรับค่าคอมมิชชัน
ไม่บังคับ: เตรียมอุปกรณ์ที่จัดเตรียม Matter ได้
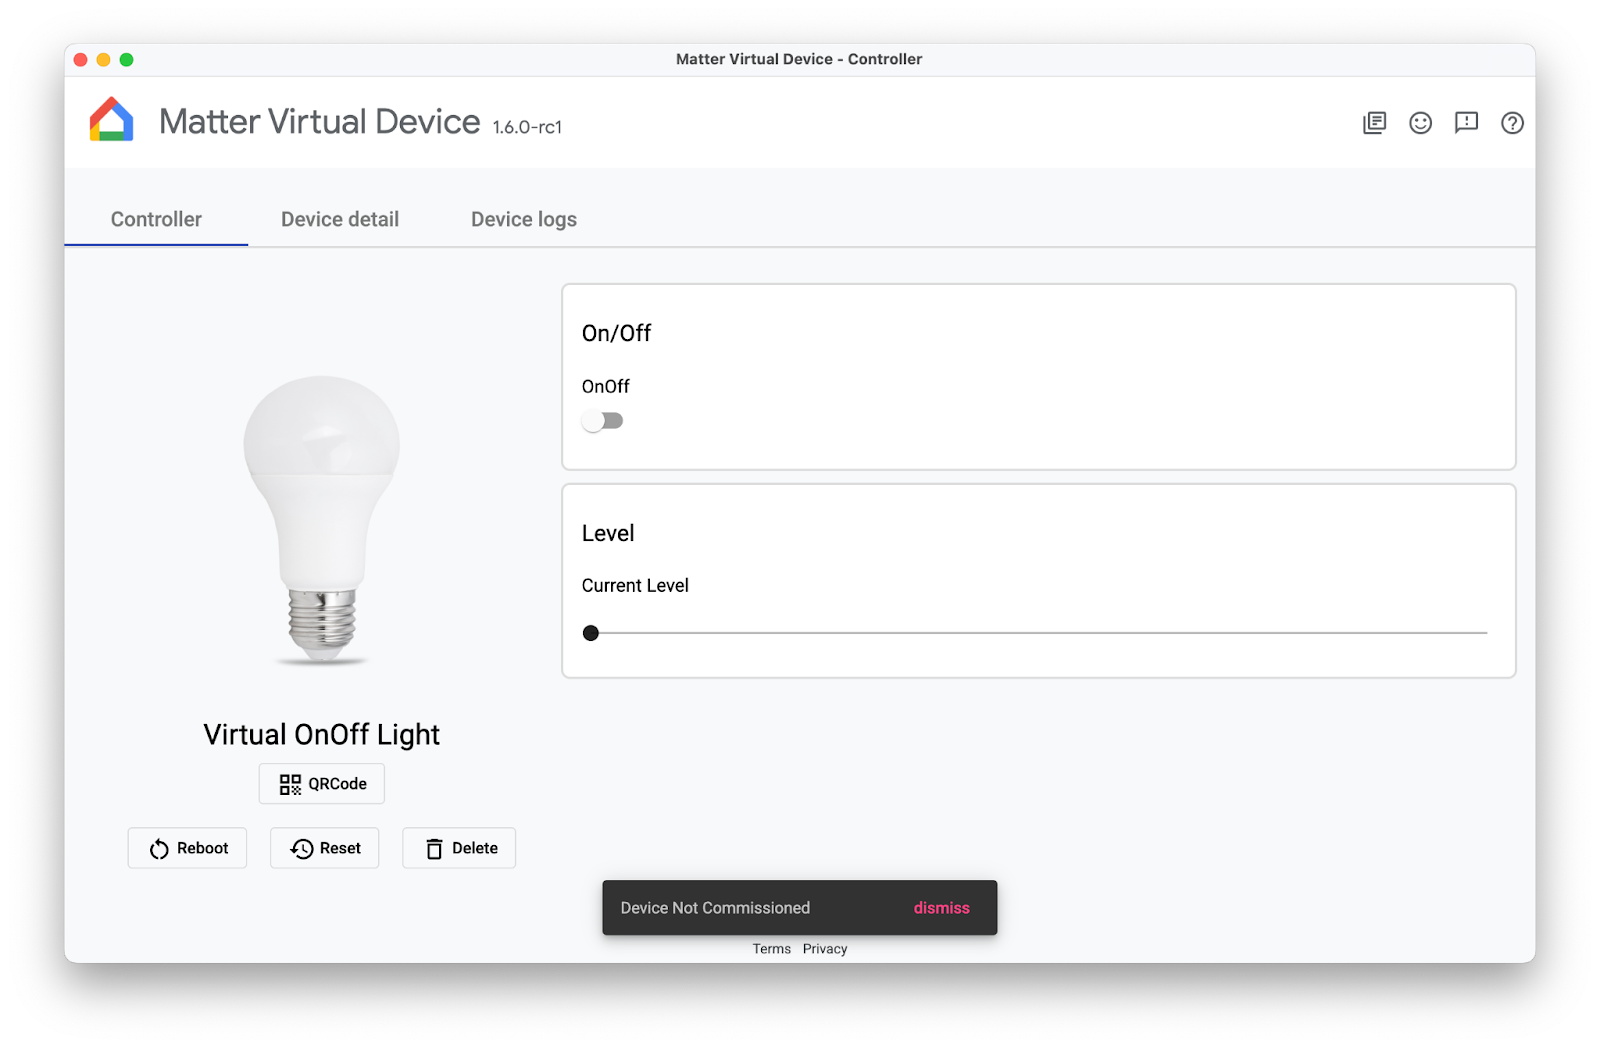
วิธีที่ง่ายที่สุดในการเตรียมอุปกรณ์ที่พร้อมใช้งาน Matter คือการใช้อุปกรณ์จำลองที่แอป Matter Virtual Device (MVD) มีให้
หลังจากติดตั้ง MVD และตั้งค่าไฟร์วอลล์แล้ว ให้เรียกใช้ MVD โดยทำดังนี้
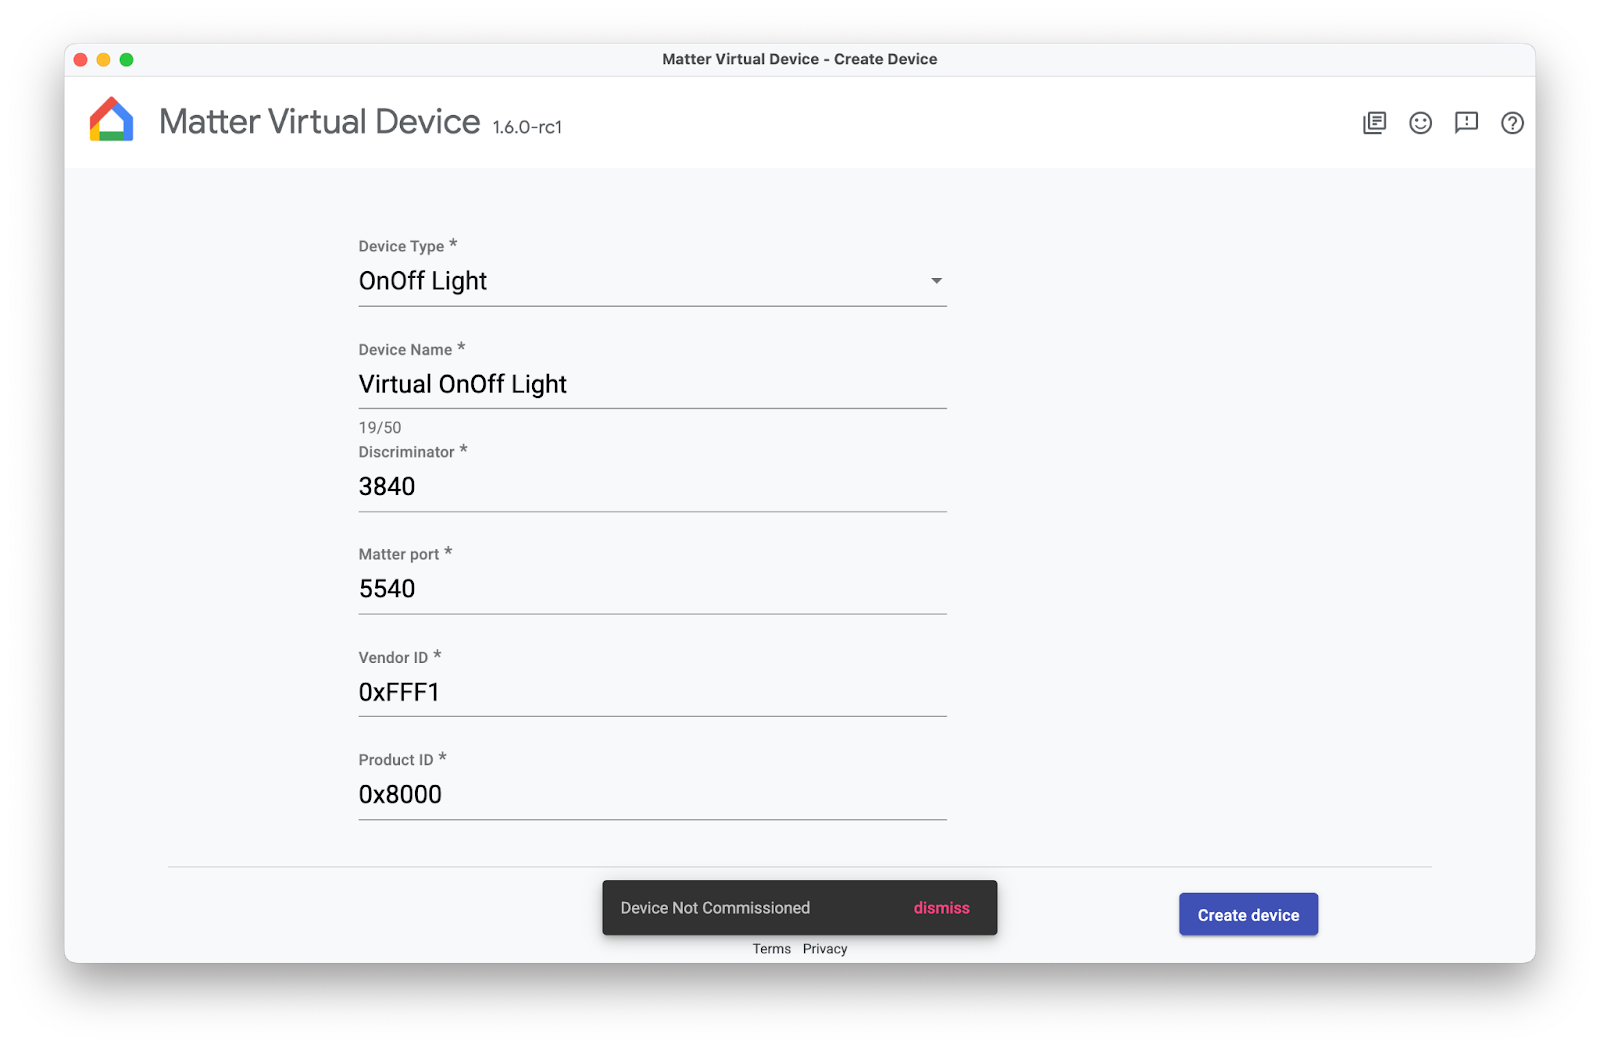
สร้างอุปกรณ์ OnOff โปรดสังเกตว่ายังไม่ได้เปิดใช้ - คุณจะเปิดใช้ในภายหลังใน Codelab นี้
เปิดใช้ Commissioning API
API การจัดสรรค่าคอมมิชชันจะทำงานภายนอกกิจกรรมของแอป ดังนั้นการจัดสรรค่าคอมมิชชันจึงต้องได้รับการจัดการแตกต่างจาก Home API อื่นๆ คุณต้องมีตัวแปร 2 ตัวเพื่อให้แอปพร้อมสำหรับการว่าจ้าง
ตัวแปรหนึ่งคือ ActivityResultLauncher ซึ่งใช้เพื่อส่งเจตนาในการจัดสรรและจัดการการเรียกกลับผลลัพธ์ ตัวแปรอีกตัวคือ CommissioningResult ซึ่งเป็นออบเจ็กต์ที่ใช้จัดเก็บผลลัพธ์การจัดสรร ดูตัวอย่างต่อไปนี้เพื่อดูวิธีตั้งค่าการส่งมอบงาน
var launcher: ActivityResultLauncher<IntentSenderRequest>
lateinit var commissioningResult: CommissioningResult?
launcher = activity.registerForActivityResult(StartIntentSenderForResult()) { result ->
try {
  commissioningResult = CommissioningResult.fromIntentSenderResult(
      result.resultCode, result.data)
  } catch (exception: ApiException) {
// Catch any issues
 }
}
เมื่อตั้งค่าขั้นตอนการมอบหมายแล้ว คุณจะสร้างเจตนาในการมอบหมายและเปิดตัวโดยใช้ Launcher ที่เราสร้างขึ้นในตัวอย่างก่อนหน้า เราขอแนะนำให้วาง Intent และ Launcher ไว้ในฟังก์ชันเฉพาะ เช่น ฟังก์ชันต่อไปนี้ ฟังก์ชันเฉพาะจะเชื่อมโยงกับองค์ประกอบ UI ได้ (เช่น ปุ่ม +เพิ่มอุปกรณ์) และเรียกใช้ตามคำขอของผู้ใช้ได้
fun requestCommissioning() {
// Retrieve the onboarding payload used when commissioning devices:
val payload = activity.intent?.getStringExtra(Matter.EXTRA_ONBOARDING_PAYLOAD)
  scope.launch {
    // Create a commissioning request to store the device in Google's Fabric:
    val request = CommissioningRequest.builder()
      .setStoreToGoogleFabric(true)
      .setOnboardingPayload(payload)
      .build()
    // Initialize client and sender for commissioning intent:
    val client: CommissioningClient = Matter.getCommissioningClient(context)
    val sender: IntentSender = client.commissionDevice(request).await()
    // Launch the commissioning intent on the launcher:
    launcher.launch(IntentSenderRequest.Builder(sender).build())
  }
}
ยกเลิกการแสดงความคิดเห็นในขั้นตอนที่ 7.1.1 ใน CommissioningManager.kt เพื่อเปิดใช้ความสามารถในการจัดสรร และทำให้ปุ่ม +เพิ่มอุปกรณ์ทำงานในแอปตัวอย่าง
// Called by +Add Device button in DeviceView.kt
fun requestCommissioning() {
// Retrieve the onboarding payload used when commissioning devices:
val payload = activity.intent?.getStringExtra(Matter.EXTRA_ONBOARDING_PAYLOAD)
// TODO: 7.1.1 - Launch the commissioning intent
// scope.launch {
//     // Create a commissioning request to store the device in Google's Fabric:
//     val request = CommissioningRequest.builder()
//         .setStoreToGoogleFabric(true)
//         .setOnboardingPayload(payload)
//         .build()
//     // Initialize client and sender for commissioning intent:
//     val client: CommissioningClient = Matter.getCommissioningClient(context)
//     val sender: IntentSender = client.commissionDevice(request).await()
//     // Launch the commissioning intent on the launcher:
//     launcher.launch(IntentSenderRequest.Builder(sender).build())
// }
}
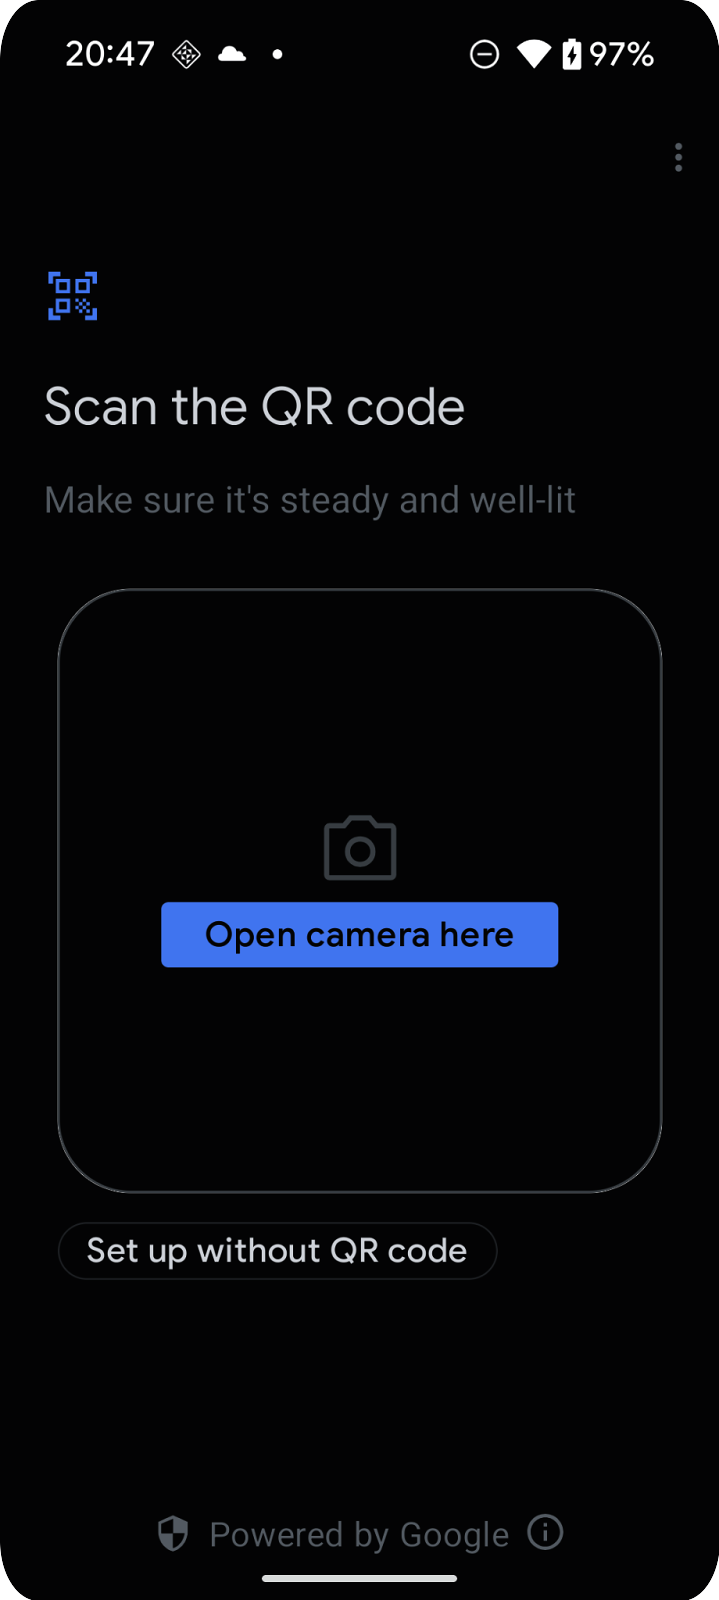
การเรียกใช้ฟังก์ชันนี้ควรเริ่มขั้นตอนการจัดสรร ซึ่งควรแสดงหน้าจอที่คล้ายกับภาพหน้าจอต่อไปนี้
ทำความเข้าใจขั้นตอนการมอบหมายงาน
โฟลว์การจัดสรรประกอบด้วยชุดหน้าจอที่จะแนะนำผู้ใช้ในการเพิ่มอุปกรณ์ลงในบัญชี Google
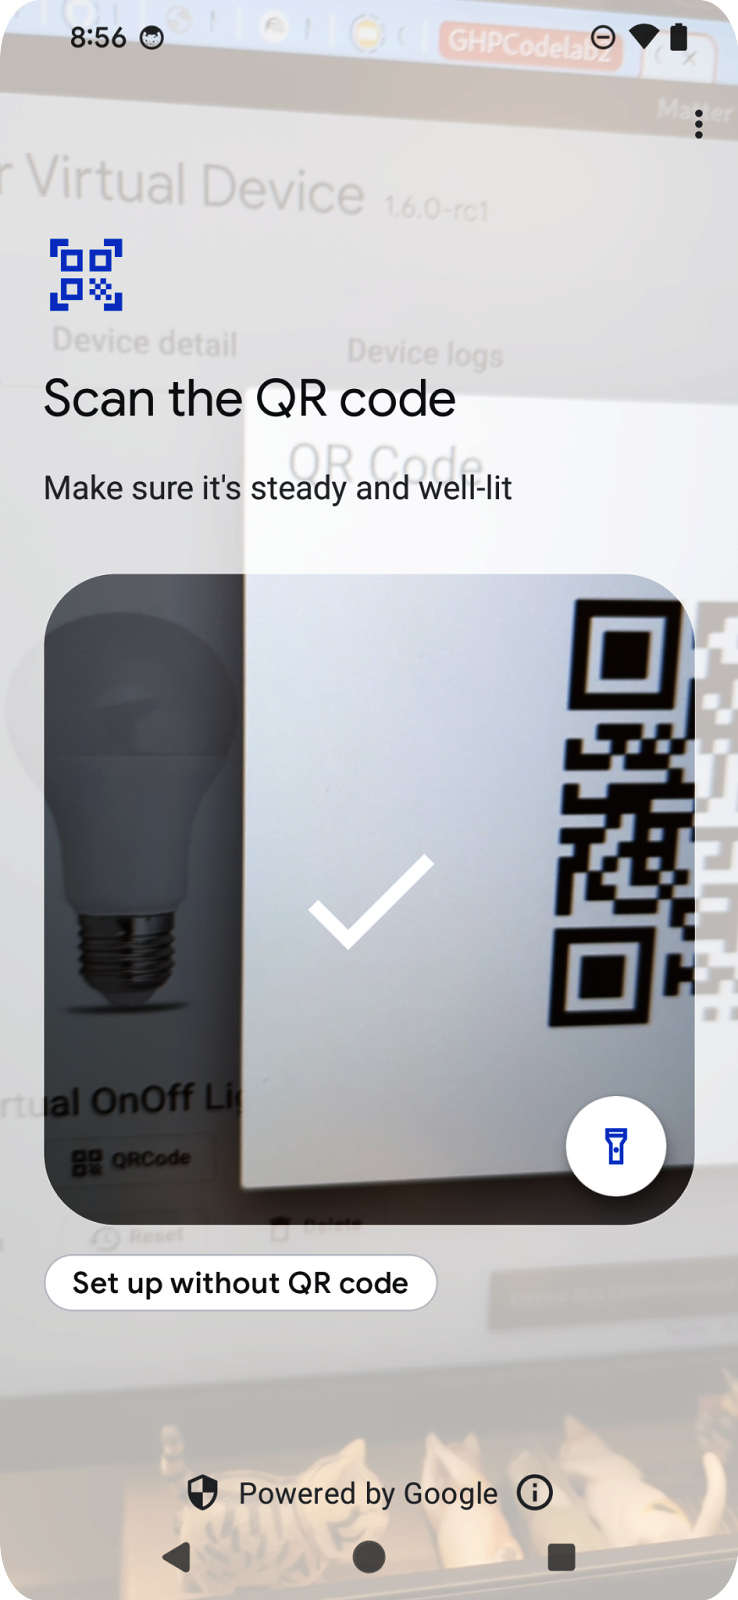
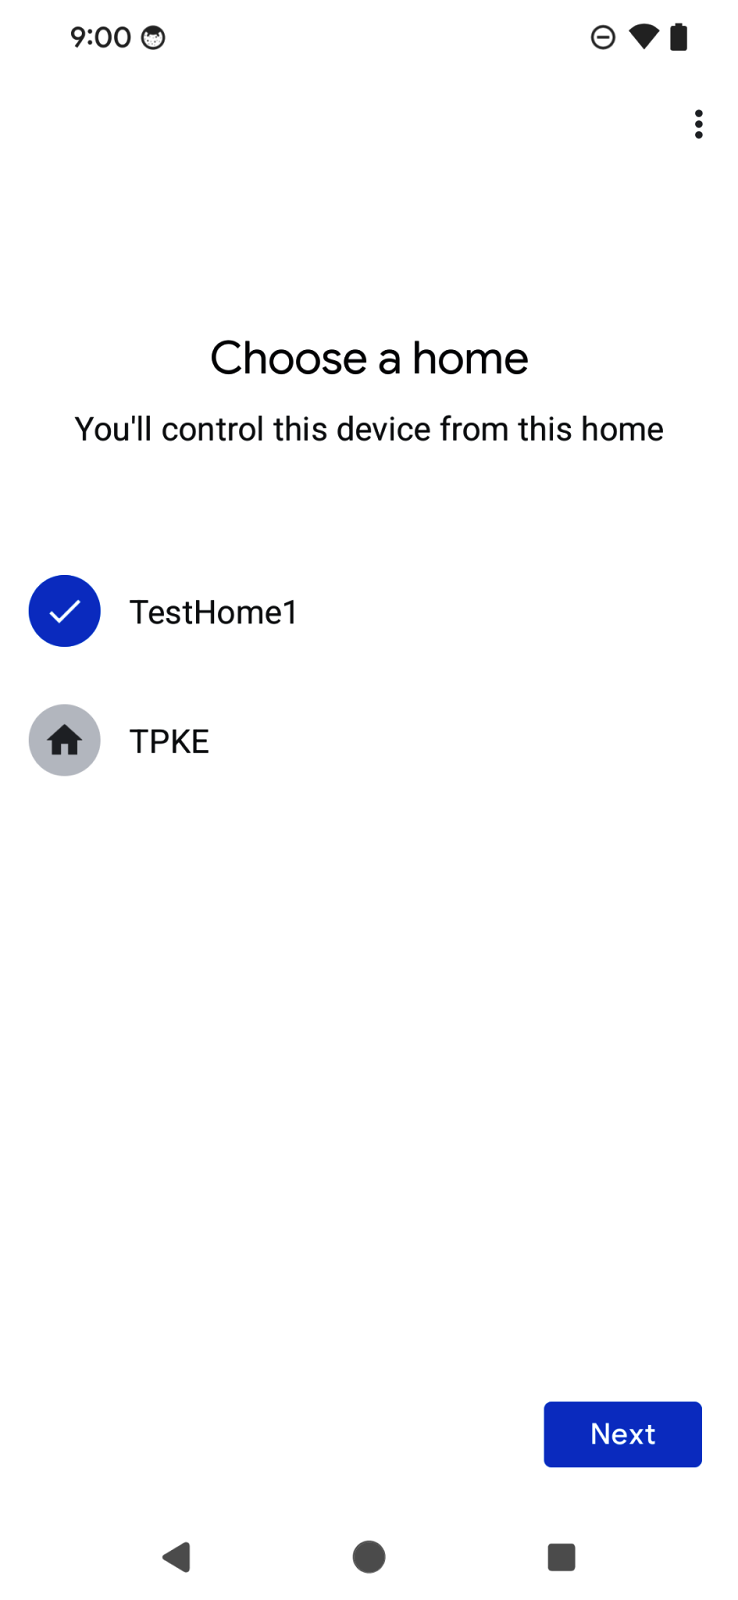
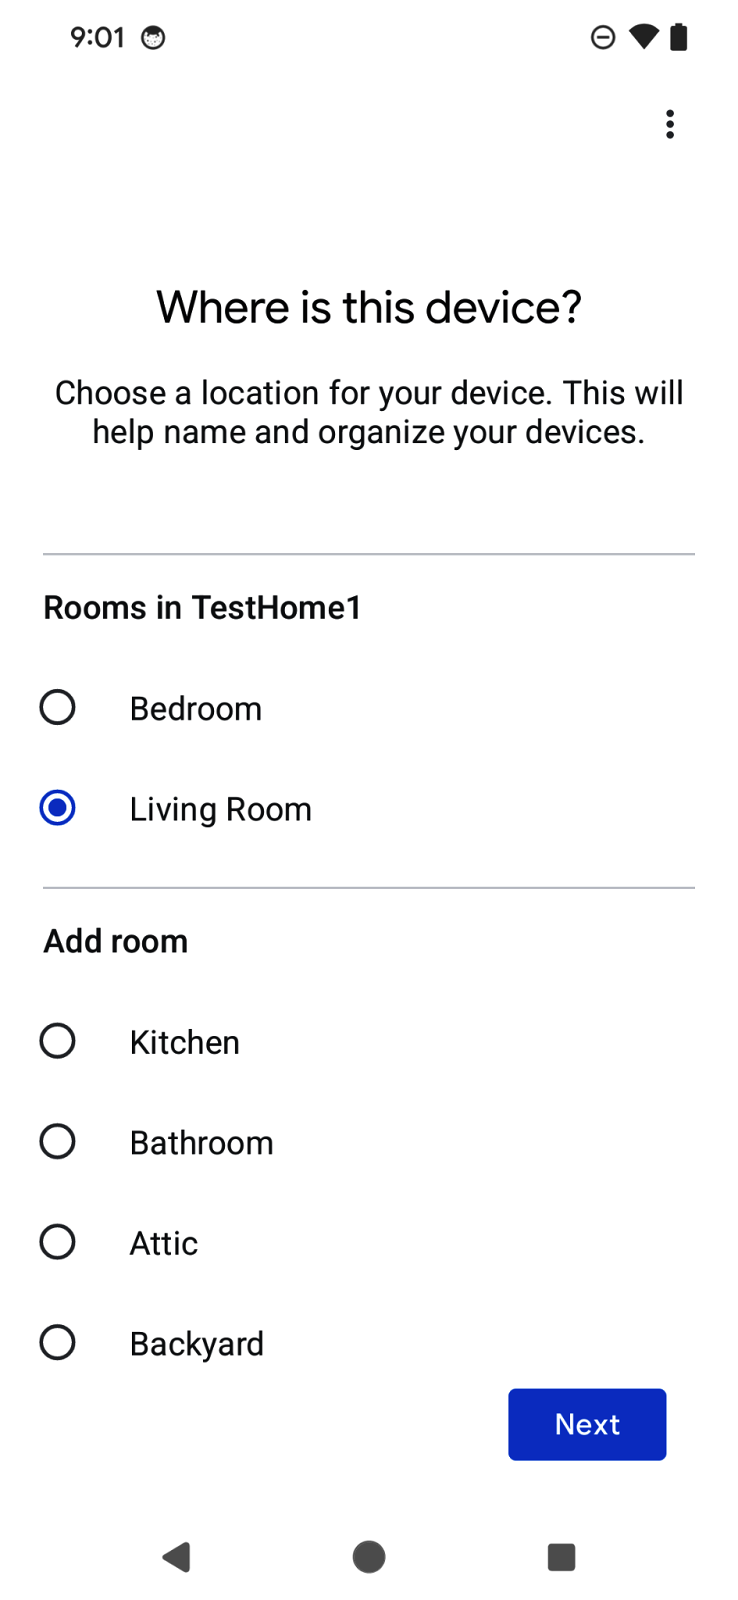
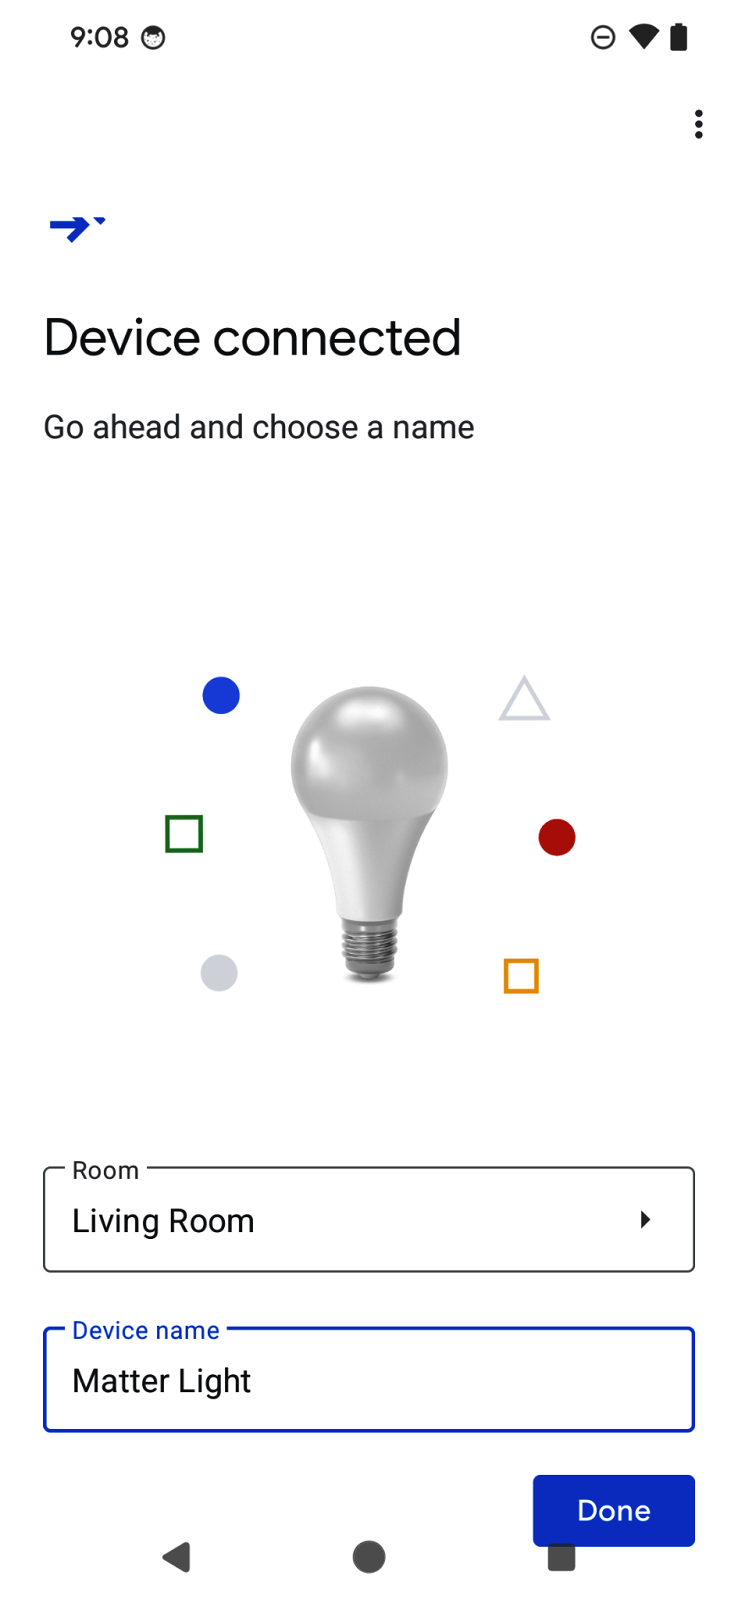
ผู้ใช้จะเห็นเครื่องสแกนคิวอาร์โค้ดที่ใช้สแกนคิวอาร์โค้ดจากอุปกรณ์ Matter ได้ จากนั้นโฟลว์จะแสดงข้อตกลงของผู้ใช้ การค้นหาและการจัดสรรอุปกรณ์ รวมถึงการตั้งชื่ออุปกรณ์ เมื่อโฟลว์เสร็จสมบูรณ์แล้ว โฟลว์จะเปลี่ยนโฟกัสกลับไปที่แอป และส่งผลการจัดสรรในฟังก์ชันเรียกกลับที่เราร่างไว้ในส่วนก่อนหน้า
ข้อดีอย่างหนึ่งของ Commissioning API คือ SDK จะจัดการโฟลว์ UX เพื่อให้นักพัฒนาแอปเริ่มต้นใช้งานได้อย่างรวดเร็ว นอกจากนี้ยังช่วยให้ผู้ใช้ได้รับประสบการณ์การใช้งานที่สอดคล้องกันเมื่อเพิ่มอุปกรณ์ในแอปต่างๆ
ดูข้อมูลเพิ่มเติมเกี่ยวกับ Commissioning API ได้ที่ Commissioning API ใน Android
8. ยินดีด้วย
ยินดีด้วย คุณสร้างแอป Android โดยใช้ Google Home API เรียบร้อยแล้ว ตลอดทั้งโค้ดแล็บนี้ คุณได้สำรวจ API ของสิทธิ์ อุปกรณ์ โครงสร้าง และการคอมมิชชัน ในโค้ดแล็บถัดไป Create advanced automations using the Home APIs on Android Codelab เราจะมาดู Automation API และ Discovery API รวมถึงสร้างแอปให้เสร็จสมบูรณ์
เราหวังว่าคุณจะสนุกกับการสร้างแอปที่ควบคุมอุปกรณ์ภายในระบบนิเวศของ Google Home ได้อย่างสร้างสรรค์
ขั้นตอนถัดไป
- เดินทางต่อไปยังส่วนถัดไปเพื่อเรียนรู้เกี่ยวกับ Home API ใน Android โดยทำ Codelab ที่ 2 ในชุดนี้ให้เสร็จสมบูรณ์: สร้างการทำงานอัตโนมัติขั้นสูงโดยใช้ Home API ใน Android
- คุณติดต่อเราเพื่อส่งคำแนะนำหรือรายงานปัญหาผ่านเครื่องมือติดตามปัญหาในหัวข้อการสนับสนุนสมาร์ทโฮมได้