
Sample app
If you encounter any issues when using the Home APIs, you can collect logs for further debugging. Collecting logs from the mobile device requires Xcode. If you need assistance from Google, collect the logs from both the iOS device and the hub and open a ticket in the issue tracker with the relevant information and logs associated with it.
Collect iOS logs
Your mobile device must be connected to your local machine for all steps involving Xcode.
App logs and SDK logs are displayed and collectable directly within the Xcode console. When your mobile device is connected to your local machine and you run the application through Xcode, the console automatically captures and streams standard output (stdout) and standard error (stderr) logs from both the application layer and the integrated Home SDK. This provides a straightforward way to monitor real-time initialization processes, API interactions, and SDK events during development and debugging.
Collecting extension logs from Xcode
If you encounter any issues when using the Home APIs, you can collect logs for further debugging.
In Xcode, go to Debug on the top menu bar and click Attach to Process by PID or Name.
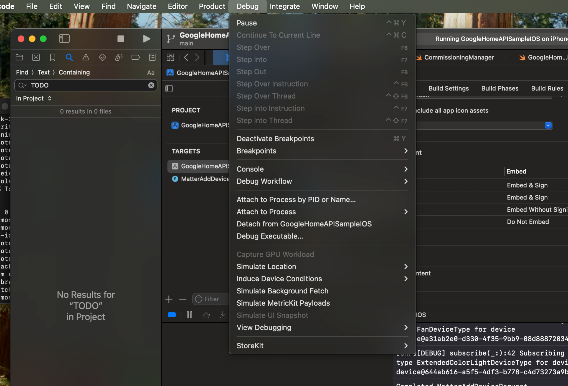
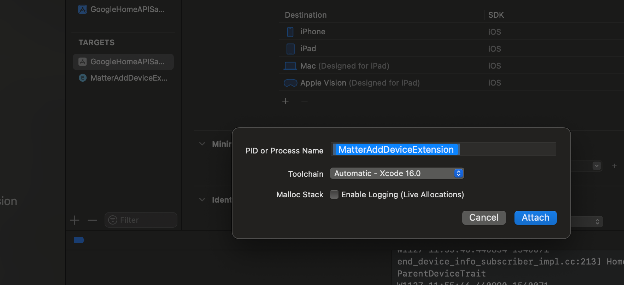
Under PID or Process Name, select MatterExtension and click Attach.
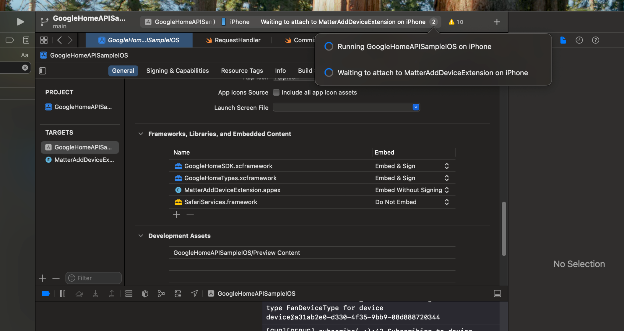
You will see Waiting to attach to MatterAddDeviceExtension on iPhone if you click the top right.
Click on the tab and select MatterAddExtension.
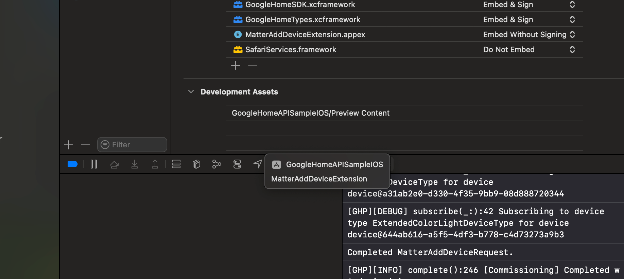
The console will log the Extension log.
Sherlog: Cross-Stack Event Tracing
Sherlog is a real-time tracing service that provides an end-to-end view of interactions between Google's infrastructure and partner cloud services.
Prerequisite: Tracing requires the use of a shared, Google-coordinated account (e.g., a GReg-registered or demo account).
Core Purpose: Debug functional defects and cloud-to-cloud (C2C) integration issues (e.g., account linking failures or incorrect device states) without requiring production code changes.
Capabilities: Provides complete RPC call graphs, request/response payloads, and metadata for SYNC, EXECUTE, QUERY, and Account Linking intents.
Fuchsia hub device logs
You can collect logs from the following Fuchsia hubs using this method: * Google Nest Hub (2nd gen) * Google Nest Hub Max
To enable a hub for local logs retrieval:
- Send an email with the Serial Number and Model of your devices to your Google Technical Account Manager (TAM). They can be found in small letters under the device.
- Once allowlisted, you must enable the feature by following these steps:
- From the hub:
- Swipe down from the top of the screen
- Tap the Settings icon
- Find the Fuchsia Version: On a Nest Hub (2nd gen), go to Device information > Technical information > Fuchsia Version
- Tap "Fuchsia Version" 7 times. This will enable the developer options
- Go back to the top-level menu
- Tap on "Developer options"
- Tap on "Partner Logging"
- The feature will be enabled for 24 hours. After that, re-enable the logging feature from step 5 onwards.
- From the hub:
- Get the IP address of your hub:
- From the hub, if it has a screen:
- Swipe down from the top of the screen
- Tap the Settings icon
- Find the device IP address: On a Nest Hub (2nd gen), go to Device information > Technical information > IP Address
- From Google Home app (GHA) on your phone:
- Tap the device to bring up the device details page
- Tap the Settings icon to bring up the settings page
- Find the device IP address: go to Device information > Technical information > IP address
- From the hub, if it has a screen:
- To retrieve logs from the hub, you'll make a GET HTTP request to the hub
from a computer on the same Wi-Fi network.
- Note the port and path of the endpoint:
curl -k -X GET https://ip-address:8443/setup/get_logs --output output-file - The connection can be kept open for only one minute, but data retrieved
from the buffer usually has 20-30 minutes of past events.
- Ideally, logs are extracted using this method immediately after completing a test procedure to ensure the buffer contains content relevant to the test (similar to Android bug reports).
- Note the port and path of the endpoint:
Automations
Edge detection
Automations in the Google Home ecosystem feature edge detection, which is logic that verifies that a starter only activates when there is an actual state change, as opposed to a state update which merely repeats the previous state of the device.
For example, if turning on a light is a starter, edge detection verifies the starter only activates if that light device goes from off to on, as opposed to from on to on (no change).
Automation doesn't behave as expected
After accounting for edge detection, if an automation doesn't behave as expected:
Check each device to make sure that it is functioning properly independent of your automation.
Have a look at the automation graph for your automation, comparing it against your automation DSL, to reveal any potentially incorrect assumptions on your part.
Observe device state in the Google Home app during the execution of your automation.
Check to make sure that all the devices referenced by the automation are present in the structure where you expect them to be. Deleting a device that an automation depends on can have unintended consequences. See Impact of device deletion on automations.
Automation runs when it shouldn't
If your automation runs when it shouldn't, examine the starter criteria. It may be necessary to add additional logic to make sure that a change in state is captured only once and triggers the automation only once.
Automation doesn't compile
Make sure your app contains all the necessary imports, including each class corresponding to the different node types as well as the traits you're referencing.
Automation creation fails validation
If automation creation does not pass validation, a warning or error message
provides information about the issue. For more information, refer to the
ValidationIssueType reference.
OAuth
If you have an existing OAuth client
If you already have a verified OAuth client for a published app, you can use your existing OAuth client to test the Home APIs.
Google Home Developer Console registration is not required to test and use the Home APIs. However, you will still need an approved Developer Console registration to publish your app, even if you have a verified OAuth client from another integration.
The following considerations apply:
There is a 100-user limit when using an existing OAuth client. For information about adding test users, refer to Generate the OAuth client ID. Independent of OAuth verification, there is a Home APIs-imposed limit of 100 users who can grant permissions to your application. This limitation is lifted upon completion of Developer Console registration.
Developer Console registration should be sent for approval when you are ready to restrict device-type grants through OAuth in preparation for updating your app with the Home APIs.
For Google Cloud apps that are still pending OAuth verification, users can't complete the OAuth flow until verification is complete. Attempts to grant permissions will fail with the following error:
Access blocked: <Project Name> has not completed the Google verification process.