
The Automation DSL can be used to create automations that are more complex than those discussed in DSL guide - basic automations on Android.
Sequential with multiple actions
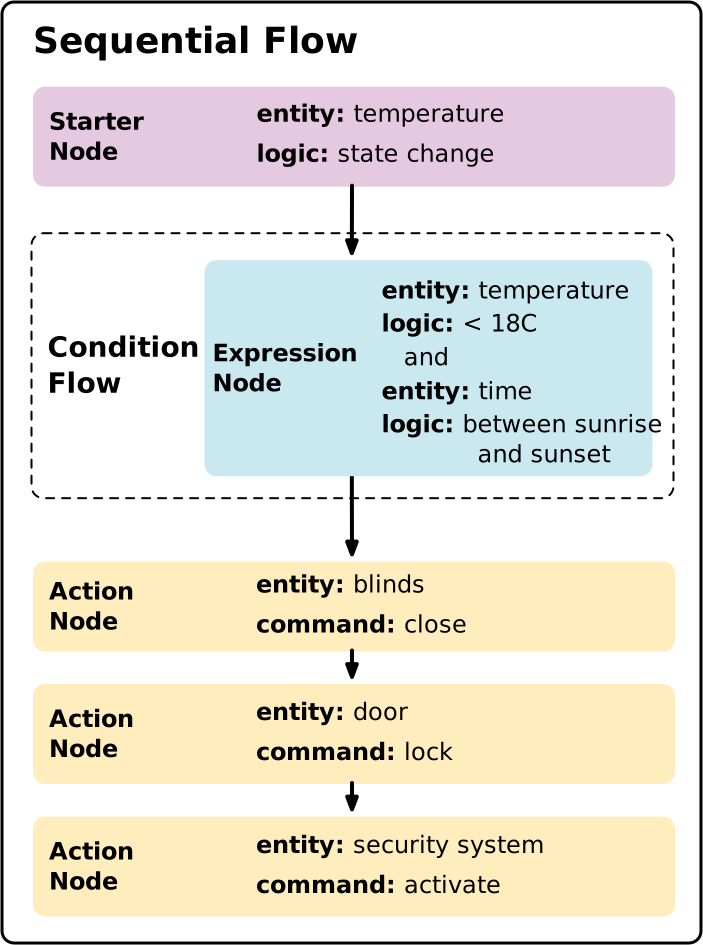
An automation can do more than one thing. For example, in place of the single
action node, you could have multiple action nodes, which run in sequential
order:
automation {
  sequential {
    starter<_>(...)
    condition {...}
    action {...}
    action {...}
    action {...}
    }
}
Sequential with multiple parallel actions
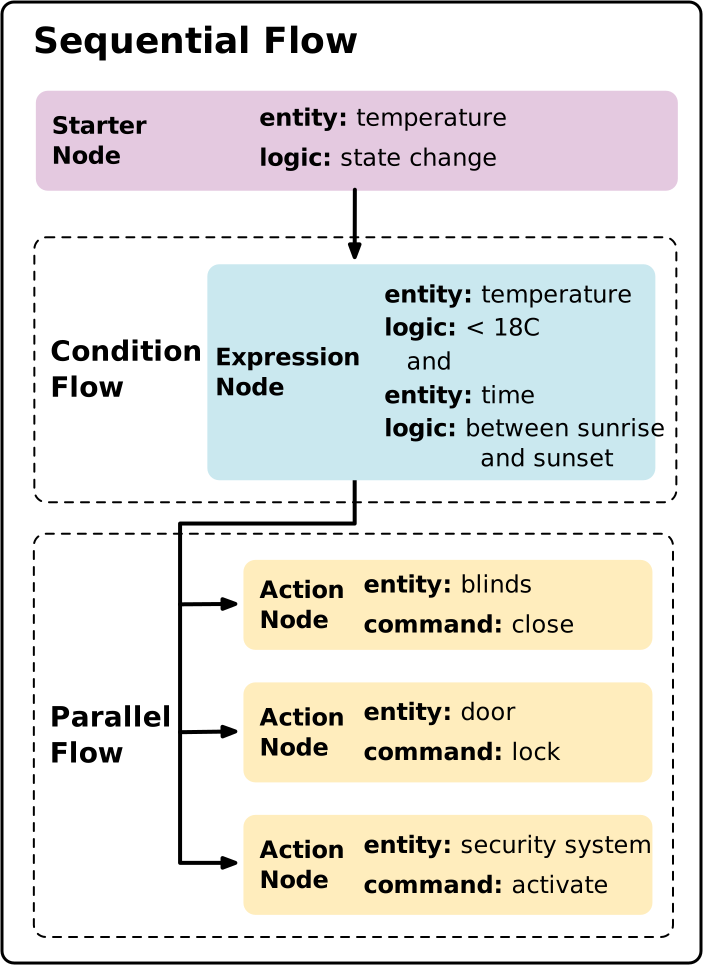
If you place multiple action nodes in a parallel node, the actions execute
concurrently.
automation {
  sequential {
    starter<_>(...)
    condition {...}
    parallel {
      action {...}
      action {...}
      action {...}
    }
  }
}
If there are action nodes in the sequential node that come after the
parallel node, they wait to execute until all the nodes within the parallel
node have finished executing.
Conditional execution
By default, an automation executes nodes sequentially or in parallel. If you
need conditional branching logic—executing different actions or paths based on
runtime conditions—use if-then-else statements, which are built using the
conditional control flow DSL blocks:
ifThen,
elseIf,
and
orElse.
While a standard condition node gates the entire automation (if the condition
evaluates to false, the automation terminates execution immediately), ifThen
blocks enable branching control flow:
conditionnode: Stops execution of the entire automation (or current execution path) if the expression isfalse.ifThen/elseIf/orElse: Evaluates conditions in order. If a condition isfalse, execution falls through to the nextelseIfbranch, theorElsefallback branch, or continues to subsequent nodes in the automation if no condition is met.
Execute an action based on a condition
The ifThen block evaluates a conditional expression. If the expression
evaluates to true, the DSL actions or nodes nested inside the block are
executed. If it evaluates to false, the actions are skipped, and the
automation continues to subsequent nodes in the sequential flow.
You can use a standalone ifThen block when you only want to perform an action
conditionally without blocking or terminating subsequent nodes in the
automation:
// When a door opens, turn on the light only if it is off,
// and always broadcast an announcement.
automation {
  sequential {
    val contactState = starter<_>(
      contactSensor,
      ContactSensorDevice,
      BooleanState,
    )
    val lightState = stateReader<_>(
      light,
      DimmableLightDevice,
      OnOff,
    )

    condition {
      // Door opened (contact sensor open)
      expression = contactState.stateValue equals false
    }

    // Conditionally turn on the light if it's off
    ifThen(lightState.onOff equals false) {
      action(light, DimmableLightDevice) { command(OnOff.on()) }
    }

    // Continue executing subsequent actions in the sequential flow
    action(structure) {
      command(AssistantBroadcast.broadcast("The door was opened."))
    }
  }
}
Execute different actions based on a condition
To execute one set of actions when a condition is true and an alternative set of
actions when it is false, chain the optional .orElse { ... } block after ifThen(...) { ... }:
// When the door is unlocked, turn on the entryway light if it is off;
// otherwise, broadcast a welcome message.
automation {
  sequential {
    val doorLockEvent = starter<_>(
      doorLock,
      DoorLockDevice,
      LockOperationEvent,
    )
    val lightState = stateReader<_>(
      light,
      DimmableLightDevice,
      OnOff,
    )

    condition {
      expression =
        doorLockEvent.lockOperationType equals LockOperationTypeEnum.Unlock
    }

    ifThen(lightState.onOff equals false) {
      action(light, DimmableLightDevice) { command(OnOff.on()) }
    }.orElse {
      action(structure) {
        command(AssistantBroadcast.broadcast("Welcome home!"))
      }
    }
  }
}
Chain multiple conditions in sequence
You can chain one or more optional .elseIf(...) { ... } blocks to evaluate multiple
conditions in sequence. The first branch whose condition evaluates to true is
executed, and all remaining branches are skipped. If none of the conditions
evaluate to true, an optional .orElse { ... } block executes (if provided):
// Adjust climate controls based on room temperature changes.
automation {
  sequential {
    val tempStarter = starter<_>(
      tempSensor,
      TemperatureSensorDevice,
      TemperatureMeasurement,
    )

    // If temperature is high (>= 28°C / 2800 mC), switch thermostat to Cool mode
    ifThen(tempStarter.measuredValue greaterThanOrEquals 2800) {
      action(thermostat, ThermostatDevice) {
        command(
          SimplifiedThermostat.setSystemMode(
            SimplifiedThermostatSystemModeEnum.Cool
          )
        )
      }
    }.elseIf(tempStarter.measuredValue lessThan 1800) {
      // If temperature is low (< 18°C / 1800 mC), switch to Heat mode
      action(thermostat, ThermostatDevice) {
        command(
          SimplifiedThermostat.setSystemMode(
            SimplifiedThermostatSystemModeEnum.Heat
          )
        )
      }
    }.orElse {
      // Otherwise, turn on the fan
      action(fan, FanDevice) {
        command(OnOff.on())
      }
    }
  }
}
Nested conditional flows
Conditional blocks can be nested inside other ifThen, elseIf, or orElse
blocks, as well as combined with parallel, delayFor,
and stateReader nodes.
ifThen, elseIf, and orElse blocks execute their contents as sequential
flows. You can place any sequential nodes inside each branch, including
action, stateReader, parallel, delayFor, and nested ifThen blocks.
Delays
You can introduce pauses in your automations using the
delayFor
keyword, which takes a
java.time.Duration
argument representing how long to pause before continuing execution. The pause
duration may be as short as five seconds or as long as 24 hours.
For example, to toggle a light four times with a five-second pause between each toggle:
sequential {
  action(light, OnOffLightDevice) { command(OnOff.toggle()) }
  delayFor(Duration.ofSeconds(5))
  action(light, OnOffLightDevice) { command(OnOff.toggle()) }
  delayFor(Duration.ofSeconds(5))
  action(light, OnOffLightDevice) { command(OnOff.toggle()) }
  delayFor(Duration.ofSeconds(5))
  action(light, OnOffLightDevice) { command(OnOff.toggle()) }
}
Trigger suppression
Trigger suppression is a capability that allows your automation to ignore a
starter for a specified period of time after the initial triggering event. For
example, if the automation has a starter that's triggered by motion detection,
and if you specify a trigger suppression duration of five minutes, then when the
starter triggers, it won't trigger again for the next five minutes. This
prevents the automation from rapidly triggering over and over.
To apply trigger suppression to your automation, use the
suppressFor
keyword with a
java.time.Duration
argument representing how long to wait before responding to subsequent triggers.
The suppression duration may be as short as five seconds or as long as 24 hours.
automation {
  sequential {
    val starterNode = starter<_>(device, OccupancySensor, MotionDetection)
    suppressFor(Duration.ofMinutes(30))
    action(light, OnOffLightDevice) { command(OnOff.toggle()) }
}
Note that trigger suppression affects all starters in an automation that
precede the suppressFor.
Limit the number of executions
You can limit the number of times an automation is permitted to run.
For example, you might want to set up a one-time automation that runs the vacuum while you're away from home for the day.
To do this, set the automation's
maxExecutionCount
metadata field.
The following example is an automation that can only execute once:
automation {
  // The automation can only be executed once.
  maxExecutionCount = 1
  // When the door lock state changes
  sequential {
    val doorLockEvent = starter<_>(doorLock, DoorLockDevice, LockOperationEvent)
    // if the door is unlocked
    condition() {
      expression = (doorLockEvent.lockOperationType equals LockOperationTypeEnum.Unlock)
    }
    // turn the light on
    action(light, DimmableLightDevice) { command(OnOff.on()) }
  }
}
The automation is immediately deleted once it completes execution for the last
time and maxExecutionCount is reached. The automation's history entry remains
in the Google Home app (GHA) Activity tab, including the automation_id.
Set trait attributes in an action
To set the value of a trait attribute:
- Create an
updatenode within anactionnode, including the relevant trait as an argument to theupdatenode:action(deviceReference, deviceType) { update(trait) { } } - Within the
updatenode, for each attribute to be modified, use a mutator function, and pass it the new value. To form the name of the mutator function:- Capitalize the name of the attribute
- Prefix it with the word
set.
defaultMoveRate, you'd use a mutator function calledsetDefaultMoveRate.
Note that an update node can have multiple mutator functions. Here's an
example where two attributes are updated:
action(device, Fan) {
  update(FanControl) {
    setPercentSetting(50u)
    setRockSetting(FanControlCluster.RockBitmap.rockUpDown)
  }
}